Manage Recordings
All user levels can be configured to view, edit, delete, download, and/or play recordings stored on the ISR (or other configured storage facility). However, a Tenant Administrator and Tenant User, if granted teh appropriate permissions, can edit, play, download, and delete their own recordings only.
Note:
Recordings that display are dependent on the level of user currently logged into the ISR Dashboard.In addition to viewing, editing, playing, downloading, and deleting recordings, a user with Notes and Scoring permission can also specify notes for a recording, and specify a rate or score for a recording. A recording can be rated or scored from 1 star to 5 stars, with 5 stars being the best. For more information about assigning a score to a recording see Recording Details.
You can access the Recordings from the Home page by clicking Find Recordings (or by clicking Recordings on the top menu bar).

Each recording displays on the Recordings page with information about that recording.
Recordings Page
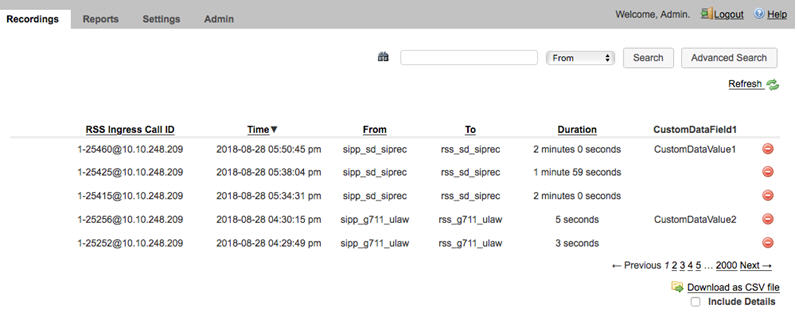
The following table describes each possible column on the Recordings page.
| Column Heading | Description |
|---|---|
| Time | Specifies the start date and time of the recording. This column is based on the User’s preferred time zone locale. |
| From | Specifies the calling party. |
| To | Specifies the called party. |
| RSS Ingress Call ID | Specifies the call-id from the SIP headers of the initial INVITE. |
| RSS Egress Call ID | Specifies the call-id from the SIP header of a secondary call leg. Only applicable for pass-through or Record & Save routes. |
| Duration | Specifies the length of time, in seconds, of the recording. |
| Session ID | Specifies the unique X-ISR-UCID for this recording. |
| Downloads the selected recording to a file on your PC. | |
| Deletes the Recording from the ISR system. | |
| Screen recording playback is available. | |
| Video playback is available. |
Playing a Recording
After a recording occurs on the ISR, it is saved as an audio, and optionally video, file so a user can review the details of the recording and playback the audio and video. Play a recording by first choosing it in search results or the default listing to bring up the Recording Details page, then clicking the Segment tab and the play button for that recorded Segment file.
Note:
The recording’s metadata is saved in the ISR database.The Recordings page displays all up-to-date recordings that meet the search parameters and access level restrictions of the user. Depending on the size of your storage device (Network Attached Storage (NAS), Storage Area Network (SAN)), older recordings may not be stored locally. However, this is transparent to the user viewing the recordings. Regardless of where the recordings are stored, all recordings display on the Recordings page.
Before playing recordings, make sure you have a media application that plays audio files with a .wav format. For more information about the software requirements and recommendations for playing recordings, see Requirements/Recommendations.
To play a recording:
-
Click on the row of
a recording to show the details, then click the
Segment
1 tab. If you have the appropriate permissions, you may play the
recording using the play button at the top of the screen.

Note:
To find a specific recording, perform a search using the Advanced Search link in the upper-right corner of the page. For more information, see Search Tools. The Recordings page refreshes depending on the value set in Settings, Refresh Rate (seconds). Default is every 30 seconds. For more information about setting the Refresh rate, see Dashboard Settings.When the recording is retrieved, the file(s) automatically opens using the applicable media application installed on your computer. For media applications you can use, see Requirements/Recommendations.
Viewing and Editing Details of a Recording
The ISR Dashboard allows you to view and edit specific details and metadata of a recording if required. From a Recording’s Details page, you can:
- Play a recording.
- Assign custom data fields to a recording.
- Specify whether or not the recording is completed.
- Assign a length of time, in hours/minutes that the reviewer spent reviewing/transcribing the recording.
- Specify notes pertaining to the recording.
- Assign a rating to the recording.
- Create a category for which to place the recording.
- Transcribe the conversation that took place on the recording.
To play a recording from the details page:
-
Choose a recording
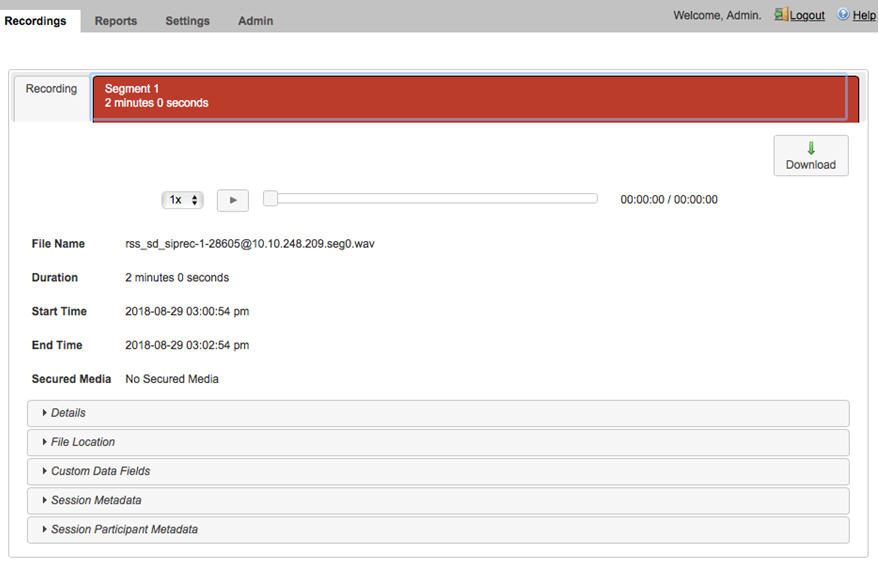
and click the Details icon. The following Recording Details page displays.
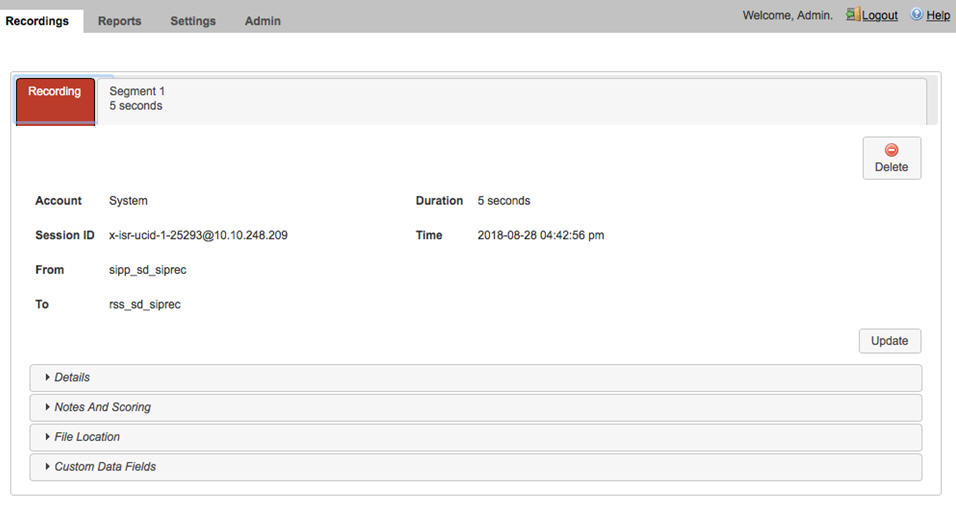
The following table describes information displayed on the Recording Details page.
Column Heading Description Account Specifies the Account name associated with the recording. Session ID The unique session identifier for the session that contains the recording segment(s). From Specifies the calling party. To Specifies the called party. Duration Specifies the length of time, in seconds, of the recording. Start Time Specifies the date and time when the active session began. This is displayed in the user's preferred time zone locale. To play the recording, click the appropriate segment tab. For example, Segment 1 and the play button at the top of the segment details.
When the recording is retrieved, the file(s) automatically opens using the applicable media application installed on your computer. For media applications you can use, see Requirements/Recommendations.
You can display additional recording details, session metadata, and session participant metadata if required. Refer to the following paragraphs for more information.
Viewing Recording Details
To display details:
-
On the Recordings
page, choose a recording and click the Details icon. The Recording Details page
displays.
The RSS field indicates the RSS that received the call session for the recording.
The RSS Ingress Call ID field indicates the call-id received in the header of the initial SIP INVITE.
Notes and Scoring
- Complete—Select
whether or not the call session represents a completed transaction for this
recording. For example, if a caller calls into a Technical Support Center for
problems with his PC, the call is recorded. If the problem was not resolved on
the initial call session, the reviewer can select No for the Complete
Transaction field, indicating that the problem was not resolved on this call.
Valid values are:
- No (default) - The transaction occuring during this recording is not yet complete.
- Yes - The transaction occurring during this recording is complete.
Note:
The Complete Transaction field must be enabled for editing. For more information about enabling this field for editing, see Recording, Editing Permissions. - Hours—Enter the length of time, in hours that the reviewer spent reviewing/transcribing the recording. Valid values are in decimal format using numeric characters. For example, 6.5, where 6 indicates the hours and .5 indicates 1/2 hour.
- Rating—Click on a
star to rate the recording. This is a score that you can assign to this
recording based on a level from 1 star to 5 stars, with 1 being the worst
rating, and 5 being the best rating. When all stars are blank, no rating is
assigned to the recording.
Note:
The Rating field must be enabled for editing. For more information about enabling this field for editing, see Recording, Editing Permissions. - Category—Enter a
category name to associate with the recording, and press <Tab>.
A category bubble displays in the Category field. This feature provides easy recording searches based on category rather than individual recordings.
To create additional categories to associate with the current recording, repeat Step 4.
- Notes—Enter notes
pertaining to the current recording. Adding more than will fit in this box
displays scroll bars in the window that allow you to scroll through multiple
screens of the note.
Note:
The Notes field must be enabled for editing. For more information about enabling this field for editing, see "Recording Editing Permissions". Enabling the Notes field automatically enables the Transcription field. - Transcription—Enter the conversation that took place during the current recording. Adding more characters than will fit in this box displays scroll bars in the window that allow you to scroll through multiple screens of the transcription.
- Click Save Changes to save the details for the recording.
Note:
The above agent-focused fields are available through Dashboard and FACE at the overall session level, but not for individual Segments in the session. These fields are replaced with a much more flexible workflow using Custom Data in Segments and soon deprecated for overall session-level details as well.Recording Details Custom Data
Specifies custom data values to associate with this recording. This information is specific to this recording
Create custom data fields via the Admin page's
Custom Data
Fields link. For more information on configuring Custom Data, see
"Custom Data".
Note:
To add or change detailed information about a recording, the user must have permission privileges for the Account’s route associated with the recording. To provide permission to add Custom Data Fields, see "Custom Data".Recording Details File Location
The File Location section on the Recording Details page
provides information about storing a recording indefinitely.
Archiving Recordings Permanently
You can view archival status of a recording by clicking File Location on the Recordings Details page.
You can also flag a recording to remain archived permanently.
To flag a recording to never expire:
-
After logging into
the
ISR Dashboard, click
Find
Recordings
or click
Recordings in the
top menu bar, select the recording you want to flag, and click File Location on
the Recording's detail page.
Segment Details Configuration
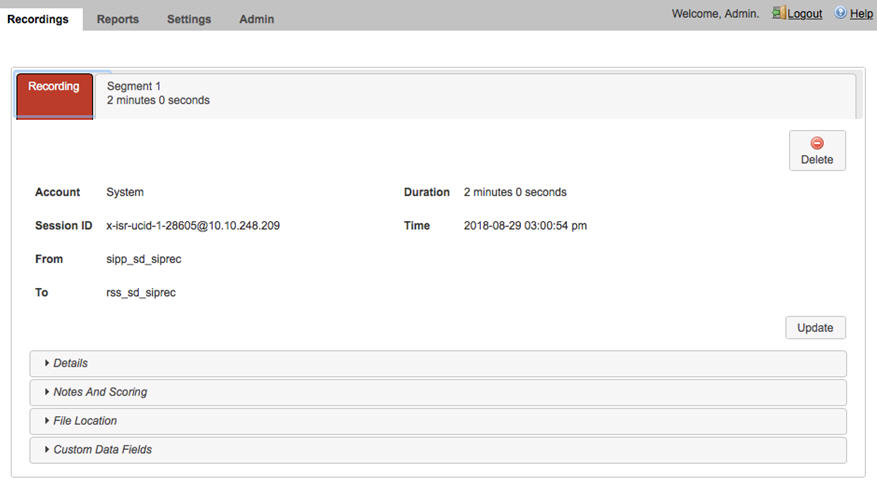
- On the Recordings page, choose a recording and click the Details icon. The Recording Details page displays.
-
Click the
Segment
# tab and the Segment details display.
Segment Recording Details Custom Data
Specifies custom data values to associate with this recording segment.
Note:
To add or change detailed information about a recording segment, the user must have permission privileges for the Account’s route associated with the recording. To provide permission to add Custom Data Fields, see "Custom Data".Recording Supplemental Files
The Supplemental Files section of Recording Details includes any
additional recorded files associated with the session such as files in MP4
format from recording of a video session. If the user's permissions allow,
these files may be downloaded by clicking the download icon for each
file.
Segment Session Metadata
To view Segment Session Metadata:
-
Click
Session
Metadata. The following information displays.

The SIPREC Session ID field displays the SIP Recording Session ID assigned to the call recording session at the time the call was received by the RSS.
The Start Time field displays the date and time the call recording session began. The date and time are based on the time zone configured for the User.
The Session Extension Metadata displays additional extension metadata associated with the session. The metadata types that may be present here include:- apkt:ucid
- calledPartyNumber
- callID
- callingPartyNumber
- extTrackingID
- groupID
- newExtTrackingID
- serviceProviderID
- userID
Segment Session Participant Metadata
You can view specific participant metadata, including extension metadata, about a recording by clicking Session Participant Metadata on the Recording Details page.
To view Session Participant Metadata:
-
Click
Session
Participant Metadata. The following information displays.

The following table describes each field on the Session Participant Metadata page.
Column Heading Description SIPREC Participant ID Specifies the ID of the SIPREC participant on the recording. Name Specifies the SIP URI name of the SIPREC participant. AOR Specifies the address of record (AOR) associated with the participant. Start Time Specifies the date and time when the active session recording began. End Time Specifies the date and time when the active session recording ended. 
Displays extension metadata information about the participant if it exists.
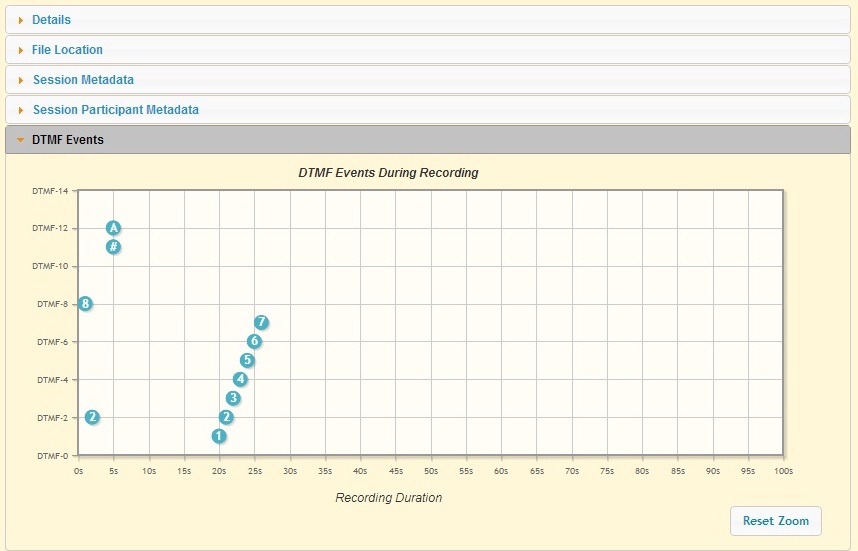
Displaying DTMF Data in Segment Details: Routes
You can configure the ISR to display DTMF data within a call’s recording details for digits transmitted via RFC 2833 and SIP INFO. The Record DTMF parameter has been created which allows you to specify whether or not to display DTMF details on either a per-route or per-account basis.
To enable the ISR to display DTMF details for a particular route:
-
Click
Route
Advanced Configurations.