Make Payment (Transfer Money)
Transfer Money enables the user to initiate online payments from his bank account to any other bank account without visiting the bank, through digital banking. Payments are categorized on the basis of the transfer being made to an account within the bank, outside the bank and beyond geographical boundaries. When transfer is to an account within the bank it is an internal transfer. Transfer to an account outside the bank but within the country is called a Domestic transfer. A transfer to an account outside the country is called an International payment. This categorization takes place when a customer saves the payee bank account details during payee maintenance.
On selecting the option, ‘Existing Payee’, the user has to simply select a payee and subsequently select the specific account of the payee towards which the transfer is to take place. The user is not required to explicitly select the transfer type (internal, domestic or international) since this categorization is undertaken at the time of payee creation when defining the payees bank account details.
Prerequisites:
- Transaction and account access is provided to corporate user
- Approval rule set up for corporate user to perform the actions
- Transaction working window is maintained
- Payees are maintained
- Purposes of Payments are maintained which are mandatory for Internal and Domestic Payment
- Transaction limits are assigned to user to perform the transaction
Features supported in application
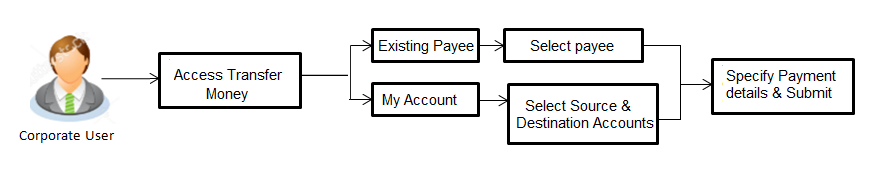
Transfer money allows the user to make payments
- Existing Payee – by selecting a registered payee. Internal, Domestic and International transfers are supported and are triggered based on the payee and specific payee account selection
- My Accounts – Users are able to transfer funds within their own accounts held in the bank.
Workflow
![]() How to reach here:
How to reach here:
Toggle menu > Payments > Transfer Money > Make Payment
OR
Maker Dashboard > Quick Links > Funds Transfer > Make Payment
OR
Maker Dashboard > Quick Links > Own Account Transfer > Make Payment
Make Payment - Existing Payee
The existing payee option of the ‘Transfer Money’ feature enables the user to initiate payments towards existing registered payees. All account payees created by the logged in user and shared by other users of the Party![]() A party is any individual or business entity having a banking relationship with the bank. are listed for selection. On selecting a payee, the user must select the specific account of the payee towards which the transfer is to be made. Once the payee’s account has been selected, the details are auto populated on transaction screen. The user is then required to fill in payment details to initiate the funds transfer. Payment details will vary based on the transfer type associated with the payee’s account. The user can also view the payee and transaction limits by selecting the ‘View Limits’ link provided on the screen.
A party is any individual or business entity having a banking relationship with the bank. are listed for selection. On selecting a payee, the user must select the specific account of the payee towards which the transfer is to be made. Once the payee’s account has been selected, the details are auto populated on transaction screen. The user is then required to fill in payment details to initiate the funds transfer. Payment details will vary based on the transfer type associated with the payee’s account. The user can also view the payee and transaction limits by selecting the ‘View Limits’ link provided on the screen.
E-Receipt gets generated on successful completion of transaction in the Core Banking Application. E-Receipt also can be accessed from Activity Log detailed view.
![]() How to reach here:
How to reach here:
Toggle Menu > Payments > Payments > Transfer Money > Make Payment > Existing Payee
OR
Maker Dashboard > Quick Links > Fund Transfer > Make Payment
To transfer the money to existing payee:
- In the Transfer Type field, select the Existing Payee option.
|
Field Name |
Description |
|---|---|
|
Transfer Type |
Payee to which transfer needs to be done. The options are:
|
|
Existing Payee Below fields appears if you select Existing Payee option in the Transfer Type field. |
|
|
Payee |
Payee to whom fund transfer needs to be done and the nickname to identify the account for fund transfer. |
|
Account Number |
The account associated with the payee along with the account nickname. |
|
Account Type |
Type of account associated with the payee. |
|
Account Name |
Name of the payee in the bank account. |
|
Payee Address |
Address of the payee in the bank account. This field appears for International type of payee. |
|
Bank Details |
Address of the payee's bank account. Note: Bank Details will not be displayed for Internal type of Payee. |
|
Transfer From |
Source account with account nickname from which funds are to be transferred. For more information on Account Nickname, click here. |
|
Balance |
Net balance in the selected account. |
|
Currency |
The currency in which transaction is initiated. |
|
Amount |
Amount to be transferred along with the currency. Note: The currency for Amount gets defaulted as per payee in case of Internal/ Domestic payee. Whereas it allows to select different currencies in case of International Payee only. |
|
View Limits |
Link to view the transaction limits for the user. |
|
View Current Exchange Rate |
Link to view the current buy or sell per unit rate for the chosen currency combination. This link will be enabled only if Forex |
|
Book New Deal |
Click to initiate new forex deal. This button gets enabled when the amount is entered in Amount field to book the deal. Note: Forex Deals can be used for Internal and International Payments only. |
|
Use Per-existing Deals |
Click to view and select the existing forex deals . |
|
Deal Number |
Displays the unique deal id of the forex deal. This field displayed, if the deal is selected from the Pre-existing Deals popup message window. |
|
Deal Type |
Displays the type of Deal user wants to initiate. This field displayed, if the deal is selected from the Pre-existing Deals popup message window. |
|
Exchange Rate |
Displays the buy or sell per unit rate for the chosen currency combination. This field displayed, if the deal is selected from the Pre-existing Deals popup message window. |
|
Transfer When |
Specify when to transfer funds. The options are:
|
|
Transfer Date |
Date of transfer. This field appears if you select the Later option from the Transfer When list. |
|
Pay Via |
The options are:
This field appears if you select the Domestic Payee option from the Payee list. |
|
Correspondence Charges |
The party bearing the charges for transaction. The options are:
This field appears only for International Payee. |
|
Transfer via Intermediary Bank |
Specify whether the fund transfer is to be done through intermediary bank. This field appears only for International Payee. |
|
Pay Via |
Network for payment. The options are:
This field appears if you select Yes option from Transfer via Intermediary Bank field. |
|
SWIFT / National clearing code value |
SWIFT code /National Clearing code value. |
|
SWIFT code Look up Below fields appears if the SWIFT Code option is selected in Pay Via field. |
|
|
Lookup Swift Code |
Link to search the SWIFT code. |
|
SWIFT Code |
SWIFT code value. |
|
Bank Name |
Bank name to search the SWIFT code. |
|
Country |
Country name to search the SWIFT code. |
|
City |
City name to search the SWIFT code. |
|
SWIFT Code Lookup - Search Result |
|
|
Bank Name |
Name of the bank. |
|
Address |
Displays complete address of the bank. |
|
SWIFT Code |
SWIFT code /National Clearing code value. |
|
National clearing code Look up Below fields appears if the National clearing code option is selected in Pay Via field. |
|
|
Lookup National clearing code |
Link to search the National clearing code. |
|
NCC Type |
NCC type of the bank branch. |
|
NCC Code |
NCC code of the bank branch. |
|
Bank Name |
Name of the bank. |
|
City |
City to which the bank belongs. |
|
NCC Lookup - Search Result |
|
|
Bank Name |
Name of the bank. |
|
Branch |
Bank branch name. |
|
Address |
Address of the bank. |
|
NCC Code |
NCC code of the bank branch. |
|
Below fields appears if the Bank Details option is selected in Pay Via field. |
|
|
Bank Name |
Name of the bank. |
|
Bank address |
Complete address of the bank. |
|
Country |
Country of the bank. |
|
City |
City to which the bank belongs. |
|
Payment Details |
The purpose of the transfer. This field appears only for International Payee. |
|
Add Payment Details |
The link to add more details of the transfer. This field appears only for International Payee. |
|
Note |
Narrative for the transaction. |
- From the Payee list, select the appropriate payee. The account maintained under payee to transfer funds appears.
- From the Transfer From account list; select the account from which transfer needs to be done.
- From the Currency list, select the appropriate currency for the amount to be transferred (applicable for international payees only. For domestic and internal payees, currency gets defaulted).
- In the Amount field, enter the transfer amount.
OR
Click the View Limits link to check the transfer limit.
From the Channel list, select the appropriate channel to view its limits. The graph with utilized amount and the available limit appears. -
View Limits
-
 Field Description
Field Name
Description
Channel
Channel for which you the user wants to view the limits.
Min Amount
The per transaction limit - minimum amount.
Max Amount
The per transaction limit - maximum amount.
Daily Limits
The daily amount limit and transaction count limit (available and utilized) of a transaction is displayed.
This is represented in a graph - with a (colored) utilized amount (numeric figure below it) and the available limit allocated by the Bank (numeric figure below it) and the total of utilized and available limits.
Monthly Limits
The monthly amount limit and transaction count limit (available and utilized) of a transaction is displayed.
This is represented in a graph - with a (colored) utilized amount (numeric figure below it) and the available limit allocated by the Bank (numeric figure below it) and the total of utilized and available limits.
- Click the View Current Exchange Rate link to check the transfer limit.
- If user clicks to book the new forex deal. The Initiate Forex Deal Booking screen appears.
- If user selects check box Use Pre-Existing Deals to select existing forex deal.
|
Field Name |
Description |
|---|---|
|
Deal Number |
The unique deal id of the forex deal. |
|
Validity |
The date upto which the deal is valid. |
|
Deal Amount |
The original buy or sell amount and currency of the deal. |
|
Outstanding Amount |
The remaining buy or sell amount and currency in the deal available for transaction. |
|
Exchange Rate |
Displays the buy or sell per unit rate for the chosen currency combination. |
- In the Deal Number field, enter the forex deal number.
Click . The deal details of selected deal appear.
OR
Select deal from the Lookup by clicking the Lookup Deal Number link.
In the Search by Deal Number field, enter the forex deal number to be searched.
Click to search. The list existing forex deal appears.
Click on Deal Number field, to select the appropriate deal from the list.
Click to continue the transaction with selected deal.
The deal details of selected deal from Lookup appear.
Click to clear the entered details. - In the Transfer When field, select the appropriate transfer date.
- If you select the Now option, transfer will be done on same day.
OR
If you select Later option in the Transfer On field, select the appropriate future date for transfer. - In the Pay Via field, select the appropriate network for payment (applicable for Domestic payees only).
- From the Correspondence Charges list, select the appropriate option (applicable for international payees only).
- In the Transfer via Intermediary Bank field, select the appropriate option (applicable for international payees only).
- If you have selected Yes option in the Transfer via Intermediary Bank field, select the appropriate network for payment in the Pay Via field.
-
- If you select Swift option:
- In the SWIFT code field, enter the SWIFT code or search and select it from the lookup.
- Click to fetch bank details based on Bank Code (BIC).
- If you select National Clearing code option:
- In the National Clearing code field, enter the National Clearing code or search and select it from the lookup.
- Click to fetch bank details based on Bank Code (BIC).
- If you select Bank details option:
- In the Bank Name field, enter the bank name.
- In the Bank Address field, enter the complete address of the bank.
- From the Country list, select the country of the bank.
- From the City list, select the city to which the bank belongs.
- From the Payment Details list, select the appropriate purpose of transfer (applicable for international payees only).
OR
Click the Add Payment Details link to add more details of the transfer, if required. - In the Note field, enter the remarks for the transaction, if required.
- Click to initiate payment.
OR
Click to cancel the operation and navigate back to ‘Dashboard’. -
Note: The warning message appears, if user is initiating a transfer towards a payee for whom a SI
Standing Instructions: It is an instruction a bank account holder (Payee) gives to his or her bank to pay set of amount at regular intervals to another's (Payees's) account. or Pay later is due within the next X days (as configured) to inform the initiator of the same. - The Make Payment - Review screen appears. Verify the details, and click .
OR
Click to navigate to the Dashboard Screen.
OR
Click to navigate back to the previous screen. -
Note: If a standing instruction or a pay later transfer is due to the payee within the next X days (as configured), a warning message will appear on the review page intimating the user about the same. This is applicable only if the transfer being initiated is an internal or domestic transfer.
- The success message of payment appears along with the reference number, host reference number and status.
Click Go to Dashboard to go to the Dashboard screen.
OR
Click Add Favorite to mark the transaction as favorite. The favorite transaction is added. For more information, click here.
OR
Click the e-Receipt link to download the electronic receipt. For more information, click here.
Make Payment - My Accounts
User can initiate a transfer within the accounts mapped to the logged in user. User can also view the transaction limits associated with a current transaction.
E-Receipt gets generated on successful completion of transaction in the Core Banking Application. E-Receipt can also be accessed from Activity Log detailed view.
To transfer the money to own account:
- In the Transfer Type field, select the My Accounts option.
|
Field Name |
Description |
|---|---|
|
Transfer Type |
Payee to which transfer needs to be done. The options are:
|
|
Account Number |
Payee account where the funds need to be transferred along with the account nickname. (if the user has added a nickname, for the account). |
|
Balance |
Net balance in the selected account. |
|
Transfer From |
Source account from which the funds are to be transferred along with the account nickname (if the user has added a nickname, for the account). |
|
Balance |
Net balance in the selected account. |
|
Currency |
The currency in which transaction is initiated. |
|
Amount |
Amount to be transferred along with the currency. The currency gets defaulted on selection of beneficiary account number. |
|
View Limits |
Link to view the transaction limits for the user. |
|
View Current Exchange Rate |
Link to view the current buy or sell per unit rate for the chosen currency combination. This link will be enabled only if Forex Deal Creation has been enabled for the user’s party under Party Preferences. |
|
Book New Deal |
Click to initiate new forex deal. This button gets enabled when the amount is entered in Amount field to book the deal. |
|
Use Per-existing Deals |
Click to view and select the existing forex deals. |
|
Deal Number |
Displays the unique deal id of the forex deal. This field displayed, if when the deal is selected from the Pre-existing Deals popup message window. |
|
Deal Type |
Displays the type of Deal user wants to initiate. This field displayed, if when the deal is selected from the Pre-existing Deals popup message window. |
|
Exchange Rate |
Displays the buy or sell per unit rate for the chosen currency combination. This field displayed, if when the deal is selected from the Pre-existing Deals popup message window. |
|
View Limits |
Link to view the transaction limits for the user. |
|
Transfer When |
Specify when to transfer funds. The options are:
|
|
Transfer Date |
Date of transfer. This field is enabled if the Later option is selected in Transfer when field. |
|
Note |
Narrative for the transaction. |
- From the Account Number list, select the own account where the funds need to be transferred.
- From the Transfer From account list, select the account from which transfer needs to be done.
- From the Currency list, select the currency in which the transfer transaction is to be done.
- In the Amount field, enter the transfer amount.
OR
Click the View Limits link to check the transfer limit.
From the Channel list, select the appropriate channel to view its limits. The graph with utilized amount and the available limit appears.View Limits
Field Name
Description
Channel
Channel for which you the user wants to view the limits.
Min Amount
The per transaction limit - minimum amount.
Max Amount
The per transaction limit - maximum amount.
Daily Limits
The daily amount limit and transaction count limit (available and utilized) of a transaction is displayed.
This is represented in a graph - with a (colored) utilized amount (numeric figure below it) and the available limit allocated by the Bank (numeric figure below it) and the total of utilized and available limits.
Monthly Limits
The monthly amount limit and transaction count limit (available and utilized) of a transaction is displayed.
This is represented in a graph - with a (colored) utilized amount (numeric figure below it) and the available limit allocated by the Bank (numeric figure below it) and the total of utilized and available limits.
- Click the View Current Exchange Rate link to check the transfer limit.
- If user clicks to book the new forex deal. The Initiate Forex Deal Booking screen appears.
- If user selects check box Use Pre-Existing Deals to select existing forex deal.
Pre Booked Deals
Field Name
Description
Deal Number
The unique deal id of the forex deal.
Validity
The date upto which the deal is valid.
Deal Amount
The original buy or sell amount and currency of the deal.
Outstanding Amount
The remaining buy or sell amount and currency in the deal available for transaction.
Exchange Rate
Displays the buy or sell per unit rate for the chosen currency combination.
- In the Deal Number field, enter the forex deal number.
Click . The deal details of selected deal appear.
OR
Select deal from the Lookup by clicking the Lookup Deal Number link.
In the Search by Deal Number field, enter the forex deal number to be searched.
Click to search. The list existing forex deal appears.
Click on Deal Number field, to select the appropriate deal from the list.
Click to continue the transaction with selected deal.
The deal details of selected deal from Lookup appear.
Click to clear the entered details. - In the Transfer When field, select the appropriate transfer date.
- If you select the Now option, transfer will be done on same day.
OR
If you select Later option in the Transfer On field, select the appropriate future date. - In the Note field, enter the remarks for the transaction, if required.
- Click to initiate payment.
OR
Click to cancel the operation, and navigate back to ‘Dashboard’. -
Note: The warning message appears, if user is initiating a transfer towards a payee for whom a SI or Pay later is due within the next X days (as configured) to inform the initiator of the same.
- The Make Payment - Review screen appears. Verify the details, and click .
OR
Click to navigate to Dashboard Screen.
OR
Click to navigate back to the previous screen. - The success message appears along with the reference number, host reference number, statu, Transfer To, Amount, Transfer From and Transfer When details.
Click Go to Dashboard to go to the Dashboard screen.
OR
Click Add Favorite to mark the transaction as favorite. The favorite transaction is added. For more information, click here.
OR
Click Set Repeat Transfer to repeat the transaction. For more information, click here.
OR
Click the e-Receipt link to download the electronic receipt. For more information, click here.
FAQs
![]() Can I set a future date for a fund transfer?
Can I set a future date for a fund transfer?
![]() What happens if the transaction amount is less than set Transaction Limit?
What happens if the transaction amount is less than set Transaction Limit?
![]() Can I make a payment to an account which is currently not registered as my payee?
Can I make a payment to an account which is currently not registered as my payee?
![]() Can I transfer the funds to any CASA
Can I transfer the funds to any CASA![]() Current Account or Savings Accounts are operative accounts through which account holders perform day to day operations such as deposits and withdrawal of money. available under party ID mapped to me by selecting My Accounts transfer?
Current Account or Savings Accounts are operative accounts through which account holders perform day to day operations such as deposits and withdrawal of money. available under party ID mapped to me by selecting My Accounts transfer?
![]() Can I transfer the funds to an account belongs to linked party?
Can I transfer the funds to an account belongs to linked party?