
|
|
|
Background Processor Setup
The following requirements must be met to enable background process functionality:
Note: Since OPERA V3.6 E1, the ORS Background Processor has been a functionality of Oracle (the advantages include the ease in which the background processor can be started and stopped). Prior to V3.6 E1, the background processor was a function of .Net. .Net service is no longer needed to run the ORS Background Processor. For those customers upgrading from an earlier version to OPERA V3.6 E1 and above, you need to uninstall the .Net OPERA Background Processor Service. See instructions below.
Any client upgrading from an OPERA release prior to V3.6 E1 needs to uninstall the .Net OPERA Background Processor Service and the OPERA Service Monitor from the OXI Monitor PC’s they are running. This prevents the process from running from two different instances.
The uninstall process is as follows:
Note: With this upgrade, clients using the HiLife (Tactical) Report, can now locate the output file in the Application Server's Export\<schema_name> directory. The file name is tacrepDDMONYYYYHH24MI.txt.
Use the Background Processor Setup screen to schedule OPERA processes so that they run automatically in the background at a time when system resources are most available or according to your business needs. These processes help ensure your OPERA system performs at maximum efficiency by cleaning up the database and other tasks. You can schedule these processes to run during non-peak hours so that system resources are free for your critical daily operations. To determine when the last time the process was run and the results, select the Status button.
An example of a background process is the Profile Auto Merge process. It can be scheduled to run at 12:00 A.M. each day to automatically find duplicate profiles and merge them into a single profile - thus saving valuable database space.
Note: If there is a database outage, after the database comes back up, both the Profile Match and Merge process and the ORS Background Processor will need to be manually restarted.
To open the Background Processor Setup screen, select Setup > Background Processor Setup. The Background Processor Setup screen opens.
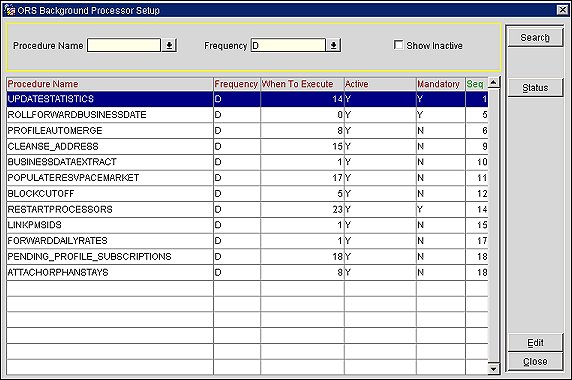
The following processes can be set up to run at a specified time and frequency:
Note: Some of these processes are mandatory (as indicated with a Y in the Mandatory column). These are essential maintenance processes that cannot be de-activated. However, you can modify the frequency in the schedule setup.
Notes:
With the Profile Auto Merge process, only Active Profiles will be considered the Base profile, which is the profile into which all other profiles will be merged. For example, an Inactive Profile can merge into an Active profile. The ONLY exception to this rule is when dealing with two Inactive Profiles that both satisfy the auto merge rules. In this case, both Inactive Profiles will merge into a single Inactive Profile that will remain inactive.
The Profile Auto Merge process will not merge an Active Profile into an Inactive Profile.
This optional process automatically merges duplicate profiles of the same individual into one profile. This eliminates the many duplicate profiles that can be inherited from various sources such as GDS and Web booking engines.
Note: Profiles created through OPERA or the web, which have a Web User account attached to the OPERA profile, can now be merged as well through this process.
It is recommended that you set the frequency to Daily to keep duplicate profiles at a minimum. Because this is a time consuming operation, this process is set to run for 12 hours each cycle (this setting cannot be modified). This may sound like a long time period, but it provides a large amount of output during that time. After running for 12 hours, the process is stopped. When the next cycle begins, it continues merging profiles starting from the last record processed. This 12 hour cycle is repeated each day (or other set frequency) until the entire database has been checked and all duplicates have been merged.
Refer to the Profile Merge Report (mergeprofile) to see what profiles were merged in this process. Profiles that have been merged will be logged in the Change Log of the Final Individual profile. Any merged profile will show in Match and Merge reports. You will be able to see how many profile were processed and those merged. It is also possible to preview what profiles will be merged prior to the Profile Auto Merge process by using the Automerge Report (automerge). See the ORS Reports topic, Automerge Report for more information.
Auto Merge Rule selections:
NAME+FIRST+POSTAL_CODE = Last Name, First Name and Postal Code
NAME+FIRST = Last Name, First Name
NAME+FIRST+EMAIL_ID = Last Name, First Name and Email Address
NAME+FIRST+PASSPORT_NO = Last Name, First Name and Passport Number
NAME+EMAIL_ID = Last Name and Email Address
NAME+PASSPORT_NO = Last Name and Passport Number
NAME+NAME_CODE = Last Name and Name Code ( internal id number for profiles)
Note: If only one of the matched profiles contains one of the following conditions, then the profile that fulfilled the condition will be the original profile and the other will be merged. �
Location of HiLife (Tactical) Report
For clients using the HiLife (Tactical) Report, the output file is now generated and located in the Application Server's Export\<schema_name> directory. The file name is tacrepDDMONYYYYHH24MI.txt.
This mandatory process ensures the business date is correct on all external PMS properties that are not part of the OPERA system. This process also ensures the property uses the current business date immediately after the PMS license is activated. This process does not affect the ORS business system date.
![]()
Select the process name and click Edit to specify when you want the process to run.
Frequency. Select whether the process is to be run daily, monthly, or yearly.
When to Execute. Select the time, date, and month depending on the frequency selected above.
Mandatory. (not configurable) If mandatory is selected, the process must be run and cannot be made inactive.
Active. Choose whether or not to have the process run at the specified time and frequency.
Sequence. Specify the order in which this process is listed in the Background Processor Setup screen.
Select a process and press the Status button to see when the process was last run, the results, and if errors occurred. Unsuccessful attempts at running the process to completion appear in red.
You can start and stop the ORS Background Processor by accessing the Utilities Application > Utilities > Processors > Background Processor menu.
Note: OPERA v5.5.0.0+ has the functionality for managing processors across schemas (synonym). Users in one schema can access another schema and select Utilities > Processors and Start and Stop the desired processor, independent of OPERA v5.5.0.0+.
Select the Background Processor menu option to open the ORS Background Processor screen. You can view the status of the background processor and start and stop it. Multiple processes may be running at the same time. If any process is running at the time the user selects the Stop button, a message appears informing the user that all processes will be "killed." The user can select Yes to kill all processes or select No to close the warning and continue processing all jobs.
Columns are populated once the Start button has been selected and the processor status is Running.
Started By. Displays the schema for which the background process is started.
Started On. Displays the date when the background process was started.
Started At. Displays the time the background process was started.
Status. Displays the status of the background process, such as Waiting or Running.
See Also