
|
|
|
Export Files
The Export functionality is used to collect information from different views/tables and export the data to an ASCII text and XML file. Select Miscellaneous > File Export or Configuration > External > File Exports > Export Files to access the file export functionality. The PMS add-on license OPP_EXP Export Files controls availability of this feature.
Notes:
If a property has the OPP_PMS license active, OPP_S&C license active, OPP_BO add-on license inactive, OPP_EXP add-on license inactive, OPP_ESM add-on license inactive, OPP_COM add-on license active, Commission > Positive Pay Check Export application parameter is inactive, and Exports > Country Export application function is inactive, the Configuration > External menu option no longer displays without any menu options.
All personally identifiable information data (birth date, ID number, and passport number) in exports accessed from Miscellaneous > File Exports / Memberships is masked in case the delivery method is not secure (i.e., SFTP or HTTPS).
To select a new export from the generic templates, select the New button. You are prompted to select from the existing templates that are available or make a customized new export.
The export file operation typically consists of the following steps:
Select the menu option Configuration > External > Export Files. All generic exports provided by OPERA SID data are available here. The Export File List screen shows the File Type (the export file name) and Description (description of the export).
Automatic Generation of Export Files. A procedure for creating export files (GENERATE EXPORT NA DATA) in End of Day (Night Audit) processing. Only files selected for Night Audit processing in the export setup are run automatically.
Manual Generation of Exports Files. You can manually create export files as needed or in case the End of Day routine procedure did not produce the desired export. To do so, select Miscellaneous > File Export > General (Sales and Catering exports, Country exports, Memberships exports, Commission exports and other types of exports are available based on parameter settings or licenses).
Creation of New Exports. In addition to the standard exports provided as OPERA SID data, you can create additional new exports from scratch or by using the existing standard exports as templates and making modifications. This can be done by selecting Configuration > External > Export Files.
Note: Creating new exports requires a basic knowledge of SQL and OPERA views and tables.
The location of the directory where OPERA export files are stored is defined in the default_<schema>.env file environment variable (default_brisbane.env), FORMS90_output. At installation, this variable is set to D:\micros\opera\export. Use oappcfged.exe to make configuration changes.
As an alternative to mapped drives, UNC (Universal Naming Convention) network share paths (e.g., \\app_server1\micros\opera\export) are also supported. This is also applicable for the zipping of the export files if the zip file name is defined in the export file details.
The following information is provided to assist in configuring OPERA systems that exchange (export) information to and from third-party systems. You need to create (or ensure that there are) the local directory (folder) on the application web server as explained in the following section.
With this module, information/data is written into the designated folder where it is picked up by the third-party system. This directory is the same path as used by all export routines that are transmitted from OPERA. For example:
D:\micros\opera\export
Note that unlike the import directory, you do not need to specify the schema name and property IDs as these are defined automatically when the exports are created.
Once the directories have been created, verify that the FORMS90_output environment variables on the application server point to the export base of the directories defined in the previous step (subtract property ID and schema name to obtain export base). These should already match and no changes should be required. For example, the standard and recommended default settings are:
FORMS90_OUTPUT = D:\micros\opera\export
The Export File List screen is used to collect information from different views/tables and export the data to an ASCII text file. The screen displays all generic exports provided by OPERA SID data. From this screen, users are able to Generate and view export data files, and also alter export file configurations. To access the Export File List screen, select Miscellaneous > File Export or Configuration > External > Export Files.
Complete the following desired search criteria and select Search.
File Type. Select from the lists of values the file type to be exported explained in the Grid below
Property. If the OPP_MHOT Multi Property PMS add-on license is active, select the property you want to export file type information from.
Show Inactive. Display all inactive file types.
For a complete list of the File Exports, see the Available Export Data Definition help topic.
Note: When the Exports > Multi Property Export VISA application parameter is set to Y, any exports that are setup to run for multiple properties have a light blue background as seen in the following image for the VISA_EXTRACT_CON and VISA_EXTRACT_CON_DAY.
The results displayed in the grid depend on the search criteria entered by the user.
File Type. Name of the export file.
Description. Description of the export.
XML. X in this column indicates that the export uses an XML format. (See Export File Details - Creating and Editing Export Files, below.)
Generate. Start the export data generation. When generation is complete, you are asked whether you wish to view the generated data. If you select Yes, the Export Data List screen appears. This screen lists export files by date generated. The most recently generated export file is at the top of the list (See View Export Data for details).
(See Generate Export Data for details).
View Data. View the export data which has already been created. (See View Export Data for details).
Unsubscr. Available when a multi-property Export is highlighted, select to unsubscribe properties from the export.
Copy. Copy one setup to another.
New. Create a new export setup. You are prompted to select from the existing templates that are available or make a customized new export.
Note: By default, only generic export templates are displayed in the Export File List. Other export templates may be available to you depending on the Config. Mode and Country Mode set on the Property Configuration screen.
Note: Exporting membership statements is a common, customized export function within ORS/OCIS (when the OPR <version number> ORS and OCIS license code is active). See Membership Statements - Export for more information.
Note: For information about the handling of credit card information in export files, see Credit Card Information Handling, below.
Refer to Export File Details - Creating and Editing Export Files, below.
Edit. Edit an export setup. Refer to Creating and Editing Export Files, below.
Delete. Delete an export setup only if an export file has not been generated for this export.
Note: In case of VISA_EXTRACT_CON export, deleting the export from one property deletes it from all the subscribed properties, irrespective of the user access /permissions to these properties.
Note: When no exports are displayed in the grid, the Generate, View Data, Edit, Copy, and Delete buttons are not available. These buttons are available only when at least one export that has been configured for the property is listed in the grid. The export can be active or inactive.
The Delivery Method Maintenance screen is used to set up the export file delivery configuration option and associate it with an export file. This separates the export file and delivery method configuration so that it is not necessary to configure the same delivery method for several exports, therefore avoiding duplicate configurations and preventing overwriting when changes via the export file template are applied. To access the Delivery Method Maintenance screen, select Configuration > Property > Delivery Method.
Note: If any destination code is attached to an active export, it cannot be deleted.
Select the New button to select the delivery method from the Export Delivery Methods screen.
This set up is independent of any specific export file and is maintained at a single location. This allows the association of an export delivery destination with an export file in the event that it is overwritten with a template. You can simply reattach the previous destination code on the updated Export File Details screen, and all the delivery configuration details with that code remain unchanged. You can configure all delivery methods at one place and simply attach the desired code to any specific export.
Delivery Method. Select the delivery method: OXI, HTTP, SFTP, or FILE SYSTEM ENCRYPTED (this last option encrypts the text/data).
Destination. Enter the export delivery method destination. Only one export delivery destination can be selected per export.
Description. Enter the export delivery method description.
Inactive. Select this check box to make a file type inactive.
Type. Only available when the OXI delivery method is selected. Enter up to 20 characters to uniquely identify the OXI action type.
Interface. Only available when the OXI delivery method is selected. Select the down arrow to choose the third-party system to which OPERA connects through OXI.
HTTP Address. Only available when the HTTP delivery method is selected. Enter the database HTTP address where the export file is uploaded.
Protocol. Only available when the HTTP delivery method is selected. If you are communicating with a Web Service, select the protocol used for extracting XML (e.g., SOAP) from the uploaded file.
SOAP Action. Available when SOAP is selected in the Protocol field. Enter the SOAP action, if any, to be applied by the Web Service.
See OXI - Export File Delivery Configuration Screen, SFTP Export File Delivery Configuration Screen, and HTTP/HTTPS Export File Delivery Configuration Screen below for additional information.
To create a new export, from the Export File List screen, select New. You can create the export file by copying an existing export file as a template, and editing it, if necessary, or by starting from scratch with a blank Export File Details screen. If you select the template option, you are prompted to select the export file types to be copied as templates. If the OPP_MHOT Multi-property license code is active, you are prompted to select the properties to which you want to copy them (the current property is selected by default).
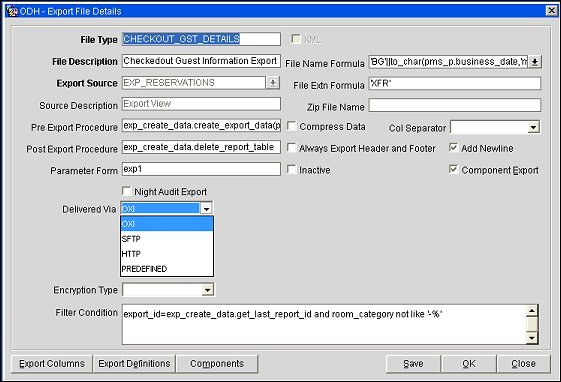
The Export File Details screen allows you to specify the particular features of the export file.
Note: To copy an existing export file delivery configuration to the Delivery Method Maintenance screen, right-click anywhere on the Export File Details screen and then click 'Copy to Export Delivery Methods'. The Export Delivery Methods screen displays.
Provide the following information and select the OK button.
File Type. Name of the export. To create a new file type, select New from the Export File List and enter a new file type name for the export.
XML. When selected, the export generates via XML messaging. By default, this check box is selected and unavailable if the export has been created as an XML export. It is available to be selected when the export is configured manually (rather than being created from a preconfigured template) as an XML export. See XML Export Configuration for details.
Note: By default, the File Extension Formula field populates with 'XML' when this check box is selected. File Extension Formula can, however, be edited to change the filename extension.
XML Doc. Available when the XML check box is selected. In this field specify the name of a wrapper tag for the export. For example, if you wanted the XML export to begin with a tag <umf> and end with a tag </umf>, you would specify umf in this field. Additionally, select the ellipsis button to further configure the XML.
File Description. Long description of the export file type.
Export Source. Select the down arrow to choose from a list of available views for the export procedure.
Source Description. The description is automatically populated when the Export Source view is selected.
Note: When the EXP_SCACTIVITY_VIEW data source is used, and the Activity > Use Time Zones for Activities application parameter is set to Y, date and time information related to activities is converted to the logged-in user's time zone; if no time zone is specified for the logged-in user, the logged-in property time zone is assumed; if the logged-in property does not have a time zone assigned, the database time zone is assumed. See Activity Time Zones for details.
Pre Export Procedure. Internal setup procedure that is executed before the data export is done. The pre-export procedure is a pre-processor that populates and filters views and sets variables.
Post Export Procedure. Internal setup procedure that is executed after the data export is done. The post-export procedure is a post-processor that truncates temp tables following export generation and may also reset parameters that were set for the export.
Parameter Form. Used for exports that can be manually generated. This field contains the name of the parameter form which is used to generate a manual export. The parameter form prompts for the required input from the user in order to generate a manual export. An example of the required parameters is the date range for which the export needs to be run. Each pre-export procedure has a unique parameter form, as the procedure is hard-coded within the form. Normally, if the parameter form is used, the pre- export procedure need not be used, but this can vary depending on the definition of the export.
Note: When automatically generating exports via End of Day processing, a parameter form should not be used because the export is generated automatically and there is no opportunity for manual input.
Night Audit Export. Check this box if the export is to be run during the End of Day procedures.
Note: When an export is set up to run during the End of Day (Night Audit) procedures, a frequency can be selected to generate this particular export file during the End of Day process. In the event user selects such an export and manually generates the export file, the setting in the Frequency field is ignored and the export is generated irrespective of the frequency setting. In addition, the export automatically generates an export file based on the Frequency during the End of Day process.
Frequency. When the Night Audit Export check box is selected, select the down arrow to select the frequency of how often the export is to be run during the night audit process - Daily, End of month, End of Year, or Weekly.
Other export disposition options are listed below Night Audit Export. No more than one of these options can be selected.
Delivered Via. Select the delivery method: OXI, SFTP, HTTP, or PREDEFINED. When a value is selected the relevant additional fields display to complete the configuration. See these selections below for additional information.
SFTP. Select this option if the export is to be delivered via a secure FTP channel. When you make this selection, the Delivery Configuration button displays. Use Delivery Configuration to set up the details of the SFTP communications. See SFTP Export - Export File Delivery Configuration Screen or SFTP Export - PuTTY Key Generation Utility for details.
Also for SFTP export file transfer, an Export Definition can be added to each export file, including XML export files, to associate a specific character set to be used. This character set is used for the export file and the value defined for the Exports > Export Character Set application setting is overridden. To override the Export Character Set setting, the following must be entered for the Export Definition of the export file:
For SFTP, if the export file transfer initially fails, it is retried the number of times specified in the EXPORTS > HTTP/SFTP FILE TRANSMISSION ATTEMPTS application setting.
HTTP. Select this option to use an HTTP upload of the export file. This file can be uploaded and automatically transferred to the HTTP address during End of Day processing or on demand (for more current information).
Note: If the export is configured to run during End of Day processing and the HTTP transmission fails, the night audit continues to run to complete the End of Day. But, an error message displays in the naweather.rdf report to notify the user of the transmission failure. As this report is non-mandatory, properties using the HTTP transmission must configure the report.
The export file is uploaded to the receiving host using HTTP protocol with content type application/octet-stream, using the POST method.
Note: If the Compress check box is selected, the content type of the compressed file is application/x-zip-compressed.
OPERA passes the following parameters to the receiving host (HTTP listener) in the HTTP POST command, which the receiving module can use:
Once the receiving module has received and processed the file it must generate an HTTP response, which is captured by the OPERA sending module. This response is an XML text document. The format of the document is as follows if the file was successfully received and processed:
<?xml version="1.0" encoding="UTF-8"?>
<YOURMODULENAME>
<STATUS>OK</STATUS>
</YOURMODULENAME>
The format is as follows if an error occurred:
<?xml version="1.0" encoding="UTF-8"?>
<YOURMODULENAME>
<STATUS>ERROR</STATUS>
<ERROR>Error Text is here</ERROR>
</YOURMODULENAME>
YOURMODULENAME is the name of the module (e.g., the servlet) which is receiving the export files. This name is for information only purposes and can be anything the property wants. Other tags in the XML should not be changed.
Note: If the OPERA sending module does not receive a response in the proper XML format (within the Retry Interval), it assumes that an error occurred during the file transfer.
OXI. Available when an OPX_XXX OXI add-on license is active. When OXI is selected, the Delivery Configuration button displays. Select this option to transport the export file via the OXI interface. See the OXI - Export File Delivery Configuration Screen topics, below.
PREDEFINED. Select this option to transport the export file via a predefined interface.
Encryption Type. Not available when OXI is selected. To encrypt the export file, select the encryption format (only AES is available at this time). The export file is encrypted using the selected algorithm and the key entered in the Key field. Encryption is performed on the raw file (that is, prior to zipping). The remote site must use the same method and key for decryption. In addition, the remote site must provide their own decryption software in order to decrypt the file.
Key. Available when an Encryption Type is selected. Enter the encryption key to be used to encrypt the export file. The AES key must equal 32 characters.
Filter Condition. Condition for the export. By default, depending on the view, all data is exported. But if a certain type of data only requires to be exported, then the condition can be filled. Technically, this is the where clause in the select statement. For example, market codes statistics export, if only certain market codes statistics are required, like FIT, COM and IND, then the condition Market code IN (FIT,COM,IND) can be entered, where market code would be one of the column names in the Export source view/table. When clicking OK, the export setup is saved and now the columns can be defined. When the export setup is saved, the button option Export Columns is available. Select this button and the entire list of columns, which are available in the view, are brought up. This occurs the first time, when setting up a new export. If the columns are already defined, then the option Export Columns lists out the columns, which have been selected. New columns can also be added.
File Name Formula. Name of the ASCII export file which is created when the option to generate file is selected. This field can accept SQL formula so that the file name can include dates or other program specific exports information (First5Characters of Property Code +Current System Month+F would be SUBSTR(property code,5)||MM||F). This should be a valid SQL formula. On clicking the list of values box, a list of all the columns defined in the Export Source View/Table appears. These are the columns that can be used to create the File Name Formula. The name of the ASCII text file can be made from any of these values or can also be any string of characters. If the file has to be always called WY P296, then enter 'WY P296' (the single quotes are necessary). If the file has to depend on the business date of the property, then enter the following, for example:
'WY'||TO_CHAR(PMS_P.BUSINESS_DATE,'MMDD')||'EXP'
This gives the name WY1103EXP for a business date of November 3.
Note: When the export file is created, the resulting filename displays just as it was configured in the File Name Formula field. This includes the case of the text, rather it all be capitalized, all lower case, or a combination of capitalized and lower case text.
File Extension Formula. Used to create any file extension for the daily export. This field can accept SQL statements so that the extension can include dates or other program specific export information (Current System Month +Day MM||DD). Examples for the file extension name would be TXT or EXP. The single quotes are necessary.
Zip File Name. The name of the zipfile if the export files are to be zipped. To make use of this functionality, the General > Compression Utility application setting must specify the zip program name. The zip program name (executable file) must be present in the \RUNTIMES directory. (The ZIP and UNZIP freeware utilities provided by Oracle are located in the Oracle bin directory on the application server and do not need to be moved to the \RUNTIMES directory.)
Note: In order for zipping of export files to work correctly, the FORMS60_OUTPUT registry setting must use a mapped drive letter on the application server and cannot use a UNC (Universal Naming Convention) path. This is a limitation of PKZIP, a DOS utility, which does not recognize UNC pathing. For example, the path could be D:\MICROS\OPERA\EXPORT but cannot be \\machinename\MICROS\OPERA\EXPORT.
Any value enclosed in single quotes can be specified as a zipfile name; the value can be concatenated with a valid OPERA expression (e.g., 'WY_296_'||pms_p.business_date).
OPERA validates the zipfile name entered here in order to help avoid a filename that contains invalid characters. (Invalid characters in the zipfile name would prevent the zipfile from being automatically created during End of Day processing.) Invalid zipfile names are possible if the filename was specified prior to the validation feature being introduced. If an export file does not have a valid zipfile name, End of Day processing continues without creating the zipfile. An appropriate entry is made to the User Activity Log in the End Of Day activity group.
Compress Data. Select this check box to delimit the column data in the export file. The delimiter can be specified in the Col Separator field.
Col. Separator. Displays when the Compress Data check box is selected. Select the space, tab, comma, or Enter (CRLF or carriage return line feed) option as the character column separator. The data column is delimited by the selected character that follows it.
Always Export Header and Footer. Based on the export setup, if no data has been generated within the export and if a header and footer are defined and a file name given in the export setup, OPERA always generates the export file that contains no information other than the header and the footer. If this check box is selected, the header and footer columns of the export should only be Formula type columns. When saving the export with this check box selected, the following reminder prompt appears: 'Always Export Header and Footer is checked. Ensure that the header (and/or footer) definition only uses formula columns.' You can continue and save the export without using formula columns for the header and/or footer. However, if there are no records in the export (that is, if the export view is empty), an exception message is thrown. This message appears “No records were found for the export source view. Export failed due to invalid column configuration in export header or footer and option Always Export Header and Footer being active.”
Inactive. Mark this check box to make a file type Active or Inactive. If the box is checked, the file type is Inactive. If the box is not checked, the file type is Active.
Add Newline. Check this box to have each record displayed on a separate line in the ASCII text file.
Component Export. Select this check box to expose the Components button. Selecting the Components button allows users to configure components to be included in the export file.
Export Columns. Click this button to display the Export Columns Detail screen where the columns to appear on the export are selected. Click here to see a complete list of all available columns from the EXP_SCBUSBLOCK_VIEW export source.
Components. Available when the Component Exports check box is selected. Use this feature to select the components to be included in the export file.
Delivery Configuration. When OXI or SFTP is selected, the Delivery Configuration button displays. Select this option to launch the Export File Delivery Configuration screen. Delivery Configuration allows you to configure a file location to which the Export is copied and a delivery method used to send the Export File. See OXI - Export File Delivery Configuration Screen, SFTP Export File Delivery Configuration Screen, and HTTP/HTTPS Export File Delivery Configuration Screen below.
Export Definitions. This option is available when the export requires the property to define specific export codes and corresponding values before running the export. Select this button to display the Export Definitions screen.
To add a new export code and its value, select the New button. To change details for an existing code, highlight your choice and select the Edit button. The Export Definitions - New or Export Definitions - Edit screen appears. Enter the export Code, Description, and Value. Select the OK button to save and return to the Export Definitions screen.
Note: Depending on the export template, specific codes and possibly default values may auto-populate the Export Definitions screen.
When the OXI option is selected on the Export File Details screen the Delivery Configuration button allows you to configure the location and delivery method for sending the selected Export File to OXI displays. If no file location/delivery method is configured, the OXI Configuration settings for the selected Export in OXI Communication Method Setup determines these options. Provide the following information and select the OK button.
File System. Configure delivery of the export file using the file system method.
Directory. Select a directory name to the local and/or network location to which the export is delivered.
Temp Directory. Select a location as a temporary directory to copy the Export File to. A Temp Directory serves as a location to house files that are incomplete or that have failed delivery to the desired location.
Compress. Select the Compress check box to compress the File Export into a zipped file.
ASCII Transfer. Select this option to transfer the Export File in ASCII format.
Delivery Time. Enter the time when the Export File is to be delivered to the desired location.
Retry Interval. Enter the time (in seconds) to reattempt a previously failed delivery.
Retry Count. Number of times re-delivery should be attempted.
Provide the following information and select the OK button.
HTTP/HTTPS. Configure delivery of the export file using the HTTP/HTTPS method.
Host/URL. Enter the path and directory name of the network location to which the export is delivered.
User ID. Enter the user ID required to log onto the host site, if necessary.
Password. Enter the password for the user ID to log onto the host site, if necessary.
SOAP. Select this check box if a SOAP protocol is to be used for extracting the XML. SOAP (Simple Object Access Protocol) is a simple XML-based protocol to let applications exchange information over HTTP/HTTPS.
SOAP Version. If a SOAP protocol is being used, select the version of SOAP from the drop down list.
SOAP Action. If a SOAP protocol is being used, enter the SOAP action to be applied by the Web Service, if necessary.
Compress. Select to compress the file export into a zipped file.
ASCII Transfer. Select to transfer the export file in ASCII format. ASCII is simply the American Standard Code for Information Interchange and gives an alternate way to exchange data.
Delivery Time. Enter the time at which the export file is to be delivered to the desired location.
Retry Interval. Enter the amount of time, in seconds, after which to reattempt a previously failed delivery of the export. For example, if 3600 is entered in this field, once an exports delivery fails it tries to deliver the export again to the desired location after 3600 seconds or 1 hour.
Retry Count. Enter the number of delivery reattempts in the event of a failed delivery of the export. When the Retry Count is greater than 0, the export is retried that number of times daily until it is successfully delivered.
Provide the following information and select the OK button.
FTP. Configure delivery of the export file using the FTP method.
Host URL. Enter the URL of the FTP site to which the export file is sent.
User ID. Enter the user ID required to log onto the FTP site.
Password. Enter the password required to log onto the FTP site.
Passive FTP. Select to send the export file in Passive Mode FTP. In active mode FTP communication, client connects to the FTP server to send commands and then the server connects back to the client to send the data. If there is a firewall in between that does not allow connection back to the client, this will not work. In passive mode FTP the client initiates both connections to the server, solving the problem of firewalls filtering the incoming data port connection to the client from the server.
Directory. Enter the name of the directory (including path) on the FTP site where the export file is stored.
Safe Create. Select to upload the data into a temporary file on the FTP server and then rename it once the upload is completed to the actual file to prevent server side programs from reading incomplete files.
Temp Directory. When Safe Create is selected, enter where to upload the file temporarily, once the upload is completed, the file is moved from this directory to the data directory entered under Directory field.
Compress. Select to compress the FTP export file into a zipped file.
Note: The Content Type of a compressed file is 'application/x-zip-compressed'.
ASCII Transfer. Select to transfer the export file in ASCII format. ASCII is simply the American Standard Code for Information Interchange and gives an alternate way to exchange data.
Delivery Time. Enter the time at which the export file is to be delivered to the desired location.
Retry Interval. Enter the amount of time, in seconds, after which to reattempt a previously failed delivery of the export. For example, if 3600 is entered in this field, once an exports delivery fails it tries to deliver the export again to the desired location after 3600 seconds or 1 hour.
Retry Count. Enter the number of delivery reattempts in the event of a failed delivery of the export. When the Retry Count is greater than 0, the export is retried that number of times daily until it is successfully delivered.
Validate. Select to test the validity of the location and delivery method information you have specified. OPERA attempts to contact the FTP site using the information you have provided. If the validation is successful, 'Valid' displays in blue type at the bottom-left of the screen. If the validation fails, a 'Connection could not be established' message screen opens and 'Invalid' displays in blue type at the bottom-left of the screen.
Note: If the location and delivery method information has not been verified via selection of the Validate button, 'Not Verified' displays in blue type at the bottom-left of the screen.
In all OPERA tables, credit card numbers and expiration dates are stored as encrypted. Based on the Reservations > Credit Card Information View user permission being granted, you can either view the credit card information or not on OPERA Screens.
Regardless of the Credit Card Information View permission, you cannot modify export data containing credit card information. The credit card information on export files output is not masked.
If the Credit Card Information View permission is not granted, credit card numbers and expiry dates in the export data generated are fully masked with Xs when displayed on screen where export data can be seen. If the user has the Credit Card Information View permission granted, then they can view the number in the export data generated but still not be able to modify it.
When requested to do so by OPERA Support staff, Export Message Logging can be activated for use in debugging export issues. See Export Message Logging for details.
See Also