
|
|
|
View Export Data
The Export Data List screen, accessed by selecting the View Data button from the Export File List screen, allows users to view and work with generated export data files. To work with a specific data file, highlight the file in the grid and select one of the available buttons.
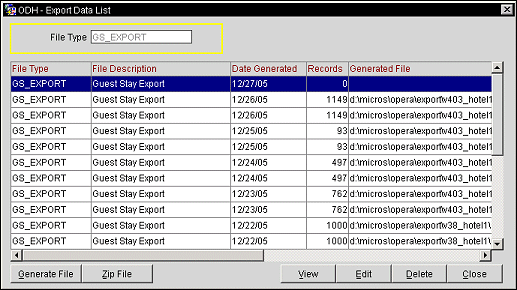
File Type. Name of the export.
File Description. Description of the export file type.
Date Generated. Date the export file was generated.
Records. Total number of records included in the export file.
Generated File. Displays the name and path to the location where the export file resides. To display the path name of the latest generated file, select the Generate File button and select Yes. The file name will now display in this column.
Note: The generated file name is not displayed if no File Name Formula exists on the Export File Details screen or if the file is automatically FTP'd.
Data From. Beginning date of the information that was collected for the file.
Data To. Ending date of the information that was collected for the file.
Errors. This field is only populated if an error occurred while uploading the export file.
An example of a typical HTTP error message that would appear in this column is:
Error During HTTP Upload: HOST: NPLSMOKEAPP2 java.net.MalformedURLException: no protocol: breakthecode?filename=PBSMUP.DAT&crc=165
An example of a typical SFTP error message that would appear in this column is:
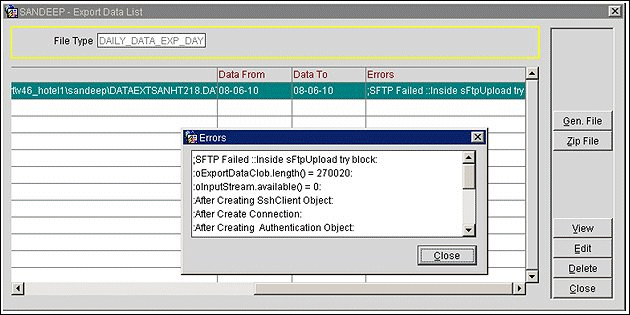
Note: When the export file has been generated successfully, then the error message is removed.
Generate File. Another Export screen displays. Enter the Export File Name. You do not need to enter a three- digit file extension, as Sales & Catering will not require one.

Select the OK button. A message displays confirming the successful generation of the new export file as well as the export file's location.

Zip File. First, ensure a file location is defined for the file type. This can be defined by editing the file type. If you generated more than one file, there could be a list of several files to zip for the highlighted file. If so, a File Details List is displayed. Select one file to zip.
View. Select the View button from the Export File List screen to display the Export Data List screen. Here you can manually generate an export file, delete, view, or edit a file.
Edit. The Edit screen for the Export Data is the same for viewing the data records, except that it allows you to perform editing functions. You can perform Find and Replace functions on the data records, delete, add, and edit the records in the export file before it is exported to Sales & Catering.
Delete. A confirmation message is displayed and deletes the highlighted file.
Close. Exits the screen.
When you select the View button from the Export Data List screen the export data is displayed. This screen shows the File Type and Description, Total Records, Property, Date Generated, File Generated and File Location. In the grid, the file records are presented with the sequence of records and the data, as well as the status of each record as to if it is a changed record. Select Close to return to the previous screen.

The Export Data screen displays the following information.
File Type. Name of the export.
Description. Description of the export file type.
Total Records. Total number of records included in the export file.
File Generated . Displays the name of the export file that was generated.
Property. Displays the name of the property that the export file was created for.
File Location. Displays the location of where the export file is located.
Date Generated. Date the export file was generated.
Seq. No. Displays the sequence number of the data in the internal system.
Data. Displays and includes information that is setup for the Data, Header, and Footer through the Export Column Details. See Export Column Details for details.
Changed. Displays a N if the file has not been modified and a Y when the export has been modified.
Find. Manually enter export data to search for.
Find/Replace. Manually enter the export data to find and what data to replace it with.
Delete. Select to delete the highlighted export data.
Add. Select to add a new record to the export.
Edit. Edits the highlighted record by allowing the user to manually modify the information that is part of the record in a free text box.
Close. Closes out of the Export Data functionality.
Within the export module the export files that are generated can be zipped by using a third party ZIP program. Based on different platforms, there are various ZIP programs that can be utilized. Provided that the ZIP program supports the following example in the command line when executed, you can use any of the ZIP programs that are available on the market. For example,
pkzip opera.ZIP opera requirements.doc
In Windows NT and AIX environments, the executable for the ZIP program must be copied to the runtime directory. The export files that need to be zipped must have a ZIP file name associated in the Export File Details screen; otherwise the ZIP action will result in an error. The name of the ZIP program should also be included in the application parameters. Select Configuration>Application Settings>General>Settings>COMPRESSION UTILITY. This is where the ZIP program name is defined.
The ZIP process can be automated for the requested export files during Night Audit by the application parameter EXPORT_ZIP_IN_ NA. The values for this parameter are Y (Yes) and N (No). By default the parameter will be set to N. Therefore, for those properties that are considering the automated ZIP procedure, the parameter must be set to Y and the check box for End of Day Routine Export must be checked.
See Also