|
|
|
ID Document Scanning
The ID Document Scanning functionality supports the document types of Passport and Enhanced Drivers Licenses.
When the PASSPORT/ID NUMBER VIEW permission is not granted to the user, then the Passport/ID Number will be masked with Xs except for the last two numbers.
With the activation of the OPP_IDS ID Document Scanning add-on license, a scanning vendor specified in the Configuration > Profiles > ID Document Scanning menu option (see ID Document Scanning Configuration for details), and an installed ID Document scanner or swipe that matches the specified scanning vendor attached to the user workstation, an ID Document can be scanned/swiped via the Scan button on the profile. From the scan/swipe, this information will be automatically populated into the guests profile and depending on the value defined for the Profiles > ID Document Stored Image Type (available when the GENERAL > FILE ATTACHMENT application function is set to Y) and the type of scanner being used, an image can be attached to the guests profile.
Note: The OPERAPrintControl install adds the location of OPERAPrintCtrl.dll to the path (C:\Program Files\Micros Systems, Inc\OPERA\Print Client).
Also, the \OAppCfgEd is updated to include the jar file OPERAScanner.jar in the Formsweb.cfg path variable archive_jini and archive_ie. OPERAScanner.jar has to exist in [micros]\opera\operaias\Jserv.
When creating or editing an individual profile for a guest, a Scan button is displayed on the Individual Profile screen.
Before selecting the Scan button, enter the last name of the guest. If the Scan button is selected before entering the guest's last name, then a message is displayed stating "Name must be entered." Once the Last Name of the guest has been entered, the Scan button will become active and can be selected. A message is then displayed to scan the document.
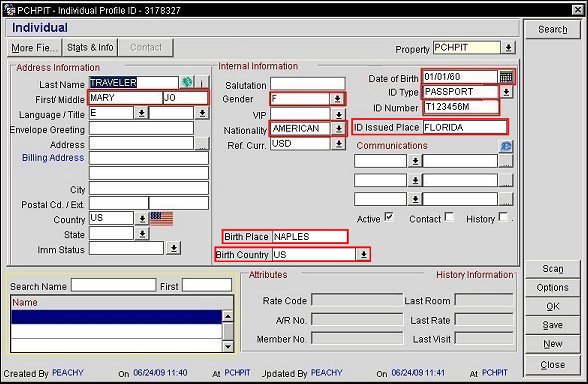
After the ID document has been scanned/swiped, selected fields on the Profile screen will be populated based on the information that was gathered from the document. For example, if a guest's passport was scanned, then the Profile screen for the guest would be displayed as below.
Note: When the ID Document has been scanned, the ID Type field will be automatically populated based on the ID Type that was configured from Configuration > Profile > Geographical Data > Custom > ID Type, that will be scanned/swiped.
Note: The format of the letters (capitalized, lowercase, or both) is all based on the format standard that is received back from the ID Document Scanning vendor. OPERA does not have any control over this formatting.
The following fields will be populated from the screen, given that they have been screen-painted on the screen:
If data is already populated in any of these fields, the information will not be overwritten by the information gathered from the scan. When a document is scanned, the fields are populated (and a document image) only if all of these fields are empty: ID Number, ID Issued Place, ID Issued Country, and ID Issued Date. If any of these fields are not empty, the values will not be updated. To force a repopulation, the missing fields must be screen-painted and the values removed from these fields before scanning.
Note: The data that is populated in the Nationality field is based on the configuration completed from the Configuration > Profile > Geographical Data > Nationality menu option. If the Nationality from the ID Document that was scanned has not been configured, select the down arrow to choose the appropriate Nationality. See Nationalities for details.
Depending on the type of scanner configured with the system, an image (maximum size of 2MB) can also be scanned and attached to the profile based on if the PROFILE > ID DOCUMENT STORED IMAGE TYPE application setting is set to FULL IMAGE or FACE IMAGE. To see the image attached to the profile, click on the Options button from the Profile screen or on the Attachments lamp that is displayed on the Profile Search screen. See Attachments for details.
With the ID Issued Country, Gender, and Nationality having configurable lists of values available, if the value scanned does not exist in the configured values, then OPERA ignores the scanned value and leaves the field blank.
Notes:
When blanking out/editing the screen paintable ID Number field manually and there is a corresponding file attachment available, the file attachment is deleted when the Profile is saved. If a profile with a scanned ID document image is deleted, the associated scanned ID document image is also deleted.
If a property wants the screen paintable ID Number field to be populated in the existing Passport field, a screen painting condition can be set up for the ID Number field to be duplicated into the Passport field. See Screen Painter Overview for details.
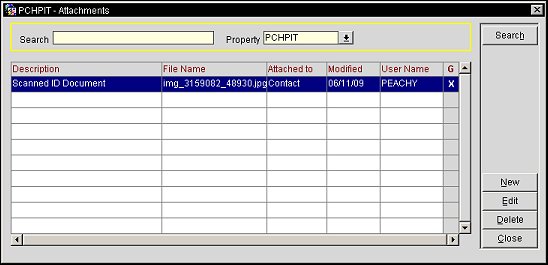
The image that was attached from the scan can be identified by its description. Just highlight the attachment you want to view and select the Edit button. Select the Open button to view the file.
|
|
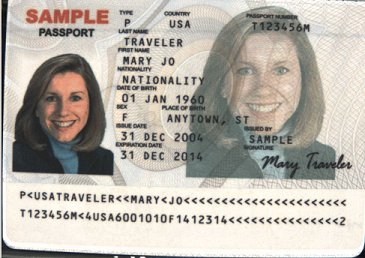
FULL IMAGE of a Passport Scan |
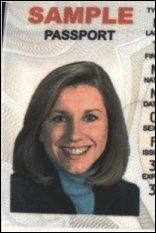
FACE IMAGE of a Passport Scan |
|
Enhanced Drivers License |
Items that can be auto-populated from an Enhanced Drivers License are the First Name, Middle Name, ID Number, Date of Birth, and Gender. For an enhanced drivers license, if the Profiles > ID Document Stored Image Type is set to FACE IMAGE, then no image will be captured as a face portion does not exist with this ID Document type. But if the PROFILES > ID DOCUMENT STORED IMAGE TYPE application setting is set to FULL IMAGE, then enhanced drivers license image, as the one above, would be stored for the profile. |
Show Me
See Also