
|
|
|
ORS Sales Screen (Cross-Selling Screen)
When the OPP_MHT2 OPERA Property Management Multi-Property Cross Reservation license code in PMS is active, or when the OPR<version number>ORS license code is active, you can access the Sales Screen from within ORS or PMS. In PMS, select the F7 Quick Key or the Reservations > Cross Selling menu option. In ORS, select Reservations > Sales Screen.
In PMS, when the Reservation > Reservation Flow application setting is set to F7 CROSS SELL AND DIRECT, the Sales Screen is displayed with the Define Search screen open when a new reservation is made from the following locations:
This screen is the starting point for all reservations activity. From this screen you may:
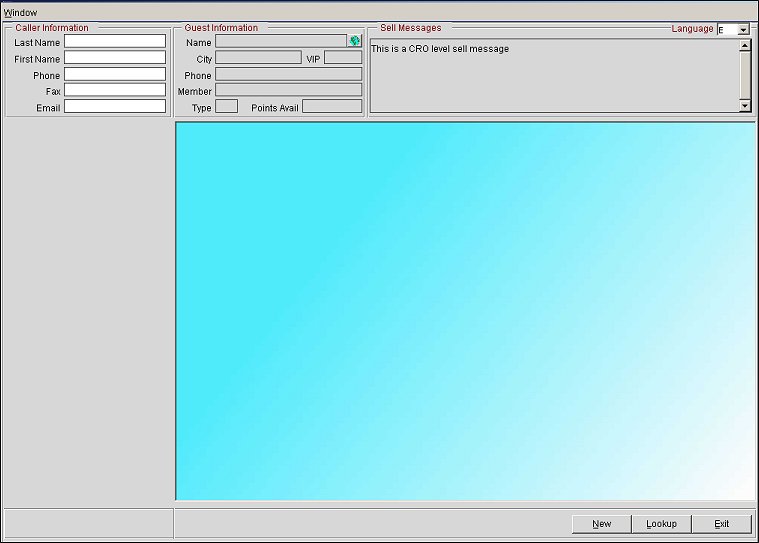
At the top of the Sell screen is an information area that remains in place while the panels below it change as the reservation process proceeds. This area contains the following kinds of general information related to the call.
OPERA records basic contact information related to the caller, the person with whom you interact while making or updating reservations. This information allows you to communicate with the caller following the conclusion of the call, for example if there is some question about the reservation. The information also permits you to track the sequences of calls that were handled relative to the reservation. (Select the Call History button from the Reservation Snapshot screen.) The Caller Information fields are available as soon as the Sales Screen appears and may be completed or modified at any time during the call. It is good practice to record this information as soon as you start working with the caller. Caller Information includes:
Last Name. The caller's last name.
First Name. The caller's first name.
Phone. The phone number of the caller.
Fax. The fax telephone number of the caller.
Email. The email address of the caller.
For your convenience throughout the call, the fields in this area show basic profile information for the primary guest associated with the reservation you are working with. Initially, these fields are blank. Information automatically appears when a profile is created or selected for a new reservation. Guest Information includes:
Name. The Guest's name. Select the globe icon to display any alternate name information for the guest. Alternate name information might include a native name (such as the guest's name as expressed in an extended character set). The globe icon is available when the General > Alternate Name application function is set to Y.
City. The guest's city as identified in the primary address portion of the guest profile.
VIP. The guest's VIP status.
Phone. The guest's primary phone number.
Member. The name on the attached membership.
Type. The membership type.
Points Avail. If the guest has award points available and wants to redeem these points, the number of available points appears in this field. While points are being retrieved, a "Retrieving available points..." message will display in blue type. The box to the left of this field shows the membership type for which the guest is redeeming points.
Note: Use the Profiles button to display the Profile screen and select the primary guest, that information will automatically populate the Guest Information area.
Sell messages can provide information that will be helpful to you in making the reservation. Appropriate messages display in this area depending on your point in the reservation flow and based on selections you have made. Upon opening the Sales screen, CRO-level sell messages are shown. Once a property is selected on the Property Search screen, property-level sell messages are displayed. In addition, when searching availability, availability-level sell messages are shown depending on room-type and rate code selections. When making block reservations, block-level sell messages are also available.
Sell messages can be configured in multiple languages. By default, sell messages are displayed in the language you select when you login to OPERA. However, you may choose another language at any time during the call by selecting the Language down arrow and choosing a language from the drop-down list. (The Language field is available when the General > Profile Language application function is set to Y.)
If the sell message is too long to fit in the Sell Messages box, double click in the Sell Messages area to display the full text of the sell message.
To begin creating a new reservation, select the New button from the Sales Screen. In very general terms, making a new reservation includes selecting a property, checking availability at the chosen property, and completing the reservation. If the guest does not already have a profile in the OPERA database, you must also create a profile.
Typically, when making a new reservation, you will select the buttons that appear at the bottom of the Sales Screen in order and provide information on, or make selections from, the additional screens as they appear:
You may advance or retrace your steps at any time in the reservation process by selecting from the active buttons.
The first step in making a new reservation is to define a search that will display the properties the guest is interested in. The Define Search screen assists you in this step. The fields that are displayed in the Define Search are configured in the Reservation Flow Configuration Options.
Note: You may also use the OPERA Speed Search features when defining a search. The Speed Search features are appropriate for more experienced agents who are familiar with the search options. See Speed Search for details.
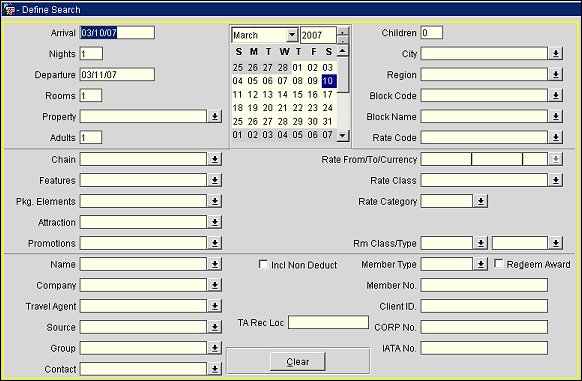
The information provided on the Define Search screen determines which properties meet the guest's requirements and from which you may review and select availability. You may enter as many or as few search criteria as you like; the more options you specify, the narrower your search becomes.
Note: Search options vary when the General > ORS CM (hidden parameter) and CRO > General > Generic CRO application parameters are set to Y. See ORS Sales Screen for Generic CRO for details.
Certain search options are required, for example, the arrival and departure dates, number of rooms, and number of adults and/or children. If conflicting search criteria are entered (for example, a room type that is not associated with the selected rate code), or if there are no matches for the options you have entered, the following message displays: "There is no property matching the search criteria. Please modify the search criteria."
The following search criteria are available for the reservation inquiry. Various fields appear depending on the application settings, license codes, and whether you are accessing this screen from within ORS or PMS.
Arrival. Use the calendar tool to select an arrival date, or type the arrival date in the field. The default is today's date. You may also type the name of a weekday in the Arrival field. When you tab out of the field, the date of the next occurrence of that day appears.
Alternatively, you may use the calendar to quickly fill in the arrival date and departure date. First click on the arrival date and, while holding down the Shift key, click on the last night of the stay. The arrival and departure dates and the number of nights are automatically filled in.
Nights. Enter the number of nights to be included in the stay. The default is 1. Enter 0 for day use. The number of nights changes automatically if you vary the departure date.
Departure. The departure date is automatically calculated using the arrival date and the number of nights in the Nights field. To change the departure date, enter a different number of nights. You may also type the departure date directly in the Departure field. Type the name of a weekday in the Departure field. When you tab out of the field, the date of the next occurrence of that day appears.
Rooms. Enter the number of rooms. The default is 1. The Selling Screen > Max Room Search application setting (available when the OPR<version number>ORS license code is active) may be used to set a ceiling on the number of rooms that may be specified for a reservation inquiry.
Note: When the Redeem Award check box is selected, the Rooms field is automatically set to 1 as Redemption Reservations can only be made for 1 room at a time. If the number is then updated to another number than 1, then the "Redemption Reservations can only be made for 1 room at a time. Number of Rooms has therefore been reset to 1." is displayed when trying to exit the field.
Adults. Enter the number of adults. The default is 1. At least 1 adult or 1 child must be specified.
Children. Enter the number of children. The default is 0. At least 1 adult or 1 child must be specified. If the Rates > Rates by Defined Buckets application parameter is set to Y, the number of children can be specified by separate age groups. The specific age groups are set up using the Rates > Min and Max Rate Buckets application settings.
Chain. Select the down arrow to choose a chain code. Only one chain code may be specified at a time. This option appears only if a chain has been configured for the CRO in ORS.
Property. Select the down arrow to choose the properties. When specific properties are selected, the Properties screen lists only the selected properties, along with any alternates. Alternates may be designated for a property using the Property Details screen. (Configuration > Property > Property Details).
City. Select the down arrow to choose marketing cities. Selected cities must belong to the same marketing region. When you select a city, the marketing region automatically appears in the Region field. (marketing cities may be different from the city defined for a property in Property Details configuration.)
Region. Select the down arrow to choose a marketing region where the property is located. This field will be automatically populated by the marketing region associated with the marketing city or cities selected in the City field. (The marketing region is a smaller area than the geographic region.) The Marketing Region will appear in the read-only search results of the Properties screen.
Block Code. Select the down arrow to display the Block Search. Choose a block code for this reservation inquiry. The selected block must be open for pickup. The block name for the block you select appears in the Block Name field.
Block Name. Select the down arrow to display the Block Search. Choose a block for this reservation inquiry. The selected block must be open for pickup. The block code for the block you select appears in the Block Code field.
Property Type. Select the down arrow to choose property types.
Features. Select the down arrow to choose property features.
Pkg. Elements. Select the down arrow to choose package elements.
Attraction. Select the down arrow to choose attractions.
Room Type. Select the down arrow to choose room types.
Rate From/To/Currency. Enter a range of rates, or a maximum or minimum rate only. Once a Rate From and Rate To have been defined, select the down arrow to choose the currency in which rates are specified.
Note: The system will not search through all rate codes in order to display the properties where there is a rate match within the given limits. This search is restricted to entries made using the Rate Range feature of the Property Detail screen (Configuration > Property > Property Details).
Rate Class. Select the down arrow to choose a rate class.
Rate Category/Rate Group. Select the down arrow to choose a rate category. If the Dynamic Best Available Rate application setting has been set to Y in ORS, the Rate Group LOV appears as an option. Select the down arrow to choose a rate group.
Rate Code. Select the down arrow to choose rate codes.
Promotions. Select the down arrow to display the Promotions List. Choose promotion codes for this search. The Availability screen displayed for this search will show rate codes associated with the promotions selected here. The Rate Code field will default to PROMOTIONS. This field is available if the Rates > Promotions application function is set to Y.
Coupon. Available when the Rates > Parameters > Promotion Coupon Codes application parameter is set to Y. When a coupon code is entered, the Promotions field will automatically be populated with the linked promotion code. See the Generating and Exporting Coupon Codes topic for more information.
Note: When the Reservations > OPERA BENEFITS application parameter is set to Y, selecting the Coupon LOV will open the OPERA Benefits screen. From this screen, you can enter a benefit coupon and use it for the reservation. See Applying a Benefit Coupon to a Reservation for more information.
ECertificate. Available when the Profiles > Parameters > OCIS E-Certificates application parameter is set to Y. Enter an e-certificate to define your search using the e-certificate. The Availability screen displayed for this search will show availability based on the e-certificate entered here.
Note: When the Reservations > OPERA BENEFITS application parameter is set to Y, selecting the E-Certificate LOV will open the OPERA Benefits screen. From this screen, you can select a benefit e-certificate to use for the reservation. See Applying a Benefit E-Certificate to a Reservation for more information.
Name. The primary guest name for this reservation. When you select the down arrow, or when you enter a name and tab to another field, the Profile Search screen appears. If the name you entered has potential matches, you may review and select from the names shown on the Profile Search screen. If the name has no possible matches, you may create a new individual profile for the guest at this time. This information will carry over to the reservation resulting from this inquiry. The name you enter here also populates the Name field in the Guest Information area at the top of the Sales Screen. The name is also used to check for negotiated rates when searching availability.
Note: If the guest profile selected for the new reservation has a relationship with a company profile having a negotiated rate, you will be offered the negotiated rate associated with the company (if certain application settings and configurations are defined.) In ORS only, if the company's negotiated rate is selected at the Rate Availability screen, the company profile is also attached to the reservation (when certain application settings are activated). See Rate Availability Screen, Negotiated Rates below.
When the Redeem Award check box is selected and a membership type and number are defined, you can select the down arrow for the Name field to open the Guest List and choose a new guest for the reservation. The reservation will be booked under the new guest's name, and member will consume the points for the reservation.
Company. The company name for this reservation. When you select the down arrow, or when you enter a company and tab to another field, the Profile Search screen appears. If the company you entered has potential matches, you may review and select from the companies shown on the Profile Search screen. If the company has no possible matches, you may create a new company profile at this time. This information will carry over to the reservation resulting from this inquiry. The company is also used to check for negotiated rates when searching availability.
Travel Agent. The name of the travel agency associated with this reservation. When you select the down arrow, or when you enter an agency and tab to another field, the Profile Search screen appears. If the agency you entered has potential matches, you may review and select from the agencies shown on the Profile Search screen. If the agent has no possible matches, you may create a new agent profile at this time. This information will carry over to the reservation resulting from this inquiry. The agent is also used to check for negotiated rates when searching availability.
Source. The source associated with this reservation. When you select the down arrow , or when you enter a source and tab to another field, the Profile Search screen appears. If the source you entered has potential matches, you may review and select from the sources shown on the Profile Search screen. If the source has no possible matches, you may create a new source profile at this time. This information will carry over to the reservation resulting from this inquiry. The source is also used to check for negotiated rates when searching availability.
Group. The group name for this reservation. When you select the down arrow, or when you enter a group and tab to another field, the Profile Search screen appears. If the group you entered has potential matches, you may review and select from the groups shown on the Profile Search screen. If the group has no possible matches, you may create a new group profile at this time. This information will carry over to the reservation resulting from this inquiry. The group is also used to check for negotiated rates when searching availability.
Contact. The contact for this reservation. When you select the down arrow, the Reservation Contacts screen appears. You may use this screen to search for and choose among the existing reservation and billing contacts associated with the guest, company, agent, source, or group profiles already selected. This information will carry over to the reservation resulting from this inquiry. If the name of the caller has not yet been specified in the Caller Information area at the top of the Sales Screen, the Name field is populated with the contact name entered here. This field is visible if the Reservations > Reservation Contact application function is set to Y.
Redeem Award. This check box appears if the OPR<version number>ORS and OPI<version number>OCIS license codes are active. Select this check box to activate the award redemption functionality for this reservation. When selecting this check box, the Rooms field will become disabled if it is set to 1 and if a value has been entered in the Rooms field that is greater than one, then the following message is displayed, "Redemption Reservations can only be made for 1 room at a time. Number of Rooms has therefore been reset to 1." For more information, refer to ORS/OCIS Sales Screen Award Redemption.
Incl Non Deduct. (Available if the OPR<version number>ORS is active) When this check box is selected, non-deductible room inventory will be included for display and selection during the availability search, in the Rate Availability screen. When the Incl Non Deduct check box is not selected, the Rate Availability screen does not include non-deductible inventory. If users want the Incl Non Deduct check box to be selected by default, a parameter can be activated: Global > Reservations > Parameters > Default Non Deduct Check Box.
Member Type. Select the down arrow to choose a membership type from the Membership Types screen. This information will carry over to the reservation resulting from this inquiry.
When the OPX_RAIN2 OPERA 2-Way Exchange for Rainmaker license is active and the Membership > Yield Market Lookup application function is set to Y, the Membership > YIELD MARKET LOOKUP MEMBERSHIP TYPE application setting is available. When the Membership Types that are selected for this application setting are defined in this field to define the search, then a Yield Market Lookup is performed for the query. But if an alternate Membership Type is used to define the search that is not selected for the application setting, then a Yield Market Lookup will not occur.
Member No. The membership number for this reservation. If this membership number is associated with a profile, OPERA will automatically populate the Name field with the appropriate guest's name. If no profile is associated with the membership number you enter, you will be given an opportunity to create a new profile. This information will carry over to the reservation resulting from this inquiry.
When the OPX_RAIN2 OPERA 2-Way Exchange for Rainmaker license is active and the correct web service has been setup for Rainmaker in the External Database Setup, if the Membership > Yield Market Lookup application function is set to Y and a Membership number is entered in this field with a membership type equal to the Profiles > Default Membership Type application setting, OPERA invokes a web service call to a third party system to obtain the Yield Market Code and associated Guest Value for the guest profile. See the Yield Market field description below for more details.
When the web service call is made, if the external system returns a value, OXI will populate it in the Yield Market field in OPERA. If a value is not returned, OPERA will use the Yield Market Type designated as the default. There are three possible outcomes by OXI:
Response Received from external system (Positive) |
A Yield Market Type code will be returned. |
Response Received from external system (Negative) |
An error text message from the negative response will be displayed to the OPERA user. |
No Response Received from external system (Timeout) |
The call was unsuccessful and times out. Time out is after 60 seconds. |
Client ID. The client ID for this reservation. If this client ID is associated with a profile, OPERA will automatically populate the Name field with the appropriate guest's name. If no profile is associated with the client ID you enter, you will be given an opportunity to create a new profile. This information will carry over to the reservation resulting from this inquiry.
Corp. No. The corporate number for this reservation. If this corporate number is associated with a company profile (account), OPERA will automatically populate the Company field with the appropriate company name. If no company profile is associated with the corporate ID you enter, you will be given an opportunity to create a new company profile. This information will carry over to the reservation resulting from this inquiry.
IATA No. The travel agent IATA number for this reservation. If this IATA number is associated with an agent profile, OPERA will automatically populate the Agent field with the appropriate agent name. If no agent profile is associated with the IATA number you enter, you will be given an opportunity to create a new agent profile. This information will carry over to the reservation resulting from this inquiry.
Source No. The source number for this reservation. If this source number is associated with a source profile, OPERA will automatically populate the Source field with the appropriate source name. If no source profile is associated with the source number you enter, you will be given an opportunity to create a new source profile. This information will carry over to the reservation resulting from this inquiry.
Yield Market. Available when the Rates > Yield Market Types application parameter is set to Y and the OPX_RAIN2 OPERA 2-Way Exchange for Rainmaker license is active and the Rates > Multiple Yield Market Types application parameter is set to Y. Select the down arrow to choose the yield market types to define. For OPP_OPUS, multiple yield market types may be selected. For OPX_RAIN2 when the Rates > Multiple Yield Market Types application parameter is set to Y, a single selection may be made; if no selection is made, the yield market type designated as the default yield market type will be applied to the search. See Yield Market Types for details.
Also when the OPX_RAIN2 OPERA 2-Way Exchange for Rainmaker license is active and the correct web service has been setup for Rainmaker in the External Database Setup, if the Membership > Yield Market Lookup application function is set to Y and a Membership number is entered in the Member No. field with a membership type equal to the Profiles > Default Membership Type application setting, OPERA invokes a web service call to a third party system to obtain the Yield Market Code and associated Guest Value for the guest profile. When the Yield Market is returned, it is automatically populated in this field, and only the rates defined for this Yield Market will be available for selection for the reservation. Once a reservation is created, this value will also be populated on the Reservation screen in the screen painted Yield Market Types field. If a Member Number is not entered or a Yield Market Code is not returned, then the Yield Market Type designated as the default Yield Market Type will be applied to the query. See Yield Market Types for details.
Note: When the Best Available Rate function is active and the application setting Best Available Rate type is defined as Best BAR by Day, then the lowest rate for the Yield Market based on the Hurdle Rate will be available.
Once you have defined a search, you may select the Properties button to display information about the properties that meet your search criteria. The Properties screen appears.
The Property Availability Search area on the left side of the screen allows you to filter the results of your search, or change any of the data fields and recheck availability based on the new specifications.
The central element on this display is the search results grid which lists all properties meeting your search criteria. When you highlight a property in the grid, the Sell Messages area at the top of the Sales Screen displays the sell message for the chain and/or property, if messages have been set up. In addition, the tabs bellow the grid refresh for the currently highlighted property.
The property names listed in the search results grid may be shown in any of the following text colors, each having a distinct meaning:
Black. Properties meeting the requirements of the search criteria which have available inventory.
Green. Properties meeting the requirements of the search criteria which have a negotiated rate code for the guest, company, agent, etc., associated with this reservation inquiry.
Red. Properties meeting the requirements of the search criteria which have no inventory available.
Magenta. Properties which are alternates of the properties meeting the requirements of the search criteria.
The following fields are shown for each property:
X. Place an X in this column by clicking to indicate that you want to see room type and rate details for this property when you select the Availability button. By default, all properties are marked. To un-check a property that is marked, click the X in the X column . Click in the X header field to mark all properties.
Chain. Chain code for the property.
Type. Property type.
Property. Property code.
Property Name. Full name of the property.
Avail. Number of rooms currently available at the property. This number is defined as the number of rooms to sell for the property, regardless of any restrictions for room type/rate code combinations.
Percent Avail. Percentage of the total number of rooms at the property which are available. (To Sell/Total Rooms * 100 = Percent Available).
Location. City where the property is located.
From<property|city>. The distance from the primary searched-for property to the alternate property. If no property was specified in the search, the distance from the city specified, if any.
Features. Icons represent up to 10 kinds of property features (such as Concierge, Pool, Golf, etc.) that might be available at properties. An X in a particular feature column indicates that feature is available at the property. Place your pointer on any of the icons to see a tip that identifies the feature. Select the Features tab to see a complete list of features available for the highlighted property.
By default, properties are displayed in an order that supports the most efficient selling approach for this reservation selling environment.
To avoid a situation where one property continually appears at the top of the list when the search is based on the most common set of search options, list order is determined dynamically based on certain priorities, including (when the OPR_<version_number> ORS license is active) the Selling Screen > Property Order application setting.
Note: You may click in any header field to order the display of properties based on that field. To return the properties to the default "selling order," select the Recheck button.
The Property Availability Search area on the left side of the screen allows you to filter the results shown in the grid; or to change any of the data fields and recheck availability based on the new specifications, without returning to the Define Search screen. For example, if the search results list is lengthy, you might want to search on a specific property. Or, if there is no availability at a particular property for the dates the guest wants to stay, you might vary the dates or the rate code and recheck.
Provide any of the following search criteria and select the Recheck button to refresh the grid display.
The Property Availability Search criteria are described under Define Search Screen, above.
Note: To locate a specific property in the search grid, select the Property field down arrow and choose the property you are interested in. When you select the Recheck button, the property you identified will be displayed in black type, while the other properties will be shown in magenta.
The area below the grid shows details for the property you have highlighted in the grid. This information can provide extra details that you can share with the caller. The kinds of details shown for the property depends on the tab selected. By default, the General tab is always available and general information is displayed when you first access the properties screen. Other tabs are optional and their appearance is determined by the selections made in CRO Configuration (Configuration > Property > CRO Configuration) if the OPR <version number> ORS license code is active, or in Multi-Property PMS Configuration (Configuration > Property > Multi-Property Setup) if the OPP_MHT2 PMS Reservation Cross Selling add on license code is active.
General. Display general information about the highlighted property. The information shown here is pulled from the Property Configuration screen General tab (see Property Configuration General Tab for details) and the application settings for the property.
Address. Address of the property.
Phone. Local phone number for the property.
Fax Number. Local fax number for the property.
Toll Free Number. Toll-free phone number for the property.
Email Address. Email address for the property.
Web Page. Internet URL for the property's web page.
Check In Time. Designated check in time for the property. (This value is set using the Reservations > Check In Time application setting.)
Check Out Time. Designated check out time for the property. (This value is set using the Reservations > Check Out Time application setting.)
Region. Regional location of the property.
Currency. Currency code for the local currency at the property.
Base Language. Primary language for the property. (This value is set using the General > Base Language application setting.)
Rooms. Total number of rooms at the property.
Beds. Total number of beds at the property.
Floors. Number of floors at the property.
Features. Display a list of the features available at the highlighted property. See Property Search Features for details.
City. Display a list of the marketing cities in the same region as the highlighted property. See Property Search Cities for details.
Attractions. Display a list of the attractions in the area of the highlighted property. You can search by attraction class (groupings of attractions) or specific attractions. See Property Search - Attractions for details.
Alternate Properties. Displays a list of the alternate properties associated with the highlighted property. See Property Search - Alternates for details.
Airports. Displays a list of the airports serving the area where the highlighted property is located. See Property Search - Airports for details.
Contacts. Displays a list of the contacts associated with the highlighted property. See Property Search - Contacts for details.
Packages. Displays a list of packages (product or service offered or sold in combination with other products or services for a set price) available for guests; including the beginning and end dates of the package availability. See Property Search - Packages.
Transportation. Displays a list of transportation providers serving the highlighted property. See Property Search - Transport for details.
Restaurants. Displays a list of restaurants at the highlighted property. See Property Search - Restaurants for details.
UDF. Displays a screen (Property Search - UDF Information) that lists any other property-specific information that the current property wants to provide to the guest. The information listed has been configured for the property through Configuration > Property > Property UDF > UDF Categories and UDF Types.
Room Description Area. A display of all room types configured for this property; each entry includes the room type code, the total number of rooms and the number of rooms available. Double click on an entry to see the room type description.
Directions. Display the driving directions associated with the highlighted property.
Map. Display images of up top 6 maps associated with the highlighted property. A link to an Internet map provider may be been configured to appear on the first map tab.
Room Image. Display an image of a room belonging to the room type highlighted in the Room Description Area, above.
Resort Image. Display an image that depicts the highlighted property. (This button is available if the property has configured a resort image.)
From the Properties screen, you may select the Availability button to go directly to choosing a rate. (When the OPR<version_number> ORS license is active, you may select the Profile button to go to the Profile screen. From the Profile screen you may attach profiles to this reservation inquiry and determine whether the associated profiles have negotiated rates or memberships that might affect the reservation.)
Select the Availability button on the Sales Screen to display the Rate Availability screen. This screen provides a summary of availability by room types, rate codes and rates for the properties you selected (by marking them with an X in the X column on the Properties screen). By default, availability is displayed based on the arrival and departure dates specified on the Define Search screen. From this screen you may select a rate and immediately proceed with the reservation; place the guest on waitlist; or analyze rate information. You may also record a turnaway or return to the Properties screen or the Define Search screen.
Note: Additional options are available for displaying rates for the properties on this screen. See Grid Display Options below.
Note: By default, the property room/rate amounts in the Rate Availability grid are displayed in their configured rate code currency. If you want to convert the original currency to the Post Exchange Rates of the CRO or of the property, if property-specific exchange rates have been configured, you may do so.
Global - To convert all rates for the selected property in the grid to a different currency type, activate Global > Selling Screen > Parameters > Convert Currencies in Grid = Y and Global > Rates > Parameter > Multi-Currency = Y. Then, select the Currency LOV in the property grid and choose the available currency type (i.e. EURO, MXN, CHF) you would like to convert the displayed properties' rates to. All rate amounts in the property availability grid will display in the newly converted currency. The Currency LOV field will display the new currency type (i.e. EURO, MXN, CHF) in the background color of 'orange,' indicating that the screen is in Global Conversion mode. The currency type in the grid also appears in orange, if the currency rate exchange was taken from the CRO global exchange rates. For those property's rate codes that have been set up as property-specific exchange rates (see Property-Specific below), their configured rate codes for that currency type will display in the property's currency exchange rate instead of the global (CRO) rate amount. To exit the Global Conversion mode, select the option Rate's Original Currency from the property grid Currency LOV.
Property-Specific - If properties have had their specific exchange rates configured for a currency type, these property rates will not be affected by the Global Conversion mode. Instead, when the currency type is selected from the Currency LOV, the property-specific currency type exchange rates will display. This applies to PMS and ORS. In ORS, however, an application setting must be activated: Property > Cashiering > Functions > Property Specific Currency Exchange to display the property- specific rates. For more information on configuring property-specific rate conversion, see Exchange Rates.

The Total Property Count value beneath the grids shows the total number of properties that can be displayed in the Rate Availability screen grids. Three property rate grids are displayed at one time. If you selected more than three properties on the Properties screen, use the scroll buttons beneath the grids to scroll to the rate information for other properties. The default display order of the properties is the same as their sequence on the Properties screen.
> |
Display rate information for the next property in the third grid. |
>> |
Display rate information for the next two properties in the second and third grids. |
>>> |
Display rate information for the next three properties in all three grids. |
< |
Display rate information for the previous property in the third grid. |
<< |
Display rate information for the previous two properties in the second and third grids. |
<<< |
Display rate information for the previous three properties in all three grids. |
The scroll buttons allow you to quickly scroll through all properties. Notice that they may also be used to display rate information for the same property in two or more grids. This permits you to select different Display Sets and/or to vary the availability search options (arrival/departure dates, number of nights, number of persons, number of rooms) and compare rates.
When you highlight a property grid, the Sell Messages area at the top of the Sales Screen displays the sell message for the associated chain and/or property, if sell messages have been configured.
Shortcut keys can be used to navigate between the 3 displaying Rate Availability Grids. Select Alt plus 0 upon entering the form to place the cursor in the property field of the first grid. Once in the Property field, Tab will take the user to the next Property field or Shift plus Tab will take the user to the previous Property field. But when the Property field is selected, Alt plus 0 will take the user to the Display Set field where they can select to enter a display set. Selecting Tab then takes the user to the rate grid and Alt plus 0 will take the user back to the Property field.
For any highlighted rate, the rate details are shown in the Room Rate Description area to the left of the grid.
Green. Available rates are displayed in green. If you want to make a reservation using one of these rates, double-click the rate to create the reservation or highlight the rate and select the Resv button. If you choose a red rate code, an overbooking message appears. See Reservations for details.
Red. Unavailable rates are displayed in red. These rates display, but are Access Excluded (Acc Ex). If you choose a red rate code, an overbooking message appears.
Yellow Background. Multi-rate rates are highlighted with a yellow background. This means that there is a rate change during the proposed stay and more than one rate applies.
Dark Green. If the room type has at least one matching feature such as a balcony, the room type displays in dark green (legend includes Pref. Upon selecting the highlighted room type, the system will display all matching preferences with the respected room type feature, visible in a yellow tooltip.
Orange. (Applicable when the Selling Screen > Parameter > SELL LIMITS BLOCKS IN DIFFERENT COLOR application parameter is set to Y.) When there are sell limit rooms available for a block, they will display in orange.
Display Set. Select the down arrow to choose the display set to see rate codes. (This feature is fully functional only when the OPR<version_number> ORS license code is active.) See Display Sets under Grid Display Options, below, for additional details.
Include Overbooking. For each property grid, this row shows the number of rooms overbooked, if applicable. For example, if there are a total of 100 QQS rooms in inventory and 101 have been booked, the Include Overbooking value will be - 1.
Physical Inventory. For each property grid, this row shows the total number of available physical rooms of each room type, excluding out of order rooms and observing sell limits. If sell limits are exceeded, this number will be negative.
Rate Codes. Each of the remaining rows is labeled for a specific rate code as defined on the Define Search screen. The rate codes also include any negotiated rates attached to the profiles (individual, company, agent, etc.) associated with the reservation inquiry. (An exception is when rate information for the prevailing rate code is displayed, should it be configured for the property. Here rows are labeled for room types rather than having room types displayed horizontally in the grid.)
Note: When the Enable Rate Groups application parameter is set to Y and the Best Available Rate Type = Best BAR by Day functionality is active, each rate group is listed in a column. Each rate group's Best BAR rate is listed on the same line. The rate groups listed in the column are the rate groups that have been configured for the property and associated with the Best BAR rate codes. See Best BAR by Day Configuration for more information.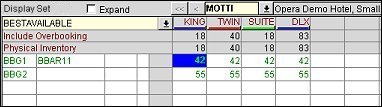
If the selected guest profile has a relationship with a company and certain application settings and configuration are set up, the company's negotiated rates also display. In ORS only, if the company's negotiated rate is selected here at the Rate Availability screen, the company profile will also be associated with the new reservation, along with the guest profile. This functionality only works with new reservations when the rate code is selected on the Rate Availability screen. See Note below for configuration and exceptions.
The currency in which the rate amounts for that rate code are quoted is shown next to the rate code. If the rate code includes a package, Pkg. appears in the field next to the currency. Pkg. (Inv.) appears here if the package has associated inventory items. The Room/Rate Description area provides a description of the package, and the Rate Information area shows the package charges.
Note: The configuration for displaying company negotiated rates when a guest profile is related to a company (in PMS and ORS) and for associating the company profile to the reservation if the company's negotiated rate is selected (available in ORS only), are:
1. Enable the application setting of Profiles > Parameter > Relationships Rate Inherit.
2. Available in ORS only, enable the application setting of Selling Screen > Function > Attach Company When Negotiated Selected. This setting only displays after the application setting Profiles > Parameter > Relationships Rate Inherit is activated. The Attach Company When Negotiated Selected application setting will attach the company profile to the reservation if a company negotiate rate is selected.
3. Ensure that the Inherit Rates functionality is activated between Company Master and Company Sub at Configuration > Profile > Relationships > Inherit Rate check box. Select the Inherit Rate check box on the Sub (right) side. See Relationship Types for more information.
4. Activate the Inherit Rates functionality between Company and Individual (or Employee) at Configuration > Profile > Relationships > Inherit Rate check box. Select the Inherit Rate check box on the Individual or Employee (right) side. See Relationship Types for more information.
5. On the individual guest profile, associate the company to the profile by accessing the individual profile and selecting Options > Relationship > New > Company > Relationship Types: either from Individual to Company or Employee to Employer > select Company Profile.
The described functionality only works when creating a new reservation and selecting the rate code from the Availability Search screen. Changes made to the existing rate code or profile at the Reservation screen will not attach, or detach, the company profile. If necessary, you will have to manually detach the existing company profile if another rate not associated with the company is selected.
Note: When a user has the VIEW SUPPRESSED RATE DETAILS permission granted and the rate availability returns a suppressed rate, an "SR" will display in the rate amount cell to indicate it is a suppressed rate. Users can select the Rate Info. button to view the suppressed rate's details. 
Room Types. Each column is labeled for a specific room type. If all room types cannot be displayed at once, use the <, <<, >, and >> buttons to scroll the list.
Each rate code/room type cell displays the room rate for that combination. A rate of SR indicates that the rate is suppressed (that is, the rate amount cannot be shared with the guest).
If you want to view more details about the room type, double-click the room type code. The Room Type screen appears. The information that appears here was created during Room Types configuration (Configuration > Room Classifications > Room Types.) The Room Type screen allows you to be more specific about the room type when communicating with guests.
The three grids display rate codes for one to three different properties, depending upon the configuration and search results.
Night/Total. Use these option buttons to display single- night or total-stay rate amounts in the grids.
Closed. Select this check box to display both open and closed rates. Un-check this check box to see only open rates.
All. You may enter room type and rate code as search criteria on the Define Search screen; if you do so, the Rate Availability grids are filtered for those room types and rate codes. Select this check box to ignore any room type and rate code search options selected on the Define Search screen and display all room types and rate codes.
Alternates. Select this check box to display rate information for those properties that are designated as Sell alternates (in Property Details configuration) for the properties selected on the Define Search screen. For example, if PROPERTY1 is selected on Define Search, and PROPERTY1 has PROPERTY2 and PROPERTY3 designated as alternates, then the Availability screen will display rates information for all 3 properties when the Alternates check box is selected. If the check box is not selected, only rates for PROPERTY 1 will display.
Property. Select the down arrow to choose the property to display rate availability. The Property list that appears includes the properties chosen on the Properties screen (and their Sell alternates) if properties were selected on the Properties screen. If no properties were selected on the Properties screen, all the Sell alternates for the log in property are available.
Expand. (Available when the OPR<version_number> ORS license is active.) When the application setting Global > Selling Screen > Functions > Enable Multiple Display Set and Property Expansion is set to Y, users can use the three grids to view additional rate code display sets for just one property, providing more information in which to compare rates. Depending upon the configuration and search results when this parameter is On, either all three grids will contain a different rate code display set for the same property, or users can select the Expand check box for one of the displayed properties and the three grids will reveal predefined display sets for that one property.
Property > Selling Screen > Settings > Default Display Grid Set Grid 1, 2, 3 (This is only available for selection if Enable Multiple Display Set and Property Expansion is enabled.) Select from the application setting LOV the desired default display set for the property. You may define up to three display sets. If a default display set is not defined at the Property level, the grid for the property shows the display set defined at the Global level (Global > Selling Screen > Settings > Default Display Set Grid). Also, when a property is in Expand mode and no default display set exists for that property, the grid will display NONE as the display set (i.e. in Grid 3).
Note: Prevailing Rates Display Sets defined for properties can also be set up and queried using the Multiple Display Set and Property Expansion feature for ORS. The preliminary setup requires:
� Global > Selling Screen > Functions > Enable Multiple Display Set and Property Expansion = On.
� Property-specific Prevailing Rates by LOS active (ORS > Property > Rates > Function > PREVAILING RATES BY LOS=Y)
� Property-specific Prevailing Rate Code setting (ORS > Property > Rates > Setting > Prevailing Rate Code)
� Display Sets Defined for Prevailing Rates (ORS > Property > Selling Screen > Default Display Set 1,2 and 3)
(This functionality is available when the OPR<version_number> ORS license code is active.) Display sets may be used to quickly display rate codes based on preset characteristics, such as whether the rate is day use, promotional, negotiated, etc. The following pre-configured filters are provided; there may be others if they have been set up for the property (Configuration > Rate Management > Codes > Display Set). These display sets can also be set up as default display sets - see Expand check box below.
Waitlist. Create a waitlisted reservation for the highlighted rate. (You may also right-click and select Waitlist.) See Waitlist for details.
Res Types. Display a list of configured reservation types for the current property, along with information on any associated deposit and cancellation rules. The reservation type selected here will populate the Reservation screen if a reservation is made at the current property. (This button is available only if the OPR <version number> ORS license code is active.) See Reservation Type List for details.
Rate Info. Display detailed rate code information for the highlighted rate. See Rate Information for details. (You may also right-click and select Rate Info.)
Resv. Create a new reservation using the highlighted rate. (You may also right click and select Reservation, or double-click the rate to create the reservation.) If you choose a red rate code, an overbooking message appears. See Reservations for details.
Hurdle. When a yield management system license code is active, display hurdle rates.
Itm Inv. Display the Item Inventory Availability screen, where you may check whether specific items will be available to accommodate guest needs.
These features are available when the OPR<version_number> ORS license is active.
Rate Info. Display detailed rate code information. See Rate Information for details.
Deposit. Display deposit cancellation information for the rate. See Reservation Deposits and Cancellations for details.
Hurdle. Check yield hurdle information for the selected rate. See Yield for details.
Waitlist. Create a waitlisted reservation for the selected rate. See Waitlist for details.
Reservation. Create a new reservation based on the selected rate. See Reservations for details.
By default, all grids are initially displayed using the availability search options specified on the Define Search screen (or in the Property Availability Search area of the Properties screen). Each of the Rate Availability grids has its own availability search frame which can be used to control the options for each grid individually. This way, you can easily compare availability and rate amounts based on different search criteria for the same or different properties. The following search options are available:
Arrive. Arrival date.
Tip: In this field, left-click and hold to see the day of the week displayed in a hint window. To leave the hint window open, right-click in this field and to close the window, left-click.
Nights. Number of nights.
Depart. Departure date.
Tip: In this field, left-click and hold to see the day of the week displayed in a hint window. To leave the hint window open, right-click in this field and to close the window, left-click.
Rooms. Number of rooms.
Adults. Number of adults.
Check. After changing any of the availability search criteria, select this button to check availability using the new options.
Note: If a block has been defined and queried, the 1st grid in the Rate Availability Screen displays the block. The search options for the displayed block are disabled and cannot be changed, such as Arrival, Departure, Nights, Rooms, and Adults. The Change All and Check buttons are also disabled in the block grid. If users make changes to the 2nd or 3rd grid search criteria and select the Change All or Check buttons, the 1st block grid is not affected.
Change All. Apply the criteria specified for this grid to all grids and check availability.
The Rate Information area displays a daily summary of the highlighted rate amount broken out into package amounts and taxes. (Only non-inclusive packages, that is, packages that are not included in the rate amount, are shown here.)To see further details, or to see rate information for stays longer than three days, the horizontal scroll bar may be used to move over to view additional stay dates or you may select the Rate Info button.
To see rate information in a currency other than the property local currency, select the down arrow and choose another currency from the Currency LOV.
The Room/Rate Description area displays a description of the room type and other information related to the combined room type and rate highlighted in the Rate Availability grid. Double-click in this text area to display an expanded window that shows the complete text. When the OPR <version number> ORS license code is active, various options for what can be displayed and communicated to reservation agents, managers, and guests are selected in the application settings (Selling Screen > Settings > RATE INFO DISPLAY). The text displayed in the Room/Rate Description is entered in the Rate Header Tab (Configuration > Rates > Rate Classifications > Rate Codes). Users may enter short or long messages related to the room and rate.
Property Calendar. Only available when the Selling Screen > Display Property Calendar application parameter is set to Y and a user has the Reservations > Calendar View permission granted. Select this link to open the Property Calendar for the property where the cursor is placed in the Rate Availability grid. Other properties can be selected from the Property Calendar's Property field.
Select the Alternates button to see the Alternate Dates calendar, a graphical display that shows any restricted dates for the rate highlighted in the Rate Availability grid. The display defaults to the month that includes the proposed arrival date. Use the << and >> buttons to move forward or backward a month at a time to review restrictions for alternate dates. Select the Reset button to return to the default month display.
Restricted dates are highlighted in red. Available dates are highlighted in green. Dates outside of the specified guest stay dates are highlighted in gray. Select the Analyze button to display detailed information concerning the types of restrictions that may apply to the stay dates. Select Alternates to return to the Alternate Dates display.
Select the Rate Desc button to return to the Room/Rate Descriptions display after using either the Alternates or the Analyze features.
When the Sales screen is called from ORS, select the Profiles button on the Sales Screen to display the Profile screen. This screen allows you to see a complete picture of the profiles attached to the current reservation inquiry. The details available to you include negotiated rates and memberships which may be important in determining the guest rate. In addition, you can create new profiles.
When you return to the Availability screen from the Profiles screen, the profiles listed on the Profile screen populate the reservation you create.
To edit an existing reservation, select the Lookup button from the Sales screen. (To edit the last reservation you made, return directly to that reservation by selecting the Last Resv button.)
See Also