
Virtual Number Setup
Virtual numbers are direct inward dial (DID) telephone numbers that allow outside callers to contact guests directly, without having to go through the telephone operator. They can be used for voice, fax, modem, and pager communications.
Note: The Virtual Numbers feature is available only when the OPP_VNS PMS Virtual Numbers add-on license is active.
There are two types of virtual numbers: those that are linked to rooms (called "room- based" virtual numbers) and those that are linked to guests (called "guest-based" virtual numbers). Which types are available at your property is largely a function of the capabilities of your local telephone PBX. A virtual number is designated as room-based or guest-based depending on the characteristics of the virtual number "pool," or group, to which it is assigned. (See Setting Up Virtual Numbers, below.)
Room-based virtual number pools are linked to specific room numbers. When a room number is selected at check-in, the virtual numbers in any room-based pools linked to that room are available for assignment to the room. (See Managing Virtual Numbers During Check- In, below.)
If more than one guest is sharing the room, the sharers use the same room-based virtual number which remains assigned to the room until all sharers have checked out. For room moves, the room-based virtual number might not follow the guest to a new room. There are a number of possible scenarios in a room move, depending, for example, on whether the virtual number pool assigned to the "source" (originating) room is also available to the "target" (destination) room; on whether the target room is occupied or vacant; and if the target room is occupied, whether a virtual number has already been assigned to the room. (See Room Moves and Virtual Numbers, below, for details.)
Guest-based virtual numbers follow the guest while the guest is in-house. This means that if the guest moves to another room, the virtual number moves with him or her, even if the guest is a sharer, provided the target room is set up to accept virtual numbers and the pool to which the guest's virtual number belongs is also available at the target room. (See Room Moves and Virtual Numbers, below, for details.) With guest-based virtual numbers, multiple virtual numbers can be linked to a single room when guests are sharing, thereby allowing each guest his own virtual number.
There are two kinds of guest-based virtual numbers — those that are assigned to the guest from a pool at check-in, and those that are permanently assigned to the guest, called "dedicated" virtual numbers. Dedicated virtual numbers might, for example, be reserved as a special feature that can be given to corporate guests who stay often or who regularly conduct business from the property.
Dedicated virtual numbers are assigned to Individual guest profiles only. (See Dedicated Guest-Based Virtual Numbers, below.) Once a virtual number has been assigned to a profile, it is reserved and cannot be used for any other assignments. Depending on how the virtual number pool is set up, the guest's dedicated virtual number can be automatically selected when a reservation attached to the guest's profile checks in to a room where the pool is available.
Virtual number assignment can be made mandatory at check in time, or it can be optional at check in. (See Managing Virtual Numbers During Check In, below.) Following check in, virtual numbers can be managed by selecting the Virtual Numbers option from the Reservation Options menu. (See Managing Virtual Numbers for Checked In Guests, below.)
Setting up virtual numbers involves the following steps:
Optionally, assign Dedicated Virtual Numbers. From Reservations>Profiles, assign dedicated virtual numbers to Individual guest profiles. (Using virtual numbers in this way is optional, and can be done at any time.)
These steps are described below in this section.
The Virtual Numbers screen is the starting point to create a new virtual number pool, to view or edit an existing pool, or to delete a pool. To display the Virtual Numbers screen, select Configuration >Setup> Virtual Numbers.
To create a new virtual numbers pool, or to view or edit an existing pool, select Configuration >Setup> Virtual Numbers. The Virtual Numbers screen appears. Using this screen you can view virtual number pool details, and create, edit, and delete virtual number pools. This screen includes the following fields:
Property. This field is available when the OPERA Multi-property license (OPP MHOT) is active. Select the down arrow to display the Properties LOV. From the list, choose the property to configure virtual number pools.
Pool. The number assigned to the pool. Up to nine pools can be created for each property.
Pool Name. The descriptive name of the virtual number pool.
Active. If the pool is active, Y (Yes) appears in this field. If the pool is not active, N (No) appears in this field. (No is the default.) Virtual numbers can be selected only from active pools.
Pool Type. If the pool is room-based, R appears in this field. If the pool is guest-based, G appears in this field. (See Virtual Number Types for details.)
Assignment Required. If a virtual number must be assigned from this pool when the guest checks in, Y (Yes) appears in this field. If a virtual number from this pool is optional when the guest checks in, N (No) appears in this field. By default, this field will be set to No. When it is changed to Yes, you will only be able to check in a guest once they have been assigned a virtual number from this pool, either by manual selection (when the Assignment Rule is set to Prompt to Assign) or by automatic selection (when the Assignment Rule is set to Auto Assign).
Note: If a pool's Assignment Rule is set to Do Not Assign, and Assignment Required is set to Yes for the pool, the Assignment Required setting is ignored for the pool at check in.
Assignment Rule. The assignment rule determines how virtual numbers will be assigned from this pool at check in. Options include: Auto Assign (automatically assign the next available number in numerical sequence from this pool); Prompt to Assign (display a LOV of available virtual numbers in this pool and allow selection); or Do Not Assign (do not allow assignment from this pool at check-in).
Details. Highlight the virtual numbers pool to specify virtual numbers and select the Details button. The Virtual Numbers Details screen appears.
New. Create a new virtual number pool. The Virtual Numbers Edit/New screen appears.
Edit. Highlight the virtual numbers pool to view or edit and select the Edit button. The Virtual Numbers Edit/New screen appears.
Delete. Highlight the virtual numbers pool to delete and select the Delete button. You are prompted to confirm your decision. The system will not allow you to delete a virtual number pool if one of the extensions in that pool is assigned to an in-house guest.
Adding or Editing a Virtual Number Pool
Select the New button from the Virtual Numbers screen to create a new pool. Or, to edit a pool, highlight the entry for a pool and select the Edit button. The Virtual Numbers Edit/New screen appears.
Complete the following fields and select the Save button.
Pool Number. Assign a number to the pool. Up to nine pools can be created. Once created, this field becomes view-only.
Pool Name. Enter a descriptive name for the virtual number pool.
Pool Active. To make a virtual number pool active, select the check box. To make a pool inactive, leave the check box unselected. Virtual numbers can be assigned only from active pools. The inactive option gives you the ability to configure a pool ahead of time, without immediately making the virtual numbers it contains available for assignment. You can make the pool active once you are ready to release the extensions for assignment.
Note: A pool cannot be changed from active to inactive if any of the virtual numbers in the pool are currently assigned to a room number or to an Individual guest profile.
Pool Type. If this virtual number pool is room-based, select R from the drop down list. If the pool is guest-based, select G from the drop down list. (See Virtual Number Types for details.)
Assignment Reqd. If a virtual number must be assigned from this pool when the guest checks in, select the check box. If a virtual number from this pool is optional when the guest checks in, the leave the check box unselected. By default, this field is not selected. When it is selected, you will only be able to check in a guest once they have been assigned a virtual number from this pool, either manually or automatically. This check box is disabled when the Assignment Rule is set to 0.
Note: If Assignment Required is not checked, select Close instead of OK on the Virtual Number Setup - Check In screen to check the guest in without assigning a virtual number. (See Managing Virtual Numbers During Check In, below.)
Assignment Rule. There are three options for the assignment of virtual numbers. These options control if and how virtual numbers are presented on the Virtual Number Setup - Check In screen and the Virtual Number Setup - Options screen. The list of values includes the following options:
Note: If a pool's Assignment Rule is set to Do Not Assign, and Assignment Required is set to Yes for the pool, the Assignment Required setting is ignored for the pool at check in.
Note: If there are no available virtual numbers in the virtual number pool at check-in, a message appears in the Virtual Number Setup screen Status field stating: "Unable to assign virtual number." Click OK to continue.
When you are finished, select Save to save your entries and return to the Virtual Numbers screen.
From the Virtual Numbers screen highlight the pool entry and select the Details button to create or edit the list of extension numbers that will be available for assignment from the pool.
Once you have created a pool, you can designate the virtual numbers that will be available for assignment from that pool. To specify extension numbers for a pool, highlight the entry for a pool on the Virtual Numbers screen and select the Details button. The Virtual Number Details screen appears.
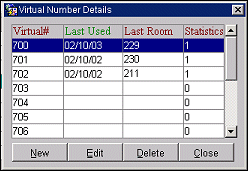
The system automatically assigns virtual numbers (when the pool's Assignment Rule is set to Auto Assign), or it makes available for selection (when the pool's Assignment Rule is set to Prompt to Assign) in a rolling sequence based on the date when they were last used. Numbers that were never used are auto-assigned (or made available) before numbers that have already been used. And numbers used further in the past are auto-assigned (or made available) before more recently used numbers. This arrangement "ages" the virtual numbers to minimize the possibility of calls to guests who have already checked out being received by current guests.
Note: Last Used, Last Room, and Statistics information is updated automatically by OPERA when the guest check out.
This screen shows the following information:
Virtual Number. The virtual number (DID extension). This is usually the last three or four digits of the telephone number, depending on the configuration of the PBX software.
Last Used. The date when this virtual number was last used. This field is blank if the number has not yet been assigned.
Last Room. The room number to which the virtual number was last assigned. This field is blank if the number has not yet been assigned.
Statistics. The number of times the virtual number was assigned to a checked in guest. A zero means that the number was never assigned. This statistic is available room-based and guest-based virtual numbers, regardless of whether they are dedicated to an Individual guest profile.
Select the New button to specify the virtual numbers that will be available for assignment from this pool. The Virtual Number Details Edit/New screen appears.
Define the sequence of virtual numbers that will be available from this pool by specifying the Virtual Number From extension number and the Virtual Number To extension number. For example, to define 10 numbers from extension 7101 to 7110, enter 7101 in the From Virtual Number field, and 7110 in the To Virtual Number field.
To add a single number outside a sequence, enter the number in the Virtual Number From field.
Select Save when you are finished.
Virtual Number From. Enter the first number in the sequence.
Virtual Number To. Enter the final number in the sequence.
You can change individual numbers by highlighting the number on the Virtual Number Details screen and selecting the Edit button. The Virtual Number Details Edit/New screen appears. Make the necessary changes and select Save.
Once virtual number pools have been created and extensions have been defined for the pools, the virtual number pools can be assigned to specific room numbers. In this step, you identify which pools will be available for use by guests staying in each room number where virtual numbers are accessible. At the property's discretion, virtual number pools can be assigned to room numbers based on room type or room location, or by using some other criteria.
To assign virtual number pools to room numbers, select System Configuration>Reservations>Room Classification>Rooms. Search for the room number to add virtual number pools to and select the Edit button. From the Rooms screen, select the Virtual Pools tab.
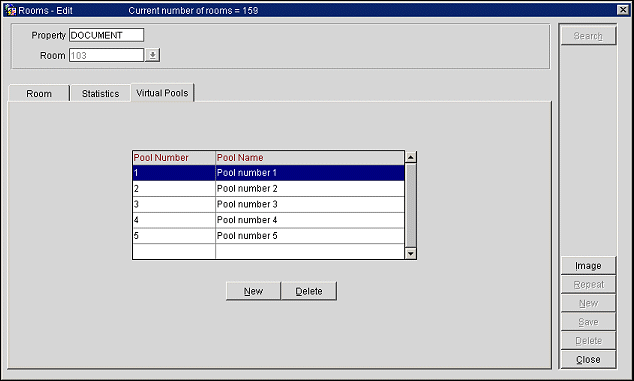
To assign a virtual number pool to the room, select the New button. The Available Pools screen appears. Multiple pools can be assigned to one room number.
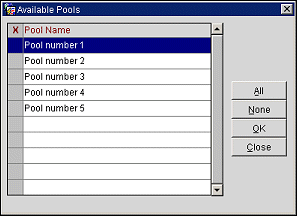
Click in the X column (or highlight the list entry and select the spacebar) to select the pools you want to assign to this room number. Click in the column again (or highlight and press the spacebar again) to un-select a pool. You can also use the All or None buttons to select all pools or none of the pools.
When the selection has been made, select OK to return to the Rooms screen Virtual Pools tab, where the assigned pools are listed.
Note: The system cannot assign virtual numbers pools to pseudo rooms (e.g., Posting Masters). Therefore, guests checked into pseudo rooms cannot be assigned a virtual number regardless of whether the number is dedicated or not.
Dedicated or fixed virtual numbers can be assigned to individual type profiles (and only individual type profiles)at any time. The dedicated number will be automatically assigned (when the pool's Assignment Rule is set to Auto Assign), or made available for selection (when the pool's Assignment Rule is set to Prompt to Assign) whenever a reservation attached to that guest's profile checks in to a room where the appropriate pool is available.
Note: As long as a virtual number is assigned to a guest profile in this way, it is reserved and cannot be assigned to any other guest or room.
To assign a virtual number to a guest, select Reservation>Profiles and open the guest's profile. Select the Virtual Number button. The Virtual Number screen appears.
This screen displays any virtual numbers linked to the profile. The Virtual Number screen provides the following information:
Property. This field is available when the OPERA multi-property license (MHOT or OPP MHT2)is active. Select the down arrow to display the Properties LOV. From the list, select the property to assign a virtual number to this guest.
Pool Name. The name of the virtual number pool to which the assigned number belongs.
Virtual Number. The virtual number (DID extension) assigned to the guest.
Checked-in Room. If the guest is checked in, the guest's room number. Otherwise, this field is blank.
To assign a virtual number to the profile, select the New button. The Pool Name LOV appears. From the list select the virtual number pool to select a virtual number for assignment to this guest. When you have selected a number, the Virtual Number assignment screen appears.
The following information is included on this screen:
Pool Name. The name of the pool selected from the Pool Name LOV. This information is view only.
Virtual Number. Select the down arrow to display the list of virtual numbers in this pool. Choose a dedicated virtual number from this list.
Select OK to save your entries.
Note: If you attempt to delete or merge a guest profile which has a dedicated virtual number, a message displays to notify you that the profile has a dedicated virtual number. You must "un-dedicate" the guest's virtual numbers before merging or deleting the profile. To do so, access the Virtual Number screen for the guest, highlight the appropriate entry on the Virtual Number screen and select the Delete button. If the guest has multiple dedicated virtual numbers, each number must be deleted individually before the profile can be merged or deleted.
Technical Note: GuestdataChange Messages to Interface when Dedicated Virtual Numbers are Assigned/Unassigned*
Assign a permanent number to a profile, no relation to a reservation:
[01.04/15:30:23.66]#1/0 => <GuestdataChange xmlns="x-schema:GuestdataChangeSchema_O" GuestName="Smith" GuestFirstname=”Paul” GuestLanguage="DE" GuestNum="0" EquipmentNumber="1046" EquipmentPoolId="1" EquipmentStatus="1"/>Un-Assign permanent number from a profile, no relation to a reservation:
[01.04/15:30:54.43]#1/0 => <GuestdataChange xmlns="x-schema:GuestdataChangeSchema_O" GuestName="Smith" GuestFirstname=”Paul” GuestLanguage="DE" GuestNum="0" EquipmentNumber="1046" EquipmentPoolId="1" EquipmentStatus="0"/>Change a permanent number to a profile, no relation to a reservation:
[01.04/15:32:06.89]#2/0 => <GuestdataChange xmlns="x-schema:GuestdataChangeSchema_O GuestName="Smith" GuestFirstname=”Paul” GuestLanguage="DE" GuestNum="0" EquipmentNumber="1080" EquipmentPoolId="1" EquipmentStatus="1" EquipmentOldNumber="1046" EquipmentOldPoolId="1" EquipmentOldStatus="0"/>
Check-In and Checkout of a reservation, where the profile has a permanent assignment: Action is "keep" (ES = 2)
C/I reservation where a permanent number is attached to the reservation:
[01.04/15:32:07.01]#1/0 => <GuestIn xmlns="x-schema:GuestInSchema_O" RoomNum="377" GuestName="Smith" GuestFirstname=”Paul” GuestLanguage="DE" GuestShareflag="N" GuestNum="34831" EquipmentNumber="1080" EquipmentPoolId="1" EquipmentStatus="2" GuestVip="0"/>C/O with permanent number attached to the reservation:
[01.04/15:32:47.15]#1/0 => <GuestOut xmlns="x-schema:GuestOutSchema_O" RoomNum="377" GuestShareflag="N" GuestName="Smith" GuestFirstname=”Paul” GuestNum="34831" EquipmentNumber="1080" EquipmentPoolId="1" EquipmentStatus="2"/>*Attributes in message may change based on Vendor system in use.
Note: A User Activity Log entry is made when a virtual numbers is assigned or unassigned from a reservation. When a virtual number is changed, two entries appear — one for the unassignment of the old virtual number and one for the new virtual number assignment. Select the Reservations activity group and the Virtual Numbers action Type to review virtual number activity on the User Activity Log screen.
Note: Depending on whether the virtual pool's Assignment Required option is set to Yes or No, assignment of a virtual number may be mandatory during check-in. If virtual number assignment is mandatory, you will not be able to check a guest in unless a virtual number has been assigned either automatically (when the pool's Assignment Rule is set to Auto Assign), or through manual selection (when the pool's Assignment Rule is set to Prompt to Assign).
The following example illustrates virtual number assignment during check in. Assume the following virtual number pool has been set up and linked to the room being assigned to the guest.
Pool |
Pool Type |
Assignment Rule |
Assignment Required |
Pool 1 |
Room- based |
Prompt to Assign |
No |
The system goes through the normal check-in procedure and displays the Virtual Number Setup - Check In screen as the last screen of the check-in process.
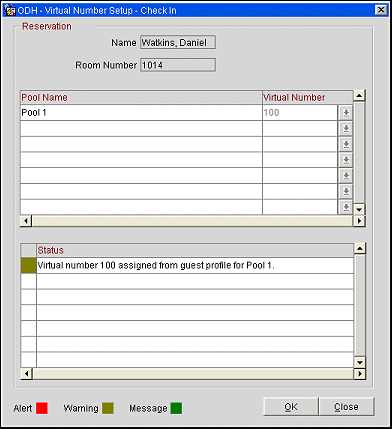
Note: Because Assignment Required is set to No for 1, you could check guests in without assigning a virtual number by selecting Close instead of OK on the Virtual Number Setup - Check In screen.
Scenario 1 - If the guest does not have a dedicated virtual number. The cursor will position itself on the virtual number entry field because the pool is set to Prompt to Assign. The user can select a number from the list of values or a number can be entered manually. (If the pool was set to Auto Assign, OPERA would automatically assign a number from Pool 1 and display the virtual number in the Status field.)
Note: If a pool's Assignment Rule is set to Do Not Assign, the system will display the message "No Virtual Number Assigned" in the Status field for that virtual number pool.
Scenario 2 - If the guest has a dedicated virtual number. If the guest has a dedicated virtual number assigned for Pool 1, the cursor will position itself on the virtual number entry field. When you select the down arrow to display the Pool 1 Virtual Numbers list of values, the virtual number attached to the guest's profile will be at the top if the list. Another number could be selected at this time; however, the dedicated number would remain unavailable for assignment to any other guest. (If the pool was set to Auto Assign and the guest has a dedicated virtual number from the pool, the system will automatically assign the dedicated virtual number attached to the profile and display it in the Status field.)
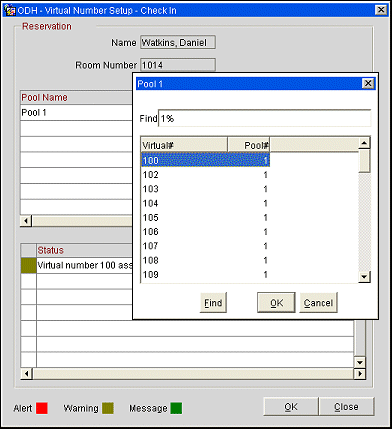
Other situations are handled as follows:
If the guest profile having a dedicated virtual number is attached to more than one reservation for the same time frame, the system will assign the dedicated virtual number to the first of the eligible reservations that checks in to the property.
If the guest with a dedicated virtual number is checked into a room that is not associated with the pool to which the guest's dedicated number belongs, OPERA will behave as if the guest profile did not have a dedicated virtual number. The cursor will position itself on the number entry field for Pool number 4 because it is set to Prompt to Assign. The user can select a number from the Pool 1 Virtual Numbers list of values. (If the pool was set to Auto Assign, the system will automatically assign a number from Pool number 4 and display the number in the Status field.)
Scenario 3 - Group Check In. For group check-in, after the user has selected Check-In Group, the system displays the message, "Show assigned virtual numbers for each group member?" If you respond Yes, the normal virtual number assignments will take place just as during regular check-in; that is, OPERA will display the assigned virtual numbers for Auto-Assign pools and prompt for assignments for Prompt to Assign pools. If you respond No, the system will not display virtual number assignments but will automatically assign the virtual numbers for Auto-Assign pools and ignore Prompt-to- Assign pools. OPERA will then continue to roll through the complete check-in without stopping for prompts.
Once a guest has checked in, you can use the Virtual Number Setup - Option screen to change virtual number assignments for the guest. To access this screen, select Virtual Numbers from the Reservation Options menu (the Reservation Options menu is accessible from the Reservation screen or from the Reservation Search screen).
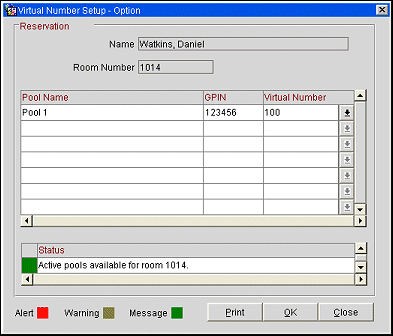
Only one virtual number can be assigned per pool and reservation. If it is necessary to change a virtual number for a reservation, first remove the existing number and then assign a new one.
Note: When the IFC>Display Virtual Number PIN application parameter is set to Y, then the GPIN column will be displayed on the Virtual Number Setup - Option form. This column displays the GPIN for the virtual number that has been assigned to the reservation. When the user is granted the VIEW/PRINT VN PIN permission, they can print out a copy of the GPIN and Virtual Number assigned to the reservation for the guest by simply selecting the Print button on the form.
The following scenarios illustrate how virtual numbers are handled when guests move from one room to another (for details on room moves functionality, see Room Moves). The information in the Status fields on the Virtual Number Setup screens tells you how virtual numbers are being managed in each instance.
When you move a guest to a vacant room, the system will display the virtual number move activity in the Virtual Number Setup - Room Move screen Status fields. If the target room is configured like the source room, the system will move all numbers across, regardless of whether the pool is room or guest-based.
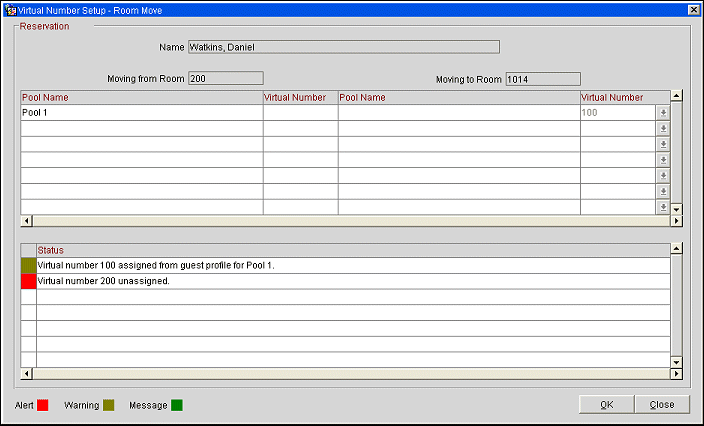
If the target room is set up differently (for example, if Pool 1 in the above example was not attached to the target room), the Status description will state that the Pool 1 virtual number 200 was "unassigned". The user would at this point select a new number from the pool attached to the target room.
For information about the behavior of virtual numbers when the guest moves to an occupied room, see the discussion of Sharers and Virtual Numbers, below.
Note: When a guest is moved from a room that has a virtual number assigned, to a PM room that has a room type that is not set up to "Send to Interface," the virtual number is unassigned from the original room and returned to the pool. All activity related to assigning and unassigning the virtual number is recorded in the user activity log.
The following scenarios illustrate how virtual numbers are handled when guests are sharing (for details on share functionality, see Shares ). The information in the Status fields on the Virtual Number Setup screens tells you how virtual numbers are being managed in each instance.
Scenario 1 - Sharing virtual numbers. Assume a guest has already checked into 1014 (and a room-based virtual number from Pool 1 was assigned). Now, sharer Garvey checks in. The existing room based number will be assigned to Garvey as well as all other sharers. If the first sharer is checked in and was not assigned a room-based virtual number, and at a later time the second sharer is checked in and is provided with a virtual number, this number will apply to all sharers in the room. (If the pool assigned to room 1014 was guest-based, Davis would have been assigned his own guest-based number from the pool.)

The room-based virtual number will remain assigned to this room until all sharers check out. (However, if the pool were guest-based, the guest-based virtual number assigned to each guest would be unassigned as each guest checks out.)
Scenario 2 - A sharer has a dedicated virtual number. Assume a room is to be shared by two persons and that Pool 1 — a room-based virtual number pool — is attached to the room. Also assume that one of the two sharers has checked in and a virtual number has been assigned from the pool. If the other sharer has a dedicated virtual number attached to his profile, that virtual number will be ignored when he checks in, and the already-assigned virtual number will remain assigned to the room.
If the sharer having the dedicated virtual number checks in first and assigns his dedicated room-based virtual number, that dedicated virtual number will remain attached to the shared room as long as at least one of the sharers is in-house — even if the sharer to whose profile the number is attached checks out.
How virtual numbers are handled at check out or when a check-in is canceled depends on whether the guest is sharing or not sharing.
When the guest is sharing, and the virtual number assigned to the room is room-based, the system will only deactivate the virtual number if all the sharers have also checked out. Guest-based virtual numbers for checked-out sharers will automatically be unassigned when the guest checks out.
When the guest is not sharing, the system unassigns all associated virtual numbers at check-out. This occurs whether or not the virtual numbers are guest-based or room-based.
See Also