4 Partner
A partner is a person or entity that has an association with the retailer in various areas of the procurement process, especially for import orders. A partner does not provide items to a retailer for resale. Information associated with a partner includes currency, language, status and primary contact details. For example, partners can include those involved in transporting goods (freight forwarders, consolidators), escheatment (for states or countries), providing credit (banks), and facilitating the import of goods (agents, brokers).
External finishers are an exception to the partner types above in that they are used in transfers, not purchasing. You may send goods to an external finisher for finishing work (such as printing, dyeing, or embroidery), or repair (for damaged goods). Then, after the job is done, the finisher will return the goods.
Create a Partner
The Partner page allows you to create, edit, and view a partner. Partner status may be active or inactive. You can enter the currency, language, status, and primary contact information. Use this page to track the following information for specific types of partners:
Bank partners: Track a line of credit.
Import authority partners: Indicate whether they are the primary import authority for the principal country.
All partners except banks: Track manufacturer ID, principal country, Tax ID, and terms.
In some countries, inventory maintained with a third party must be controlled by the retailer. A retailer may send goods to the external finisher or supplier for finishing the work (such as printing, dyeing, and embroidery) or repair (in case of damaged goods). After the job is done, the finisher or the supplier returns the goods back to the same or a different location. All such movements must be accompanied by a Nota Fiscal.
Auto Receive Stock Indicator: Available only if the partner type is an external finisher.
This flag is used in the two-legged transfer process to indicate, when the warehouse/store ships the stock for the first leg, the system should automatically update the stock at the external finisher. The system will not wait for confirmation from the external finisher, regardless of whether it has received the merchandise or not. If this indicator is unchecked, when the first leg of the transfer is shipped, the system should not update the stock at the external finisher until the external finisher sends across a message that it has received the merchandise.
At the system level, you can determine if partner IDs are unique to all partners or unique to a partner type. If IDs are unique to a partner type, partners with different partner types may have the same ID.
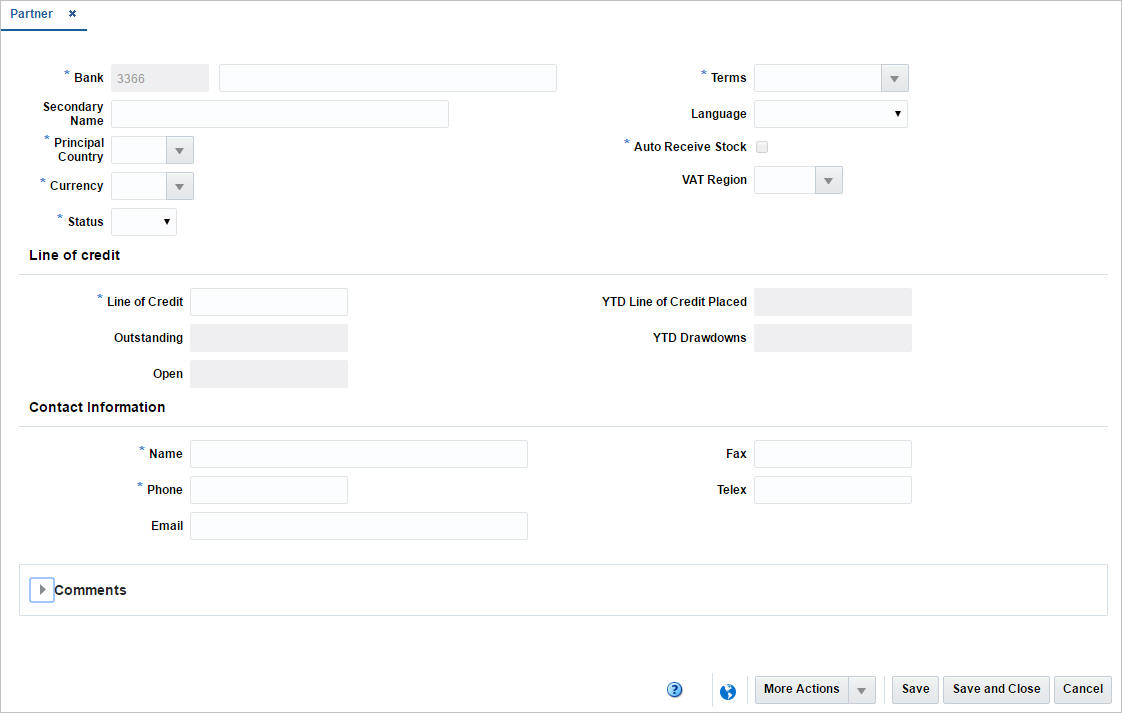
Header
The header section contains the following fields.
Table 4-1 Header - Fields and Description
| Fields | Description |
|---|---|
|
Partner Type |
The Partner Type field is labeled according to the created partner, for example, Bank. The partner ID is generated automatically. Enter the name of the partner. This field is a required field. |
|
Secondary Name |
Enter a secondary name for the partner, if available. |
|
Principal Country |
Enter, select or search for the principal country code of the partner. This field is a required field. |
|
Currency |
Enter, select or search for the partner's currency code. This field is a required field. |
|
Status |
Select the status of the partner from the list. This field is a required field. |
|
Terms |
Enter, select or search for the payment terms. This field is a required field. |
|
Language |
Select the partner's language from the list. |
|
Auto Receive Stock checkbox |
Select this checkbox to indicate that the system updates the stock for the external finisher when the 1st leg of the transfer is shipped. |
|
Line of Credit: |
|
|
Line of Credit |
Enter the credit limit. This field is a required field. |
|
Outstanding |
Contains the total amount of credit that the company has used or has charged against in the partner's currency. |
|
Open |
Displays the open credit amount. |
|
YTD Line of Credit Placed |
Contains the total amount of credit the company has used this year to this date in the partner's currency. |
|
YTD Drawdowns |
Contains the year to date payments the bank has made on behalf of the company in the partner's currency. |
|
Contact: |
|
|
Name |
Enter the name of the primary contact at the partner's site. This field is a required field. |
|
Phone |
Enter the phone number of the primary contact. This field is a required field. |
|
Email/Fax/Telex |
Enter additional contact information in the appropriate fields. |
Comments
In the Comments section you can enter any comments relevant for the partner, if necessary.
Creating a Partner
To create a partner, follow the steps below.
-
From the Tasks menu, select Foundation Data > Items > Suppliers and Partners > Create Partner. The Create Partner page appears.
-
In the Partner Type field, select the type of partner you want to create.
-
Click OK. The Partner page appears. The partner ID is generated automatically.
-
Enter the necessary partner information in the available sections.
For more information about the available sections of the Partner page, see the Create a Partner section.
-
Then choose one of the following options.
-
Click Save to save the partner information.
-
Click Save and Close to save the partner and close the page.
-
Click Save and Create Another to create additional partners.
-
Click Cancel to reject all entries and close the page.
-
Editing a Partner
To edit a partner, follow the steps below.
-
From the Tasks menu, select Foundation Data > Items > Supplier and Partners > Manage Partners. The Partner Search page appears.
-
Enter or select search criteria as desired to make the search more restrictive.
-
Click Search. The partners that match the search criteria are displayed in the Results section.
-
In the Partner column, click the partner link, or mark a record and select Actions > Edit, or use the Edit icon. The Partner page appears.
-
Edit the fields as, necessary.
-
Then choose one of the following options.
-
Click Save to save the partner information.
-
Click Save and Close to save the partner and close the page.
-
Click Save and Edit Another to edit additional partners.
-
Click Cancel to reject all entries and close the page.
-
Specifying Invoicing Attributes
The Invoicing Attribute page allows you to specify how invoices from the partner are handled. You can indicate where an invoice is received and where an invoice is paid. You can also indicate that the stores must confirm that the service was performed before the invoice from the partner is approved. You can select invoicing attributes for a partner if the Oracle Retail Invoice Matching product is installed.
To specify invoicing attributes for a partner, follow the steps below.
-
From the Tasks menu, select Foundation Data > Supplier and Partners > Manage Partner. The Partner Search page appears.
-
Enter or select search criteria as desired to make the search more restrictive.
-
Click Search. The partners that match the search criteria are displayed in the Results section.
-
In the Partner column, click the partner link, or mark a record and select Actions > Edit, or use the Edit icon. The Partner page appears.
-
Select More Actions > Invoicing Attributes. The Invoicing Attribute page appears.
-
In the Receive Invoice, field, select where the invoice is received.
-
In the Pay Invoice field, select where the invoice is paid.
-
Select the Confirmation Required for Services Performed checkbox, to indicate that the stores must confirm that the service was performed before the invoice from the partner is approved.
-
Then choose:
-
Click OK to save the invoicing attributes and close the page.
-
Click Cancel to reject all entries and close the page.
-
-
Update a Partner
The Manage Partners option opens the Partner Search page. In this page you can perform the following actions.
-
Search for partners by various search criteria
-
View the search results
-
View partner information
-
Create partner information
-
Edit partner information
You can access the Partner Search page from the Task menu, select Foundation Data > Suppliers and Partners > Manage Partners. The Partner Search page appears.
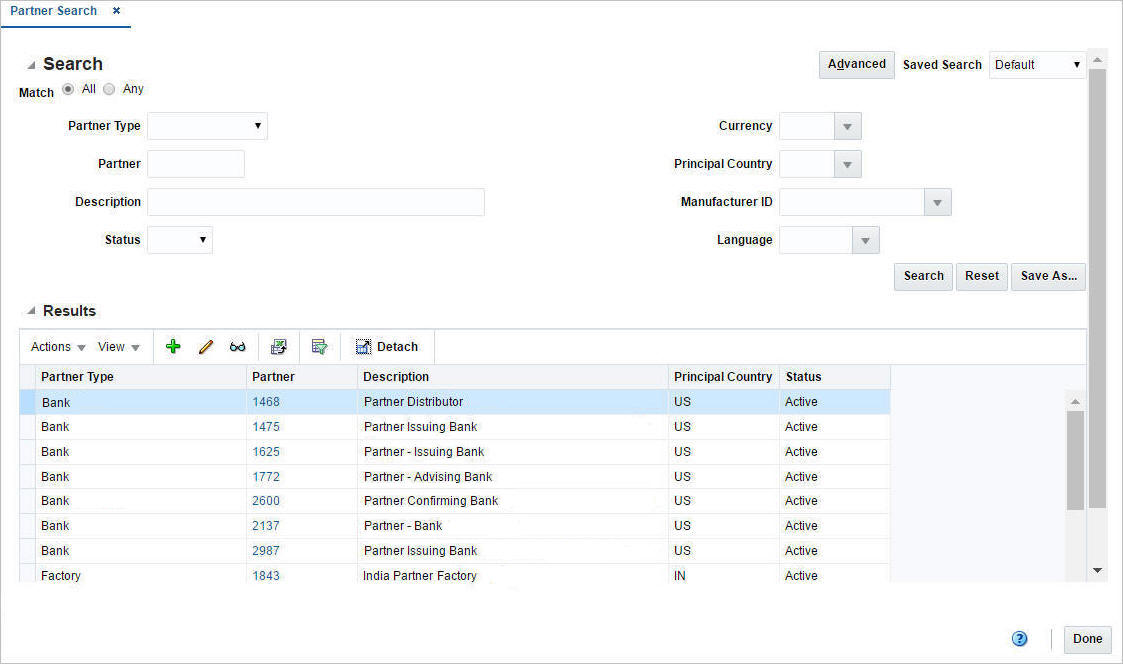
Searching for a Partner
To search for a partner:
-
From the Task menu, select Foundation Data > Suppliers and Partners > Manage Partners. The Partner Search page appears.
-
You can search for a partner by using basic or advanced search criteria, depending on the requirement. The basic mode is the default search mode.
-
Click Advanced to access the search section in advanced mode.
-
Click Basic to return to basic mode.
-
Searching for a Partner Through the Basic Search Criteria
To search for a partner by using basic search criteria:
-
Enter, select or search for one or all of the following basic search criteria.
Table 4-2 Partner Search - Basic Search Criteria and Description
Fields Description Match option
Check radio button All or Any.
All - only partners matching all entered search criteria are shown.
Any - partners matching any of the entered search criteria are shown.
Partner Type
Select the partner type from the list.
Partner
Enter, select or search for the partner ID.
Description
Enter, select or search for the partner description.
Status
Select the status of the supplier.
Currency
Enter, select or search for the currency.
Principal Country
Enter, select or search for the principal country.
Manufacturer ID
Enter, select or search for the manufacturer ID.
Language
Enter, select or search for the language.
-
Click the Saved Search list to select one of the saved search criteria. Selecting a saved search populates the search section with the saved search criteria. If the run automatically function is enabled for the search, the search is executed immediately.
You can also personalize your saved searches by selecting Personalize. The Personalized Saved Searches page appears.
For more information about the Personalized Saved Search, see Personalize Saved Search in the Oracle® Retail Merchandising Foundation Cloud Service Do the Basics User Guide.
-
Click Search. The partners that match the search criteria are displayed in the Results section.
-
Click Reset to clear the search section and results.
-
Click Save As... to save the current search criteria. The Create Saved Search page appears.
For more information about how to save your search criteria, see Create Saved Search in the Oracle® Retail Merchandising Foundation Cloud Service Do the Basics User Guide.
-
Click Done to close the page.
Searching for a Partner Through Advanced Search Criteria
To search for a partner by using advanced search criteria:
-
To search by using advanced search criteria, enter or select one or all of the advanced search criteria.
-
To narrow down the search, use the list next to the search fields. For example, determine if the entered value should be equal or not equal to the search result.
-
Click the Saved Search list to select one of the saved search criteria. Selecting a saved search populates the search section with the saved search criteria. If the run automatically function is enabled for the search, the search is executed immediately.
You can also personalize your saved searches by selecting Personalize. The Personalized Saved Searches page appears.
For more information about the Personalized Saved Search, see Personalize Saved Search in the Oracle® Retail Merchandising Foundation Cloud Service Do the Basics User Guide.
-
Click Search. The partners that match the search criteria are displayed in the Results section.
-
Click Reset to clear the search section and results.
-
Click Save As... to save the current search criteria. The Create Saved Search page appears.
For more information about how to save your search criteria, see Create Saved Search in the Oracle® Retail Merchandising Foundation Cloud Service Do the Basics User Guide.
-
Click Add Fields to add more fields for the advanced search. To remove the field from the search, click the x right next to the field.
-
Click Reorder to change the order of the available search fields. The Reorder Search Fields page appears.
-
Select the desired search field and use the up and down arrows to rearrange the order of the fields.
-
Click OK to confirm the new order of the fields and close the page.
-
Click Cancel to reject any changes and close the page.
-
-
Click Done to close the page.