3 Manage Franchise Costs
The Franchise Cost Template is used to apply the same pricing concept to multiple item/franchisee location combinations. Each template defines the method by which costing for the Franchisee will be calculated. The Franchise Cost Templates page allows you to view, edit, or create cost templates used to determine customer costs for franchise.
The following template types are available:
-
Margin then Up Charges
-
Up Charges then Margin
-
Percent off Retail
-
Fixed Cost
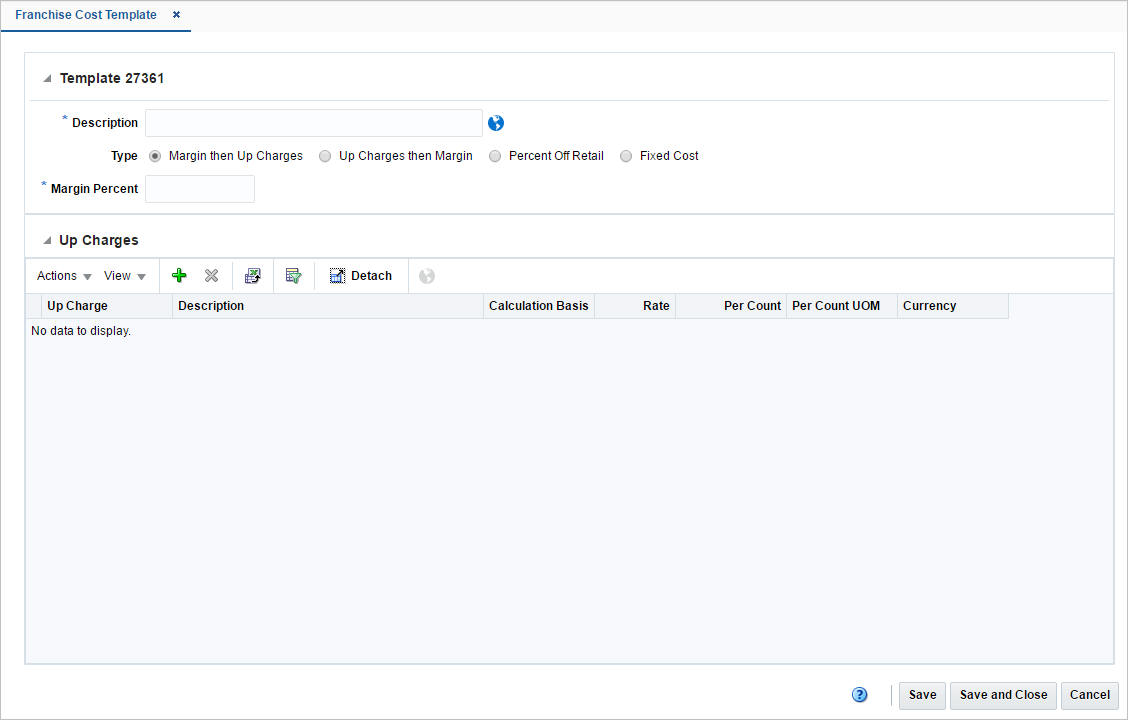
Template
The Template section contains the template ID that is that is automatically generated. Depending on the calculation type selected, the section contains the following fields. The system defaults to the Margin then to the Up Charges type.
Table 3-1 Template - Fields and Description
| Fields | Description |
|---|---|
|
Description |
Enter a description. This field is a required field. |
|
Translate icon |
You can create a translation by using the Translate icon |
|
Type |
Select the method by which the costing will be calculated. The following template types are available:
|
|
Margin Percent |
Only available if you select one of the following template types:
Enter the margin in percent. |
|
Percent Off Retail |
Only available if you select the template type Percent Off Retail. Enter the percent off retail used to calculate the customer cost for an item. This field is a required field. |
|
Fixed Cost |
Only available if you select the template type Fixed Cost. Enter the fixed cost. This field is a required field. |
|
Final Cost checkbox |
Only available if you select the template type Fixed Cost. You can define the final customer cost for an item. Select the Final Cost check box. The Final Cost option signifies if this is the final cost for the item/franchise location or deal pass through will have to be applied on the cost to derive the final customer cost for the item/franchise location. |
Up Charges
The Up Charges section contains the list of up charges associated with the template. This section is only available when the template type is either Margin then Up Charges or Up Charges then Margin. You can add new up-charges or delete existing up-charges from the template in this section.
Create a Franchise Cost Template
To create a franchise cost template, follow the steps below.
-
From the Tasks menu, select Inventory > Franchise Orders > Create Cost Template. The Franchise Cost Template page appears.
-
Enter the required fields.
-
Then choose one of the following options.
-
Click Save to save the franchise cost template.
-
Click Save and Close to save the template and close the page.
-
Click Cancel to reject all entries and close the page.
-
Add Up Charges to a Franchise Cost Template
To add up charges to a franchise cost template, follow the steps below. This section is only available when the template type is either Margin then Up Charges or Up Charges then Margin.
-
In the Up Charges section, select Actions > Add, or use the Add icon
 . The Add Up Charges pop-up appears.
 -
In the Up Charges field, enter, select or search for the up charge you want to add to the template. This field is a required field.
-
Then choose one of the following options.
-
Click OK to add the up charge and close the pop-up.
-
Click OK and Add Another to add additional up charges
-
Click Cancel to reject all entries and close the pop-up.
-
Manage a Cost Template
The Manage Cost Template option opens the Franchise Cost Template Search page. In this page you can perform the following actions.
-
Search for cost templates by various search criteria
-
View search results
-
View cost template information
-
Create cost templates
-
Edit cost templates
-
Export Query Results to Excel
You can access the Franchise Cost Template Search page from the Task menu, select Inventory > Franchise Orders > Manage Cost Template. The Franchise Cost Template Search page appears.
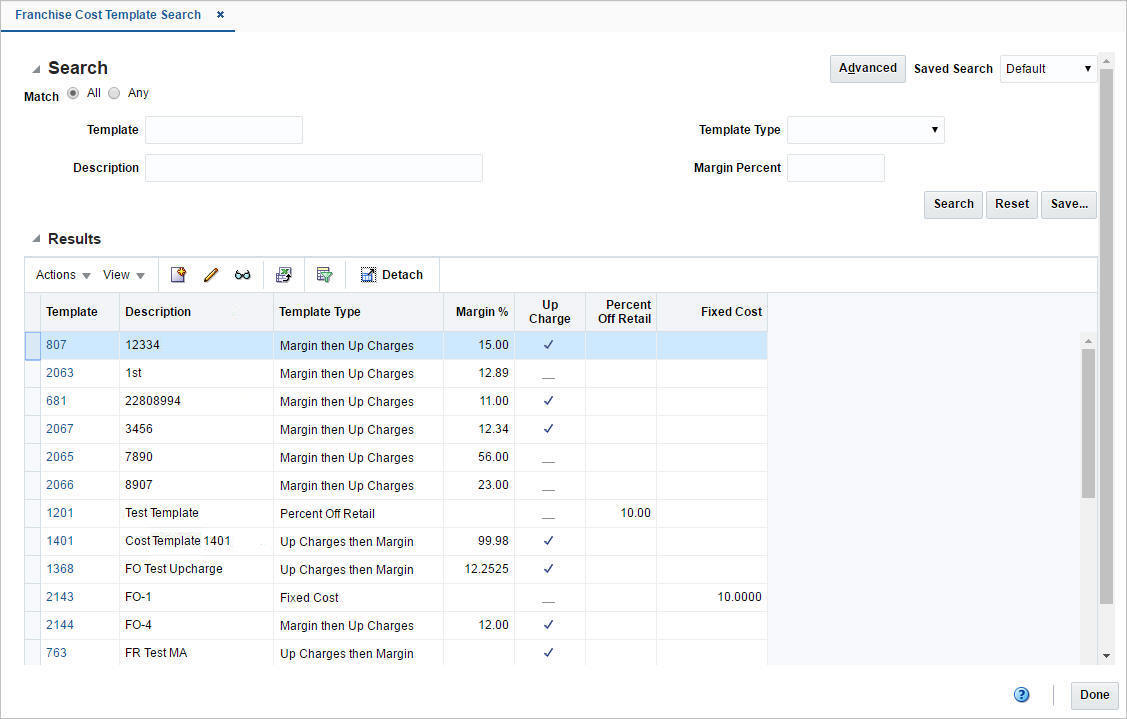
Search for a Franchise Cost Template
To search for a franchise cost template:
-
From the Task menu, select Inventory > Franchise Orders > Manage Cost Templates. The Franchise Cost Template Search page appears.
-
You can search for a franchise cost template using basic or advanced search criteria, depending on the requirement. The basic mode is the default search mode.
-
Click Advanced to access the search section in advanced mode.
-
Click Basic to return to basic mode.
-
Search for a Franchise Cost Template Through the Basic Search Criteria
To search for a franchise cost template using basic search criteria:
-
Enter, select or search for one or all of the following basic search criteria.
Table 3-2 Franchise Cost Template Search - Basic Search Criteria and Description
Fields Description Match option
Check radio button All or Any.
All - only franchise cost templates matching all entered search criteria are shown.
Any - franchise cost templates matching any of the entered search criteria are shown.
Template
Enter the template ID.
Description
Enter the template description.
Template Type
Select the template type from the list.
Margin Percent
Enter the margin in percent.
-
Click Search. The franchise cost templates that match the search criteria are displayed in the Results section.
-
Click Reset to clear the search section and results.
-
Click Done to close the page.
Search for a Franchise Cost Template through Advanced Search Criteria
To search for a franchise cost template using advanced search criteria:
-
To search using advanced search criteria, enter or select one or all of the advanced search criteria.
-
To narrow down the search, use the list next to the search fields. For example, determine if the entered value should equal or not equal the search result.
-
Click Search. The franchise cost templates that match the search criteria are displayed in the Results section.
-
Click Reset to clear the search section and results.
-
Click Add Fields to add more fields for the advanced search. To remove the field from the search, click the x right next to the field.
-
Click Done to close the page.
Edit a Franchise Cost Template
To edit a franchise cost template, follow the steps below.
-
From the Tasks menu, select Inventory > Franchise Orders > Manage Cost Template. The Franchise Cost Template Search page appears.
-
Enter or select search criteria to make the search more restrictive.
-
Click Search. The franchise cost templates that match the search criteria are displayed in the Results section.
-
Select a franchise cost template in the Results section.
-
Then select Actions > Edit, or use the Edit icon
 , or click on the template link. The Franchise Cost Template page appears.
 -
Edit the information in the individual sections.
For more information about the available sections of the Franchise Cost Template page, see the Manage Franchise Costs section.
-
Then choose one of the following options.
-
Click Save to save your changes.
-
Click Save and Close to save your changes and close the page.
-
Click Cancel to reject all entries and close the page.
-
Franchise Cost Relationships
The Franchise Cost Relationships page allows you to maintain the franchise cost relationships between departments/items and locations.
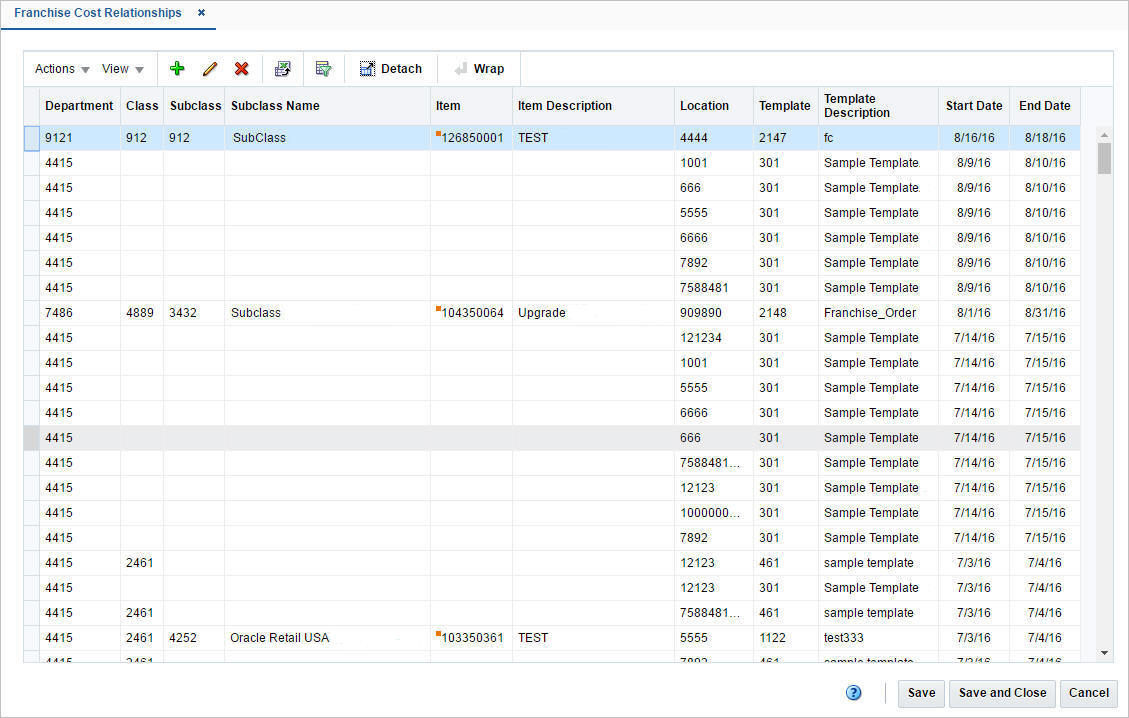
The table contains the cost templates associated with a department/class/subclass or item for one or more franchise stores. You can only associate an item with a template if the selected template uses the fixed cost pricing method. These relationships, which also include start and end dates, are used to calculate the pricing cost for franchise stores.
Add Cost Relationships
To add cost relationships, follow the steps below.
-
From the Tasks menu, select Inventory > Franchise Orders > Cost Relationships. The Franchise Cost Relationships page appears.
-
In the table, select Actions > Add, or use the Add icon
. The Add Relationships pop-up appears.-
In the Template field, enter, select or search for the template. This field is a required field.
-
In the Department field, enter, select or search for the department you want to associate the template with. This field is a required field.
-
In the Class field, enter, select or search for the class.
-
In the Subclass field, enter, select or search for the subclass.
-
In the Location field, select the location type from the list. Then enter, select or search for the location. This field is a required field.
-
In the Start Date field, enter the start date or use the Calendar icon to select a date. This field is a required field.
-
In the End Date field, enter the end date or use the Calendar icon to select a date. This field is a required field.
-
Then choose one of the following options.
-
Click OK to add the cost relationship to the table and close the pop-up.
-
Click OK and Add Another to add additional cost relationships.
-
Click Cancel to reject all entries and close the pop-up.
-
-

Edit Cost Relationships
To edit cost relationships, follow the steps below.
-
From the Tasks menu, select Inventory > Franchise Orders > Cost Relationships. The Franchise Cost Relationships page appears.
-
Select a record in the table.
-
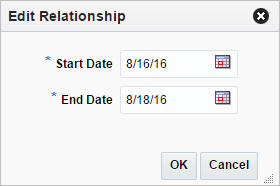
Then select Actions > Edit, or use the Edit icon
. The Edit Relationships pop-up appears. The start and end date of the selected template are displayed.-
In the Start Date field, edit the start date, if necessary.
-
In the End Date field, edit the end date, if necessary.
-
Then choose one of the following options.
-
Click OK to save your changes and close the pop-up.
-
Click Cancel to reject all entries and close the pop-up.
-
-
Manage Deal Pass Through
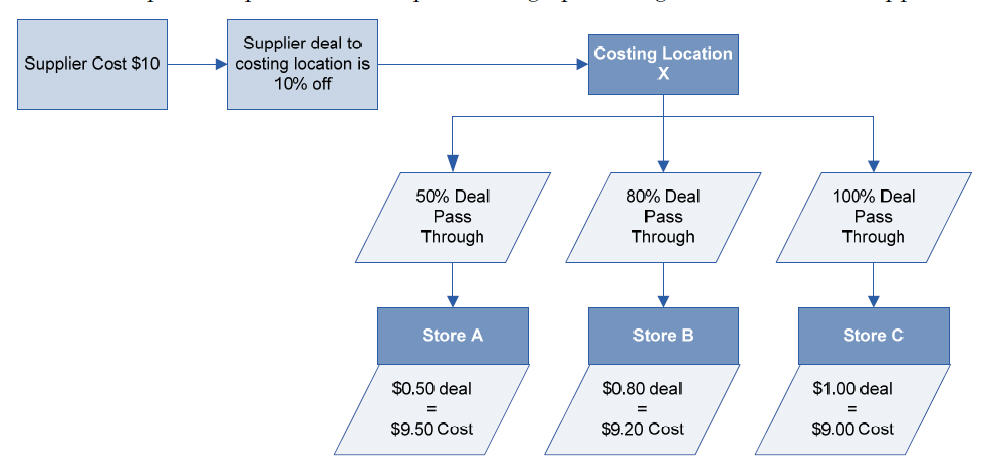
Suppliers often provide off-invoice deals to promote purchases by retailers. These purchase related benefits can be further passed through from the retailer to the franchise customer. The retailer may opt to pass through a full or a partial benefit to the franchise customer. The Merchandising system provides an option to define this deal pass-through percentage by department/supplier/costing location for each franchise store. The diagram below depicts a simple example of how this pass through percentage is calculated and applied.
Deal pass through percentages can be defined and managed using the spreadsheet download and upload processes, which are accessed through the main Merchandising task list under Foundation Data > Download Foundation Data and Foundation Data > Upload Foundation Data respectively. Navigate to Foundation Data > Download Foundation Data, choose the Template Type of Franchise and the Template titled Deal Pass Through to download existing pass through data.
Add a Deal Pass Through Definition
To add a new Deal Pass through definition, start in the Deal Pass Through tab. Add a new row by selecting the action type of Create and enter the department, supplier, costing location and location combination for which the deal pass through is being defined and the pass through percentage applicable for deals involving this combination of entities.There are no significant validations for uploading a new deal pass through definition apart from validating that the department, supplier, costing location and location values supplied in the spreadsheet are valid and that the pass through % does not exceed 100%.
Update a Deal Pass Through Definition
If you would like to update any of the deal pass though related details, a similar process will be followed as that described above for creating new definitions. First, download the Deal Pass Through spreadsheet, and then navigate to single tab in the spreadsheet where you would like to make your updates. Only the deal pass through % can be updated as part of the deal pass through definition. For the rows wherein the pass though % is intended to be updated, select the action type of Update, and then correct the value in the spreadsheet. Once your updates are complete, save and close the spreadsheet.
Delete a Deal Pass Through definition
If you wish to delete a deal pass through definition because it is not used by your business, update the action column to Delete against the rows in the Deal Pass Through tab that are to be deleted. Care should be taken before deleting a deal pass through definition as it can directly impact the pricing cost for a franchise customer.
Upload Changes
For all actions defined above, once all the updates have been made to the data in the spreadsheet, save the file and close it. Then, return to the Merchandising screens and select Foundation Data > Upload Foundation Data from the main task list. In this screen, you'll again select the template type Franchise and the template Deal Pass Through. This will generate a process description automatically, but this can be updated if desired. Lastly, you'll select the Browse button and navigate to the directory where you saved the updated spreadsheet.
To review the status of the upload and check whether any errors occurred, select the Foundation Data > Review Status task from the main task list.
For more information, see "Download Data," "Data Upload," and ”View Data Loading Status” in the Oracle Retail Merchandising Do the Basics User Guide.