3 Manage Customs Entries
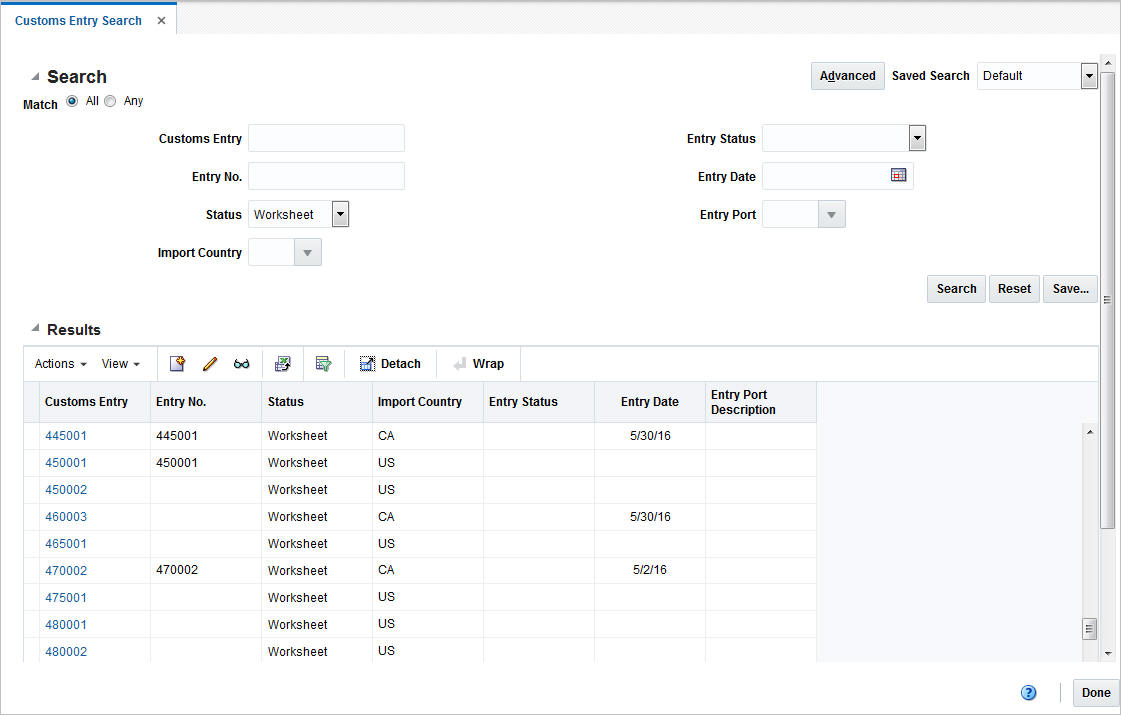
The Manage Customs Entries option opens the Customs Entry Search window. The Customs Entry Search window allows you to search for customs entry as well as view and edit the search results.
You can access the Customs Entry Search window from the Task menu, select Import Management > Manage Customs Entries. The Customs Entry Search window appears.
The Customs Entry Search window contains the following sections.
-
Search
For more information about how to search for customs entries, see the Search for a Customs Entry section.
Search for a Customs Entry
To search for a customs entry:
-
From the Task menu, select Inventory Management > Manage Customs Entries. The Customs Entry Search window appears.
-
You can search for a customs entry by using basic or advanced search criteria, depending on the requirement. The basic mode is the default search mode.
-
Click Advanced to access the search section in advanced mode.
-
Click Basic to return to the basic mode.
-
Search for a Customs Entry Through the Basic Search Criteria
To search for a customs entry by using basic search criteria:
-
Enter, select or search for one or all of the following basic search criteria.
Table 3-1 Customs Entry Search - Basic Search Fields and Description
Fields Description Match option
Check radio button All or Any.
All - only CEs matching all entered search criteria are shown.
Any - CEs matching each entered search criteria are shown.
Customs Entry
Enter the customs entry ID.
Entry No.
Enter the customs entry number.
Status
Select the customs entry status.
Possible customs entry statuses are:
-
Worksheet
-
Send
-
Confirm
-
Downloaded
-
Confirmed
Import Country
Enter, select or search for the import country.
Entry Status
Enter, select or search for the entry status.
Entry Date
Enter a date or use the Calendar icon to select a date.
Entry Port
Enter, select or search for the entry port.
-
-
Click Search. The customs entries that match the search criteria are displayed in the Results section.
-
Click Reset to clear the search section and results.
-
Click Done to close the window.
Search for a Customs Entry Through Advanced Search Criteria
To search for a customs entry by using advanced search criteria:
-
To search using advanced search criteria, enter or select one or all of the advanced search criteria.
Table 3-2 Customs Entry Search - Advanced Search Criteria and Description
Fields Description Division
Enter, select or search for the division.
Group
Enter, select or search for the group.
Department
Enter, select or search for the department.
Class
Enter, select or search for the class.
Subclass
Enter, select or search for the subclass.
-
To narrow down the search, use the list next to the search fields. For example, determine if the entered value should equal or not equal the search result.
-
Click Search. The custom entries that match the search criteria are displayed in the Results section.
-
Click Reset to clear the search section and results.
-
Click Add Fields to add more fields for the advanced search. To remove the field from the search, click the x right next to the field.
-
Click Done to close the window.
Results
The Results section lists the retrieved customs entries. The Results table shows the following columns by default.
-
Customs Entry
-
Entry No.
-
Status
-
Import Country
-
Entry Status
-
Entry Date
-
Entry Port Description
Edit a Customs Entry
To edit a customs entry, follow the steps listed below.
-
From the Tasks menu, select Import Management > Manage Customs Entry. The Customs Entry Search window appears.
-
Enter or select search criteria as desired to make the search more restrictive.
-
Click Search. The Customs Entries that match the search criteria are displayed in the Results section.
-
Select a record in the Results section.
-
In the Customs Entry column, click on the customs entry link, or mark a record and select Actions > Edit or use the Edit icon. The Customs Entry window appears.
-
The values of the selected customs entry are displayed. Change the values, if necessary. For more details about the values of the Customs Entry window, see the Define/Enter a Customs Entry section.
-
Then select one of the following options.
-
Click Save and Close to save you entries and close the Customs Entry window.
-
Click the arrow on the right side of the button to display the additional save options.
-
Click Save to save your entries.
-
Click Save and Create Another to create further entries.
-
-
Click Cancel to reject all entries and close the Customs Entry window.
-
Download a Customs Entry to a Broker
Letters of Credit Approval Process
When a letter of credit is added to the system, it must go through a series of checks before it is accessible in the system. Depending on your user role, you may not be able to move the letter of credit to the next status. A letter of credit may be in any of the following statuses.
| Status | Definition |
|---|---|
| Worksheet | The letter of credit has been started, but not completed. |
| Submitted | The letter of credit has been completed and is pending review. |
| Approved | The letter of credit has been reviewed and approved. |
| Extracted | The details of the letter of credit were sent to the external entity affected by the letter of credit. |
| Confirmed | The letter of credit has been confirmed by the bank and a reference number has been assigned to the letter of credit. |
| Closed | The letter of credit is complete. |
Submit a Letter of Credit for Approval
To submit a letter of credit for approval follow the steps below.
-
From the Tasks Menu, select Import Management > Manage Letter of Credit. The Letter of Credit Search window appears.
-
Restrict your search to letters of credit in the status Worksheet.
-
Click Search. The LCs that match the search criteria are displayed in the Results section.
-
In the Letter of Credit column, click on the LC ID link, or mark a record and select Actions > Edit, or use the Edit icon. The Letter of Credit window appears.
-
In the LC Toolbar, select Submit.
-
When prompted to submit the letter of credit, click Yes.
-
After you have submitted the LC, choose one of the following options.
-
Select Save to save your changes.
-
Select Save and Close to save your changes and exit the Letter of Credit window.
-
Select Cancel to reject all entries and exit the Letter of Credit window.
-
Approve a Letter of Credit
To approve a letter of credit follow the steps below.
-
From the Tasks Menu, select Import Management > Manage Letter of Credit. The Letter of Credit Search window appears.
-
Restrict your search to letters of credit in the status Submit.
-
Click Search. The LCs that match the search criteria are displayed in the Results section.
-
In the Letter of Credit column, click on the LC ID link, or mark a record and select Actions > Edit, or use the Edit icon. The Letter of Credit window appears.
-
In the LC Toolbar, select Approve.
-
When prompted to approve the letter of credit, click Yes.
-
After you have approved the LC, choose one of the following options.
-
Select Save to save your changes.
-
Select Save and Close to save your changes and exit the Letter of Credit window.
-
Select Cancel to reject all entries and exit the Letter of Credit window.
-
Manage Shipments
Edit Shipments of a Customs Entry
To edit shipments of a customs entry, follow the steps listed below.
-
From the Tasks menu, select Import Management > Manage Customs Entry. The Customs Entry Search window appears.
-
Enter or select search criteria as desired to make the search more restrictive.
-
Click Search. The Customs Entries that match the search criteria are displayed in the Results section.
-
Select a record in the Results section.
-
In the Customs Entry column, click on the customs entry link, or mark a record and select Actions > Edit or use the Edit icon. The Customs Entry window appears.
-
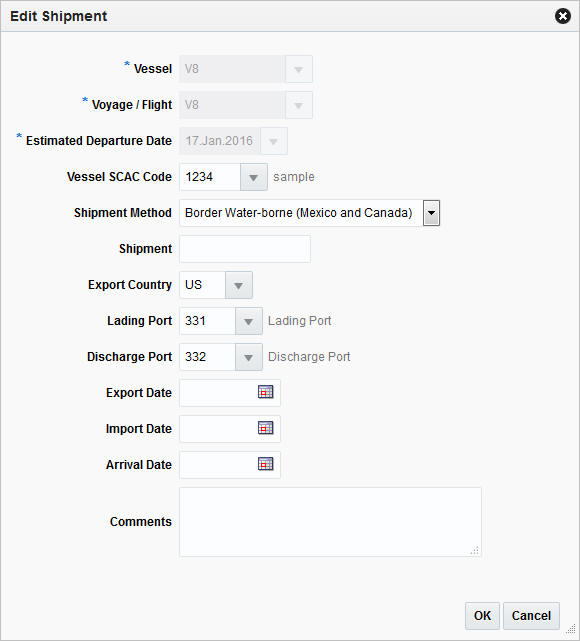
In the Toolbar, click the Details button. The CE Details window appears.
-
In the Shipments table, select a record.
Note:
You can change the shipment and the comments directly in the Shipments table. -
Then select Actions > Edit or use the Edit icon. The Edit Shipment window appears.
-
The values of the selected shipment are displayed. Change the values, if necessary.
Note:
You cannot change the vessel ID, voyage/flight number and estimated departure date. -
Then choose one of the following options.
-
Click OK to save your changes and close the Edit Shipment window. The system returns to the CE Details window.
-
Click Cancel to reject all entries and close the Edit Shipments window. The system returns to the CE Details window.
-
-
-
After have made all necessary changes, choose one of the following options.
-
Click Save to save your changes.
-
Click Save and Close to save your changes and close the CE Details window.
-
Click Cancel to reject all changes and close the CE Details window.
-
Delete Shipments from a Customs Entry
To delete a shipment from a customs entry, follow the steps listed below.
-
From the Tasks menu, select Import Management > Manage Customs Entry. The Customs Entry Search window appears.
-
Enter or select search criteria as desired to make the search more restrictive.
-
Click Search. The Customs Entries that match the search criteria are displayed in the Results section.
-
Select a record in the Results section.
-
In the Customs Entry column, click on the customs entry link, or mark a record and select Actions > Edit or use the Edit icon. The Customs Entry window appears.
-
In the Toolbar, click the Details button. The CE Details window appears.
-
In the Shipments table, select a record.
-
Then select Actions > Delete or use the Delete icon.
-
You are prompted if you want to delete the selected record. Confirm the prompt with Yes.
-
Then choose one of the following options.
-
Click Save to save your changes.
-
Click Save and Close to save your changes and close the CE Details window.
-
Click Cancel to reject all changes and close the CE Details window.
-
Mange Order/Items
Edit Order/Item of a Customs Entry
To edit an order/items combination of a customs entry, follow the steps listed below.
-
From the Tasks menu, select Import Management > Manage Customs Entry. The Customs Entry Search window appears.
-
Enter or select search criteria as desired to make the search more restrictive.
-
Click Search. The Customs Entries that match the search criteria are displayed in the Results section.
-
Select a record in the Results section.
-
In the Customs Entry column, click on the customs entry link, or mark a record and select Actions > Edit or use the Edit icon. The Customs Entry window appears.
-
In the Toolbar, click the Details button. The CE Details window appears.
-
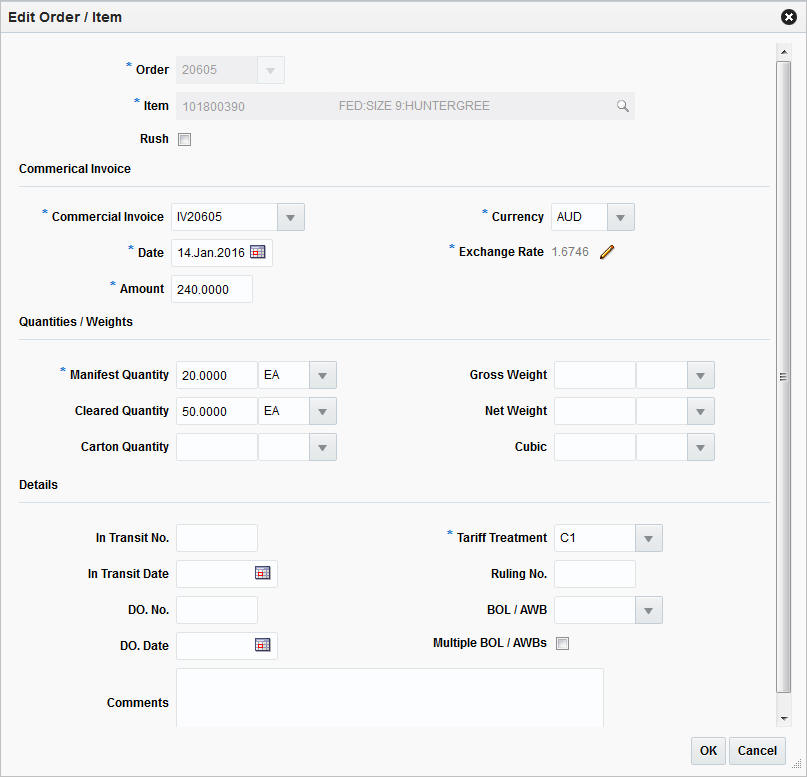
In the Order/Item table, select a record.
Note:
You can change the comments directly in the Order/Item table. -
Then select Actions > Edit or use the Edit icon. The Edit Order/Item window appears.
-
The values of the selected order/item information are displayed. Change the values, if necessary.
Note:
You cannot change the order number and the item. If you need to change the Exchange Rate, see ”Editing the Exchange Rate” in the Oracle Retail Import Management Cloud Service Letters of Credit User Guide. -
Then choose one of the following options.
-
Click OK to save your changes and close the Edit Order/Item window. The system returns to the CE Details window.
-
Click Cancel to reject all entries and close the Edit Order/Item window. The system returns to the CE Details window.
-
-
-
After have made all necessary changes, choose one of the following options.
-
Click Save to save your changes.
-
Click Save and Close to save your changes and close the CE Details window.
-
Click Cancel to reject all changes and close the CE Details window.
-
Delete Order/Item from a Customs Entry
To delete an order/items combination from a customs entry, follow the steps listed below.
-
From the Tasks menu, select Import Management > Manage Customs Entry. The Customs Entry Search window appears.
-
Enter or select search criteria as desired to make the search more restrictive.
-
Click Search. The Customs Entries that match the search criteria are displayed in the Results section.
-
Select a record in the Results section.
-
In the Customs Entry column, click on the customs entry link, or mark a record and select Actions > Edit or use the Edit icon. The Customs Entry window appears.
-
In the Toolbar, click the Details button. The CE Details window appears.
-
In the Order/Item table, select a record.
-
Then select Actions > Delete or use the Delete icon.
-
You are prompted if you want to delete the selected record. Confirm the prompt with Yes.
-
Then choose one of the following options.
-
Click Save to save your changes.
-
Click Save and Close to save your changes and close the CE Details window.
-
Click Cancel to reject all changes and close the CE Details window.
-
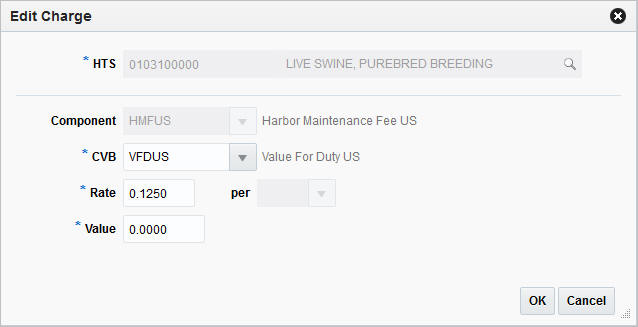
Edit Charges of Order/Items
To edit an charge of an order/items combination, follow the steps listed below.
-
From the Tasks menu, select Import Management > Manage Customs Entry. The Customs Entry Search window appears.
-
Enter or select search criteria as desired to make the search more restrictive.
-
Click Search. The Customs Entries that match the search criteria are displayed in the Results section.
-
Select a record in the Results section.
-
In the Customs Entry column, click on the customs entry link, or mark a record and select Actions > Edit or use the Edit icon. The Customs Entry window appears.
-
In the Toolbar, click the Details button. The CE Details window appears.
-
In the Charges - Component Item table, select a record.
-
Then select Actions > Edit or use the Edit icon. The Edit Charge window appears.
-
The values of the selected charge are displayed. Change the values, if necessary.
Note:
You cannot change the HTS code and component. -
Then choose one of the following options.
-
Click OK to save your changes and close the Edit Charge window. The system returns to the CE Details window.
-
Click Cancel to reject all entries and close the Edit Charge window. The system returns to the CE Details window.
-
-
-
After have made all necessary changes, choose one of the following options.
-
Click Save to save your changes.
-
Click Save and Close to save your changes and close the CE Details window.
-
Click Cancel to reject all changes and close the CE Details window.
-
Delete Charges from Order/Items
To delete a charge from an order/items combination, follow the steps listed below.
-
From the Tasks menu, select Import Management > Manage Customs Entry. The Customs Entry Search window appears.
-
Enter or select search criteria as desired to make the search more restrictive.
-
Click Search. The Customs Entries that match the search criteria are displayed in the Results section.
-
Select a record in the Results section.
-
In the Customs Entry column, click on the customs entry link, or mark a record and select Actions > Edit or use the Edit icon. The Customs Entry window appears.
-
In the Toolbar, click the Details button. The CE Details window appears.
-
In the Charges - Component Item table, select a record.
-
Then select Actions > Delete or Delete HTS. You can also use the Delete icon, or the Delete HTS button.
-
You are prompted if you want to delete the selected record. Confirm the prompt with Yes.
-
Then choose one of the following options.
-
Click Save to save your changes.
-
Click Save and Close to save your changes and close the CE Details window.
-
Click Cancel to reject all changes and close the CE Details window.
-
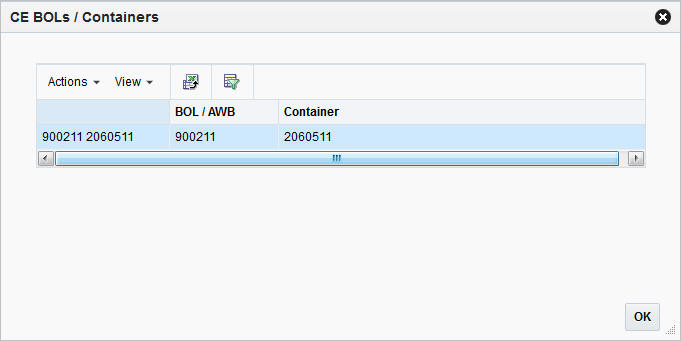
View BOLs/Containers
To view bill of lading and/or container information of a customs entry, follow the steps listed below.
-
From the Tasks menu, select Import Management > Manage Customs Entry. The Customs Entry Search window appears.
-
Enter or select search criteria as desired to make the search more restrictive.
-
Click Search. The Customs Entries that match the search criteria are displayed in the Results section.
-
Select a record in the Results section.
-
In the Customs Entry column, click on the customs entry link, or mark a record and select Actions > Edit or use the Edit icon. The Customs Entry window appears.
-
In the Toolbar, click the Details button. The CE Details window appears.
-
In the Order/Item table, select a record.
-
Then select Actions > BOLs/Containers or use the BOLs/Containers button.
-
The CE BOLs/Containers Window appears. View the bill of lading and container information.
-
Click OK to exit the CE BOLs/Containers window.