Using the PeopleSoft Fluid User Interface for Self Service Banking
This topic discusses how to review, edit, and add bank account and payment distribution information using the PeopleSoft Fluid User Interface.
|
Page Name |
Definition Name |
Usage |
|---|---|---|
|
HC_GPSC_SSB_BNKACC_FL |
Access the Banking page. |
|
|
GPSC_BANK_ADD_FL |
Review your bank account and payment distribution information. |
|
|
GPSC_BANK_ACC_FL |
Edit or add a bank account. |
|
|
GPSC_NET_DIST_FL |
Edit or add a payment distribution. |
Use the Banking tile (HC_GPSC_SSB_BNKACC_FL) to access the Banking page.
Navigation
The Banking tile is delivered as part of the Employee Self Service home page, but the location can change if you change the delivered home pages or if administrators personalize their home pages.
Image: Banking tile
This example illustrates the Banking tile.
Use the Banking page (GPSC_BANK_ADD_FL) to review your bank account and payment distribution information.
Navigation
Click the Banking tile on the Employee Self Service home page.
Image: Banking page
This example illustrates the fields and controls on the Banking page.
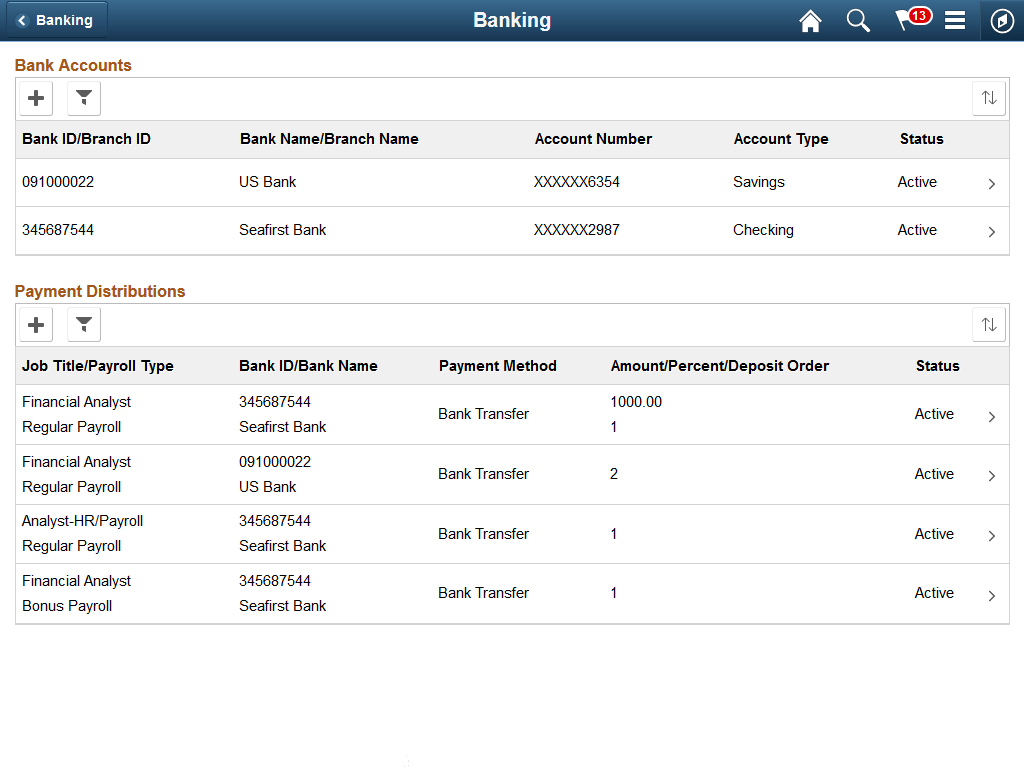
This page displays your bank accounts and payment distributions. To edit bank account information, click a bank account to access the Bank Accounts Page. To edit payment distribution information, click a payment distribution to access the Payment Distribution Page.
Note: The Payment Distributions grid is available only for employees processed using PeopleSoft Global Payroll.
|
Field or Control |
Definition |
|---|---|
 (Add) (Add) |
Click to add a new bank account or payment distribution using the Bank Accounts Page or Payment Distribution Page, respectively. |
 (Filter) (Filter) |
Click to access the Filter page and select criteria to narrow the list of bank accounts or payment distributions. You can filter bank accounts by Status and Account Type, and payment distributions by Status. |
Use the Banking page (GPSC_BANK_ACC_FL) to edit or add a bank account.
Navigation
Click a bank account on the Banking page.
Click the Add button on the Banking page to add a new bank account.
Image: Bank Accounts page
This example illustrates the fields and controls on the Bank Accounts page.
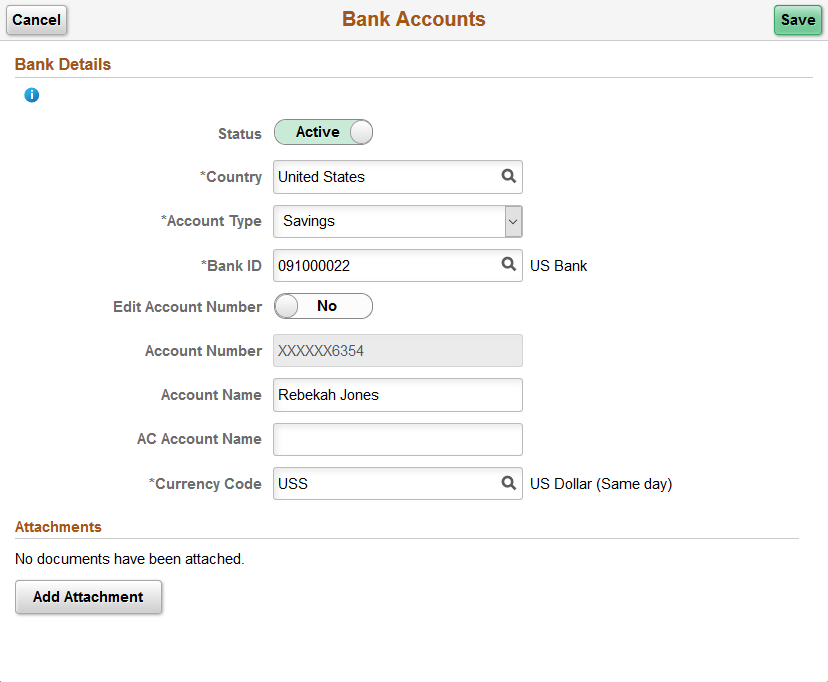
Note: The fields that appear on this page vary according to your banking setup and the country you select for the account.
Bank Details
|
Field or Control |
Definition |
|---|---|
| Status |
Select whether the bank account is Active or Inactive. |
| Country |
Select the country for the payee's bank account. The countries available for you to select are defined on the Self Service Banking Options Page. |
| Account Type |
Select the bank account type for the payee. The types available for you to select are defined on the Self Service Banking Options Page. |
| Bank ID |
Enter the ID of the bank associated with the account. |
| Account Number and Retype Account Number |
Enter the account number. Depending on the security setup on the Self Service Banking Options Page, you may need to retype the account number in the Retype Account Number field to confirm that you’ve entered it consistently and correctly. Note: If masking is enabled for the country, saved account numbers appear in this field with most of the digits replaced by the letter X. |
| CLABE |
(MEX) Enter the Clave Bancaria Estandarizada (CLABE) number. This field is available only if you select Mexico in the Country field. |
| CBU |
(ARG) Enter the La Clave Bancaria Uniforme (CBU) number. This field is available only if you select Argentina in the Country field. |
| Description 1 and Description 2 |
(NLD) Enter any additional payment information to include in your payment file. For example, if you use this bank account for mortgage payments, you could use these fields to enter a mortgage reference number. |
| Buliding Society ID, Roll Name, and Roll Number |
(GBR) Enter the ID, name, and number associated with the employee’s building society account. These fields are available only if you select United Kingdom in the Country field, and Building Society Roll Number in the Account Type field. |
| Account Name |
Enter the account name for the person. |
| AC Account Name (alternate character account name) |
Enter an account name using alternate characters. |
| Currency Code |
Select the code of the currency in which the account is maintained. |
|
Field or Control |
Definition |
|---|---|
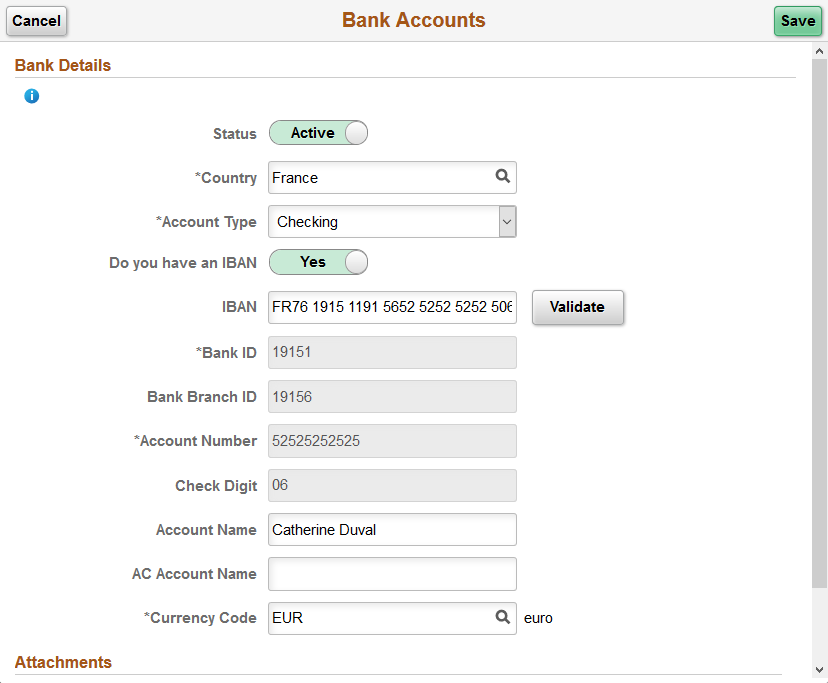
| Already have an IBAN Number |
Switch to Yes to indicate that the payee has an (International Bank Account Number) IBAN. When you select Yes, the Bank ID and Account Number fields become display-only and the IBAN field and Validate button become available. An IBAN is an account number that uniquely identifies a bank account and is assigned according to ISO standards so that it can be used across national borders. It is typically used for employees who reside in countries that are part of the European Union. Note: When the Already have an IBAN Number check box is selected, the Bank ID, Bank Branch ID, Account Number, and Check Digit fields are not editable. The system populates them based on the entered IBAN when you click the Validate button. |
Image: Example of the Bank Account page for an employee with an IBAN
This is an example of the Bank Accounts page for an employee with an IBAN.
|
Field or Control |
Definition |
|---|---|
| IBAN (International Bank Account Number) |
Enter the IBAN for the payee. |
| Validate |
Click to validate the number entered in the IBAN field. The validation process alerts you if there is an error in the entered IBAN. In addition, the validation process populates the Bank ID, Bank Branch ID, Account Number, and Check Digit fields based on the entered IBAN. |
Attachments
|
Field or Control |
Definition |
|---|---|
| Add Attachment |
Click to add an attachment to your bank account. |
Use the Banking page (GPSC_NET_DIST_FL) to edit or add a payment distribution.
Navigation
Click a payment distribution on the Banking page.
Click the Add button on the Banking page to add a new payment distribution.
Image: Payment Distribution page
This example illustrates the fields and controls on the Payment Distribution page.
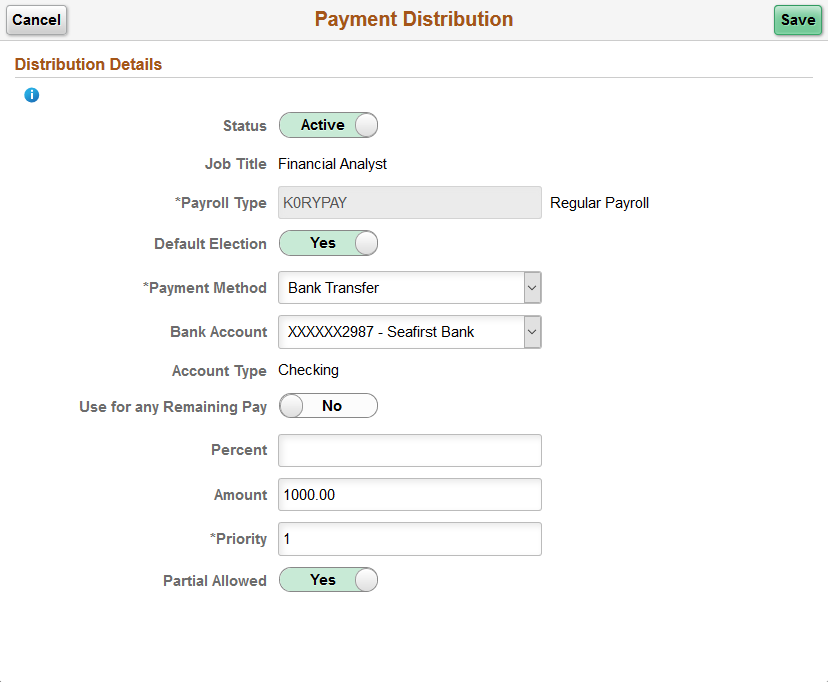
|
Field or Control |
Definition |
|---|---|
| Status |
Select whether the distribution is Active or Inactive. |
| Job Title |
Select the job title to which this payment distribution applies. |
| Payroll Type |
Select the run type for the payment distribution. |
| Default Election |
Switch to Yes to indicate the default run type. When the banking process runs, the system checks the run type defined on the pay calendar and seeks a match on the net distribution for the payee. If it finds none, it uses the distribution designated as the default election. |
| Payment Method |
Select the payment method for your distribution. The methods available for you to select are defined on the Self Service Banking Options Page. |
| Bank Account |
For Bank Transfer and Wire Transfer payment methods, select the account you want to use. |
| Use for any Remaining Pay |
Switch to Yes to make this the primary account. If you set up distribution amounts for allocation to several accounts and an amount remains after allocation, the extra amount goes to the primary account. |
| Percent |
If the distribution is calculated by a percentage of the net payment, enter that percentage. |
| Amount |
If the distribution to an account is calculated by an amount, specify that amount. Note: You can define a distribution in percentages, amounts, or both. The total cannot exceed 100 percent. Any amount remaining after percentage allocation is allocated to the primary account, unless otherwise specified. |
| Priority |
Enter a number to prioritize a distribution. For example, if you want 100 distributed to a savings account every month and everything else distributed to a checking account, you would give the savings account higher priority. |
| Partial Allowed |
Select to allow partial amounts to be distributed. For example, let’s say you distribute 1200 monthly as follows:
One month, your pay is only 1050. The system still distributes 500 to the checking account and 400 to the savings account, but it cannot distribute the full 300 to the retirement account. If Partial Allowed is selected, the system distributes the partial amount, which is 150 in this case. If Partial Allowed isn't selected, the system allocates 150 your primary account and nothing is deposited in the retirement account. |