Copying Elements
|
Page Name |
Definition Name |
Usage |
|---|---|---|
|
GPSC_ECPY_CIDTL |
Associate component interfaces with element types that can be copied. |
|
|
GPSC_ECPYCICOL_SEC |
Configure the sequence numbers for collection fields. |
|
|
GPSC_ECPY_MAIN |
Copy existing elements. |
Element creation is a fundamental and basic activity for PeopleSoft Global Payroll and PeopleSoft Absence Management. Depending on the type of element you are creating, you are required to define a wide variety of parameters. The general parameters of all elements, however, tend to follow a standard structure. Entering all of this similar information for each new element can be extremely time consuming. The Element Copy component enables you to create new elements by copying existing elements, thereby completely avoiding most of the manual element configuration steps.
Use the Element Copy Configuration page (GPSC_ECPY_CIDTL) to associate component interfaces with element types that can be copied.
Navigation
Image: Element Copy Configuration page
This example illustrates the fields and controls on the Element Copy Configuration page.
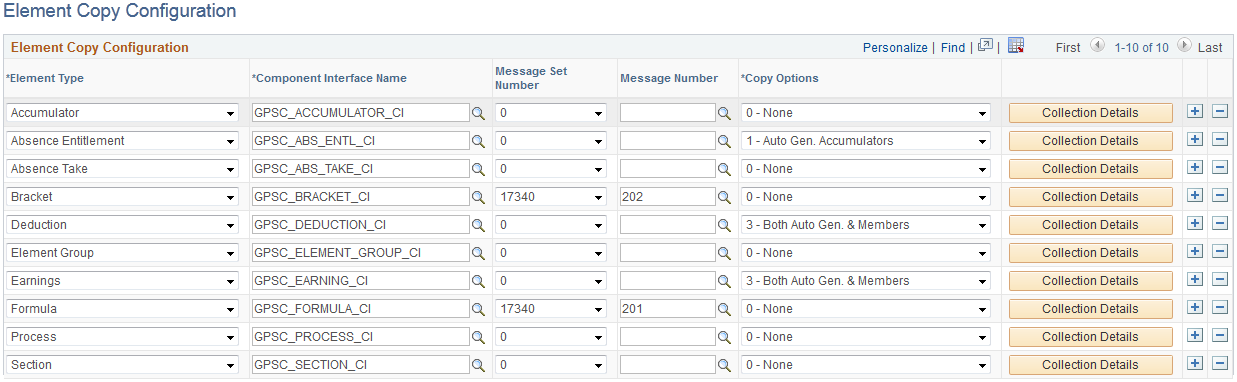
Note: Customers cannot edit the setup for the delivered element types.
|
Field or Control |
Definition |
|---|---|
| Element Type |
Select the type of element that you want to configure for copying. PeopleSoft Global Payroll and Absence Management delivers element copy configuration for the following element types:
|
| Component Interface Name |
Enter the name of the component interface you want to associate with the element type. |
| Message Set Number |
If you want special instructions to display for an element type after copying it, select a value of 17340. Select 0 if no special instructions are required for the element type. |
| Message Number |
If you select 17340 in the Message Set Number, enter the message number corresponding to the special instructions that you want to display when the element type is copied. |
| Copy Options |
Define which copy options are available on the Element Copy page. Options are:
|
| Collection Details |
Click to access the Component Interface Collection Items Sequence Override Page for an element type. |
Use the Component Interface Collection Items Sequence Override page (GPSC_ECPYCICOL_SEC) to configure the sequence numbers for collection fields.
Navigation
Click the Collection Details button on the Element Copy Configuration page.
Image: Component Interface Collection Items Sequence Override page
This example illustrates the fields and controls on the Component Interface Collection Items Sequence Override page.
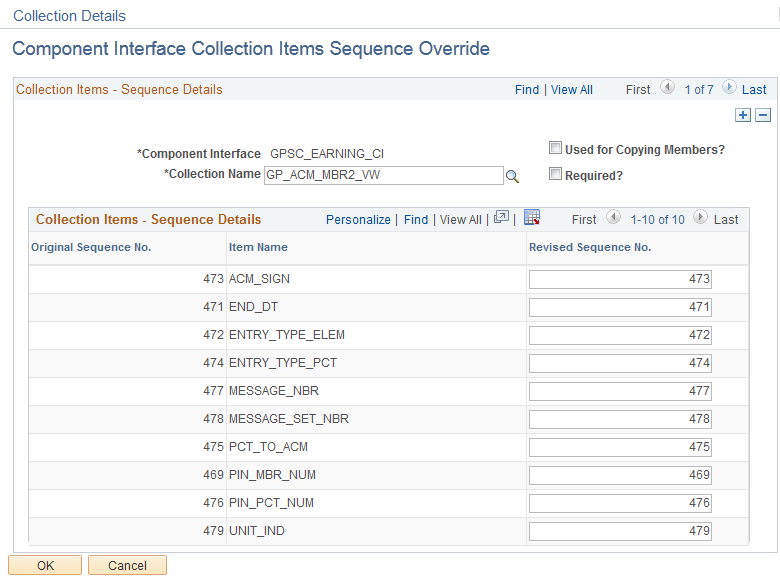
Use this page to override the sequence numbers defined as part of the component interface (CI) metadata. This is necessary when the collection’s key field is controlled by a non-key field or a derived record field on the PeopleSoft Internet Architecture (PIA) page. In this case, the CI metadata table assigns a lower sequence number for the collection’s key field, but for the purposes of element copying, we need to assign a value to the non-key field first and then to the key field to satisfy the component logic. For example, for a learning element’s supporting element override (SOVR) page, the element type (a non-key field) should be assigned a value first before assigning the supporting element (key field). To control this, it is necessary to configure a sequence number override.
Note: Customers cannot edit the sequence overrides defined for the delivered element types.
|
Field or Control |
Definition |
|---|---|
| Collection Name |
Enter the name of the collection for which you want to define sequence numbers. |
| Used for Copying Members? |
Select to designate the collection as being used for copying member elements. When you select this check box, the system automatically selects the Required? check box . |
| Required? |
Select to make it a requirement to copy the collection details from the source element when creating the new element. |
| Revised Sequence No. |
Enter a sequence number for the collection item. |
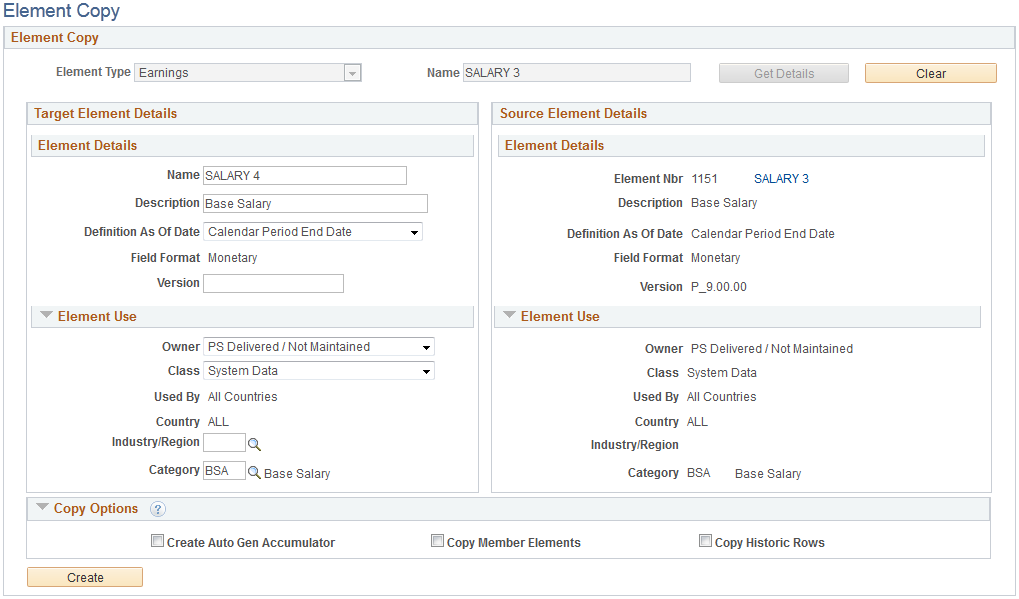
Use the Element Copy page (GPSC_ECPY_MAIN) to copy existing elements.
Navigation
Image: Element Copy page
This example illustrates the fields and controls on the Element Copy page.
|
Field or Control |
Definition |
|---|---|
| Element Type |
Select the type of element that you want to copy from the following options:
|
| Name |
Enter the name of the element that you want to copy. |
| Get Details |
Click to display the Source Element Details group box for the element that you are copying, and the Target Element Details group box for the element that you are creating. The Copy Options group box also appears when you click this button. |
| Clear |
Click to remove the selected values from the Element Type and Name fields. When you click this button, the page no longer displays the Source Element Details, Target Element Details, and Copy Options group boxes. Once the page is cleared, you can enter new values to copy another element. |
Source Element Details
Displays details for the element that you are copying. You can use these details as an easy reference as you are creating your new element. Click the element name link to access the <Element> Name Page, where you can access the full definition of the source element.
Target Element Details
Use the fields in this group box to define parameters for the element that you are creating. For more information on defining basic element parameters, see Defining Element Names.
|
Field or Control |
Definition |
|---|---|
| Name |
Enter a unique name for the new element. Note: The name you enter here must meet all the existing guidelines for naming an element. |
| Description |
Enter a description for the new element. |
| Definition As Of Date |
Select the date on which the system is to retrieve the element definition during a process run. Options are: Calendar Period Begin Date: The begin date of the calendar period to which the element is linked. Calendar Period End Date: End date of the calendar period to which the element is linked. Payment Date: Payment date of the calendar period to which the element is linked. Process Begin Date: Begin date of the calendar period in which the element is processed. Process End Date: End date of the calendar period in which the element is processed. Selections are limited for some elements. For example, Calendar Period End Date is the only valid option for section elements. Retroactivity is also a consideration for this field. During recalculation, the system always respects this day and uses the appropriate date based on individual recalculation period calendars. |
| Field Format |
Defines the format for the resolved value. Available values are based on the element type and can include Date, Decimal, Character, Monetary, or Pointer (for calculating generic formulas for a variable). For some element types, such as earnings and deductions, you cannot change the displayed field format. Note: The difference between Decimal and Monetary is that Monetary is currency-controlled and requires the entry of a currency code. |
| Version |
You can enter up to 14 alphanumeric characters in this field to identify the element definition. When you save the definition, the system adds a prefix of INT_ to indicate that this is a user-defined value. You can use the Global Payroll utilities to stamp and package elements by version. |
| Owner |
Identifies who controls and maintains the definition of the element. Values are: Customer Maintained: Identifies the elements that you created. All fields are available for entry. This is the only valid value for customer created elements. PS Delivered/Maintained: The element is delivered and maintained by PeopleSoft. PS Delivered/Not Maintained: The element is delivered, but not maintained by PeopleSoft (for example, sample data or statutory data). You can update any editable fields. PS Delivered/Customer Modified: Indicates that you have taken control of a PeopleSoft-delivered or maintained element. PS Delivered/Maintained/Secure: The element is delivered and maintained by PeopleSoft. You can edit the name, description, override levels, results, custom fields, and comments (and for system elements, Use as Chartfield and prompt view). Any changes that you make can be overwritten by future PeopleSoft updates. |
| Class |
Indicates the type of rule for the element. Values are: Customary: Sample rules that are created by PeopleSoft. They are not statutory requirements, but are commonly followed rules. An example of when a customary rule is used is with tariffs. Customary rules are often used in a production environment. Not Classified. Sample Data: Rules that are created by PeopleSoft for sample data purposes. They are not used in a production environment. Statutory: Rules that are created by PeopleSoft for calculating rules that are required by law. System Data: Rules that are created by PeopleSoft. They are either system elements or system data that are delivered with the application—for example, common constants and dates. The Class field works with the Owner field to determine the level of support and security. |
| Used By and Country |
Indicate whether the element is used by all countries or a specific country. The new element that you are creating inherits these values from the element that you are copying. |
| Industry/Region |
To classify your element further, select an industry code or region code. You define industry codes on the Industry/Region Types page. If an element is created for a specific industry, select an industry code here. Typical industry codes include Banking, Insurance, and Metallurgy. |
| Category |
To classify your element further, select a category code. Category codes are defined on the Category Types page. |
Copy Options
|
Field or Control |
Definition |
|---|---|
| Create Auto Gen Accumulator (create auto generated accumulator) |
Select to generate auto generated accumulators for the new element that are based on the auto generated accumulators defined for the source element. Note: This check box is not available for all element types. |
| Copy Member Elements |
Select to associate the new element with the accumulator members of the source element. Note: This check box is not available for all element types. |
| Copy Historic Rows |
Select to copy all of the effective-dated rows of the source element. When this check box is deselected, the system copies only the most recent effective-dated row of the source element. |
| Create |
Click to create the new element based on the selected source element. After creating the new element, the New Element Details and Special Instructions group boxes appear at the bottom of the page. |
Image: Example of the Element Copy page after element copy creation
This example illustrates how the Element Copy page appears after you create a copy of an element by clicking the Create button.
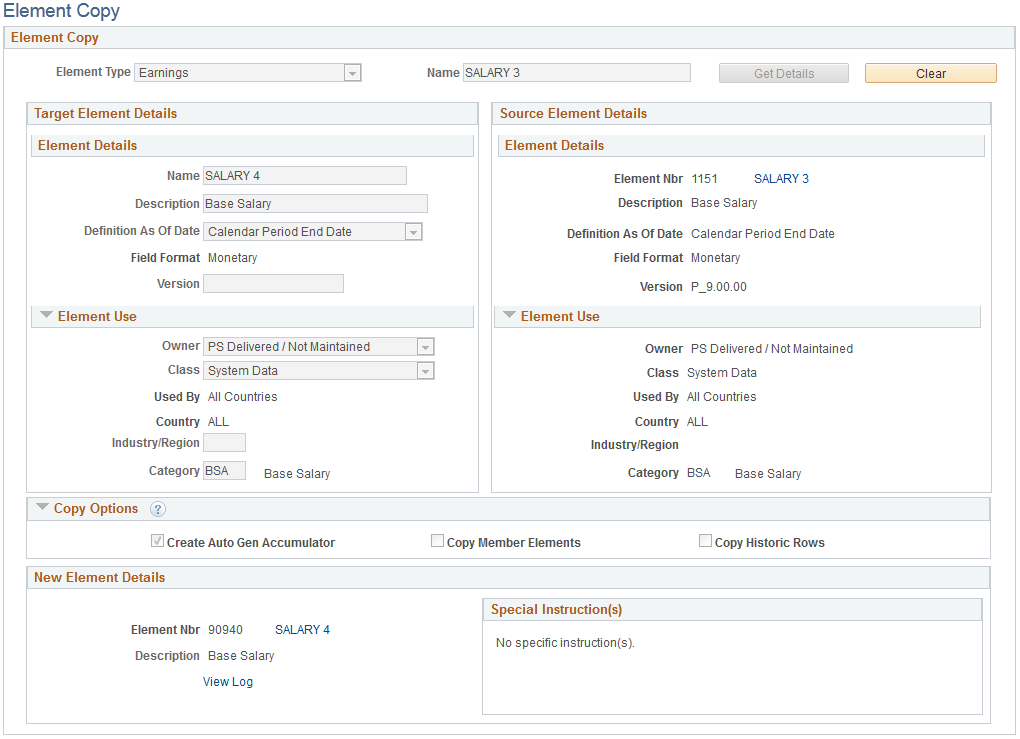
The New Element Details group box displays the element number, name, and description of the newly created element. Click the element name link to access the <Element> Name Page for the new element. Click the View Log link to view detailed information about how the system created the new element.
The Special Instructions group box displays any additional steps you need to take to complete following the creation of the new element. For example, when you create a new formula element, the Special Instructions group box indicates that you must still manually validate the new formula.