Creating and Viewing Schedules
To create schedules, use the Schedule Group (SCH_GROUP), Shifts (SCH_SHIFT), Workdays (SCH_WRKDAY), and Definitions (SCH_DEFINITION) components.
Note: Self-service pages are available to managers for creating, viewing, and modifying work schedules. These pages are discussed later in this topic.
|
Page Name |
Definition Name |
Usage |
|---|---|---|
|
SCH_GROUP |
Define schedule groups. |
|
|
SCH_SHIFT |
Set up elapsed, flex, and punch shifts. |
|
|
SCH_WRKDAY |
Set up workdays. |
|
|
SCH_DEFINITION |
Define basic schedule definition details. |
|
|
SCH_DEFINITION_2 |
Define shifts for schedule definitions. |
|
|
Definitions - Shift Information Page |
SCH_DEFN_SEC |
Define or view shift details. |
|
SCH_CLND_VW_SEC |
View the schedule calendar derived from a specific schedule definition. |
To create work schedules:
Create schedule groups.
Schedule groups provide a way to organize schedules and group payees with like schedules. Each schedule group is associated with a SetID (as is each shift, workday, and schedule definition). When you assign schedules, you select the schedule group, which filters the schedules that you can assign.
Create shifts (optional).
You can create elapsed, flex, and punch shifts with the Shifts component (SCH_SHIFT) or you can enter shift information manually when you create a schedule definition.
Create workdays (optional).
You can create workdays to be used as labels for the days within a schedule definition.
Create schedule definitions.
Schedule definitions comprise a series of short term or long term workdays. When you create schedule definitions, you can incorporate predefined shifts and workdays. You can also enter shift information manually.
View schedule calendar.
The system derives the schedule calendar from the schedule definition.
Creating Personal Schedules
At times, you may want to create a schedule definition that applies only to a specific payee. In these cases, you use the Personal Schedule Definition component (SCH_DEFN_ADHOC) that you access through the Work Schedule Assignment page. The personal schedule definition pages are identical to the pages in the Schedule Definition component that you use to define all other work schedules.
Use the Schedule Group page (SCH_GROUP) to define schedule groups.
Navigation
Image: Schedule Group
This example illustrates the fields and controls on the Schedule Group.

Think of a schedule group as a way to organize schedules. Shifts, workdays, and schedule definitions are created based on a SetID value. Schedule groups group these together by way of the Set Control value.
When you assign a schedule to a pay group or directly to a payee, you must first select the associated schedule group. This selected schedule group filters the schedules that you can choose from.
|
Field or Control |
Definition |
|---|---|
| Clone Existing Schedule Group |
If you clear the Default Set ID field, you can select a schedule group to clone. The system copies the SetID from the definition of the cloned schedule group. |
See PeopleTools: Data Management product documentation.
Use the Shift page (SCH_SHIFT) to set up elapsed, flex, and punch shifts.
Navigation
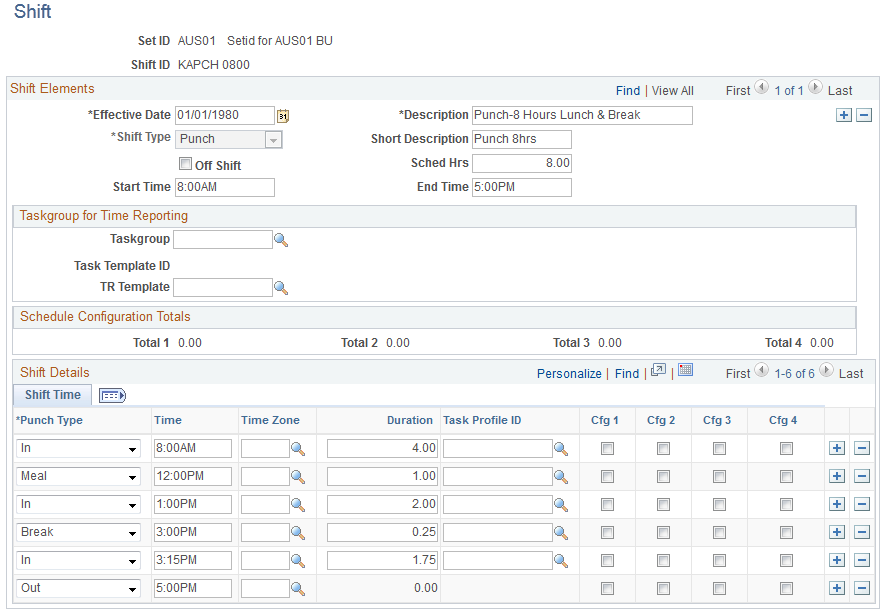
Image: Shift page
This example illustrates the fields and controls on the Shift page.
|
Field or Control |
Definition |
|---|---|
| Effective Date |
Enter a date for this shift. If you modify a previously saved shift, the effective date that you select has some limitations. You cannot change the effective date of the shift to: A date before the earliest effective date of all workdays that contain that shift. A date later than the start date of any schedule calendar containing it. A date later than the earliest effective date of all pay groups whose default schedule IDs contain that shift. |
| Shift Type |
Select a type. Options are: Elapsed: Only the Elapsed punch types appear in the prompt. An Elapsed shift can contain only one punch entry. Punch: In, Out, Break, Meal, and Transfer punch types can be entered. The Flex Shift Information group box doesn't appear on the page. To save punch shifts, you need an In and Out punch. Flex: Only In and Out punches can be entered. The Flex Shift Information group box appears, available for entry. To save flex shifts, you need an In and Out punch. If you change this field in Add mode and punch detail is already entered, you're warned that punch detail is deleted if the type field is changed. For all effective-dated rows, the system deletes the punch details for all effective-dated rows and the type field is updated to the new type that you selected. Having saved a shift as one type, you cannot change it to another. |
| Off Shift |
Select to identify this day as an off day. Note: If you are including off days for the self service absence duration calculation you will need to add the hours you would like to use for an off day in the duration field. |
| Scheduled Hrs (scheduled hours) |
Displays the total amount of work time for the shift. For example, you require payees to punch in at 09:00 and punch out at 17:00, but the shift includes a one-hour non-punch lunch break. The field calculates nine hours, but your organization is paying for eight hours worked, so the scheduled hours are eight. This field's value is calculated from the sum of the durations of punches in the group box at the bottom of the page—except Meal punches. You can edit this number for Punch and Flex shifts. For an Elapsed shift, this field equals the Elapsed punch entry's duration and is unchangeable. If you make changes affecting punch time or punch duration, the Scheduled Work Hours field recalculates. |
| Start Time and End Time |
These fields indicate the starting and ending times of the shift. For fixed and punch shifts, the system populates these fields automatically based on the information you enter in the Shift Detail group box. |
Taskgroup for Time Reporting
This group box enables you to view time reporting and task elements while you build the schedule definition. It appears only if you have Time and Labor installed.
|
Field or Control |
Definition |
|---|---|
| Taskgroup |
Select a taskgroup. The system populates the Time Reporting Template ID field with the associated time reporting template. |
| Task Template ID |
Displays the task template associated with the taskgroup you select. Click the link next to view details about the task template. |
| TR Template (time reporting template) |
The system populates this field with the time reporting template associated with the taskgroup you select. Click the link next to this field to view details about the time reporting template. |
The task template and the related time reporting template determine which task elements and time reporting elements appear as columns in the grid for scheduling purposes.
Schedule Configuration Totals
Total durations appear for the punches being tracked. For each selected check box that appears in the group box at the bottom of the page, the corresponding configuration total is updated with the number of hours corresponding to the total of all marked entries.
Flex Shift Information
If the Flex shift type is selected, these times represent the required core hours for the flex shift.
|
Field or Control |
Definition |
|---|---|
| Core Begin and Core End |
Enter the times for the core period, the period when payees must be at work, excluding meal and break time. The core begin time must be after the shift's In punch; the core end time must be before the shift's Out punch. |
| Weekly Hours |
Enter how many hours this shift requires. |
Shift Details
This group box label varies, depending on which shift type you selected. Saving the shift requires at least one line of punch detail.
|
Field or Control |
Definition |
|---|---|
| Punch Type |
Select a punch type. You cannot have consecutive punches (except transfer punches) of the same type. Options are: In: Start of a work period—at the beginning of a shift or for returning to work after a break or meal. The first punch of a punch or flex shift must be an In punch. Punch and flex shifts cannot be saved if an In punch lacks a punch time and duration. Transfer: Start of a work period that generally denotes a change in task and compensation-related characteristics. Break: Start of a break period. If you enter a Break punch, you must follow this with an In or Transfer punch. Meal: Start of a meal period. If you enter a Meal punch, an In or Transfer punch must follow immediately, or the system can't save the page. Out: Start of unpaid, non-work time. Required as the last punch of a punch or flex shift. The Duration field is unavailable for entry. You can't enter an Out punch if an In punch doesn't precede it somewhere in the shift. Punch and Flex shifts cannot be saved if an Out punch lacks a punch time. For a Punch or Flex shift, you must enter an Out punch. No punches can be added to a shift after the Out punch row. Elapsed: For Elapsed shifts. The associated duration reflects the elapsed duration of the shift. An Elapsed shift cannot be saved if an Elapsed punch lacks a punch duration. Note: This product documentation uses punch and punch type interchangeably. |
| Time |
For Punch and Flex shifts; all punches (except the Out punch) in Punch and Flex shifts require a time and duration. Enter the time this punch is scheduled. The first punch time of a shift must be entered. You can enter subsequent punch times, or the system can calculate punch times based on the duration of the preceding punch. If you change the time of a punch besides the last punch, the duration changes, based on the new and the subsequent punch time. If it's not the first punch, the duration of the previous punch changes, based on the changed punch's new punch time. If you enter a punch time, the system calculates the duration based on the punch time of the previous row. If you enter a duration, the system calculates this field on the next punch row. |
| Time Zone |
Enter a time zone that is assigned to time entered for this shift. |
| Duration |
Displays the length of the punch in hours. You can enter it, or the system can calculate it when the next punch time is entered. If you change the time of a punch besides the last punch, the duration changes, based on the new and the subsequent punch time. If it's not the first punch, the previous punch's duration changes, based on the changed punch's new punch time. If you delete a row, the duration of the punch above the deleted row changes to the difference between the punch times of that row and of the row that followed the deleted row. The system warns you if a punch or flex shift is over 24 hours. The duration is displayed as a percentage of an hour. Note: This field is available for off days for flex and punch schedules used with the absence self-service duration calculation. |
| Cfg1 to Cfg4 (schedule configuration) |
These fields are populated based on check boxes that you select in the Shift Details group box. The corresponding Schedule Configuration Total fields are updated with the corresponding number of hours. For example, to have the system calculate how many hours in a shift are in the morning and how many in the afternoon, select Cfg1 for morning punches and Cfg 2 for afternoon punches. Note: These fields are available for off days for flex and punch schedules used with the absence self-service duration calculation. |
Use the Workday page (SCH_WRKDAY) to set up workdays.
Navigation
Image: Workday page
This example illustrates the fields and controls on the Workday page.
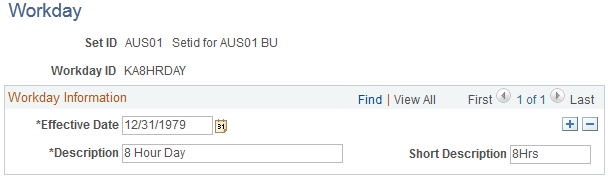
You use workdays to group shifts when creating a schedule definition. Enter an effective date and a description for the workday. The effective date of a workday must be earlier than or equal to the effective dates of the schedule definitions in which you use it.
Note: Setting up workdays is not a prerequisite for creating schedule definitions. You can define shift information that is not grouped by workday when you create schedule definitions.
Use the Definitions - Definition page (SCH_DEFINITION) to define basic schedule definition details.
Navigation
Image: Definitions - Definition page
This example illustrates the fields and controls on the Definitions - Definition page.

|
Field or Control |
Definition |
|---|---|
| Schedule ID |
Displays the value that you entered to access this page. |
Schedule Details
|
Field or Control |
Definition |
|---|---|
| Effective Date |
Enter the first day of the schedule definition. For example, if the schedule begins on a Monday, make sure that the date you enter falls on a Monday. |
| Definition Type |
Select a type. Options are: Elapsed: Only Elapsed shifts can be used in the definition. Punch: Only Punch shifts can be used in the definition. Flex: Only Flex shifts can be used in the definition. You cannot combine different types of shifts in the same definition. If you change this field in Add mode and shift detail rows are already entered, you're warned that shift detail rows are deleted if the type field is changed. When a schedule definition is saved as a particular type, such as Elapsed, it cannot be changed to another type, such as Punch. |
| Rotating Schedule |
Select to indicate that this definition is for a rotating schedule. When you select this check box, the Rotation Details group box becomes available. |
| Days in Schedule |
Enter the number of days in the schedule. You can change this at anytime. If you do make a change, the system automatically inserts or deletes the appropriate number of rows from the SCH_DEFN_DTL table to ensure that there is one row for each day in the schedule. |
| Daylight Saving Rule |
This field applies to punch and flex schedules. Select the method that the system uses to resolve the schedule on days where daylight saving time changes fall within a shift. Fixed Time: The system uses the specified out time that you enter even if it shortens or lengthens the shift by one hour. Fixed Duration: The system adjusts the schedule to maintain the total duration that you specify for the shift. |
Taskgroup for Time Reporting
This group box enables you to view the time reporting and task elements while you build the schedule definition. It appears only if you have Time and Labor installed.
|
Field or Control |
Definition |
|---|---|
| Taskgroup |
Select a taskgroup. The system populates the Time Reporting Template ID field with the associated time reporting template. |
| Task Template ID |
Displays the task template associated with the taskgroup you select. Click the link next to view details about the task template. |
| Time Reporting Template ID |
The system populates this field with the time reporting template associated with the taskgroup you select. Click the link next to this field to view details about the time reporting template. |
The task template and the related time reporting template determine which task elements and time reporting elements appear as columns in the grid for scheduling purposes.
Rotation Details
Use this group box to determine the rotating pattern of the schedule. You create multiple rotation IDs that share the same schedule, but start on different days.
|
Field or Control |
Definition |
|---|---|
| Rotation ID |
Enter an ID for each rotation. |
| Relative Day |
Enter the day that the rotation starts in relation to the first day of the schedule. For example, if you enter 8 in this field, the associated rotation begins 7 days after the first day. Note: You may not enter 0 or a number greater than the total number of days in the schedule |
| Add Rotations |
Click to insert a new rotation. The system prompts you to enter the number of days between rotations to determine the relative day of the new rotation. |
Use the Definitions -Schedule Shifts page (SCH_DEFINITION_2) to define shifts for schedule definitions.
Navigation
Image: Definitions - Schedule Shifts page
This example illustrates the fields and controls on the Definitions - Schedule Shifts page.
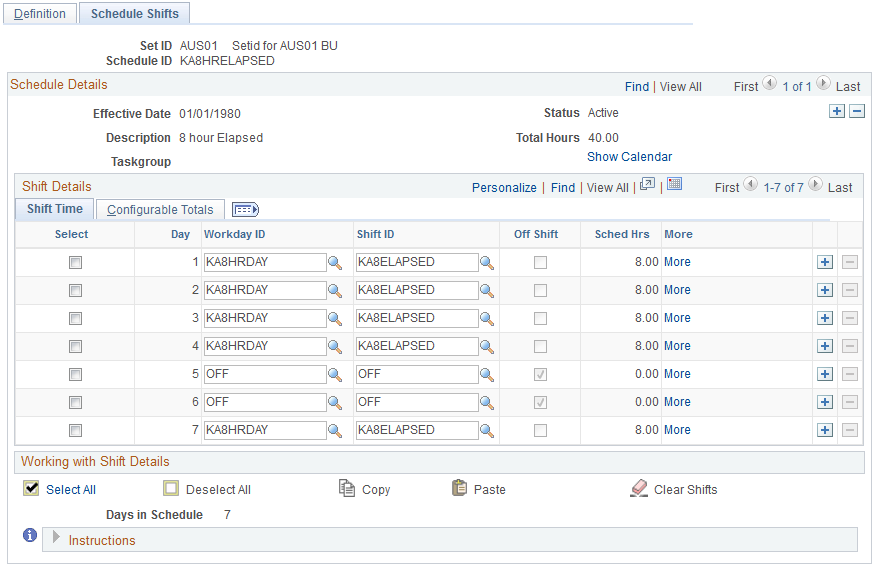
You can use this page to define shift information for schedules in two ways:
Using predefined workdays and shifts.
Use the Workday ID and Shift ID columns to select predefined workday and shifts. The system populates the remaining columns based on the shift you enter.
Manually (for flex and punch schedules).
The type of schedule that you are defining determines the columns that appear in the Shift Details grid. For punch schedules, the system displays the default punch pattern and labels defined on the Schedule Settings page. To see all available punch types, select All Punches in the Punch Pattern field. For flex schedules, the system includes fields for In, Out, and Sched Hrs (scheduled hours). For elapsed schedules, it includes fields for identifying an off shift and scheduled hours.
To specify an off shift, you can select a predefined off shift, or select the Off Shift check box and enter an in and out time. When selected the system will deactivate the More link. It allows you to add duration hours for off days.
Click the Show Calendar link to view the schedule calendar that the system derives from the schedule definition.
Click the More link to access the Shift page where you can view or enter details for a shift.
Copying, Pasting, and Clearing Shifts
Select the check box in the Select column. This makes the Copy, Paste, and Clear Shifts links available so that you can quickly copy, insert, and delete rows of workday and shift information.
See Shift Page.
Configuration Totals
Select the Configuration Totals tab.
Image: Definitions - Schedule Shifts page: Configurable Totals tab
This example illustrates the fields and controls on the Definitions - Schedule Shifts page: Configurable Totals tab.
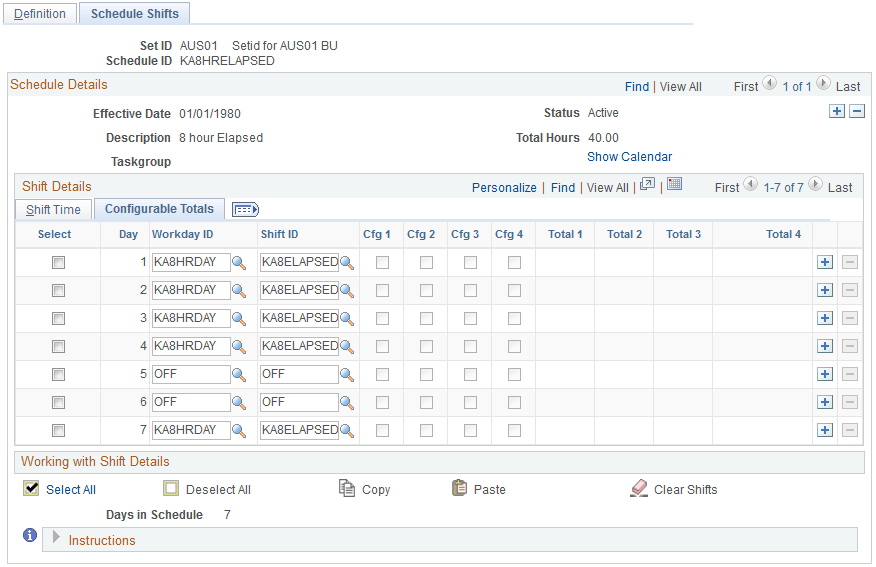
This tab displays the total hours that are associated with each configuration indicator. You can use the configuration totals in payroll and absence rules.
Use the Schedule Calendar page (SCH_CLND_VW_SEC) to view the schedule calendar derived from a specific schedule definition.
Navigation
Click the Show Calendar link on the Definitions - Schedule Shifts page.
Image: Schedule Calendar page
This example illustrates the fields and controls on the Schedule Calendar page.
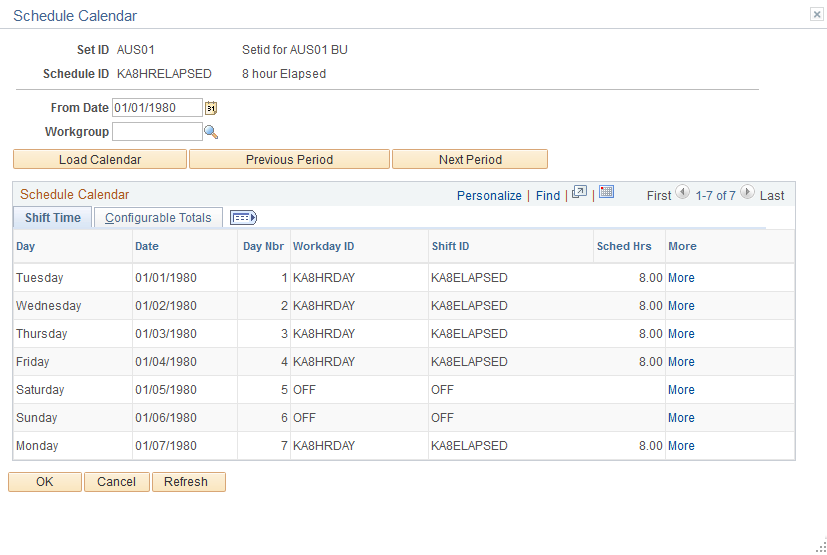
This page enables you to view the schedule calendar that the system derives from a specific schedule definition.
|
Field or Control |
Definition |
|---|---|
| From Date |
Enter the starting date of the schedule calendar you want to view. By default this page displays the schedule calendar starting with the effective date of the associated schedule definition. |
| Rotation ID |
Select the rotation ID for which you want to view a schedule calendar. This field appears only if there are rotation IDs defined for the schedule calendar. |
| Workgroup |
Enter the workgroup for which you want to view a schedule calendar. This field is available only if Time and Labor is installed. |
| Load Calendar |
Click to view the schedule calendar for the selected date and workgroup. |
| Previous Period |
Click to view the schedule calendar for the previous period. |
| Next Period |
Click to view the schedule calendar for the next period. |