Sending Payments to PeopleSoft Financial Gateway
You send generated payment details from PeopleSoft Global Payroll to PeopleSoft Financial Gateway. Financial Gateway then dispatches the payments to banks in compliance with country-specific rules and standards.
|
Page Name |
Definition Name |
Usage |
|---|---|---|
|
GP_FG_RUNCTRL |
Send payments to Financial Gateway. |
Before you can send payment requests to Financial Gateway, there are some setup steps you must complete outside of Global Payroll. You must:
Set up Integration Broker.
Set up banks for countries in your PeopleSoft Financials system.
Setting Up Integration Broker
Global Payroll publishes payment data to and from Financial Gateway via Integration Broker. It is necessary to set up Integration Broker in both the Global Payroll and Financial Gateway environments.
To set up Integration Broker in your Global Payroll environment:
On the Gateways page, configure the Gateway URL and ping it to confirm that it connects.
On the PeopleSoft Node Configuration page of the Gateways component, configure your nodes and ping them to confirm that they connect.
Access the Service Configuration page and confirm that the Target Location field is set up correctly.
Using the Nodes component, configure the local and remote nodes. Use your HCM system as the local node and your Financials system as the remote node.
For the remote node, be sure to define the Content URL and Portal URL fields on the Portal page of the Nodes component. The system uses the URL you enter in these fields for related content.
Create a routing for the PAYMENT_REQUEST service operation using the HCM node as the sender node and the Financials node as the receiver node.
Ensure that the PAYMENT_REQUEST service operation and its routing are active using the Service Operations component.
Create a routing for the PAYMENT_RESPONSE_OUT_ASYNC service operation using the HCM node as the receiver node and the Financials node as the sender node.
Ensure that the PAYMENT_RESPONSE_OUT_ASYNC service operation and its routing are active using the Service Operations component.
Configure the nodes for single signon using the Single Signon page.
Use the Queue Status component to confirm that the PAYMENT_REQUEST queue is running.
To set up Integration Broker in your Financial Gateway environment:
On the Gateways page, configure the Gateway URL and ping it to confirm that it connects.
On the PeopleSoft Node Configuration page of the Gateways component, configure your nodes and ping them to confirm that they connect.
Access the Service Configuration page and confirm that the Target Location field is set up correctly.
Using the Nodes component, configure the local and remote nodes. Use your Financials system as the local node and your HCM system as the remote node.
Ensure that the PAYMENT_REQUEST service operation and routing are active using the Service Operations component.
Create a routing for the PAYMENT_REQUEST service operation that uses the HCM node as the sender node and the Financials node as the receiver node.
Create a PAYMENT_REQUEST queue using the Queues component.
Create a routing for the PAYMENT_RESPONSE_OUT_ASYNC service operation using the HCM node as the receiver node and the Financials node as the sender node.
Ensure that the PAYMENT_RESPONSE_OUT_ASYNC service operation and its routing are active using the Service Operations component.
Ensure that the PAYMENT_DISPATCH service operation and its routings are active using the Service Operations component.
Configure the nodes for single signon using the Single Signon page.
Use the Queue Status component to confirm that the PAYMENT_REQUEST queue is running.
Setting Up Banks for Countries
For each country for which you intend to send payment data to Financial Gateway, you must set up a bank in your PeopleSoft Financials system that matches the source bank information for your pay entity in your Global Payroll system. For each bank:
Create a bank using the Bank Information (BANK_PNL1) page.
Create a bank branch using the Bank Branch Information (BANK_BRNCHPNL) page.
Set up a bank integration layout on the Bank Integration Layouts (BANK_INTEGRATION) page.
Create an external account on the External Accounts (BANK_PNL2) page.
See PeopleTools: Integration Broker Testing Utilities and Tools product documentation.
Defining “Financial Gateway Integration Options, Registering a Source Application with Financial Gateway” in the PeopleSoft Financial Gateway product documentation.
Use the Payment File Generation page (GP_FG_RUNCTRL) to send payments to Financial Gateway
Navigation
Image: Payment File Generation page
This example illustrates the fields and controls on the Payment File Generation page.
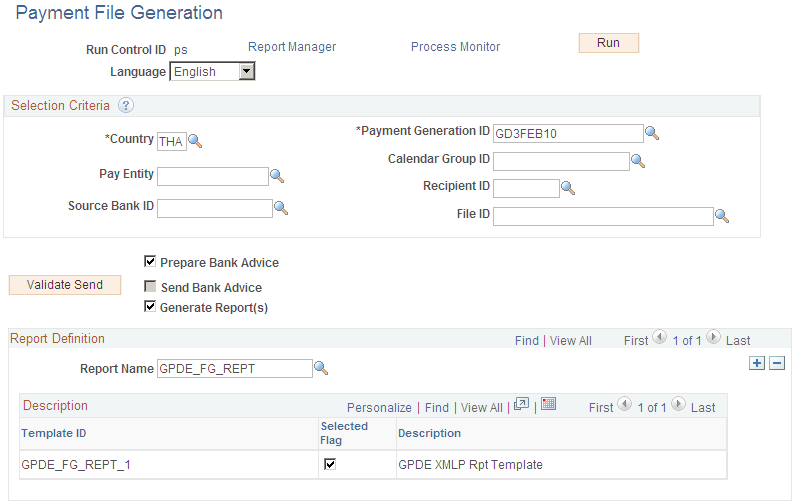
Use this page to initiate payment requests that send payment data to Financial Gateway.
Selection Criteria
Use the fields in this group box to filter the payments that you want to send to Financial Gateway. You can filter the payments by Country, Payment Generation ID, Pay Entity, Calendar Group ID, Recipient ID, Source Bank ID, and File ID.
|
Field or Control |
Definition |
|---|---|
| Validate Send |
Click to ensure that the payments that meet your selection criteria have been finalized before you send them to Financial Gateway. If the selected rows are invalid, the Reason field appears on the page. |
| Reason |
This field appears when you click the Validate Send button to display the reason that the selected payment rows are invalid. If the selected payments are valid, this field does not appear. |
| Prepare Bank Advice |
When you select this check box, the Payment for FG (GP_PMT_FG) process identifies the rows of GP_PAYMENT_FG that meet your selection criteria and prepares them to be sent to Financial Gateway. Also, when you select this check box, the Debit Date field becomes available. Note: Subsequent runs of the Prepare Bank Advice process pick up any new rows that meet the selection criteria, but they do not affect rows that were already prepared during the first run. |
| Send Bank Advice |
This check box becomes available to select only after you run the Payment for FG (GP_PMT_FG) process with the Prepare Bank Advice check box selected and successfully validate the payments using the Validate Send button. When you select the Send Bank Advice check box, the Payment for FG (GP_PMT_FG) process inserts the prepared payment rows into staging tables and publishes them to Financial Gateway through Integration Broker using the PAYMENT_REQUEST message. Note: Once you run the Payment for FG (GP_PMT_FG) process with the Send Bank Advice check box selected, you cannot cancel or resend the bank advice. |
| Generate Reports |
When you select this check box, the Payment for FG (GP_PMT_FG) process generates Oracle Business Intelligent Publisher (BI Publisher or BIP) reports using the templates defined in the Report Definition group box. Note: If you select the Generate Reports check box when the Prepare Bank Advice check box is deselected, you receive a message reminding you that you cannot generate reports for payments for which you have not yet prepared the bank advice. You can, however, run the Payment for FG (GP_PMT_FG) process with both the Prepare Bank Advice and Generate Reports selected. |
Report Definition
Use this group box to define which BI Publisher reports generated when you select the Generate Reports check box.
|
Field or Control |
Definition |
|---|---|
| Report Name |
Enter the name of the report you want to generate. The system populates the Template ID and Description columns for all templates associated with the selected report. |
| Selected Flag |
Select this check box next to the report template you want to use. By default, the system selects this check box for the default template associated with the selected report. |
Transaction Status Changes
When you run the Payment for FG (GP_PMT_FG) process, it affects the transaction status of each payment transaction included in the selection criteria. In addition, Financial Gateway affects the status of payment transactions through the PAYMENT_RESPONSE message. The following table lists all possible transaction statuses along with how they are updated:
|
Transaction Status |
Results From |
|---|---|
|
Pay Prep Run |
GP_PMT_PREP This is the status that all payment transactions begin with after undergoing the GP_PMT_PREP process. |
|
Prepare Bank Advice Run |
GP_PMT_FG with the Prepare Bank Advice check box selected. |
|
Processing |
The GP_PMT_FG currently running. |
|
Payment Sent to FG |
GP_PMT_FG with the Send Bank Advice check box selected. |
|
Canceled |
PAYMENT_RESPONSE message when transactions are canceled in Financial Gateway. |
|
Error |
PAYMENT_RESPONSE message when transactions are not received successfully by Financial Gateway. |
|
Awaiting Dispatch |
PAYMENT_RESPONSE message when transactions are received successfully by Financial Gateway. |
|
Paid |
PAYMENT_RESPONSE message when transactions are paid to the recipient. |
|
Received by Bank |
PAYMENT_RESPONSE message when the external bank successfully receives dispatched transactions from Financial Gateway. |
|
Dispatched to Bank |
PAYMENT_RESPONSE message when Financial Gateway dispatches the transactions to the external bank. |
Note: You must manually correct any payments with a status of Error.
You can view the status of your payments using the Payment Transactions page.
Negative Payments
Global Payroll Core by default does not prevent you from sending negative payments to Financial Gateway. Likewise, Financial Gateway by default does not prevent you from sending negative payments to banks. Therefore, if it is necessary to prevent negative payments from being sent to banks, country extensions can:
Prevent negative payments from being created in the first place during payment processing. Global Payroll for France and Global Payroll for Switzerland are examples of country extensions that do this.
Prevent the system from sending negative payments to Financial Gateway by using the Having Clause field on the Banking Preparation Definition page to modify the CORE_BANK:SQL application package so that it filters out any negative payments. Global Payroll for Spain is an example of a country extension that does this.
Configure Financial Gateway so that it does not dispatch any negative payments received from Global Payroll to the banks. Global Payroll for Germany and Global Payroll for the Netherlands are examples of country extensions that do this.
Customers who want to process negative payments can configure their systems to do so if they have contracts with their banks to allow it.