Using the PeopleSoft Fluid User Interface to Work with Absences as an Employee
Employees can use the PeopleSoft Fluid User Interface to request absences, view absence requests, and view absence balances.
Click the Time tile on the Employee Self Service home page to access a list of PeopleSoft Time and Labor, and PeopleSoft Absence Management self-service tasks that you can perform. The tasks listed are based on the applications that are installed and on the security access of the logged in user.
This topic describes the PeopleSoft Absence Management tasks that you access using the Time tile. For more information on the PeopleSoft Time and Labor tasks, see Using PeopleSoft Fluid User Interface for Time Reporting as an Employee
|
Page Name |
Definition Name |
Usage |
|---|---|---|
|
HC_TL_START_NAV_FLU_ESS2_GBL (this is the cref for the tile) |
Click this tile to access the Time page. |
|
|
HC_TL_EMP_DSHBD_FL_LINK |
Access employee self-service absence transactions. |
|
|
HC_HGA_SS_REQ_FLU_GBL |
Select to access Request Absence page. |
|
|
HGA_SS_REQ_FLU |
Enter self-service absence requests. |
|
|
HC_HGA_SS_REQCAN_FLU_GBL |
Select to access Cancel Absences page. |
|
|
HGA_SS_REQHIST_FLU |
Select an absence request that you want to cancel. |
|
|
HGA_SS_REQ_FLU |
Cancel an absence request. |
|
|
HC_HGA_SS_REQHIST_FLU_GBL |
Select to access View Requests Page |
|
|
HGA_SS_REQHIST_FLU |
View your absence requests. |
|
|
HGA_SS_REQ_FLU |
View detailed information for your absence requests. |
|
|
HC_HGA_SS_BAL_FLU_GBL |
Select to access Absence Balances page. |
|
|
HGA_SS_BAL_FLU |
View your current absence balances. |
Use the Time tile to access the fluid Time pages.
Navigation
Select Fluid Home under the main menu. On the page that appears, select Employee Self Service. The Time tile is available on the Employee Self Service landing page.
As an employee, you can add the tile, through personalization, to a system-delivered home page or a home page that you create.
Image: Time tile
This example illustrates the Time tile.
Click the Time tile to access these employee self-service transactions easily without using traditional menu navigations:
Request Absence
View Requests
Absence Balances
Cancel Absences
Use the Time Collection — Actionable Tiles (HC_TL_EMP_DSHBD_FL_LINK) to navigate to the corresponding pages.
Navigation
Select Fluid Home under the main menu. On the page that appears, select Employee Self Service. The Time tile is available on the Employee Self Service landing page.
Select Time Tile to access the actionable tiles.
As an employee, you can add the tile, through personalization, to a system-delivered homepage or a homepage that you create.
Image: Time Collection — Actionable tiles
This example illustrates the Time Collection — Actionable tiles .
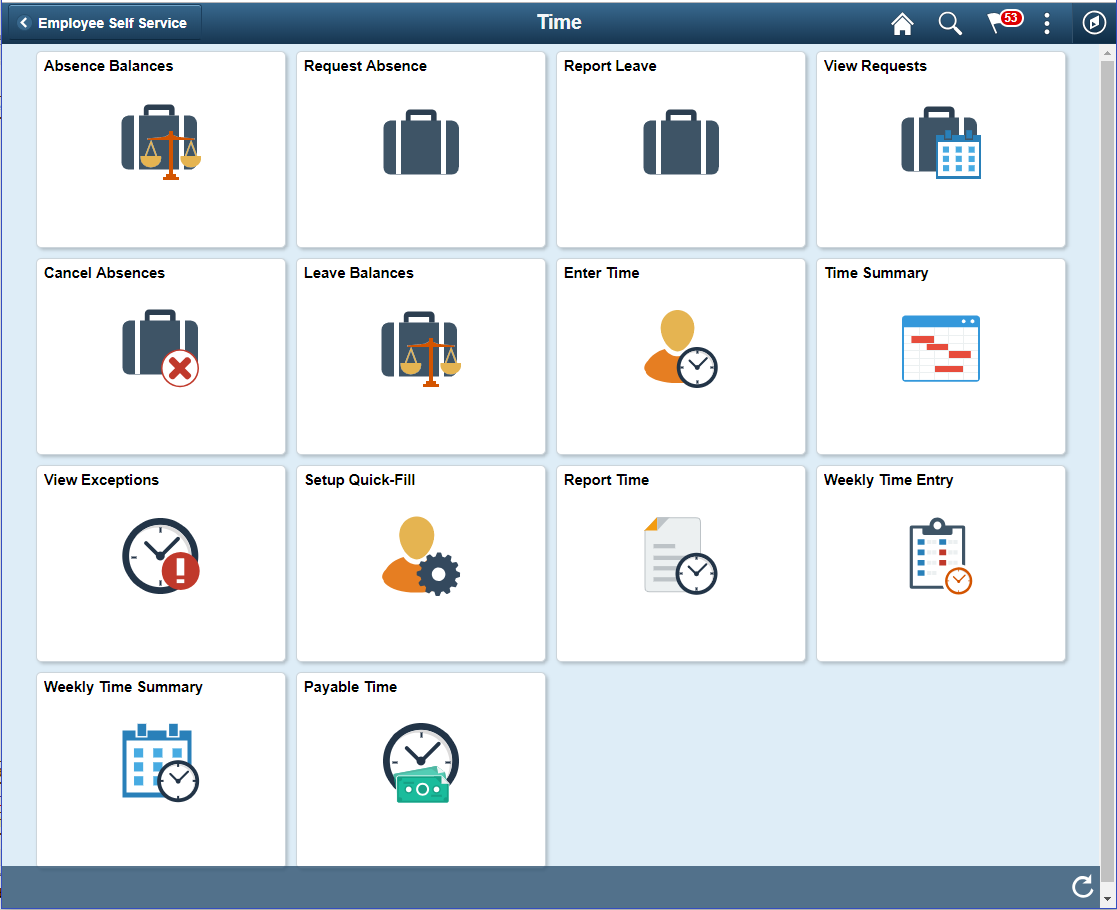
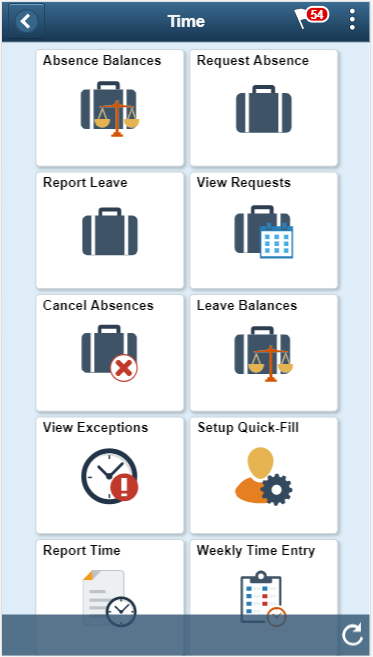
Image: (Smartphone) Time Collection - Actionable Tiles
This example illustrates the (Smartphone) Time Collection - Actionable Tiles while using a mobile.
Use the Time page (HC_HGA_SS_REQ_FLU_GBL) to access employee self-service absence transactions.
Navigation
Select Fluid Home under the main menu. On the page that appears, select Employee Self Service. The Time tile is available on the Employee Self Service landing page.
Select Request Absence Tile to access the Request Absence page.
Image: Request Absence Tile
This example illustrates the fields and controls on the Request Absence Tile.
Use the Request Absence page (HGA_SS_REQ_FLU) to enter self-service absence requests.
Navigation
Click the Request Absence tile on the Employee Self Service fluid home page to access Request Absence page.
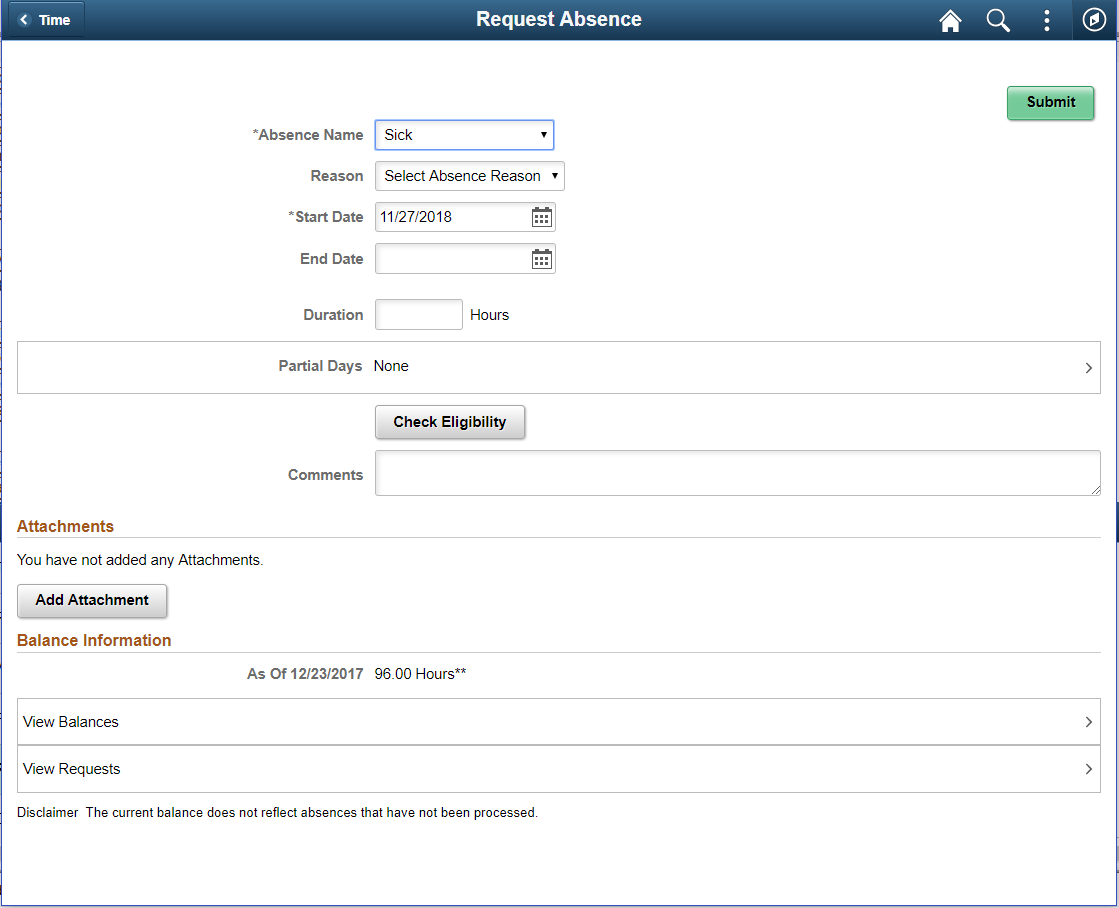
Image: Request Absence Page
This example illustrates the fields and controls on the Request Absence page.
|
Field or Control |
Definition |
|---|---|
| Absence Name |
Select the type of absence you want to request. After you select an entry, additional fields display on the page according to how the selected absence type is configured. |
| Reason |
Select a reason from the available options. Absence reasons are linked to the Absence Name (Take) through the Absence Take Type. |
| Start Date |
Select the first day of the absence event. The field option defaults to the current date. If there's a break in the absence, enter each event separately. For example, if you're out sick for two days, return to work for three days, and are out sick again, enter two absence events. If the absence includes a weekend (say, Thursday to Monday), enter one absence event. |
| End Date |
Select the last day of the absence event. |
| Duration |
The system calculates the value of this field based on the Start Date and End Date that you enter. |
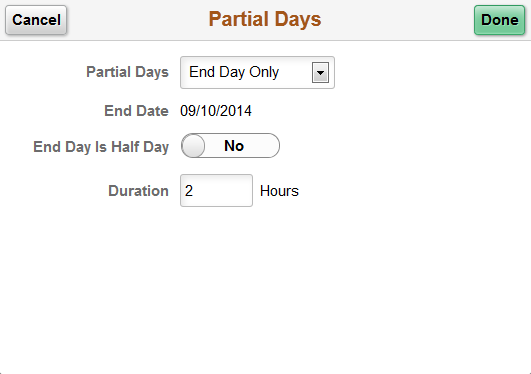
Partial Days Page
Click Partial Days to access the Partial Days page, where you can enter partial day information for your absence request.
Image: Partial Days page
This example illustrates the fields and controls on the Partial Days page.
|
Field or Control |
Definition |
|---|---|
| Partial Days |
Specify which days of the absence event are partial days. Available options are:
|
| Start Date and End Date |
Displays the start date and end date that you entered on the Request Absence page. |
| All Days are Half Days,Start Day is Half Day, and End Day is Half Day |
Indicate Yes or No to specify which days of the absence event are half days. Important! These fields are not available unless the Country Take enables you to specify partial days on the Request Absence page. |
| Duration |
For days that are not half days, enter the number of hours for the partial day. |
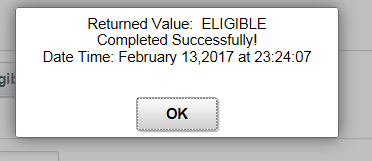
Check Eligibility
Click Check Eligibility to see if you are eligible for the absence request based on the values entered.
When you click the link, a pop up appears displaying the eligibility status.
Image: Eligibility Result Page
Eligibility Result Page
View Eligibility Details
On checking the eligibility, View Eligibility Details link appears on the screen. Click the link to view the absence eligibility details of the selected employee.
Image: Eligibility Details Page
Eligibility Details Page
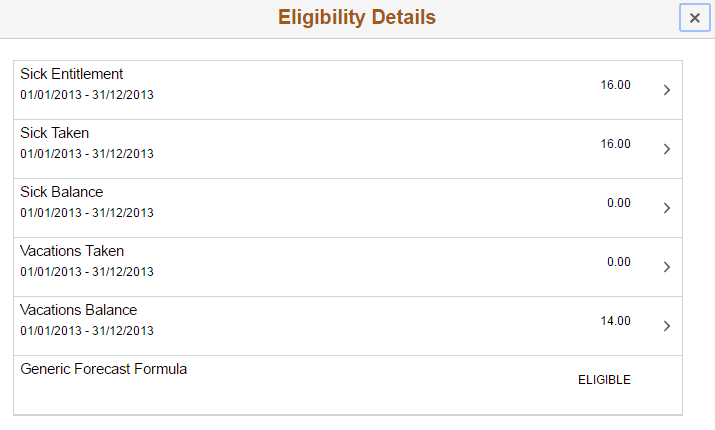
Using the more button you can view the configured user keys corresponding to each entitlement.
Image: Eligibility Details Sub Page
Eligibility Details Sub Page
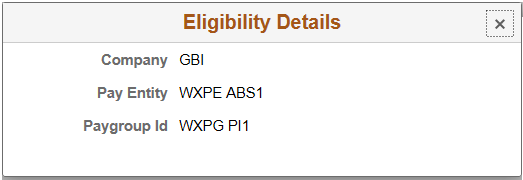
Note: To view these details at-least one user key should be configured. If not, the link appears as disabled.
Additional Information
Enter any additional information for the absence request. This section of the page appears only if the Display User Fields check box is selected on the Country Take - User Fields Page and you have user fields defined.
Attachments
Click Add Attachment button to open the File Attachment page and upload a file. After you have selected and uploaded the file, click Done to return to this page. The uploaded file will appear as an active link in the Attachment section along with the status, date and time the file was uploaded. You can also add description for the file and delete it, if required.
Note: Attachment option is available based on the configuration defined on the Define Attachments Page.
Balance Information
|
Field or Control |
Definition |
|---|---|
| View Balances |
Click to view your current absence balances. |
| View Requests |
Click to view your existing absence requests. |
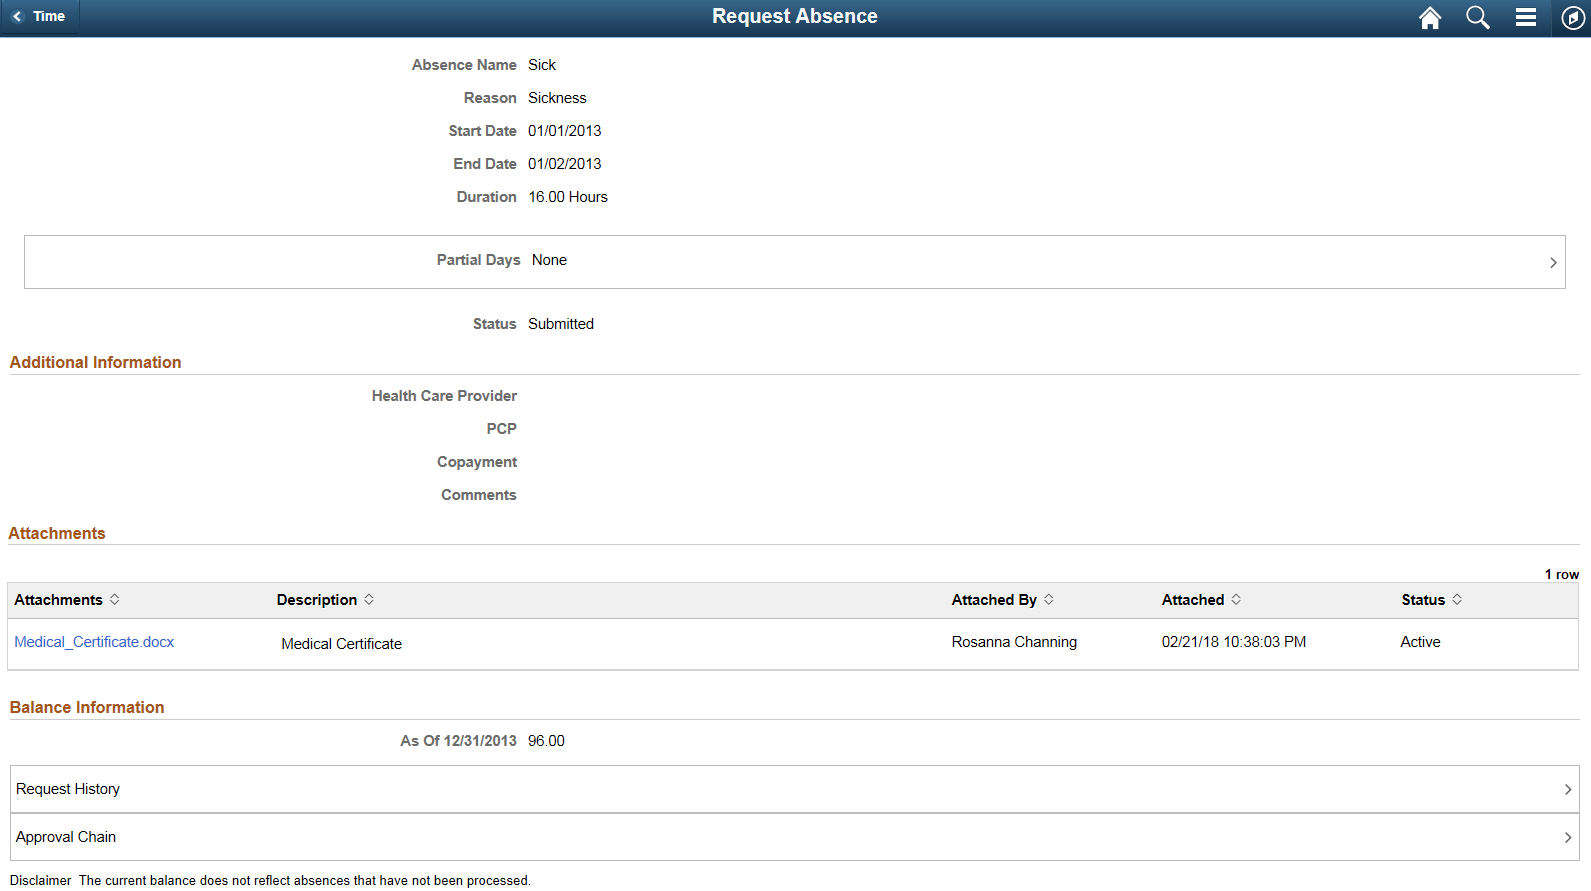
On submitting the absence request, Request History link and Approval Chain link appears on the page.
Image: Request Absence_Submitted
This is an example of a submitted absence request.
|
Field or Control |
Definition |
|---|---|
| Request History |
Click Request History link to view the transaction history for this absence request. |
| Approval Chain |
Click Approval Chain link to access the Approval Chain page, where you can view your absence requests which are pending for approval. |
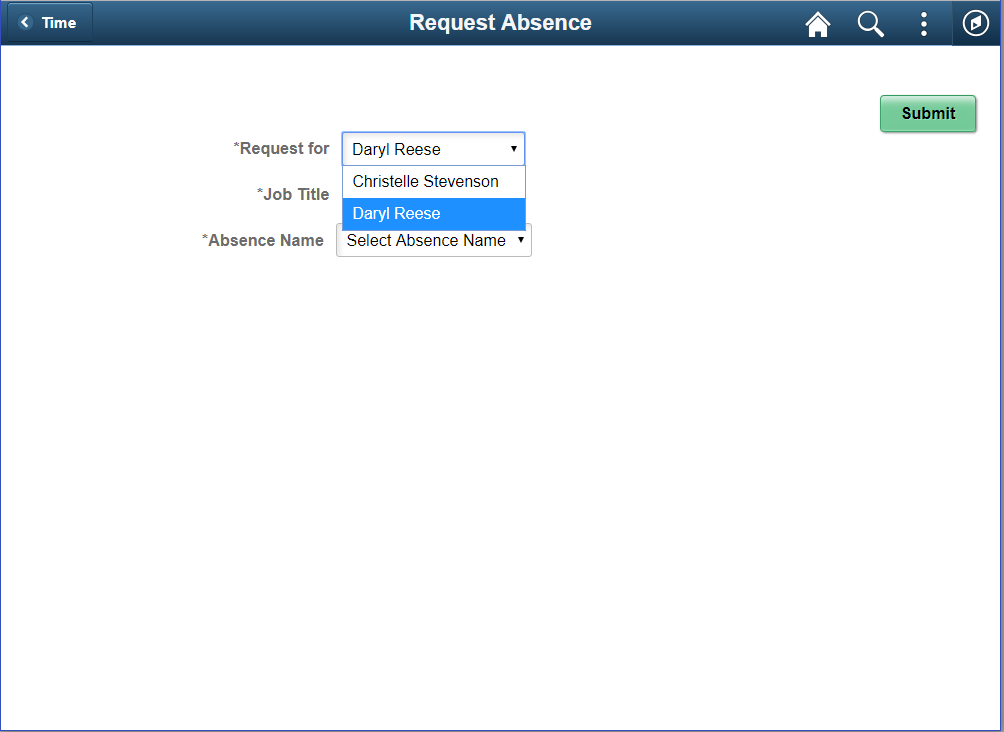
Request Absence page with Delegation Enabled
The employee can enable another person as his/her proxy to delegate the request absence transaction.
Image: Request Absence page with proxy enabled
This example illustrates the fields and controls for Request Absence page with proxy enabled.
Select Cancel Absences (HC_HGA_SS_REQCAN_FLU_GBL) tile to navigate toCancel Absencespage.
Navigation
Select Fluid Home under the main menu. On the page that appears, select Employee Self Service. The Time tile is available on the Employee Self Service landing page.
Select Cancel Absences Tile to access the Cancel Absences page.
Image: Cancel Absences tile
This example illustrates the Cancel Absences tile.
Use the Cancel Absences (View Requests) page to select an absence request that you want to cancel.
Navigation
Click the Time tile on the Employee Self Service fluid home page, then click Cancel Absences on the Time page.
Image: Cancel Absences (View Requests) page
This example illustrates the fields and controls on the Cancel Absences (View Requests) page.
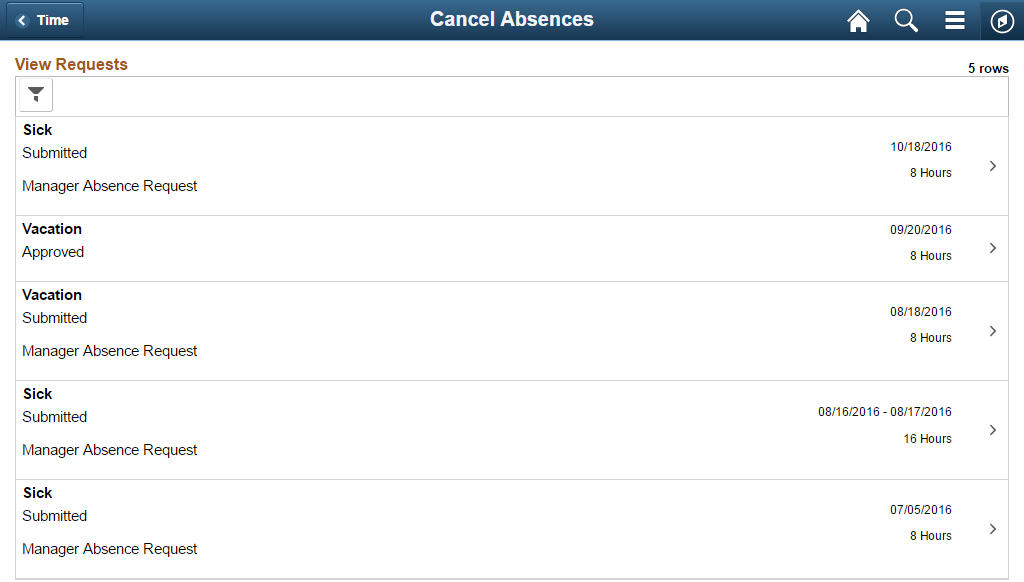
This page lists your existing absence requests. Click a request that you want to cancel to access the Cancel Absence Page.
|
Field or Control |
Definition |
|---|---|
 (Filters) (Filters) |
Click to filter your absence requests by start date, end date, and absence type. |
Use the Cancel Absence page (HGA_SS_REQ_FLU) to cancel an absence request.
The following video includes a demonstration of absence cancellation.
|
Field or Control |
Definition |
|---|---|
| Cancel Reason |
Select a reason for canceling the absence request. |
| Comments |
Enter any additional comments regarding the absence cancellation. |
| Approval Chain |
Click this link to access the Approval Chain page, where you can view your absence requests which are pending for approval. |
| Cancel Absence |
Click this button to submit the request to cancel the absence. You will receive a message confirming that you want to submit the request to cancel the absence. Click Yes to confirm the request submittal. The system changes the status of the absence request to Cancel in Progress and routes it to your manager for approval. |
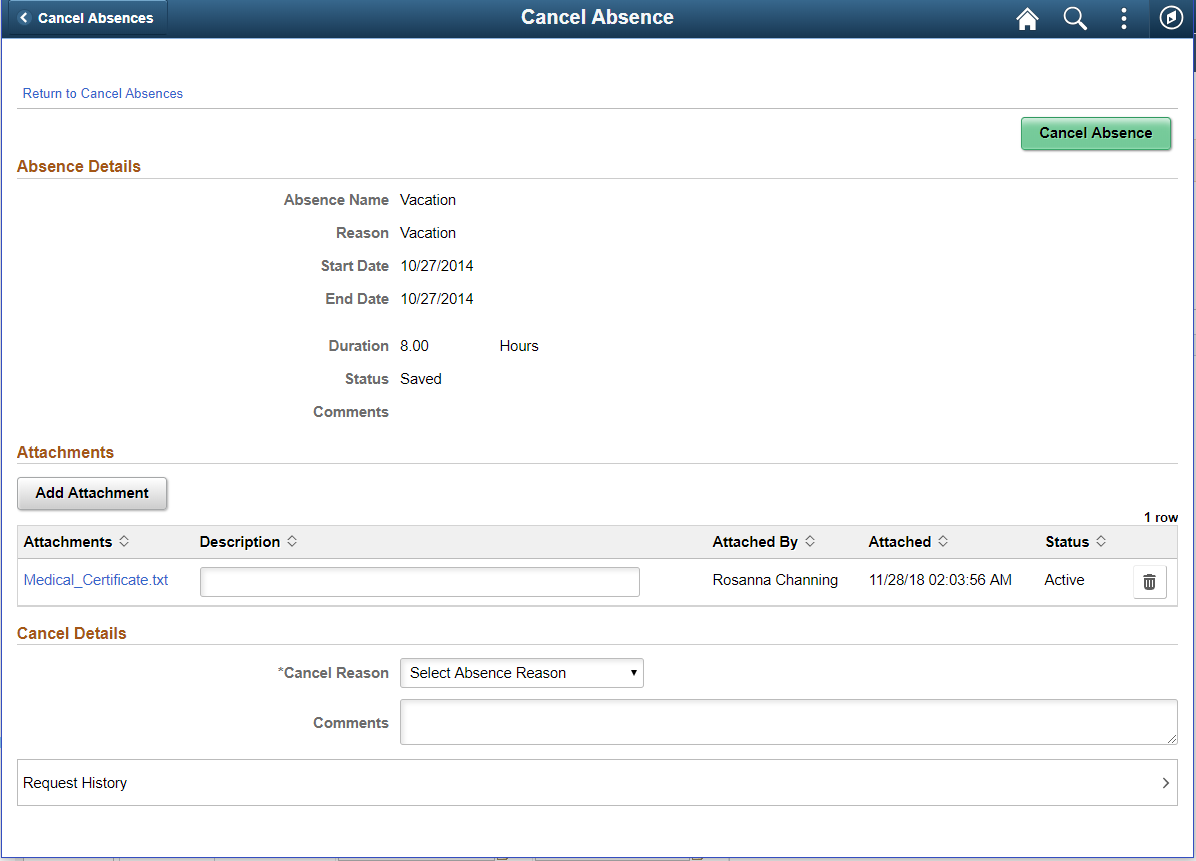
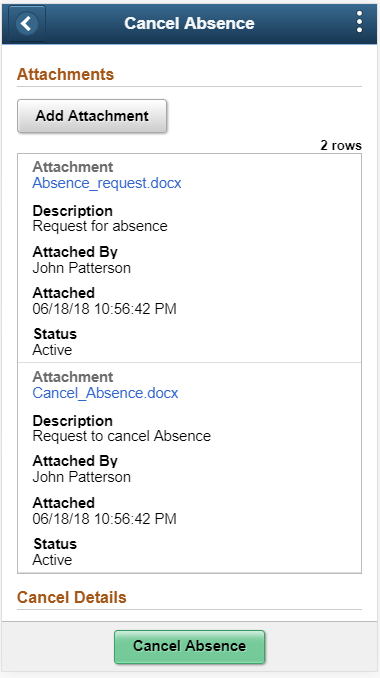
Image: Cancel Absence with Absence request attachment
This example illustrates the fields and controls on the Cancel Absences page with fluid attachment.
|
Field or Control |
Definition |
|---|---|
 |
Select the button to add the absence related fluid attachment document. |
Note: Previously attached documents are in view only mode. The documents attached as a part of cancel request can be edited before submitting. All attachments as part of Absence Request and Cancel Absence are part of Approval Request.
Image: (Smartphone) Cancel Absences with Absence request attachment
This example illustrates the fields and controls on the Cancel Absences page with fluid attachment using a smartphone
Cancel Absences page with Delegation Enabled
The employee can enable another person as his/her proxy to delegate the cancelling absence transaction.
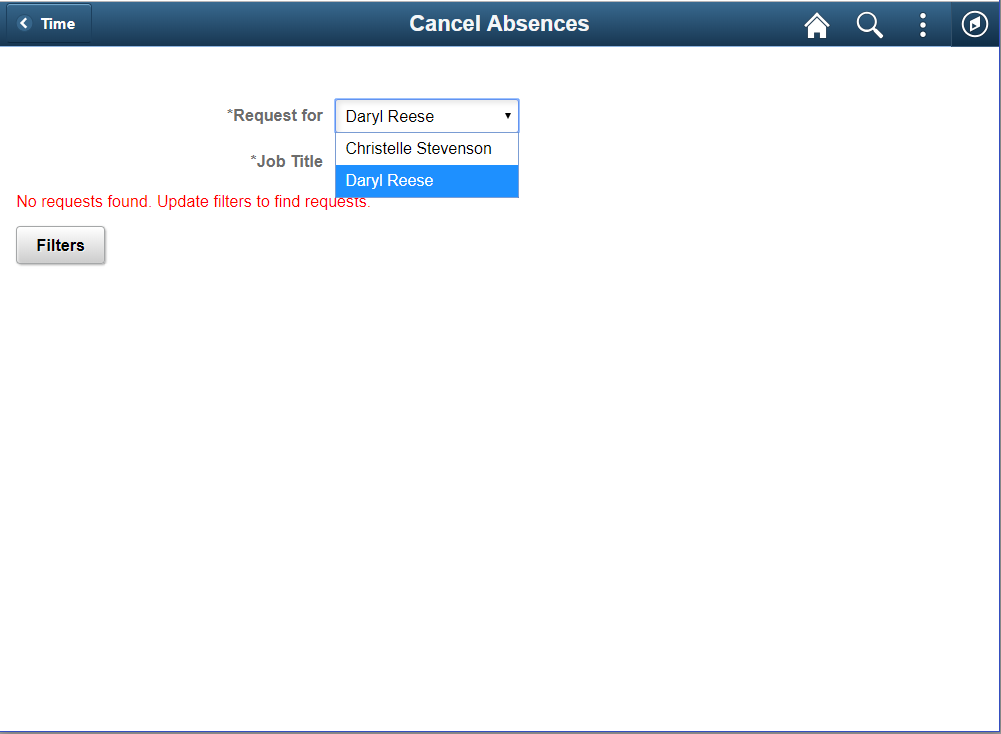
Image: Cancel Absences page with proxy enabled
This example illustrates the fields and controls for Cancel Absences page with proxy enabled.
Select View Requests (HC_HGA_SS_REQCAN_FLU_GBL) tile to navigate toView Requestspage.
Navigation
Select Fluid Home under the main menu. On the page that appears, select Employee Self Service. The Time tile is available on the Employee Self Service landing page.
Select View Requests Tile to access the View Requests page.
Image: View Requests tile
This example illustrates the View Requests tile.

Use the View Requests page (HGA_SS_REQHIST_FLU) to view your absence requests.
Navigation
Click the Time tile on the Employee Self Service fluid home page, then click View Requests on the Time page.
Image: View Requests page
This example illustrates the fields and controls on the View Requests page.
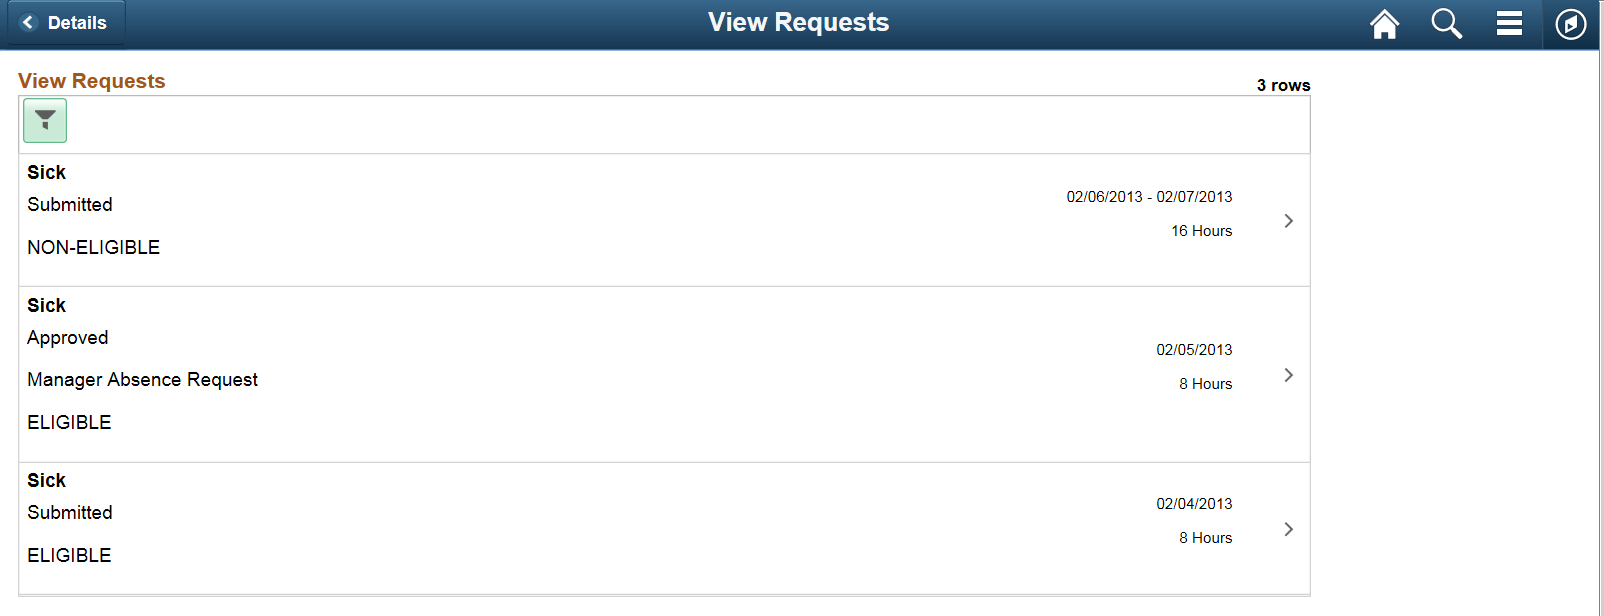
This page lists your existing absence requests. Click a request to access the Request Details Page, where you can view additional information about the request.
|
Field or Control |
Definition |
|---|---|
| (Filters) |
Click to filter your absence requests by start date, end date, absence type, and absence status. |
Use the Request Details page (HGA_SS_REQ_FLU) to view detailed information for your absence requests.
Navigation
Click an absence request on the View Requests page.
Image: Request Details page
This example illustrates the fields and controls on the Request Details page.
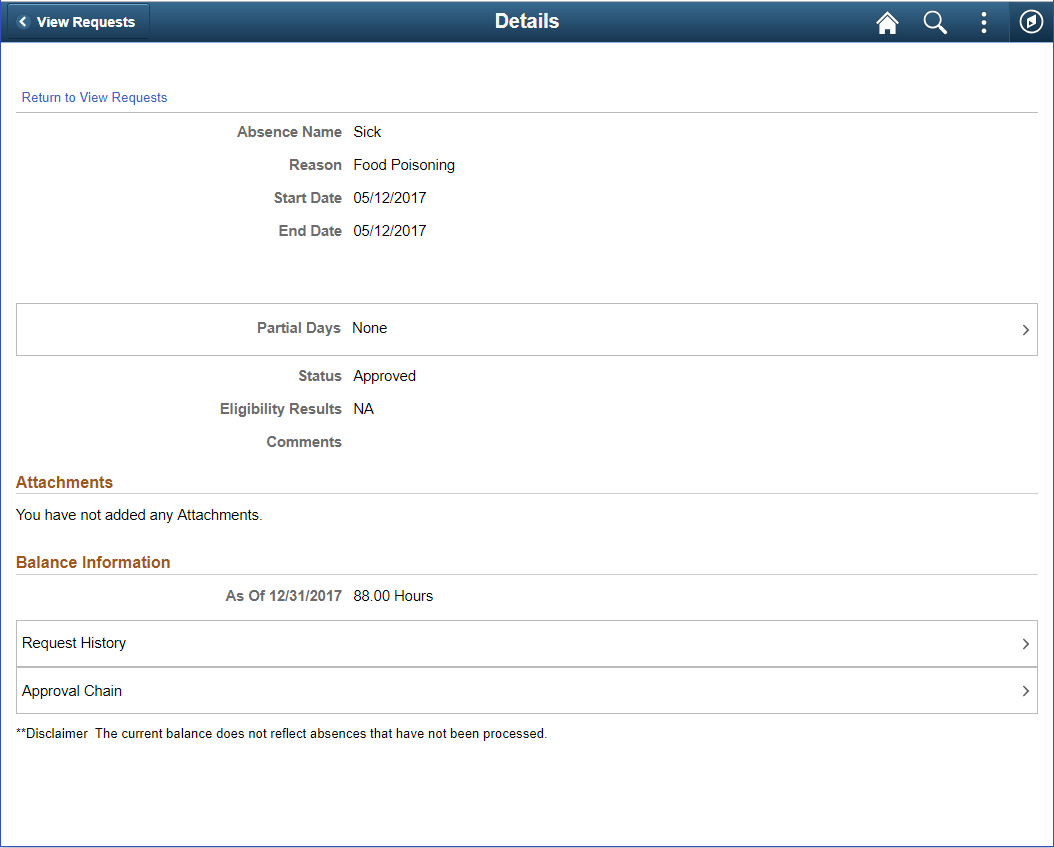
This page displays details for a specific absence request along with your current balance for the associated absence type.
Note: You can edit absence requests and attachments on this page if they have been saved, but not submitted.
You can view the Status and the Eligibility Results of the selected employee’s absence request. Click the View Eligibility link to view the absence eligibility details of the employee.
Attachments, if submitted, can appear as view only or as editable, depending on the absence status. For example, absence in saved status would provide the ability to add attachments while an absence in submitted status will display attachment as a view only grid.
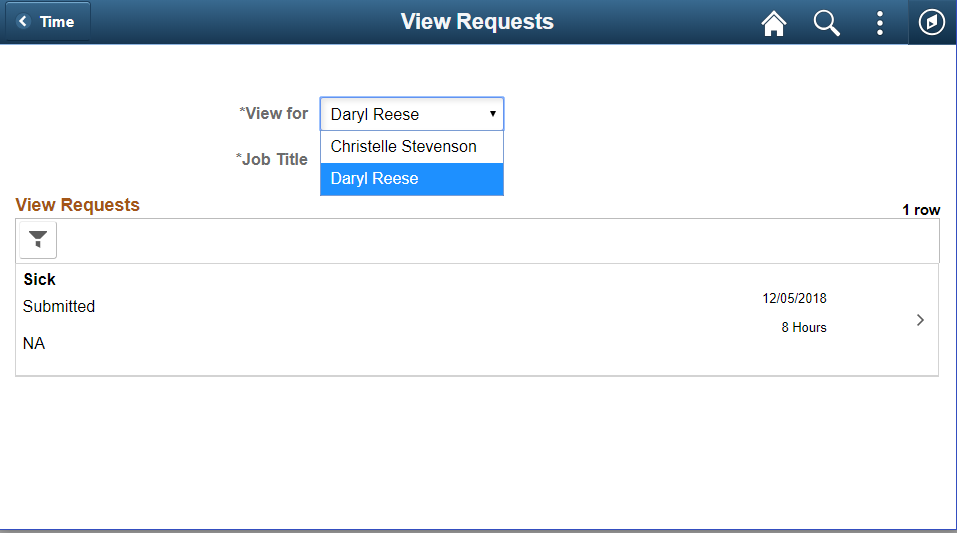
View Requests page with delegation Enabled
The employee can enable another person as his/her proxy or delegate for viewing absence requests.
Image: View Requests page with proxy enabled
This example illustrates the fields and controls for View Requests page with proxy enabled.
Select Absence Balances (HC_HGA_SS_BAL_FLU_GBLL) tile to navigate toAbsence Balancespage.
Navigation
Select Fluid Home under the main menu. On the page that appears, select Employee Self Service. The Time tile is available on the Employee Self Service landing page.
Select Absence Balances Tile to access the Absence Balances page.
Image: Absence Balances tile
This example illustrates the Absence Balances tile.
Use the Balances page to view your current absence balances.
Navigation
Click the Time tile on the Employee Self Service fluid home page, then click Absence Balances on the Time page.
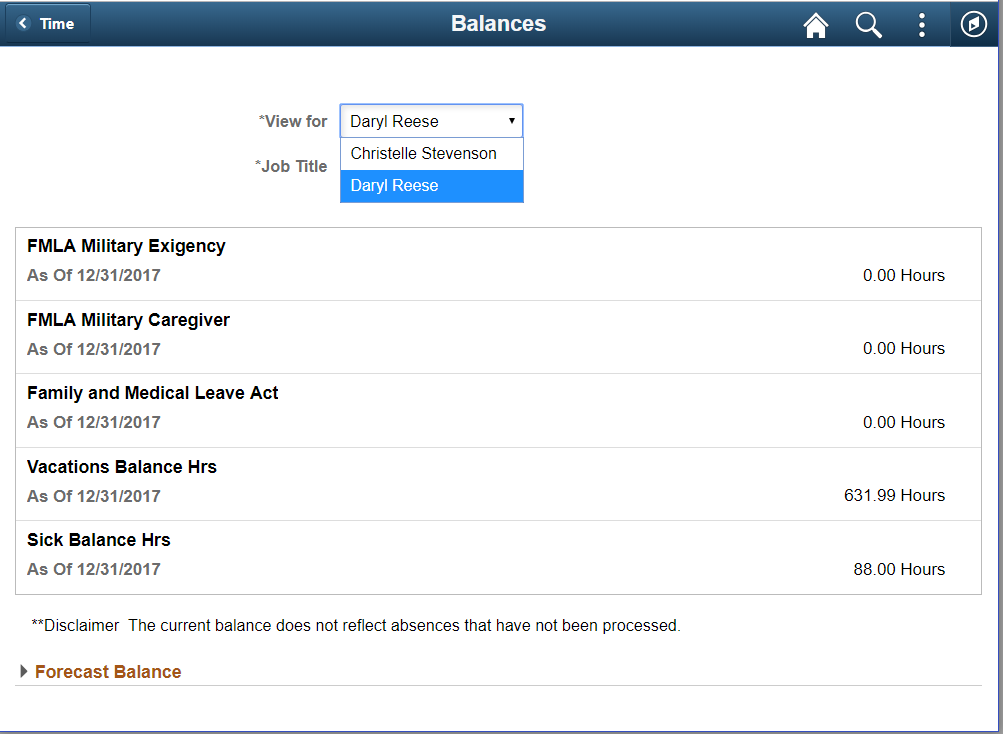
Image: Balances page
This example illustrates the fields and controls on the Balances page.
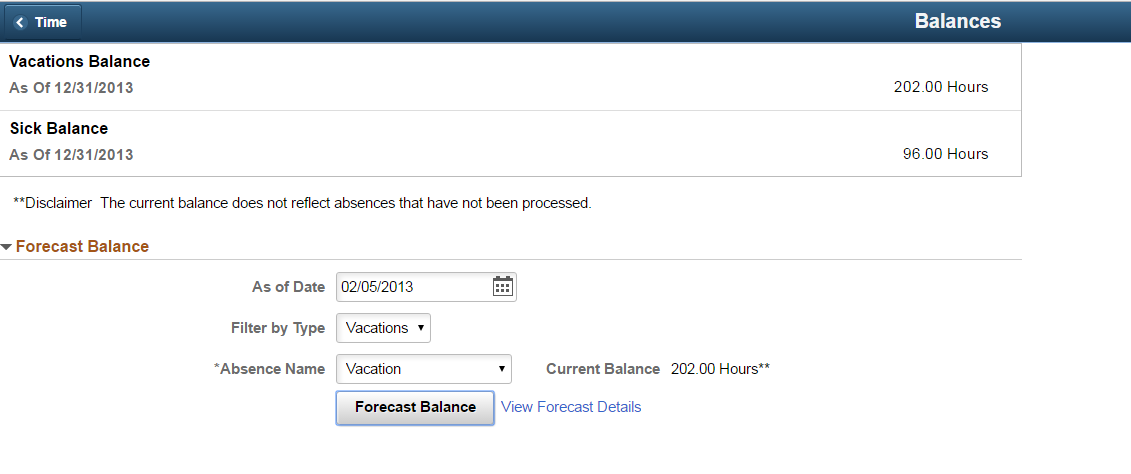
This page displays your current absence balances and forecast balance.
|
Field or Control |
Definition |
|---|---|
| Absence Name |
On selecting the absence name, the current balance of the employee based on the selected absence name is displayed. |
| Forecast Balance |
On clicking the Forecast Balance button, you can view the forecast balance details of the employee. Note: Forecast Balance button appears only once you select a value in the Absence Name field. |
| View Forecast Details |
On clicking the View Forecast Details link, you can view the absence forecast details of the employee. Note: View Forecast Details link appears on the screen only after you run the forecast balance using the Forecast Balance button. |
Absence Balance page with delegation Enabled
The employee can enable another person as his/her proxy or delegate for viewing absence balances.
Image: Absence Balance page with proxy enabled
This example illustrates the fields and controls for Absence Balances page with proxy enabled.