Setting Up Mouse Over Popups
To set up the employee mouse over pop up page, use the MouseOver Field Definition (HR_MO_FLDNM_TBL), MouseOver Page Design (HR_MO_TBL), and MouseOver Component Setup (HR_MO_COMPONENTS) components.
These topics provide an overview of the mouse over popup page, employee photos and the mouse over popup page, and discuss how to set up the mouse over popups on the application pages.
|
Page Name |
Definition Name |
Usage |
|---|---|---|
|
HR_MO_FLDNM_TBL |
Define mouse over popup fields and supporting fields that will be available in the MouseOver Page Design component and can be used with the mouse over popup page. Only the fields delivered as system data will be retrieved by the mouseover popup application class. |
|
|
Mouse Over Column 1 Page (Mouse Over Column 1 and Mouse Over Column 2 Pages) |
HR_MO_CL1_TBL |
Create mouse over page designs by defining the fields for the first column of the mouse over popup page. |
|
Mouse Over Column 2 Page (Mouse Over Column 1 and Mouse Over Column 2 Pages) |
HR_MO_CL2_TBL |
Create mouse over page designs by defining the fields for the second column of the mouse over popup page. |
|
HR_MO_COMP_SETUP_1 |
Enable the mouse over popup page for a component. Define the components which will utilize the Mouse Over Popup feature. This setup will define the popup type, the mouse over ID to be used with the component, and the owner and sub owner ID, if needed. |
|
|
HR_MO_COMP_SETUP_2 |
Indicate the ID field to retrieve the mouse over page. |
The Mouse Over Popup feature enables you to quickly see additional employee or applicant information by pausing on a person's name or ID that has a dotted line under it, as shown in this example.
Image: Example of a mouse over popup page showing additional employee data
Example of the mouse over popup page.
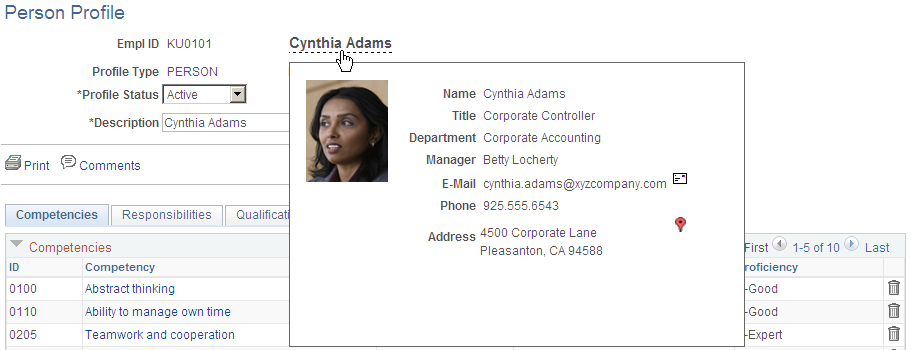
The PeopleSoft HCM application provides you with the flexibility to configure this mouse over popup page in a way that is useful to you or other groups within your organization. You may want to set up a popup page that includes employee information such as a picture, job title, department, supervisor's name, and work location. Or, when performing certain business processes, you may find it beneficial to have a popup page that includes contact information, such as an email for an employee or applicant. You can even associate this email contact information with an icon that, by clicking, will initiate an email notification.
Create different mouse over popup page designs to associate with a specific product, feature, or user role; or share the same design across multiple products. For example, you may want to view information regarding an employee's benefit selections on one page while on another page you may find it more beneficial to view the employee's holiday schedule.
Mouse Over Popup Page Layout and Design
Use the MouseOver Page Design component to identify mouse over IDs, which define the fields and number of columns that should appear on a given mouse over popup page. The system delivers these three layout designs that enable you to display pages differently:
One column of data (HR_MO_DSP_1_POP)
Two columns of data (HR_MO_DSP_1_2_POP )
An employee picture in one column and a second column of data (HR_MO_DSP_P_2_POP)
Each column can include up to seven fields. However, when you include an employee's picture on the mouse over popup page, the image will display in column 1 and no other fields will appear in that column.
The PeopleSoft application delivers these mouse over IDs:
|
Mouse Over ID |
Description |
|---|---|
|
APPLICNT_INFO_1 |
Applicant Information – Column 1 and Column 2 of data |
|
APPLICNT_INFO_2 |
Applicant Information – One column of data |
|
EMPLOYEE_INFO_1 |
Employee Information – Employee Picture and one column of data |
|
EMPLOYEE_INFO_2 |
Employee Information – Column 1 and Column 2 of data |
|
EMPLOYEE_INFO_3 |
Applicant Information – One column of data |
Note: We recommend that if you want to use a variation of one of these delivered mouse over IDs that you insert a row in the MouseOver Page Design for the ID and use the Owner ID and Sub ID fields. Do not modify the delivered value other than by inserting a row and using the owner field, since other applications may be using the delivered value. Changes to the delivered ID can affect other application currently using the mouse over ID.
Prior to creating your mouse over popup page designs, you must identify the fields that can be included on the page in the MouseOver Field Definition component. The PeopleSoft application delivers these predefined fields:
|
Applicant Data |
Person and Job Data |
|---|---|
|
|
Warning! Adding other fields is considered a customization and requires modifications to the Application Package/Class (HR_MO_COMMON: SET_UP_COMMON) PeopleCode that is used to retrieve the data associated with any new fields.
PeopleTools Application Designer Setup
The majority of the setup for the mouse over popup page is done through delivered PIA setup pages in the HCM system. However, the Mouse Over Popup properties must also be set within the page field properties within Application Designer by enabling the page popup and selecting the page layout, which is identified in the MouseOver Page Design component, Suggested Popup Page field. When mouse over popup is set up, the system places the mouse over indicator of a dotted underline under the field, which will initiate the popup.
Note: The Mouse Over Popup feature can be applied to many different pages within HCM as long as the employee or applicant ID is located at level 0 in the record structure.
Important! When you have set up a page field property for use with the mouse over popup, and this page is used in a component, the mouse over indicator will be present on the page. If this page exists in multiple components and each of those components has not been properly setup then the user will receive a message indicating so.
For more information about page levels and enabling mouse over popup pages, see the product documentation for PeopleTools: Application Designer Developer's Guide.
You can configure the system to enable managers to see the employee photo and employee details on manager self-service mouse over popup pages. However, the PeopleSoft system already displays an employee photo on various self-service transaction pages if the Display on Self Service check box is selected on the Installation Table - HCM Options Page. When both the employee photo and mouse over popup are available on a page, the system displays the employee photo in the header section next to the employee name and the delivered mouse over component setup for these pages is configured to use a mouse over ID that does not include an employee picture. This is done on the MouseOver Component Setup Page.
This table lists the Manager Self Service pages that are delivered to display an employee photo in the header when enabled on the Installation Table but also contain a mouse over popup, and are therefore configured to use a mouse over ID that does not use a picture.
|
Manager Self Service Menu Group |
Transaction Page |
|---|---|
|
Job and Personal Information |
View Employee Personal Info Promote Employee Approve Promotion View Promotion Status Transfer Employee Approve Transfer View Transfer Status Retire Employee Approve Retire View Retire Status Terminate Employee Approve Terminate Employee View Terminate Employee Status Request Job Change Review Job Change Request Change Full/Part Time Status Approve Full Part Status View Full Part Change Status Approve Location Change View Location Change Status |
|
Compensation and Stock |
Request Ad Hoc Salary Change View Compensation History |
|
Career Planning |
Manage Career Plans |
When the Allow Employee to Upload Photo option is selected on the Installation Table, the employee can determine which photo option appears in the header section: the HR system photo, and personal uploaded photo, or a dummy default photo.
Use the MouseOver Field Definition page (HR_MO_FLDNM_TBL) to define mouse over popup fields and supporting fields that will be available in the MouseOver Page Design component and can be used with the mouse over popup page.
Only the fields delivered as system data will be retrieved by the mouseover popup application class.
Navigation
Image: MouseOver Field Definition page
This example illustrates the fields and controls on the MouseOver Field Definition page. You can find definitions for the fields and controls later on this page.
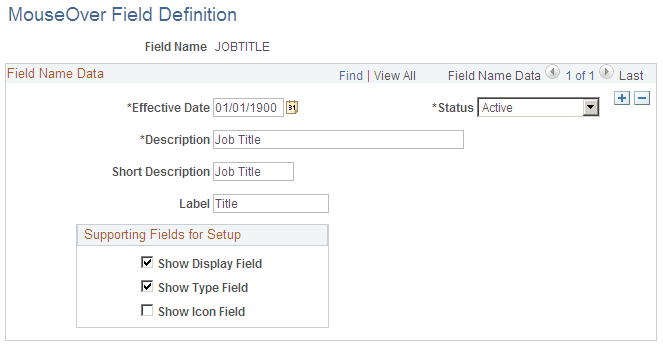
Define the fields that are configured for use with the mouse over popup page. There are 31 fields that we are delivering with this feature. Adding any other fields would be considered a customization and will require peoplecode modifications to the Application Package/Class (HR_MO_COMMON: SET_UP_COMMON) that is used to retrieve the data associated with any new fields.
Note: Only the fields delivered as system data will be retrieved by the mouseover popup application class. Any new fields added to the component require modifications to HR_MO_COMMON application package in order to retrieve the data.
|
Field or Control |
Definition |
|---|---|
| Field Name |
Define a field name that should be available for entry on the MouseOver Page Design pages when creating the design of the mouse over popup page for the user. The PeopleSoft application delivers several predefined fields for the mouse over popup page. |
| Label |
Define the default label name that will appear on the mouse over popup page. The value you enter here will supply the default value for the Label field on the Mouse Over Column 1 and 2 page but can be overwritten on that page. |
Supporting Fields for Setup
|
Field or Control |
Definition |
|---|---|
| Show Display Field |
Select this check box to have the Display field appear on the Mouse Over Page Design pages for this field. You use the Display field to specify whether the field value on the mouse over popup page should display the code, the description, or both the code and description for the user. For example, you can determine whether to have the Department field display the department code of 11000, the department description of Accounting, or both the code and description 11000 Accounting. |
|
Field or Control |
Definition |
|---|---|
| Show Type Field |
Select this check box to have the Field Type field appear on the Mouse Over Page Design pages for this field. You use the Field Type field when the field can have different types of the same data. For example, you may have a phone type of Home, Business, or Other for a person. |
|
Field or Control |
Definition |
|---|---|
| Show Icon Field |
Select this check box to have the Icon ID field appear on the Mouse Over Page Design pages for this field. You use the Icon ID field when the field can have an image associated with a field. For example, you may want to have an email field with an icon image that when selected will take the user to another window and bring up their email software. Note: The PeopleSoft application is set up to support email field icons. You will need to make modifications to PeopleCode to use other types of software. |
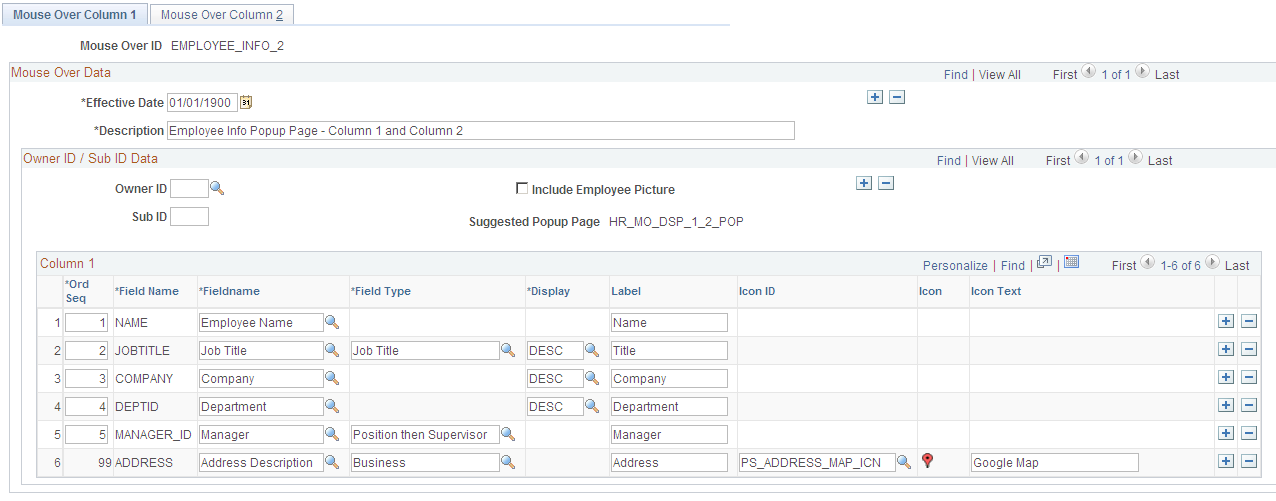
Use the Mouse Over Column 1 page (HR_MO_CL1_TBL) to create mouse over page designs by defining the fields for the first column of the mouse over popup page.
Navigation
Image: Mouse Over Column 1 page
This example illustrates the fields and controls on the Mouse Over Column 1 page. You can find definitions for the fields and controls later on this page.
Use the Mouse Over Column 2 page (HR_MO_CL2_TBL) to create mouse over page designs by defining the fields for the second column of the mouse over popup page.
Navigation
Image: Mouse Over Column 2 page
This example illustrates the fields and controls on the Mouse Over Column 2 page. You can find definitions for the fields and controls later on this page.
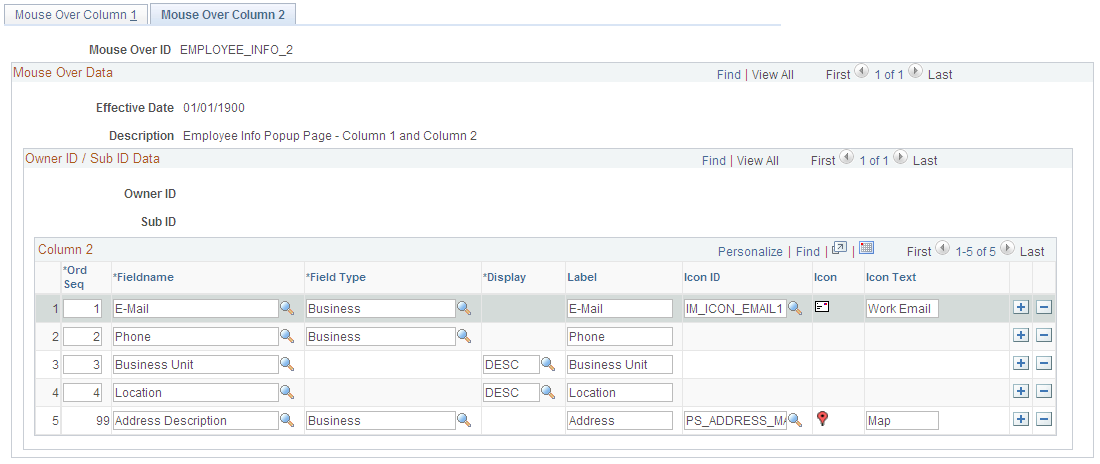
Note: Set up the Mouse Over Column 2 page the same way you set up the Mouse Over Column 1 page with the exception of the Owner ID / Sub ID Data fields. The Include Employee Picture check box and the Popup Page field are available on the Mouse Over Column 1 page only. The Owner ID and Sub ID fields are display only on the Mouse Over Column 2 page.
When creating a mouse over popup page, you can define fields to display in column 1 only, column 2 only, or both columns 1 and 2.
|
Field or Control |
Definition |
|---|---|
| Mouse Over ID |
Enter a mouse over ID that defines this unique mouse over popup page layout. You will associate this code with each component that should use this mouse over popup layout. For information about delivered mouse over IDs, see Understanding the Mouse Over Popup Page. |
Owner ID / Sub ID Data
This level enables the system to display different items on the mouse over popup page for owners and sub owners. You can have several different owner IDs and page structures associated with the same mouse over ID.
|
Field or Control |
Definition |
|---|---|
| Owner ID |
Enter an owner ID when there are different views of the same popup page for different owners. For example, use this field when a group or applications want to use the same mouse over ID but would like to change the data details of an existing ID. If you do not specify an owner id, the system uses the most recently effective mouse over ID for the display of the page. When you associate the mouse over ID with a component on the MouseOver Component Setup page, you can also enter the owner ID to specify the unique mouse over popup page design for this owner. |
| Include Employee Picture |
Select this check box to have the popup page display the employee picture, if available. When this check box is selected, the Column 1 fields are unavailable for entry and the system displays a message that no other data will display in column 1 other than the picture. Note: This field is only available on the Mouse Over Column 1 page and will display employee only pictures and should not be used for applicant mouse over popup pages. When the Display Photo option is deselected on the Installation Table - HCM Options Page, mouse over popup pages with Include Employee Picture selected will display a dummy photo. |
| Sub ID |
Enter a sub owner ID in order for the system to display different views of the same pop up page for the different sub owners. If you do not specify an owner or sub owner id, the system uses the most recently effective mouse over ID for the display of the page. When you associate the mouse over ID with a component on the MouseOver Component Setup page, you can also enter the owner ID and sub owner ID to specify the unique mouse over popup page design for this owner or sub owner. |
| Suggested Popup Page |
Displays the name of the page layout upon saving the page and determines which popup/layout to apply to the page in application designer when using the selected mouse over ID. The page layouts identify a page with one column of data (HR_MO_DSP_1_POP), a page with two columns of data (HR_MO_DSP_1_2_POP ), or a page that displays an employee's picture and one column of data (HR_-MO_DSP_P_2_POP ). |
Column 1 and Column 2
The fields in this grid box depend upon the Fieldname values you select and the supporting fields that you selected for this field name on the MouseOver Field Definition page. The fields and field detail data you enter on these pages determine how the system will display the mouse over popup page for the user.
Note: The system enables you to select up to seven field items per column.
|
Field or Control |
Definition |
|---|---|
| Ord Seq (order sequence) |
Enter a sequence number up to 98 for any field name except for address fields, which the system automatically assigns with the sequence number of 99. The layout of the mouse over page puts address fields at the bottom of the column because the system displays the address as two rows. |
| Field Name and Fieldname |
Select the fields that should appear on the mouse over popup page. Values are defined on the MouseOver Field Definition page. When you enter a value in the Fieldname field, the Field Name value displays. The grid displays additional fields based upon the supporting fields that were selected on the MouseOver Field Definition page. |
| Field Type |
Select a specific type of field value that should display when there may be more than one option available. For example, select whether to show the business phone number or the home phone number for the Phone field. This field is available when the Show Type Field check box is selected on the MouseOver Field Definition page for the field name. |
| Display |
Identity how the system should display the field value to the user. You can choose to show the field value code (CODE), the description of the field (DESC), or display both the code and description in the field BOTH. For example, you can have the system display the job code 290000, the description of the job Clerk, or have the system display both 290000 Clerk. This field is available when the Show Display Field check box is selected on the MouseOver Field Definition page for the field name. |
| Label |
Enter the label name that should appear for the user. The field value is provided by default from the MouseOver Field Definition page but can be overwritten on this page. |
| Icon ID |
Specify the icon that should display for the user that will enable him or her to click and initiate contact with the person. For example, the user can click an email icon to have the system launch the email software The PeopleSoft application supports this functionality for contacting a person through email. This field is available when the Show Icon Field check box is selected on the MouseOver Field Definition page for the field name. |
| Icon |
Displays the icon selected in the Icon ID field. |
| Icon Text |
Specify text that should appear when the user places the mouse over the icon. The default value comes from the icon ID description but can be overwritten here. This field is available for entry after selecting a value in the Icon ID field. |
Use the MouseOver Component Setup page (HR_MO_COMP_SETUP_1) to enable the mouse over popup page for a component.
Define the components which will utilize the Mouse Over Popup feature. This setup will define the popup type, the mouse over ID to be used with the component, and the owner and sub owner ID, if needed.
Navigation
Image: MouseOver Component Setup page
This example illustrates the fields and controls on the MouseOver Component Setup page. You can find definitions for the fields and controls later on this page.

|
Field or Control |
Definition |
|---|---|
| Component Name |
Identify the component that will utilize the Mouse Over Popup functionality. |
| Market |
Indicate the markets for the component. The mouseover popup key structure is by component, however, when different markets exist with the same component name you can differentiate them by market. For example, you differentiate between the Canada and United States balance arrears components by entering the market code of CAN in one row of the component name and USA in another row of the component name. |
| MouseOver Popup Type |
Select the mouse over type that should be used within this component. Values are Employee and Applicant. |
| Include Job |
Select this check box to enable the user to specify the employment record number if the data retrieved through the popup should be based on a particular employee record number. When you deselect this check box, the system uses the employee's current effective job data. |
| Mouse Over ID |
Enter the mouse over ID that should be used in relation to this component. The mouse over ID determines the look of the mouse over popup page, which is defined in the MouseOver Page Design component. Manager self-service pages that already display an employee photo in the header are delivered to use a mouse over ID (EMPLOYEE_INFO_3) that does not use an employee photo. For a list of these delivered pages, see the Understanding Employee Photos and the Mouse Over Popup Page topic. |
| Owner ID and Sub ID |
Enter an owner or sub owner ID when there are different views of the same popup page for different owners. If you do not specify an owner or sub owner id, the system uses the most recently effective mouse over ID for the display of the page. |
| Person Detail |
Click this link to access the Person Detail page and enter the record name and field name that will initiate the mouse over popup page. |
Note: The field properties for a page must be setup to use a mouse over popup page in the Application Designer. When this is done the system displays the dotted lines under the ID, indicating that the Mouse Over Popup functionality has been enable for the field. The system will display an error message if the component that contains the page has not been properly setup in the MouseOver Component Setup component.
For more information, see the product documentation for PeopleTools: PeopleSoft Application Designer Developer’s Guide.
Use the MouseOver Component Setup - Person Detail page (HR_MO_COMP_SETUP_2) to indicate the ID field to retrieve the mouse over page.
Navigation
Click Person Detail on the MouseOver Component Setup page.
Image: MouseOver Component Setup - Person Detail page
This example illustrates the fields and controls on the MouseOver Component Setup - Person Detail page. You can find definitions for the fields and controls later on this page.
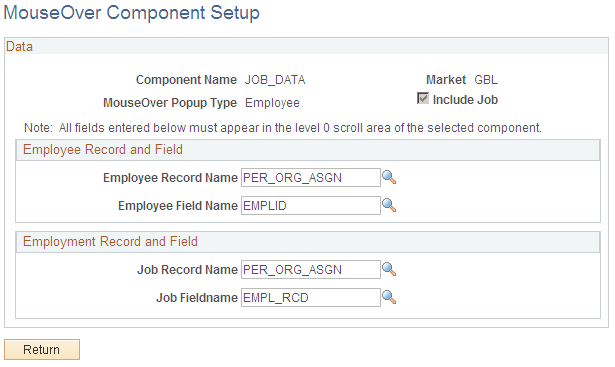
Employee or Applicant Record and Field
If the Include Job check box is not selected on the MouseOver Component Setup page, the system will only these fields for entry.
|
Field or Control |
Definition |
|---|---|
| Employee Record Name or Applicant Record Name |
Enter the record in the selected component that the system will use to retrieve the employee or applicant information. |
| Employee Fieldname or Applicant Fieldname |
Specify the field from the record identified in the Employee/Applicant Record Name field that will invoke the mouse over popup page and retrieve the employee or applicant information. |
Important! The field that will be used to retrieve the applicant or employee information must be at level 0 in the component and the Mouse Over Popup properties must also be set within the page field properties within the Application Designer.
For more information, see the product documentation for PeopleTools: PeopleSoft Application Designer Developer’s Guide.
Employment Record and Field
These fields appear when the Include Job check box is selected for the component on the MouseOver Component Setup page when the mouse over popup type is Employee.
|
Field or Control |
Definition |
|---|---|
| Job Record Name |
Enter the name of the record of the selected component that the system will use to retrieve job related information specific to an employment record number. |
| Job Fieldname |
Enter the name of the field in the job record which the system will use to retrieve job related information specific to an employment record number. |
Note: The record and field must be at level 0 of the component.