Setting Up Implementation Defaults
To set up implementation defaults, use the Installation Table component (INSTALLATION_TBL).
These topics provide an overview and discuss implementation defaults.
Note: In addition to the defaults that you define here on the Installation Table component, additional product-specific installation tables may exist that enable you to view or set system-wide defaults specific to the product. To identify product-specific installation tables, navigate to , and then consult the respective product documentation for more information.
|
Page Name |
Definition Name |
Usage |
|---|---|---|
|
INSTALLATION_TBL1 |
Specify the PeopleSoft applications for your installation. |
|
|
Global Payroll Country Extensions Page |
INSTALL_GP_SEC |
Select the PeopleSoft Global Payroll country extensions you are implementing. |
|
INSTALL_PIP_SEC |
Select the payroll integration pack you are using, if applicable. |
|
|
INSTALLATION_TBL1B |
Specify how to drive your system: by person, by position, or both. Enter the PeopleSoft HCM defaults that are related to your organizational policies. |
|
|
INSTALLATION_TBL1A |
Enter product- and industry-specific installation information. |
|
|
INSTALLATION_TBL3 |
Enter country-specific installation information. |
|
|
INSTALLATION_SEC |
Specify which local country functionality to activate for users in PeopleSoft Human Resources. |
|
|
INSTALLATION_TBL2 |
Specify the number that the system uses to start assigning numbers. |
|
|
INSTALLATION_TBL4 |
Set the criteria for gathering statistics and activate the SQR security for PeopleSoft HCM. Define parameters for using third-party applications such as Visio. |
|
|
ALT_CHAR_TBL |
Specify the language code and alternate character type. |
|
|
Installation Table Report - Run Control Page |
PRCSRUNCNTL |
Run the Installation Table report (PER702). This report lists default values for field defaults, such as company code, minimum/maximum standard hours, and Social Security number. |
For each site where you implement PeopleSoft HCM, you must complete the Installation Table to specify various defaults, processing rules, and counters for the system to use. You can have only one set of installation information for each site; this information is required.
Warning! You must complete the information on the Org Defaults by Permission Lst component (OPR_DEF_TBL_HR) for each primary permission list. Most of the defaults in PeopleSoft HCM come from the Org Defaults by Permission Lst component and not the Installation Table pages. Other PeopleSoft HCM applications have defaults that are based on the Installation Table settings. However, in PeopleSoft Human Resources, all defaults are based on the settings that you make on the Org Defaults by Permission Lst component. There are some exceptions to this rule in PeopleSoft Human Resources, and they are noted in the default field level discussion.
See Setting Up Primary Permission List Preferences.
When you access the Installation Table pages for the first time, you'll see that PeopleSoft has already entered information for a sample company that you can use as a guide. After you enter your installation information, log off to save your changes.
Use the Products page (INSTALLATION_TBL1) to specify the PeopleSoft applications for your installation.
Navigation
Image: Products page
This example illustrates the fields and controls on the Products page. You can find definitions for the fields and controls later on this page.
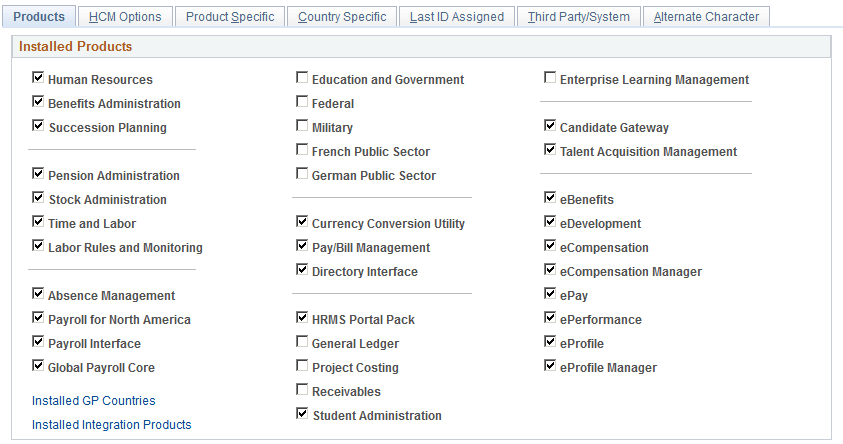
Select the applications you are installing. To access that application's functionality, you must select it on this page.
If you are implementing PeopleSoft Global Payroll, select the Installed GP Countries link to select the Global Payroll country extensions you are implementing.
If you are implementing an integration product, select the Installed Integration Products link to select the integration product.
(USF) Setting Up PeopleSoft HCM for Federal Functionality
To set up your database for U.S. federal government functionality, select Federal on the Installation Table - Products page and update the Org Defaults by Permission Lst component to point to the U.S. federal government industry and sector.
To set up your database for military functionality, select Militaryon the Installation Table - Products page.
Make your primary permission list preference changes on the Settings page of the Org Defaults by Permission Lst component. To set up a federal database, select an Industry of Government and an Industry Sector of US Federal.
Use the Installed Integration Products page (INSTALL_PIP_SEC) to select the integration products you are using, if applicable.
Navigation
Click the Installed Integration Products link on the Products page.
Image: Installed Integration Products page
This example illustrates the fields and controls on the Installed Integration Products page.
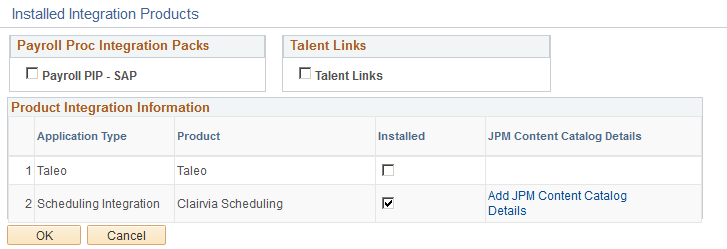
Payroll Proc Integration Packs
|
Field or Control |
Definition |
|---|---|
| Payroll PIP - SAP |
Select this option if you license and implement the payroll process integration pack for SAP. |
Talent Links
|
Field or Control |
Definition |
|---|---|
| Talent Links |
Select this option if you license and implement the Talent Integration Management solution. The Talent Integration Management solution enables you to integrate between two instances of HCM on different releases, and utilize new functionality delivered in the newer system without having to perform a full upgrade. For example, as you run your core HR products on an older HCM instance, you can integrate with another HCM instance running on the current release using Talent Integration Management, and be able to take advantage of all the new Talent Management features offered on that release. See this My Oracle Support posting for more information: PeopleSoft Talent Management 9.2 to PeopleSoft 9.1 Integration (Document 1583596.1) |
Product Integration Information
Select any integrated products listed in this section that are installed in your HCM system.
Use the HCM Options page (INSTALLATION_TBL1B) to specify how to drive your system: by person, by position, or both.
Enter the PeopleSoft HCM defaults that are related to your organizational policies.
Navigation
Image: HCM Options (1 of 2) page
This example illustrates the fields and controls on the HCM Options (1of 2) page. You can find definitions for the fields and controls later on this page.
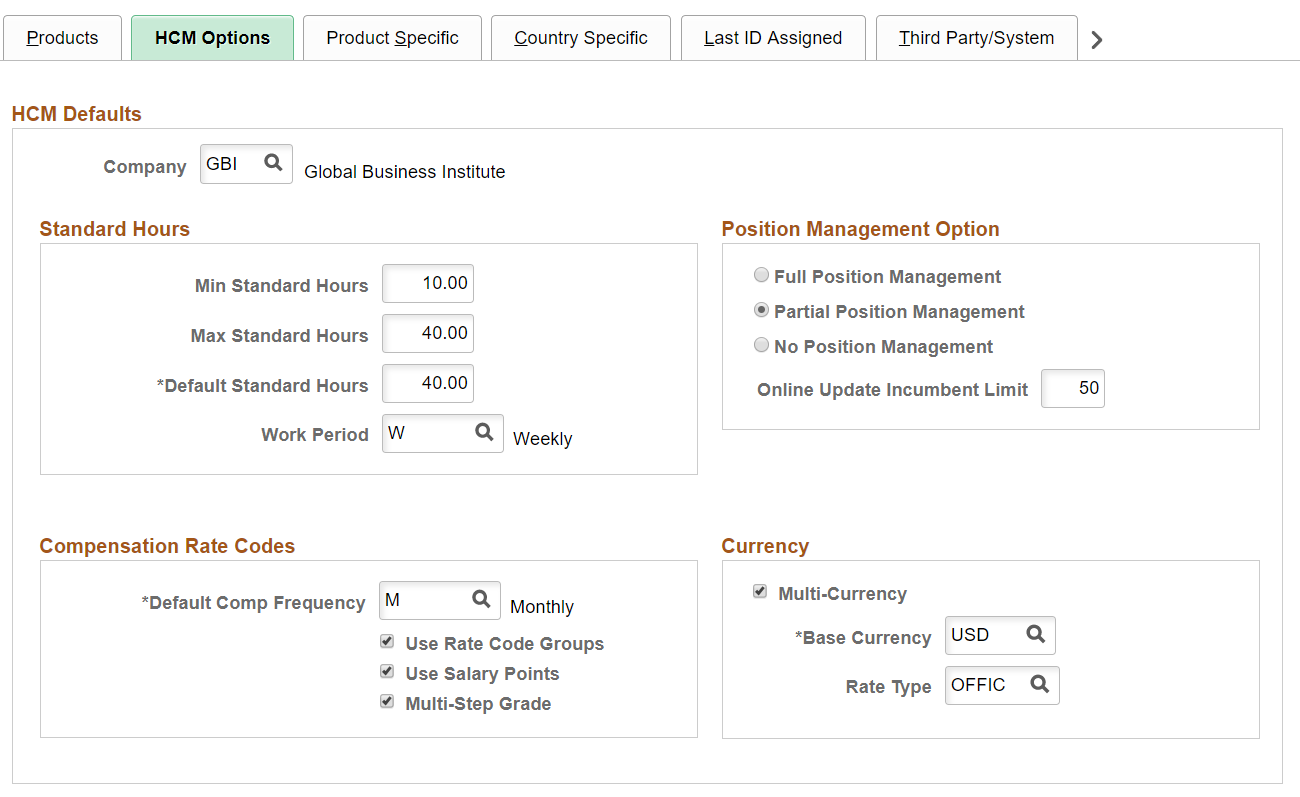
Image: HCM Options (2 of 2)page
This example illustrates the fields and controls on the HCM Options (2 of 2) page. You can find definitions for the fields and controls later on this page.
|
Field or Control |
Definition |
|---|---|
| Company |
Select the default company code. The system uses this default in several tables in PeopleSoft Human Resources. For a single-company organization, enter the code for that company; for multicompany environments, determine which company is most appropriate. |
Standard Hours
To use this functionality to control payroll input in PeopleSoft Global Payroll, review your payroll and make sure that the elements reference the appropriate PeopleSoft Human Resources items. The system does not use them automatically.
|
Field or Control |
Definition |
|---|---|
| Min Standard Hours (minimum standard hours) and Max Standard Hours (maximum standard hours) |
Enter the minimum and maximum standard hours that workers are expected to work in the standard work period. The system enters this information as default values but you can override the values on either the Job Code component (JOB_CODE_TBL) or Position Data component (POSITION_DATA). |
| Default Standard Hours |
Enter the number of hours in a standard work period at the company. This is a required field. When you define preferences for a primary permission list, the standard hours appear by default from the Installation Table. The value that you enter also becomes the default standard hours value for a job in the Job Code Table component and the default standard hours value in the Salary Plan Table component (SALARY_PLAN_TABLE). PeopleSoft Human Resources uses standard hours to compute a full-time equivalency (FTE) value to prorate holiday hours and pay for part-time and hourly workers. |
| Work Period |
Select a standard work period (the time period in which workers must complete the standard hours). Values are stored on the Frequency table. The system uses the annualization factor of the standard work period in combination with the standard hours to calculate FTE. |
See Classifying Jobs.
Position Management Option
To drive part or all of the system by position, change the setting in this group box.
If you use PeopleSoft Pension Administration, don't use position management for your retiree organization. If you use position management for your workers, select Partial to exclude retiree departments.
Note: Using position management substantially alters the way that the system processes your data, and requires you to maintain data differently.
|
Field or Control |
Definition |
|---|---|
| Full Position Management |
The system expects that you track position data for all people in your organization and that you drive your human resource system by position, not by person. |
| Partial Position Management |
The system uses whatever position data is available, but doesn't require that you track your entire organization using position management. Select to use the business process on a trial basis or for selected departments. |
| No Position Management |
You drive your system by person. You can still assign position numbers to people, but the system doesn't use position data for job records, such as work phone or mail drop ID. This is helpful for tracking only certain positions, such as those above a particular management level. |
| Online Update Incumbent Limit |
The system uses this number to capture the maximum number of incumbents in a position that will be updated online. The system default is 50, but you can adjust this amount based on your organization's server capabilities. If the number of incumbents for the position does not exceed the limit set here, the incumbent data is updated online. When saving data in the Position Data component, and the number of incumbents for the position exceeds the limit set here, the system will display a message that the update of incumbent data will be done through a batch process. The process is scheduled and another message with the process instance number of the job displays. The application engine program calls the Position Data CI so that the UpdateIncumbents function is invoked to perform the incumbent updates. |
Compensation Rate Codes
|
Field or Control |
Definition |
|---|---|
| Default Comp Frequency (default compensation frequency) |
Select the value to use for reporting salaries. This field is required. The system also uses this value as the default compensation frequency in the Job Code Table. |
See Classifying Jobs.
|
Field or Control |
Definition |
|---|---|
| Use Rate Code Groups |
Select if your organization bundles rate codes to apply percentages when calculating compensation. |
| Use Salary Points |
Select if your organization uses rate codes that have the rate code type points. |
| Multi-Step Grade |
Select if your organization uses a multistep/grade salary plan. This causes the system to use the Salary Step Components page (SALARY_PLAN_T3GBL) to determine compensation rates. |
Currency
|
Field or Control |
Definition |
|---|---|
| Multi-Currency |
Select if you use different types of currency to pay people. This option affects only PeopleSoft Payroll for North America. PeopleSoft Global Payroll uses a separate multicurrency in the payroll system. Note: Select the Multi-Currency check box on the PeopleTools Options page (PSOPTIONS). |
| Base Currency |
Select a currency code from the values in the Currency Code page (CURRENCY_CD_TABLE). The code you select is the default currency that the system uses to calculate compa-ratios (percent through range calculations) and all total amounts on pages and reports for PeopleSoft Human Resources and PeopleSoft Payroll for North America, regardless of the currency that is used for individual line items. For example, if the U.S. dollar is your base currency, but your global salespeople submit expense reports in French francs, the system calculates the expense total in U.S. dollars by internally converting all line item amounts to U.S. dollars and displaying the total in U.S. dollars. Note: All currency defaults in PeopleSoft Human Resources are based on the base currency that you indicate on the Installation Table page, not the Org Defaults by Permission Lst component. The Org Defaults by Permission Lst component doesn't affect the currency defaults on the local country pages. |
See Understanding Currencies and Market Rates.
|
Field or Control |
Definition |
|---|---|
| Rate Type |
Identify the default rate type on which your currency conversion is based. Do this only if you haven't specified a default rate type for a primary permission list on the Org Defaults by Permission Lst component. The system checks the Org Defaults by Permission Lst component for a default rate type first; if none is specified, it looks at this value. |
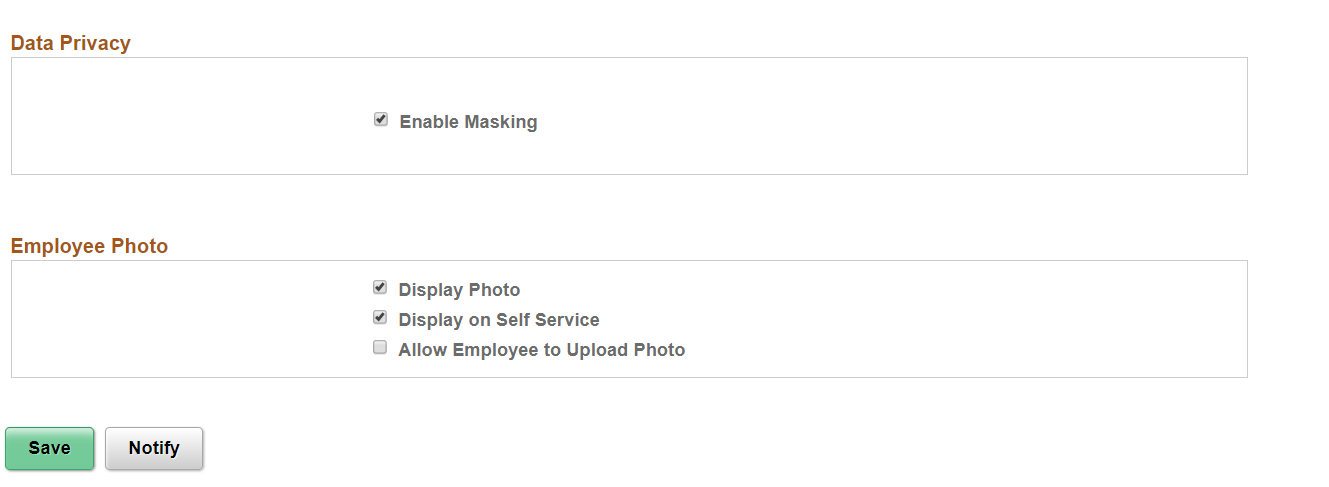
Data Privacy
|
Field or Control |
Definition |
|---|---|
| Enable Masking |
Select to enable the settings for sensitive data masking. |
Employee Photo
|
Field or Control |
Definition |
|---|---|
| Display Photo |
Select to display a photo of the employee on application pages throughout the HCM system. Many application pages display employee photos using the Mouse Over Popup feature. For more information on employee photos and how to set up these popup pages displaying the employee photo, see Understanding Employee Photos and the Mouse Over Popup Page and Setting Up Mouse Over Popups. Deselect to turn off the employee photo display across the HCM application. When this option is deselected, the Display on Self Service and Allow Employee to Upload Photo check boxes on this page become unavailable for selection. |
| Display on Self Service |
Select to display a photo of the employee on the self service and PeopleSoft Fluid User Interface pages, this includes the pages on ePerformance and the Org Chart Viewer, such as the Company Directory. |
| Allow Employee to Upload Photo |
Select to enable employees to upload their own photo. By selecting this option, the Update Photo link or icon will appear beneath the employee photo on the self-service Personal Information Summary page, the Profile Page of the Org Chart Viewer (such as the Company Directory), and the Personal Details page of the PeopleSoft Fluid User Interface (see Using the PeopleSoft Fluid User Interface to Review and Update Personal Information). When this option is enabled, the employee can select the Update Photo link or icon to select a photo display options. The employee can chose to display:
When deselected, the Update Photo link or icon will not be a available on the self-service pages. However, administrators still have the ability to upload the official HR system photo on the Identification Data - Employee Photo Page. |
Use the Product Specific page (INSTALLATION_TBL1A) to enter product- and industry-specific installation information.
Navigation
Image: Product Specific page
This example illustrates the fields and controls on the Product Specific page. You can find definitions for the fields and controls later on this page.
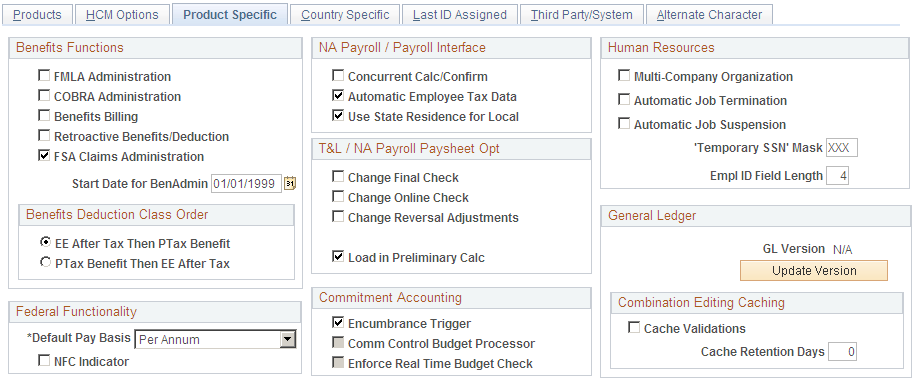
Benefits Functions
|
Field or Control |
Definition |
|---|---|
| FMLA Administration (Family Medical Leave Act), COBRA Administration (Consolidated Omnibus Budget Reconciliation Act administration), Benefits Billing, Retroactive Benefits / Deductions, and FSA Claims Administration |
Select to activate these different types of benefits functionality. |
| Start Date for BenAdmin (start date for Benefits Administration) |
Enter the start date in PeopleSoft date format: MM/DD/YYYY. |
Benefits Deductions Class Order
When the 415(c) limit is met, the deduction classes are limited in the following order: Employee Before-tax contribution, Employee After-tax contribution, Ptax Benefit (Employer Before tax Match), & then the Nontaxable Benefit (After Tax Employer Match). The user can change the deduction class order when the limit is met by selecting PTax Benefit then EE After Tax — Employer Before Tax Contribution is limited first then the Employee After Tax Contribution. The deduction class order will then be Employee Before-tax contribution, Ptax Benefit (Employer Before tax Match), Employee After-tax contribution & then the Nontaxable Benefit (After Tax Employer Match).
(USF) Federal Functionality
|
Field or Control |
Definition |
|---|---|
| Default Pay Basis |
For the Default Pay Basis, select the value to use for quoting and reporting salaries. This field is required if you selected Federal on the Products page. |
| NFC Indicator |
Select this check box to expose National Finance Center (NFC) fields on impacted components and run the associated Peoplecode logic. |
NA Payroll / Payroll Interface (North American Payroll and Payroll Interface)
|
Field or Control |
Definition |
|---|---|
| Concurrent Calc/Confirm (concurrent calculation and confirmation) |
Select to enable the system to run a calculation and confirmation at the same time. It is possible for a person to be in two concurrent runs; this could cause a deadlock situation where the process ends abnormally. |
| Automatic Employee Tax Data |
Select to enable the system to create employee federal, state, and provincial tax records automatically whenever the following criteria are met:
|
| Use State Residence for Local |
Automatically selected when you select Automatic Employee Tax Data. Leave this field selected to assume that an employee is a resident of any local tax jurisdiction that happens to be located in the employee's state of residence. If this assumption is not true, clear this field to prevent resident local taxes from being erroneously deducted from an employee's paycheck. |
T&L/NA Payroll Paysheet Opt (Time and Labor and Payroll for North America paysheet options)
|
Field or Control |
Definition |
|---|---|
| Change Final Check, Change Online Check, and Change Reversal Adjustments |
Select to enable payroll users to make paysheet changes to data that is retrieved from PeopleSoft Time and Labor. PeopleSoft recommends not selecting these check boxes because changes that are made directly to the paysheets aren't transmitted to PeopleSoft Time and Labor. |
| Load in Preliminary Calc (load in preliminary calculation) |
The Pay Calculation process uses the value of the Load in Preliminary Calc field to determine whether to load new available time (additional time that was worked before the job change but not previously loaded on paysheets):
Note: If an employee had a Job data change that caused paysheets to be rebuilt, the Pay Calculation process attempts to reload all valid time and rejects time that is no longer valid as a result of the Job data change. This is true regardless of the setting of the Load in Preliminary Calc field. In this case, the process first rejects all previously loaded time, then it reloads the available time. If Load in Preliminary Calc is not selected, some new time might be loaded, but only for the employee being processed due to the Job data change. |
AP Invoice Prefix (accounts payable invoice prefix)
|
Field or Control |
Definition |
|---|---|
| AP Inv. Prefix (accounts payable invoice prefix) |
(Optional) Enter a prefix to be used for accounts payable invoices that are generated through HCM. |
Commitment Accounting
|
Field or Control |
Definition |
|---|---|
| Encumbrance Trigger |
Select to enable pre-encumbrance and encumbrance triggers to be processed from various online events. Each event causes the system write a record to the Encumbrance Trigger table (ENCUMB_TRIGGER), which is then used as input for the Batch Encumbrance Calculation process (ENC_CALC). |
| Comm Control Budget Processor (commitment control budget processor) |
Select to enable real-time budget checking using the Commitment Control Budget Processor in PeopleSoft Financials. Real-time budget checking verifies available funding for job data changes or position data changes that generate encumbrances and pre-encumbrances. The Commitment Control Budget Processor is a PeopleSoft Financials Application Engine program that checks your budget for available funds This check box is available if you have configured the necessary integration with PeopleSoft Financials 9.0 or higher, but you must separately confirm that the necessary ledgers have been set up. If the ledgers have not been set up, the Commitment Control Budget Processor response to all budget checks is that the charges are invalid. Note: Real-time budget checking must be additionally activated at the department level. |
| Enforce Real Time Budget Check |
This setting is applicable only to departments with real time budget checking configured in department table setup. Select to prevent users from saving certain critical job data and position data changes when real-time budget checking shows that there are not sufficient budgeted funds for the change. Critical changes in the Job Data component include hiring, rehiring, and adding a concurrent job. Critical changes in the Position Data component include creating a position, increasing the head count for a position, changing a position from inactive to active, and changing the Pre-Encumbrance Indicator for a position from None or Requisition to Immediate. Any other changes that affect encumbrance and pre-encumbrance calculations are considered non-critical. If you select this check box, users must address the budget errors before the system will allow the critical job data or position data changes to be saved. If you do not select this check box, users can choose to ignore the budget errors for critical changes. Note: Users can always ignore budget check errors related to non-critical job data and position data changes. |
Human Resources
|
Field or Control |
Definition |
|---|---|
| Multi-Company Organization |
Select if your organization comprises more than one company. Select if you use PeopleSoft Pension Administration, because you set up companies specifically to house your pension payees. |
| Automatic Job Termination |
Select to automatically terminate any job that has an end date. The system does this by creating a termination row for the job. |
| Automatic Job Suspension |
Select to activate substantive job suspension for workers working in temporary assignments where the substantive job requires suspension for the duration of the assignments. |
| 'Temporary SSN' Mask (temporary Social Security number mask) |
Enter a three-digit number to be a default Social Security number for all applicants or people whose Social Security numbers are unavailable. Assign a value that is greater than 800 so that the temporary number doesn't conflict with valid Social Security numbers. |
| Empl ID Field Length |
Enter the number of characters to be used for employee IDs. |
General Ledger
|
Field or Control |
Definition |
|---|---|
| GL Version |
Displays the version of PeopleSoft General Ledger that is interfacing with PeopleSoft HCM. Click the Update Version button if you change versions. The system will automatically update the GL Version. Note: Full ChartField functionality is available only when you use PeopleSoft General Ledger 8.4 or higher. Real-time budget checking is available only when you use PeopleSoft Financials 9.0 or higher with Commitment Control. |
| Update Version |
Click to test the integration with PeopleSoft Financials and display the latest version of Financials. |
| Cache Validations |
Select to cache the results of your validations. This improves performance by enabling you to cached validations. |
| Cache Retention Days |
Enter the number of days to store validation results. The system will delete anything in the cache older than this. |
Use the Country Specific page (INSTALLATION_TBL3) to enter country-specific installation information.
Navigation
Image: Country Specific page
This example illustrates the fields and controls on the Country Specific page. You can find definitions for the fields and controls later on this page.
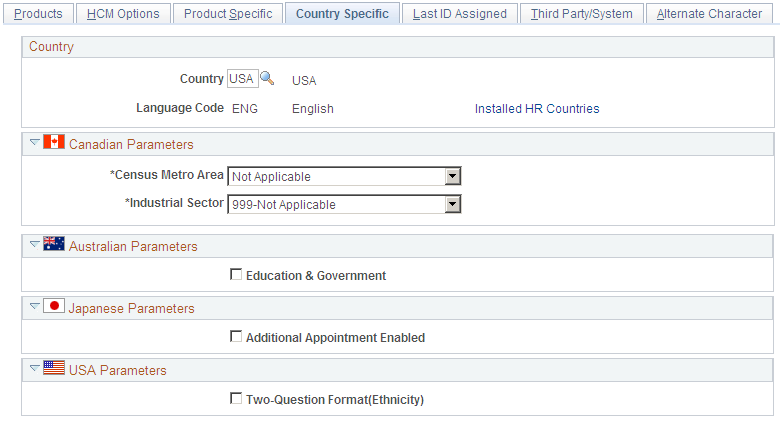
Country
|
Field or Control |
Definition |
|---|---|
| Country |
Select a country for the system to enter as a default value. |
| Language Code |
The system displays the default base language for the database. |
| Installed HR Countries |
Select this link to go to the Installed HR Countries page, where you can select which local country functionality is installed in the system. |
(CAN) Canadian Parameters
|
Field or Control |
Definition |
|---|---|
| Census Metro Area (census metropolitan area) |
Enter the Census Metro Area (CMA) code that is prescribed by Statistics Canada for this location. The system uses the default CMA code that you enter only if no default CMA code is specified on the Org Defaults by Permission Lst component. CMA refers to the main labor market area of an urban core with a population of at least 100,000. This field is required for Canadian companies. |
See Setting Up Primary Permission List Preferences.
|
Field or Control |
Definition |
|---|---|
| Industrial Sector |
Used for Canadian employment equity purposes. The system uses the default value that you enter only if no default industrial sector is specified on the Org Defaults by Permission Lst component. This value is used as the default for the Canadian Industrial Sector field in the Department component; and it identifies the industrial sector with which people in a given department are associated. This field is required. |
(AUS) Australian Parameters
|
Field or Control |
Definition |
|---|---|
| Education & Government |
Select this check box for Australian public service organizations. |
(JPN) Japanese Parameters
|
Field or Control |
Definition |
|---|---|
| Additional Appointment Enabled |
Select if you will be implementing Additional Appointment tracking (Kenmu). Selecting this check box activates functionality to create a dummy additional appointment job code when you create a new business unit. |
(USA) USA Parameters
|
Field or Control |
Definition |
|---|---|
| Two-Question Format (Ethnicity) |
Select this check box if you want to collect U.S. employee ethnicity data using the two-question format defined in the U.S. Office of Management and Budget's (OMB) 1997 Standards for Maintaining, Collecting and Presenting Federal Data on Race and Ethnicity. When this check box is selected, U.S. employees who access the self-service Ethnic Groups page see a version of the page that uses the two-question format. When this check box is deselected, U.S. employees see the same version of the self-service Ethnic Groups page that non-U.S. employees see. This general-purpose version of the page does not include any questions. Instead, employees specify one or more ethnicities in an Ethnic Groups grid. |
Use the Installed HR Countries page (INSTALLATION_SEC) to specify which local country functionality to activate for users in PeopleSoft Human Resources.
Navigation
Click the Installed HR Countries link on the Installation Table - Country Specific page.
Image: Installed HR Countries page
This example illustrates the fields and controls on the Installed HR Countries page. You can find definitions for the fields and controls later on this page.
The system displays a flag for each country that has special local functionality in PeopleSoft Human Resources:
Select a check box to activate local functionality for that country. Users who have security access can see and work with that country's local functionality.
Deselect a check box to hide that local functionality from your users.
If the check box for a country is selected on this page, but you don't grant country access to the users' primary permission list on the Setup Global Security page (SCRTY_TBL_GBL), users will not see local country functionality.
Use the Last ID Assigned page (INSTALLATION_TBL2) to specify the number that the system uses to start assigning numbers.
Navigation
Image: Last ID Assigned page
This example illustrates the fields and controls on the Last ID Assigned page. You can find definitions for the fields and controls later on this page.
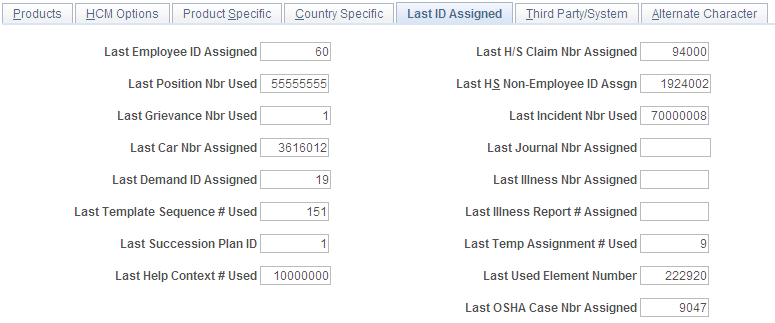
In PeopleSoft HCM, there are several fields where you can either enter numbers manually or let the system assign them.
The following table lists auto-numbering fields.
|
Field |
Application |
Business Process |
|---|---|---|
|
Last Employee ID Assigned |
PeopleSoft Human Resources |
Administer Workforce Recruiting Workforce |
|
Last Position Nbr Used |
PeopleSoft Human Resources |
Manage Positions Plan Successions |
|
Last Grievance Nbr Used |
PeopleSoft Human Resources |
Manage Labor Administration |
|
Last Car Nbr Assigned |
PeopleSoft Human Resources |
Administer Company Cars |
|
Last Demand ID Assigned |
PeopleSoft Human Resources |
Budget Training |
|
Last Template Sequence # Used |
PeopleSoft Human Resources |
Administer Workforce |
|
Last Succession Plan ID |
PeopleSoft Human Resources |
Plan Successions |
|
Last Help Context # Used |
PeopleSoft HCM |
Customizing Windows Online Help |
|
Last H/S Claim Nbr Assigned |
PeopleSoft Human Resources |
Monitor Health and Safety |
|
Last H/S Non—Employee ID Assigned |
PeopleSoft Human Resources |
Monitor Health and Safety |
|
Last Incident Nbr Used |
PeopleSoft Human Resources |
Monitor Health and Safety |
|
Last Journal Nbr Assigned |
PeopleSoft Payroll for North America |
Administer GL Interface |
|
Last Illness Nbr Assigned |
PeopleSoft Human Resources |
Monitor Absence |
|
Last Illness Report # Assigned |
PeopleSoft Human Resources |
Monitor Absence |
|
Last Temp Assignment # Used |
PeopleSoft Human Resources |
Administer Workforce |
|
Last Used Element Number |
PeopleSoft Human Resources |
Manage Profiles |
|
Last OSHA Case Nbr Assigned |
PeopleSoft Human Resources |
Monitor Health and Safety Meet Regulatory Requirements |
To let the system assign numbers for the fields on this page, enter the last number that you used in the field. The system increases that number by one when it assigns a new number. The system updates the Installation Table every time it assigns a number. You can override this value as necessary.
Note: To avoid maintaining two different sets of numbers, either always assign numbers manually or always let the system do it.
In addition to the last IDs that you set here, additional product-specific installation tables might enable you to view or set last IDs specific to that product. Navigate to to access product-specific installation tables.
ID Considerations
When you convert ID data to PeopleSoft Human Resources from another system, enter the highest number that was used in your previous system so that you don't duplicate IDs. If the last ID you assigned in your previous system was 1000, enter 1000 in the Last Employee ID Assigned field. When you add a person in PeopleSoft Human Resources, the system assigns an ID of 1001 and updates the Last Employee ID Assigned field accordingly.
To always enter IDs manually, enter 9999999999 (ten 9's) in the Last Employee ID Assigned and Last Applicant ID Assigned fields.
If you use Social Security or insurance numbers as IDs, change the formatting for the employee ID field using PeopleSoft Application Designer.
Zero-filled Numbers
To make data entry faster and more accurate on several pages when you enter a number that the system has assigned, the system enters zeros before the number. For example, when you enter 4, you see 00000004, a total of 8 characters per number. This occurs in the following fields:
Job Opening
Requirements Search
Grievance
Incident
Claim
Position
Note: If you have already assigned numbers that aren't zero-filled, change their numbering so that the system can accurately track them when you convert the data to PeopleSoft Human Resources.
For more information about data conversion, ask your human resources project leader or see the PeopleSoft Application Designer documentation.
See PeopleTools: Application Designer Developer's Guide
Use the Third Party/System page (INSTALLATION_TBL4) to set the criteria for gathering statistics and activate the SQR security for PeopleSoft HCM.
Define parameters for using third-party applications such as Visio.
Navigation
Image: Third Party/System page
This example illustrates the fields and controls on the Third Party/System page. You can find definitions for the fields and controls later on this page.
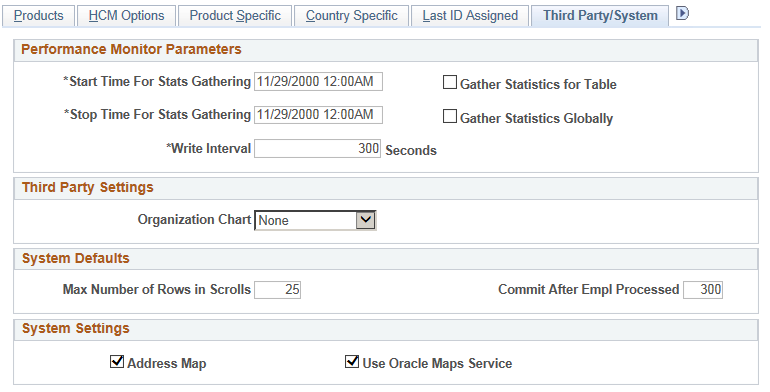
Performance Monitor Parameters
|
Field or Control |
Definition |
|---|---|
| Start Time For Stats Gathering (start time for statistics gathering) and Stop Time For Stats Gathering (stop time for statistics gathering) |
Enter the date and time of the start and stop. |
| Gather Statistics for Table |
Select to gather statistics locally. |
| Gather Statistics Globally |
Select to gather statistics globally. |
| Write Interval |
Enter the number of seconds for gathering the statistics. |
Third Party Settings
|
Field or Control |
Definition |
|---|---|
| Organization Chart |
Enter the type of third-party program you use to create organizational charts with your human resources data. |
System Defaults
|
Field or Control |
Definition |
|---|---|
| Max Number of Rows in Scrolls (maximum number of rows in scrolls) |
Enter the maximum number of rows in a scroll-controlled data box for third-party systems. |
| Commit After Empl Processed (commit after employee processed) |
Enter the maximum number of people for the system to process before committing. This setting is used only for PeopleSoft Payroll for North America processing. |
System Settings
|
Field or Control |
Definition |
|---|---|
| Address Map |
Select to include a map of an address. |
| Use Oracle Maps Service |
Select this check box when you have licensed the Oracle Maps Cloud Service for PeopleSoft to enable applications to use eLocation services. Note: The map display functionality shown in the HCM features requires a separate license to Oracle Maps Cloud Service for PeopleSoft. For details see the Licensing Information User Manual (LIUM). |
Use the Alternate Character page (ALT_CHAR_TBL) to specify the language code and alternate character type.
Navigation
Image: Alternate Character page
This example illustrates the fields and controls on the Alternate Character page. You can find definitions for the fields and controls later on this page.

Note: Because you are setting the alternate character code on the Installation Table, the setting affects your entire HCM application configuration. Make sure that you account for all language codes for your installation.
If you don't specify an alternate character type for a language code that a user is working with, and the user tries to enter characters in an Alternate Character field, a warning message appears.
If you specify an alternate character type for a language code, and a user enters any other character type in an Alternate Character field, a warning message appears.
Note: You can ignore the warning message and enter the data in another character set, but problems can occur when data is sorted in multiple alternate character sets.