Maintaining Departments
To maintain departments, use the Departments component (DEPARTMENT_TBL) and the Department Table Report component (RUN_PER701). Use the DEPARTMENT_TBL component interface to load data into the tables for this component.
These topics provide an overview of departments and discuss how to maintain department information.
|
Page Name |
Definition Name |
Usage |
|---|---|---|
|
DEPARTMENT_TBL_GBL |
Define basic information about a department. For Payroll for North America: Use department IDs for accounting purposes, such as charging earnings to a department or implementing labor distribution accounting. The system uses department IDs when you sequence pay sheets and paychecks by department. |
|
|
Comm. Acctg. and EG Page (department table - commitment accounting and education and government) |
DEPARTMENT_TBL_CA |
Enable and control department information that is specific to Education and Government customers and customers who use the Commitment Accounting feature. |
|
Department Table Report - Run Control Page |
PRCSRUNCNTL |
Run the Department Table report (PER701) that lists all departments by Department ID. |
After you define company and location data for your enterprise, use the Departments component to define business entities in your organization. If you're using PeopleSoft Payroll for North America or PeopleSoft Global Payroll, you must set up department codes according to your cost centers where you charge wages. If you use PeopleSoft Pension Administration, you need departments to house your pension payees. You can use a single department for all your pension payees, or you can organize your payees using a department scheme that meets your reporting needs. Otherwise, you can set up departments using any groupings you like.
PeopleSoft Human Resources offers two ways to access the Departments component to define and view departments:
From the Set Up HCM menu.
From PeopleSoft Tree Manager.
This topic discusses how to use the Departments component from within the Set Up HCM menu.
Using Departments for Data Permission Security
PeopleSoft enables you to create a security hierarchy using PeopleSoft Tree Manager and use it to grant or deny users to person data, based on the department a person belongs to. If you decide to use a Department Security tree to control data access, you must attach each department you create, whether from the Set Up HCM menu or Tree Manager, to an effective Department Security Tree.
PeopleSoft HCM also enables you to use other fields for data permission security.
For more information, see the product documentation for PeopleTools: Tree Manager.
Use the Department Profile page (DEPARTMENT_TBL_GBL) to define basic information about a department.
For Payroll for North America: Use department IDs for accounting purposes, such as charging earnings to a department or implementing labor distribution accounting. The system uses department IDs when you sequence pay sheets and paychecks by department.
Navigation
Image: Department Profile page (1 of 4)
This example illustrates the fields and controls on the Department Profile page (1 of 4). You can find definitions for the fields and controls later on this page.
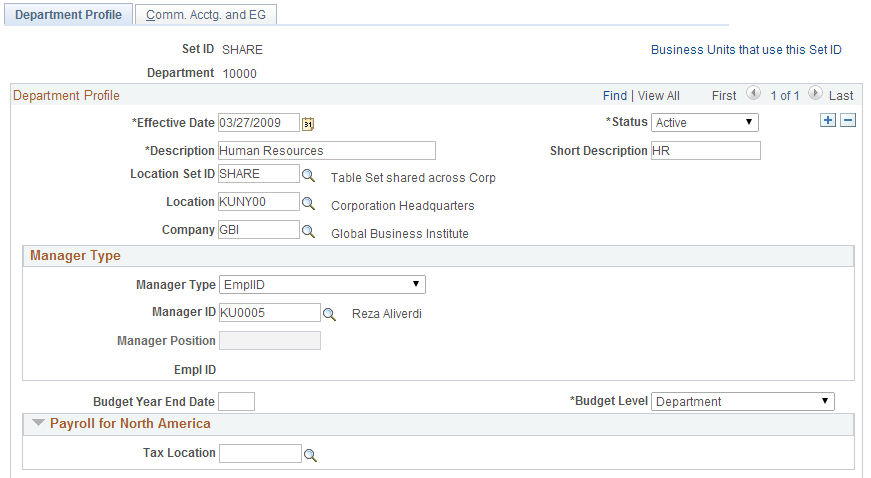
Image: Department Profile page (2 of 4)
This example illustrates the fields and controls on the Department Profile page (2 of 4). You can find definitions for the fields and controls later on this page.
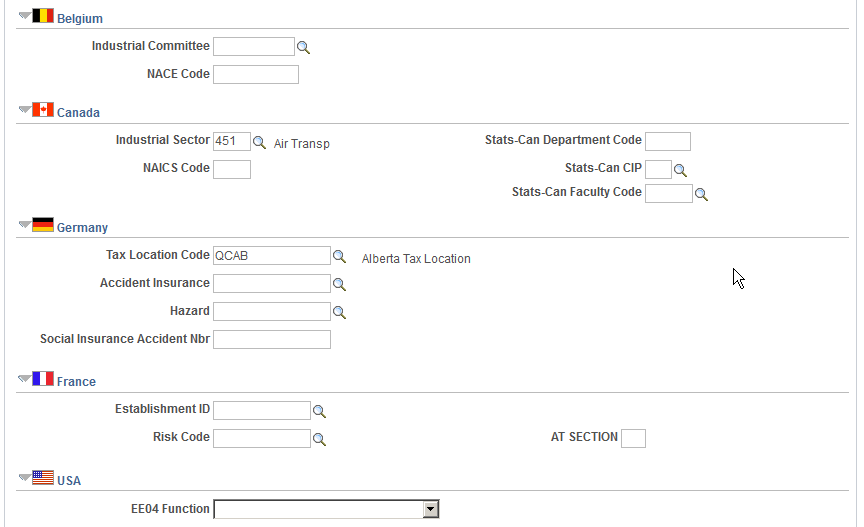
Image: Department Profile page (3 of 4)
This example illustrates the fields and controls on the Department Profile page (3 of 4). You can find definitions for the fields and controls later on this page.
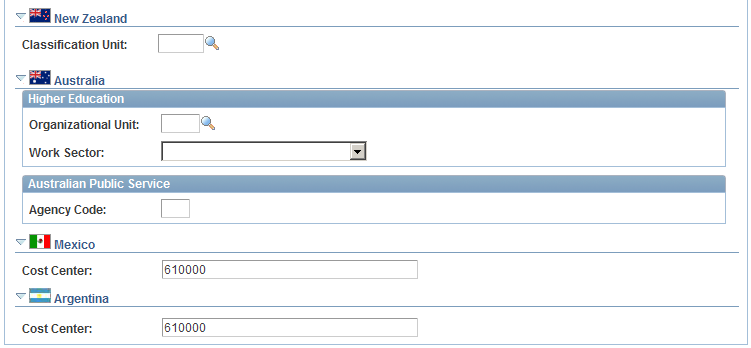
Image: Department Profile page (4 of 4)
This example illustrates the fields and controls on the Department Profile page (4 of 4). You can find definitions for the fields and controls later on this page.
|
Field or Control |
Definition |
|---|---|
| Effective Date |
If you add a new department to the Departments component from the Set Up HCM menu, set its effective date to predate (or be equal to) the effective date of your security tree. |
| Description |
For Payroll for North America: If you use the department specified on the employee's Job record to indicate where to deliver checks, the system automatically prints the department description and code on the check. |
| Location Set ID and Location |
To associate a department with a physical location, select the location. Maintain these values in the Locations component. |
| Company |
Indicate the company to which this department belongs. The system uses the Company field value as the default company location on the job records for all people associated with this department. If you add a person to this department, the system assumes that they are also with the designated company. If you don't enter a company here, you can enter it on the Job Data pages. If you do enter a company here, you can't change it on the Job Data pages. Note: If yours is a multicompany environment and you want more than one company to share the department, leave the Company field blank. |
Manager Type
If you are not specifying managers for departments, select None. If you are specifying managers, indicated if the manager is a person (EmplID) or a position (Position). If you use partial position management, where you use positions for only a portion of your organization, select whichever option is appropriate for this department.
|
Field or Control |
Definition |
|---|---|
| Manager ID |
If you selected EmplID, the system makes this field available for you to select the ID of the manager. The manager ID that you select becomes the default supervisor ID on the Job records of all people who are assigned to this department. If you have more layers in your organization, override the default. |
| Manager Position |
If you selected Position, and you have created positions for this department, select a Manager Position number. This field is optional, but you might find it useful for reporting activities such as departmental hierarchical data. The system displays the name and EmplID of the current position incumbent in the EmplID field. Note: The system allows you to select any position. To have the system prompt you with positions that are only in this department, update the DEPT_TBL in PeopleSoft Application Designer so that the prompt table for this field is DEPT_POSITIONS. |
| Budget Year End Date |
If you handle your budgeting in PeopleSoft Human Resources, enter the last month and day of the budget year as the date for all positions in this department. |
| Budget Level |
Select Department, Job Code, Line Item, Position Number, or None to define budgeting for this department. |
Payroll for North America
|
Field or Control |
Definition |
|---|---|
| Tax Location |
Specify the tax jurisdiction for the department. The code that you enter populates the Tax Distribution pages (TAX_DISTRIBUTION or TAX_DIST_CAN) of employees of this department. You can override this information for individual employees. |
(BEL) Belgium
|
Field or Control |
Definition |
|---|---|
| Industrial Committee |
Select the industrial committee for the company. This can be overwritten at the department level if necessary. |
| NACE Code |
Enter the NACE code for the company. Note: The NACE code can range from 5 digits for group level, 6 for class level, and 7 for subclass level. |
(CAN) Canada
|
Field or Control |
Definition |
|---|---|
| Industrial Sector |
The North American Industrial Classification System (NAICS) is a common framework for the production of comparable industry statistics for Canada, Mexico and the United States. Its hierarchical structure is composed of sectors (two-digit codes), subsectors (three-digit codes), industry groups (four-digit codes), and industries (five-digit codes). At each level of the hierarchy, additional digits are appended to those from the previous level. For example, the NAICS-2007 sector code for health care is 62, so all of the subsector, industry group, and industry codes for healthcare begin with 62. Use the Canadian Industrial Sector field to select the two-digit sector code for the department. Sectors with a large number of industries have multiple sector codes. Although there is no difference between the codes at the sector level, the best practice is to select the code with the correct digits for the department's industry. For example, although you can use 31, 32, or 33 for the Manufacturing sector, if you are a clothing manufacturer with an industry group of 3151, you should select 31 as the sector code. Codes are effective-dated so that you can easily update this field when new codes are published. For example, the NAICS-2007 codes became effective on January 1, 2007 and are available for entry only in rows with effective dates on or after that date. |
| NAICS Code |
Enter the four-digit NAICS code for the department's industry group. The NAICS code is used for Canadian employment equity reporting purposes and appears in the Employment Equity Report (PER101CN). When new NAICS codes are published, create a new effective-dated row to capture any changes to a department's industry group code. |
| (E&G) Stats-Can-Department Code (Statistics Canada department code) |
Enter a department code to be reported in the Canada Academic Teaching Survey. This field is intended for Canadian higher education degree-granting institutions only. For reporting periods that start before October 1, 2009, the system uses this code for the department when you load data (see Loading Data Into the Academic Teaching Survey Tables) into the Academic Teaching Survey Tables and when you create the survey result flat file (see .Creating the Survey Report Flat Files). |
| (E&G) Stats-Can CIP (Statistics Canada Classification of Instructional Programs) |
Enter the code that classifies the department’s instructional programs. This field is intended for Canadian higher education degree-granting institutions only. For reporting periods that start on or after October 1, 2009, the system uses this code for the department when you load data (see Loading Data Into the Academic Teaching Survey Tables) into the Academic Teaching Survey Tables and when you create the survey result flat file (see Creating the Survey Report Flat Files). |
| (E&G) Stats-Can Faculty Code (Statistics Canada faculty code) |
Select a code to associate a faculty with a department. Faculty codes are set up on the Faculty Code Stats CAN Page and are used to associate medical and dental categories with faculties. The system uses the faculty code that is associated with this department to determine the medical and dental categories that are reported in the Canada Academic Teaching Survey. This field is intended for Canadian higher education degree-granting institutions only. |
See Understanding the University and College Academic Staff System (UCASS) Survey Business Process.
(DEU) Germany
|
Field or Control |
Definition |
|---|---|
| Tax Location Code |
Select a code. Note: For more information about how tax location codes affect payroll processing for North America, see your PeopleSoft Payroll for North America documentation. |
Note: The Accident Insurance, Hazard, and Social Insurance Accident # fields are used to monitor Health and Safety business process functionality in PeopleSoft Human Resources.
(FRA) France
|
Field or Control |
Definition |
|---|---|
| Establishment ID |
Select an establishment ID for this department. French Social Security defines a risk code for your establishment, based on the number of work accidents that have occurred in the past three years in a particular establishment. Your establishment must contribute to a Work Accident fund, based on the number of work accidents that occur in your establishment; the more accidents you have, the more you pay into the fund. This field is required for Global Payroll for France. The system will default this value into a worker's Job record when you use PeopleSoft Human Resources: Manage Positions. |
| Risk Code |
Select a risk code from the list of risk codes. You define your organization's percentage of contributions to the French Social Security fund at the department level, based on the risk code that you enter. |
| AT SECTION |
Select the AT section for the risk code selected in the Risk Code field. Risk Code / AT sections are defined for establishments. When there are several AT sections defined for the establishment, use this field to specify the AT section to use. |
(USA) USA
|
Field or Control |
Definition |
|---|---|
| EEO4 Function (Equal Employment Opportunity 04 function) |
Select the functional category, such as health or fire protection, that applies to this department. The option that you select affects your EEO reporting to the U.S. federal government. |
(NZL) New Zealand
|
Field or Control |
Definition |
|---|---|
| Classification Unit |
Enter the classification unit for your company. This information comes from the Classification Unit Table. The system uses this data for Accident Rehabilitation Compensation Insurance (ARCI) employer premium calculations. |
(AUS) Australia
These fields appear only if you selected the Education & Government check box on Country Specific page of the Installation component.
|
Field or Control |
Definition |
|---|---|
| Organizational Unit |
Enter the appropriate Higher Education organizational unit code. |
| Agency Code |
Enter the four-digit Australian Public Service code for this department. |
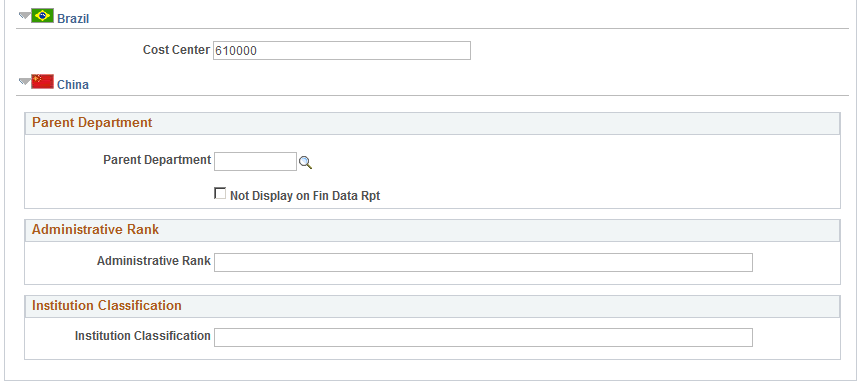
(MEX, ARG, and BRA) Mexico, Argentina, and Brazil
|
Field or Control |
Definition |
|---|---|
| Cost Center |
Identify the cost center for this department. |
(CHN) China
|
Field or Control |
Definition |
|---|---|
| Parent Department |
Enter the parent department responsible for CNAO reporting for SOE and PSGM. |
| Not Display on Fin Data Rpt (not display on financial data report |
When this check box is selected, the parent company information does not appear on the CNAO XML file. If you want the parent company information to appear, you must deselect this check box. |
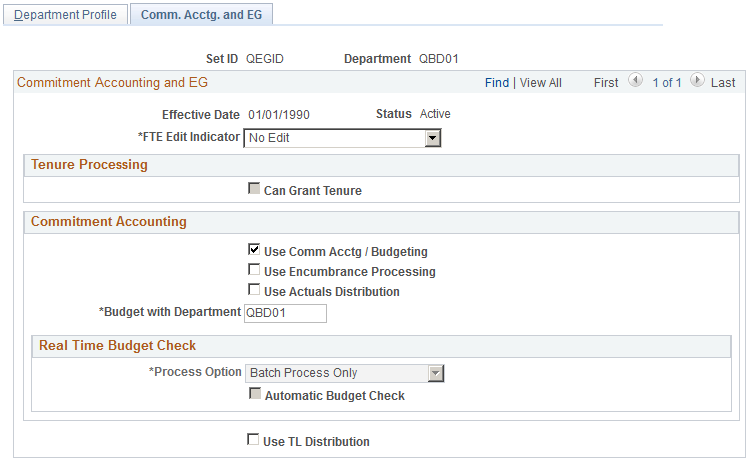
Use the Comm. Acctg. and EG (department table - commitment accounting and education and government) page (DEPARTMENT_TBL_CA) to enable and control department information that is specific to Education and Government customers and customers who use the Commitment Accounting feature.
Navigation
Image: Comm. Acctg. and EG page
This example illustrates the fields and controls on the Comm. Acctg. and EG page. You can find definitions for the fields and controls later on this page.
|
Field or Control |
Definition |
|---|---|
| FTE Edit Indicator (full-time equivalency edit indicator) |
Select whether you want the system to display a warning or an error message when you exceed the FTE maximums for this department. If you don't want the system to perform an FTE edit for this department, select No Edit. |
Tenure Processing
|
Field or Control |
Definition |
|---|---|
| Can Grant Tenure |
Select to be able to grant tenure to qualified people in this department. |
Commitment Accounting
|
Field or Control |
Definition |
|---|---|
| Use Comm. Acctg / Budgeting (use commitment accounting / budgeting) |
Select if you use Commitment Accounting processing for this department. When you select this check box, the other page elements in this group box become available for entry. |
| Budget with Department |
An accumulated budget for a group of departments rolls up to the department that you enter. The department that you enter must be in the same Set ID as the department that you are defining, and it must be higher on the security tree. For example, if departments 00010 and 00012 are lower on the security tree than department 00005 and they have the same Set ID, then departments 00010 and 00012 can budget with department 00005. The budgets for 00010 and 00012 roll up into a single budget with 00005. |
| Use Encumbrance Processing |
Select if you use Commitment Accounting encumbrance processing for this department. |
| Use Actuals Distribution |
Select if you use Commitment Accounting's Actuals Distribution process for this department. |
Real Time Budget Check
|
Field or Control |
Definition |
|---|---|
| Process Option |
Choose how to process job data and position data changes that can affect encumbrance calculations. Certain processing options result in different actions depending on whether the job data or position data change is considered critical. Critical changes in the Job Data component include hiring, rehiring, and adding a concurrent job. Critical changes in the Position Data component include creating a position, increasing the head count for a position, changing a position from inactive to active, and changing the Pre-Encumbrance Indicator for a position from None or Requisition to Immediate, The following table describes your processing option choices: |
|
Process Option |
Critical Changes |
Non-Critical Changes |
|---|---|---|
|
All |
Allows immediate budget checking from the Job Data and Position Data components. |
Allows immediate budget checking from the Job Data and Position Data components. |
|
Batch Process Only |
Do not allow real-time budget checking. All encumbrance calculations are performed by the batch process. The individual budget check status is set to Pending. |
Do not allow real-time budget checking. All encumbrance calculations are performed by the batch process. The individual budget check status is set to Pending. |
|
Critical |
Allows immediate budget checking from the Job Data and Position Data components. |
Do not allow immediate budget checking from the Job Data and Position Data components. Encumbrance calculations are performed by the batch process or individual budget checks from the Real-time Budget Checking components. The individual budget check status is set to Pending. |
|
Deferred |
Do not allow immediate budget checking from the Job Data and Position Data components. Encumbrance calculations are performed by the batch process or individual budget checks from the Real-time Budget Checking components. The individual budget check status is set to Pending. |
Do not allow immediate budget checking from the Job Data and Position Data components. Encumbrance calculations are performed by the batch process or individual budget checks from the Real-time Budget Checking components. The individual budget check status is set to Pending. |
|
Field or Control |
Definition |
|---|---|
| Automatic Budget Check |
This check box is available only if the selected Process Option is All or Critical. Select this check box if you want the system to immediately perform a real-time budget check when a user attempts to save a change to job data or position data. Deselect this check box if you want the system to present a pop-up window when a user attempts to save a change to job data or position data. The pop-up window gives the user the choice of performing the budget check immediately or saving the transaction without performing the budget check. If the user bypasses the budget check, the system generates a transaction that can be processed from the Budget Check by Job page or the Budget Check by Position page. |
Additional Page Element
|
Field or Control |
Definition |
|---|---|
| Use TL Distribution |
Select to take into account the task information that is entered into PeopleSoft Time and Labor during Commitment Accounting's Actuals Distribution process. This check box applies only to PeopleSoft Time and Labor customers. If you select this check box, the Actuals Distribution process creates an entry for each Time and Labor task entry. It then distributes the earnings in the appropriate ratio (the same ratio that is used for Labor Distribution). |
When you add new departments to the Departments component, also add them to your security tree so that they are a part of your security structure. After you build your security tree, you can run a SQR audit (PER506) to determine which department IDs are in the Departments component but not in the security tree. This SQR also lists the departments that are in the security tree but not in the Departments component. The latter situation can occur if you delete a department from the system and don't remove the node from your security tree.
The procedures for running SQRs vary with your application environment. If you aren't sure of your standard procedures, ask your system administrator.