(USA) Managing I-9 Information
These topics provide an overview of managing I-9 information and discuss how to complete, update, print, and archive I-9 data.
|
Page Name |
Definition Name |
Usage |
|---|---|---|
|
HR_I9_EE |
Enter employee self identification and employment authorization information for Form I-9. If you are a person that assisted the employee in the completion of the Form I-9 information, enter your name and address in the Preparer and/or Translator Certification section of this page. |
|
|
USCIS Form I-9 - Submit Confirmation Page |
EO_SUBMIT_CONFIRM |
View a confirmation that you have successfully submitted the Form I-9. This page appears after the employee, preparer, translator, or representative successfully completes the required information and submits the Form I-9. |
|
Employment Eligibility Verification Page, Section 2 and Section 3 |
HR_I9_ADMIN_SEC2 |
Complete the employer sections (2 and 3) of the Form I-9. |
|
HR_RUNCTL_I9_FORM |
Generate the Form I-9s in PDF format. |
|
|
HR_RUNCTL_I9_VERFY |
Identify Form I-9s that require re-verification and notify administrators. |
The Immigration and Nationality Act requires United States employers to complete and store Form I-9. Employers may process paper Form I-9s and store them electronically or complete and retain the Form I-9 solely in electronic format.
PeopleSoft Human Resources enables you to collect, store, and manage all I-9 information in compliance with the Immigration and Nationality Act. This includes employee self service functions to complete and submit the employee I-9 information, and functionality for the employer to complete the required employer sections of the Form I-9. The application provides components to report and process I-9 information, including notification of expiration dates, storing, printing, and archiving.
Image: Process flow for completing the Form I-9
This example illustrates the process flow for completing the Form I-9 online.
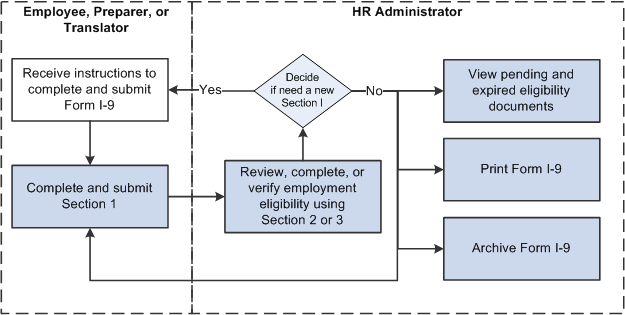
Completing the Form I-9 online requires the following steps:
An employee must submit employment verification information on the first day of employment. The employee, preparer, or translator for the employee can fill out the identification and citizenship information for section 1 on the self service Form I-9 - Employment Eligibility Verification page.
After the employee submits this information, the HR administrator will:
Review and complete sections 2 and 3 of the Form I-9 required by the employer using the Complete/Reverify EE Form I-9 component.
If a new I-9 is needed, the administrator can send notification to the employee to complete a new Form I-9.
Manage the I-9s by viewing pending and expired documents, printing Form I-9, or archiving data that is no longer needed.
Use the Employment Eligibility Verification page (HR_I9_EE), Section 1 to enter employee self identification and employment authorization information for Form I-9. If you are a person that assisted the employee in the completion of the Form I-9 information, enter your the name and address in the Preparer and/or Translator Certification section of this page.
Navigation
From the Employee Self Service fluid landing page, click Personal Details, then select the Form I-9 category tab from the left panel navigation, then click the Go to Form I-9 link.
Note: The Fluid Interface self-service Form I-9 Page (HR_I9_EE_FL) is documented in your eProfile product documentation.
Image: Employment Eligibility Verification page, Section 1 (1 of 3)
This example illustrates the fields and controls on the Employment Eligibility Verification page, Section 1 (1 of 3). You can find definitions for the fields and controls later on this page.
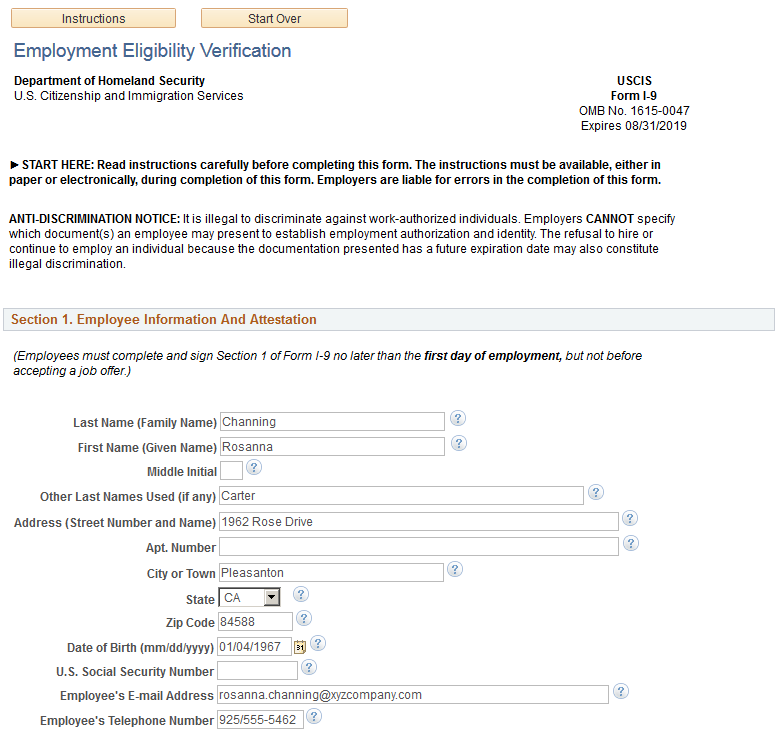
Image: Employment Eligibility Verification page, Section 1 (2 of 3)
This example illustrates the fields and controls on the Employment Eligibility Verification page, Section 1 (2 of 3). You can find definitions for the fields and controls later on this page.
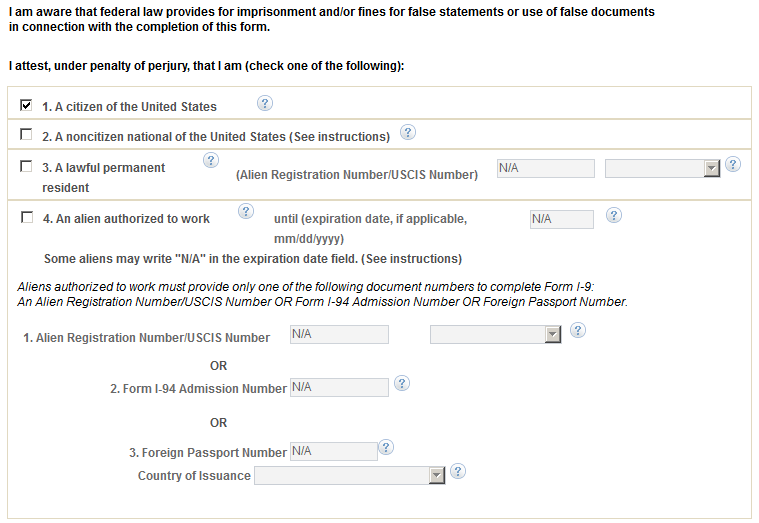
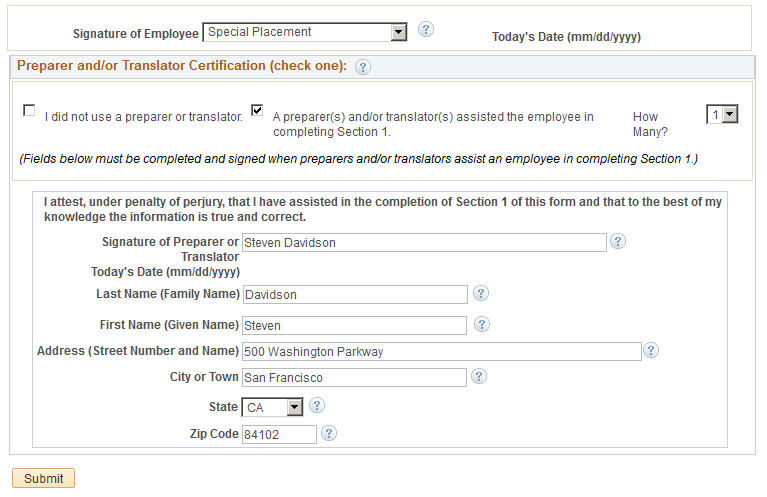
Image: Employment Eligibility Verification page, Section 1 (3 of 3)
This example illustrates the fields and controls on the Employment Eligibility Verification page, Section 1 (3 of 3). You can find definitions for the fields and controls later on this page.
Employees, preparers, or translators use this page to complete and submit the Section 1 information of the Form I-9 for the employee. Employees can complete and submit more than one Form I-9 but cannot modify the Form I-9 after submission and can view the most recent submission only.
Fields and links on this page are editable only when you are entering or completing a Form I-9. If the Form I-9 has been submitted into the system, this page is display only but contains a link to the I-9 instructions for the employee. However, if the form has already been completed and submitted, the page displays a Select button that you select to open up the fields and complete a new form.
Note: The information you enter on this page is for I-9 purposes only and does not update other HR data stored in the system.
|
Field or Control |
Definition |
|---|---|
| Instructions |
Click this button to open a new browser window that contains a PDF of the instructions for completing the Form I-9. |
| Start Over |
Click this button to clear all the fields on this page and start over. |
| Select |
Select this button to enable the page for data entry and submit a new Form I-9. This button is available when you have already submitted I-9 verification data. |
Section 1. Employee Information And Attestation
Use this section to enter the employee’s name, address, birth date, U.S. social security number, and contact information.
|
Field or Control |
Definition |
|---|---|
| Other Names Used (if any) |
Enter the maiden or other names, if applicable. When more than one name exists, separate the names by a semicolon (;). |
| Employee’s E-mail Address and Employee’s Telephone Number |
Enter the appropriate contact information. |
| I attest, under penalty of perjury, that I am (check one of the following) |
Select the option for your eligibility type. You must select one of the options and provide any additional data that is associated with the selected option. Options are:
|
| (Alien Registration Number/USCIS Number) |
Enter your lawful Permanent Resident alien number or USCIS number. This field is mandatory if you select the option stating that you are a lawful permanent resident. |
| until (expiration date, if applicable, mm/dd/yyyy) (month/day/year) |
Enter the date until which you are authorized to work. There are certain types of aliens having work authorization that do not expire - e.g. refugees or asylees. Therefore, if the expiration date does not apply, leave this field blank. Note: The printed form will display N/A in this field when the value is left blank. This field is available when you select that you are an alien authorized to work. |
| 1. Alien Registration Number/USCIS Number |
Enter your temporary alien number. |
| 2. Form I-94 Admission Number |
Enter your assigned number. |
| 3. Foreign Passport Number and Country of Issuance |
Enter the foreign passport number and the country that issued that passport. |
|
Field or Control |
Definition |
|---|---|
| Signature of Employee |
Select a signature type. Options include:
|
Preparer and/or Translator Certification
The system requires this information only if you selected Minor Under Age 18 or Special Placement in the Signature of Employee field.
|
Field or Control |
Definition |
|---|---|
| I did not use a preparer or translator |
When you enter the signature as that of the employee, this check box is selected and the rest of the fields in this group box are unavailable for entry. This field is also available when you select Special Placement as the signature of Employee. |
| Signature of Preparer of Translator |
Enter the preparer's signature. |
| Last Name (Family Name) and First Name (Given Name) |
Enter the preparer's first and last name in these fields. These fields are required. |
| Address (Street Number and Name), City or Town, State, and Zip Code |
Enter the preparer's address information in these fields. These fields are required. |
| Submit |
Select this button to save and submit this form, trigger appropriate workflow notifications to the administrator, and generate the confirmation page. |
Use the Employment Eligibility Verification page (HR_I9_ADMIN_SEC2), Section 2 and Section 3 to complete the employer sections (2 and 3) of the Form I-9.
Navigation
Image: Employment Eligibility Verification page, Section 2 (1 of 3)
This example illustrates the fields and controls on the Employment Eligibility Verification page, Section 2 (1 of 3). You can find definitions for the fields and controls later on this page.
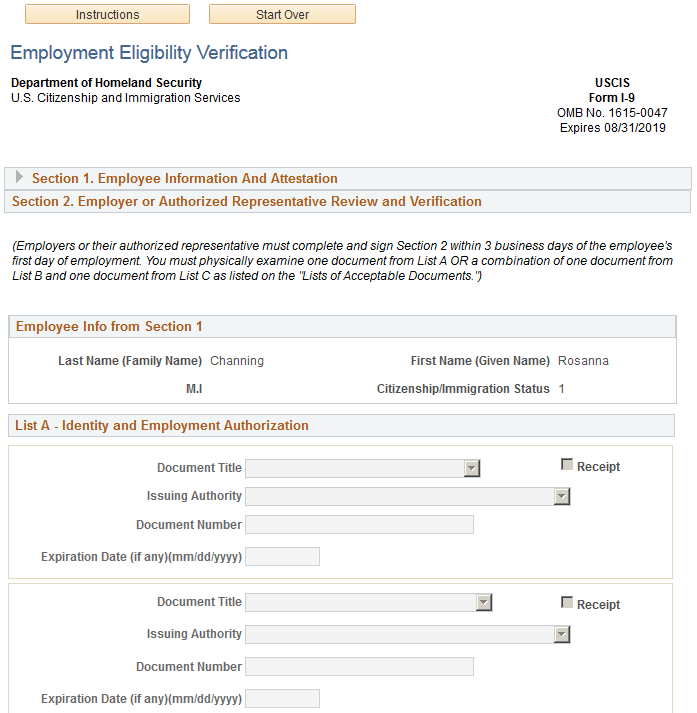
Image: Employment Eligibility Verification page, Section 2 (2 of 3)
This example illustrates the fields and controls on the Employment Eligibility Verification page, Section 2 (2 of 3). You can find definitions for the fields and controls later on this page.
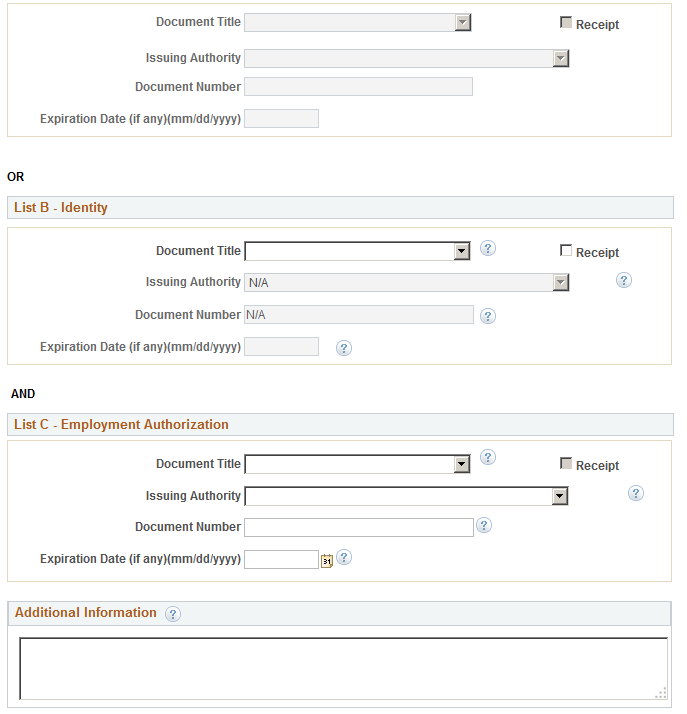
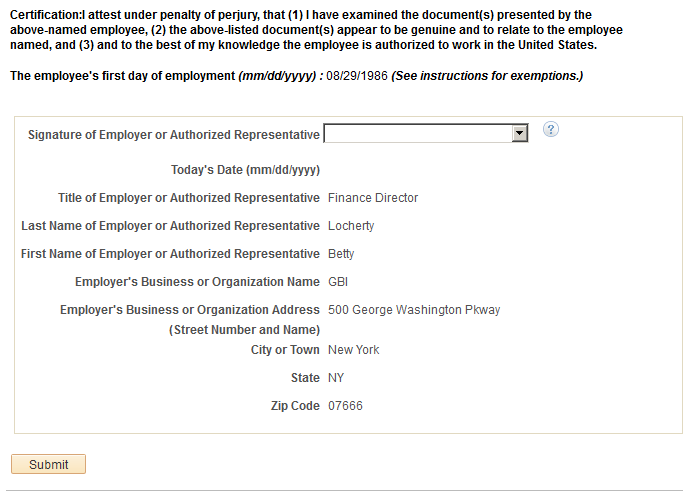
Image: Employment Eligibility Verification page, Section 2 (3 of 3)
This example illustrates the fields and controls on the Employment Eligibility Verification page, Section 2 (3 of 3). You can find definitions for the fields and controls later on this page.
Use this page to complete the employer sections after the employee, preparer, or translator has completed and submitted the Form I-9.
|
Field or Control |
Definition |
|---|---|
| Instructions |
Select this button to access the Handbook for Employers PDF. |
| Start Over |
Click this button to clear all the editable fields on this page and start over. |
Section 1. Employee Information and Attestation
This section displays the data entered and submitted by the employee, preparer, or translator on the Employment Eligibility Verification Page, Section 1. Expand or collapse this section to view or hide the information.
Section 2. Employer or Authorized Representative Review and Verification
The sections and field that are available for entry correspond to the citizenship status and the minor and specials placement details selected by the employee on the form. The page populates the following fields based on the options selected by the employee:
If the employee selected Special Placement for his or her signature, then the List B – Identify section displays the text Special Placement in the Document Title field, and the List C – Employment Authorization section fields are available for entry.
If the employee selected Minor Under Age 18 for his or her signature, then the List B – Identify section displays the text Individual under age 18 in the Document Title field, and the List C – Employment Authorization section fields are available for entry.
The employer representative needs to complete one of the following section options:
List A - Identity and Employment Authorization
List B - Identity AND List C - Employment Authorization.
|
Field or Control |
Definition |
|---|---|
| Document Title |
Record the type of documentation provided by the employee. There are separate fields for each document type (A, B and C). |
| Issuing Authority |
Enter the name of the agency that issued the document. |
| Receipt |
Select this check box to indicate that the employee has applied for the document but the document is not yet available. By selecting this check box, it indicates that you are submitting the receipt information (therefore the Document Number field should contain the receipt number). If the original document is available, do not select this check box. Deselect this field to indicate that you are submitting the document information (and therefore the Document Number field contains the document number). |
| Document Number |
Enter the number of the actual document, or if the Receipt check box is selected, enter the receipt number. |
| Expiration Date (if any) (mm/dd/yyy) |
(Optional) Record the expiration date, if any, of the document or receipt entered. |
Certification
|
Field or Control |
Definition |
|---|---|
| Signature of Employer or Authorized Representative |
Select the name of the employer representative who is submitting the data. The drop-down value displays the name of the person logged into the system. |
| Title of Employer or Authorized Representative |
Displays the job title of the employer representative who is submitting the data.. |
| Employer’s Business or Organization Address (Street Number and Name), City or Town, State, and Zip Code |
Displays the current organization’s address. |
| Submit |
Click this button to save and submit the information you entered. |
Section 3. Reverification and Rehires
This section is available when you have a rehire or a reverification and need to request that the employee submit a new form.
Image: Employment Eligibility Verification page, Section 3
This example illustrates the fields and controls on the Employment Eligibility Verification page, Section 3. You can find definitions for the fields and controls later on this page.
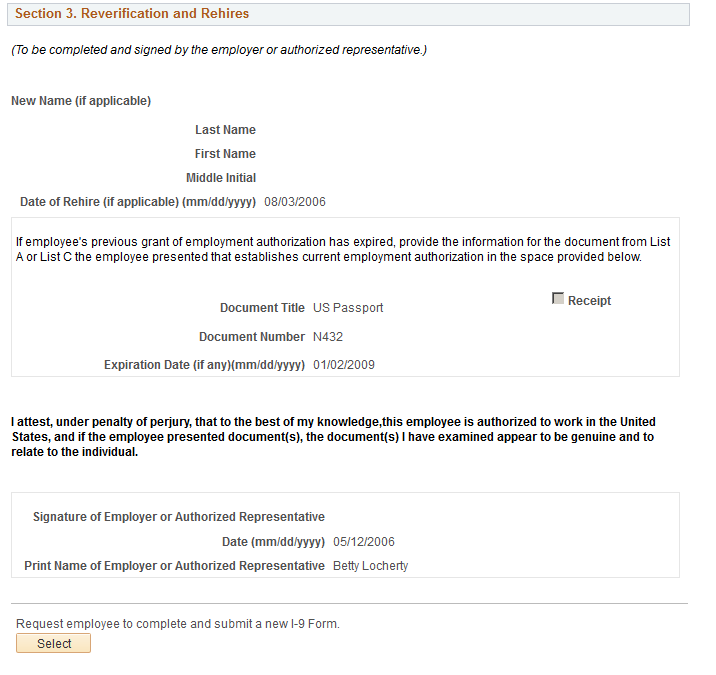
If an employee is rehired within three years of termination, or if the original document has expired, employers may reverify or update the original I-9 after it is submitted. A Form I-9 can only be updated or reverified one time (including receipt and actual documentation).
If new information needs to be entered and actual documentation information already exists, all fields above this section will be display only and the employee and employer must complete a new Form I-9. The administrator can send an email notification to the employee requesting a new Form I-9 from this page. The administrator is able to view all forms completed by employees, including history.
The employer is not allowed to make any changes to the form after it is saved unless the Receipt check box is selected. In this case, you can enter the actual information for the specific document that was flagged as a receipt. The entry in the Document Title field cannot be changed. After the additional field entries are completed and the form is saved, the Receipt check box, Document Number, and Expiration Date fields are grayed out and cannot be edited.
|
Field or Control |
Definition |
|---|---|
| New Name (if applicable) |
Displays the employee's current name if it is different from the name initially saved on the form. |
| Date of Rehire (if applicable) (mm/dd/yyy) |
Displays the most current rehire date by default in this field. |
| Document Title |
Enter the type of documentation being reverified or for the employee being rehired. |
| Receipt |
Select this check box to indicate that the employee has applied for the document but the document is not yet available. By selecting this check box, it indicates that you are submitting the receipt information (therefore the Document Number field should contain the receipt number). If the original document is available, do not select this check box. Deselect this field to indicate that you are submitting the document information (and therefore the Document Number field contains the document number). |
| Document Number |
Enter the number of the actual document, or if the Receipt check box is selected, enter the receipt number. |
| Expiration Date (if any) (mm/dd/yyyy) |
(Optional) Record the document or receipt expiration date, if any. |
| Signature of Employer or Authorized Representative |
Select the signature of the employer or representative to confirm that the employee is authorized to work. The drop-down menu value displays the name of the person logged into the system. |
| Submit |
Click this button to save and submit the form. |
| Select |
Select this button to send an email notification to the employee to request a new Form I-9. |
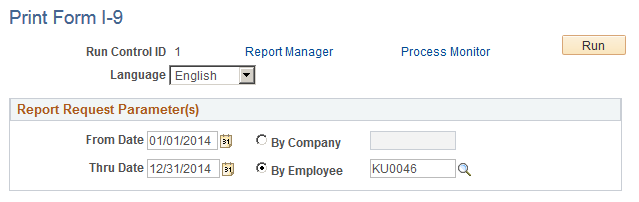
Use the Print Form I-9 page (HR_RUNCTL_I9_FORM) to generate the Form I-9 in PDF format.
Navigation
Image: Print Form I-9 page
This example illustrates the fields and controls on the Print Form I-9 page. You can find definitions for the fields and controls later on this page.
|
Field or Control |
Definition |
|---|---|
| From Date and Thru Date |
Use these fields to determine effective dates to extract when running the report. Both fields are required. |
| By Company or By Employee |
Run the report using one of these options. Use the lookup icon to enter a company code or an employee ID. |
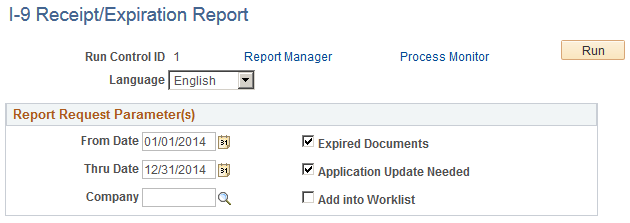
Use the I-9 Receipt/Expiration Report page (HR_RUNCTL_I9_VERFY) to identify I-9 forms that require re-verification and notify administrators.
Navigation
Image: I-9 Receipt/Expiration Report page
This example illustrates the fields and controls on the I-9 Receipt/Expiration Report page. You can find definitions for the fields and controls later on this page.
|
Field or Control |
Definition |
|---|---|
| From Date and Thru Date |
Use these fields to define the effective dates for the report. Both fields are required. |
| Company |
This is an optional field. Entering a value will limit the report output to employees for a specific company as of the date that the employee submitted the Form I-9. |
| Expired Documents |
Select this check box to have the report list Form I-9s with expiration dates within the specified date range. |
| Application Update Needed |
Select to have the process find all documents that have a Receipt check box selected. The process compares the I-9 submission date with the date range and includes all employees whose I-9 date plus 90 days is within the date range. |
Note: You must select either the Expired Documents or the Application Update Needed check box to run the report.
|
Field or Control |
Definition |
|---|---|
| Add into Worklist |
Select this check box to have the administrator receive a worklist entry for each employee form listed in the report. |
See the product documentation for PeopleTools: Data Management, "Using PeopleSoft Data Archive Manager."