Approving Reported Time
This section provides an overview of approving reported time.
|
Page Name |
Definition Name |
Usage |
|---|---|---|
|
TL_MSS_TIMESHEET |
View a group of employees or an individual employee's reported time needing approval. |
|
|
TL_RPTD_ELP TL_RPTD_PCH |
Approve or deny an employee's reported time. The format of the timesheet depends on whether the employee is an elapsed or punch time reporter. |
|
|
TL_TR_COMMENT |
Add comments to timesheet information. |
|
|
TL_MNG_PAY_DET_VW |
Review details of payable time after online rules are run. |
You have the ability to require approval of reported time, after it has been submitted, by selecting the Approve Reported Time option on the Workgroup or TRC definition. If specified for a workgroup, all reported time for employees in that workgroup needs approval. If specified at the TRC level, only reported time associated with the TRC needs approval.
Reported time that requires approval, regardless of the source, must be approved before it will be selected and processed by Time Administration to generate payable time. Time that has been submitted, either through interfaces or online, is available for approval.
When approved, the reported time status is Approved, and it is ready to be selected by the Time Administration process for payable time generation.
If reported time is denied, the reported time is given a status of Denied and will not be processed by Time Administration. The time remains in a Denied status until it is resubmitted.
Important! Approvers cannot directly approve time with a status of Denied. When you select a row with denied time, the only available option is to submit the time for approval once more. The status of the time changes from Denied to Needs Approval until the approval process is completed.
Approvals at the Approve Reported Time Summary Level
Because approvals are based on stages, paths, steps, and routing approval transactions through the approval path, the manager only sees reported time that needs approval where the approval transaction is pending within the Approval Framework and the requestor ID within the Approval Framework equals the manager's operator ID.
Time Approvals by Manager
The manager can do the time approval using Time and Labor Dashboard now. The Time and Labor Dashboard is a one stop shop for performing all the time related transactions by a manager.
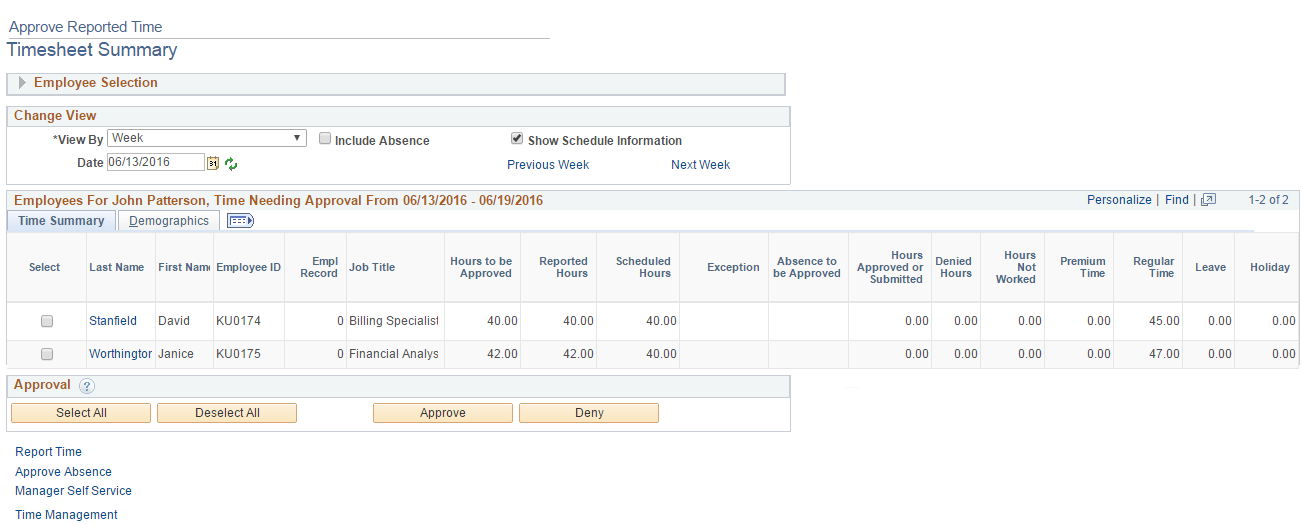
Use the Approve Reported Time - Timesheet Summary page (TL_MSS_TIMESHEET) to view a group of employees or an individual employee's reported time needing approval. For more details, refer Viewing the Time and Labour Dashboard pagelets
Navigation
Image: Approve Reported Time - Timesheet Summary page
This example illustrates the fields and controls on the Approve Reported Time – Timesheet Summary page. You can find definitions for the fields and controls later on this page.
For more details, see Time and Labor Dashboard
Employee Selection Criteria
Enter selection criteria in the fields in this collapsible group box. You can select a group of employees or individual employees. The fields that are displayed in this group box are defined in Manager Search Options. If the Manager Search Options are cleared, the criteria that are displayed are derived from the Manager Search Defaults page in the Time and Labor Installation component.
See Setting Up Manager Search Options.
|
Field or Control |
Definition |
|---|---|
| Click for Instructions |
Click this link to view instructional text for using this page. |
| View By |
This field determines how much reported time you see in the summary list. The page refreshes each time you select an option. The options are Day, Week, All Time Before and All Time After:
Note: If the value in the View By field is All Time Before or All Time After, the system displays the first row needing approval because the manager could have denied time in the past. |
| Date |
The default is today's date when you first enter this page. If the View By option is Week, the system checks the value in the Start Day of Week field on the Time Reporting Preferences page and displays the week accordingly. If the View By option is All Time Before, the system returns a list of employees who have time needing approval prior to that date. If the View By option is All Time After, the system returns a list of employees who have time needing approval after that date. |
| Include Absences |
Select this check box to include employees who have one or more reported absences needing approval within the specified time period. |
| Refresh |
Click this button to refresh the page after changing date-related criteria or selecting or clearing the Include Absences check box. |
Note: The approval status monitor does not display on the Timesheet Summary page, the Approve Reported Time Summary page or the Approve Payable Time Summary page.
Employee Grid
|
Field or Control |
Definition |
|---|---|
| Title Bar |
This group box title displays the manager's name and the date range being viewed. |
| Select |
Select the check box next to the employee name to approve or deny reported time for the timeframe you selected. The Select check box is grayed out if the employee has only a reported absence to be approved, and no reported work time. Note: Reported absences cannot be approved on the Approve Reported Time Summary page. You must access the employee's Timesheet to approve an absence. |
| Name |
Click the time reporter's name link to display the Timesheet grid. |
| Exception |
Displays an icon indicating that exceptions exist. |
| Absence to be Approved |
Displays an icon indicating that absences requiring approval exist. |
Note: All columns are displayed when viewing reported time using the by Day or Week View By options. If the All Time Before or All Time After options are selected, fewer columns are displayed. All columns can be sorted, ascending or descending, by clicking the column headers, with the exception of the TRC columns.
Use the Timesheet page (TL_RPTD_ELP ) to approve or deny an employee's reported time.
The format of the timesheet depends on whether the employee is an elapsed or punch time reporter.
Navigation
Image: Timesheet page - Punch example
This example illustrates the fields and controls on the Timesheet page – Punch example. You can find definitions for the fields and controls later on this page.
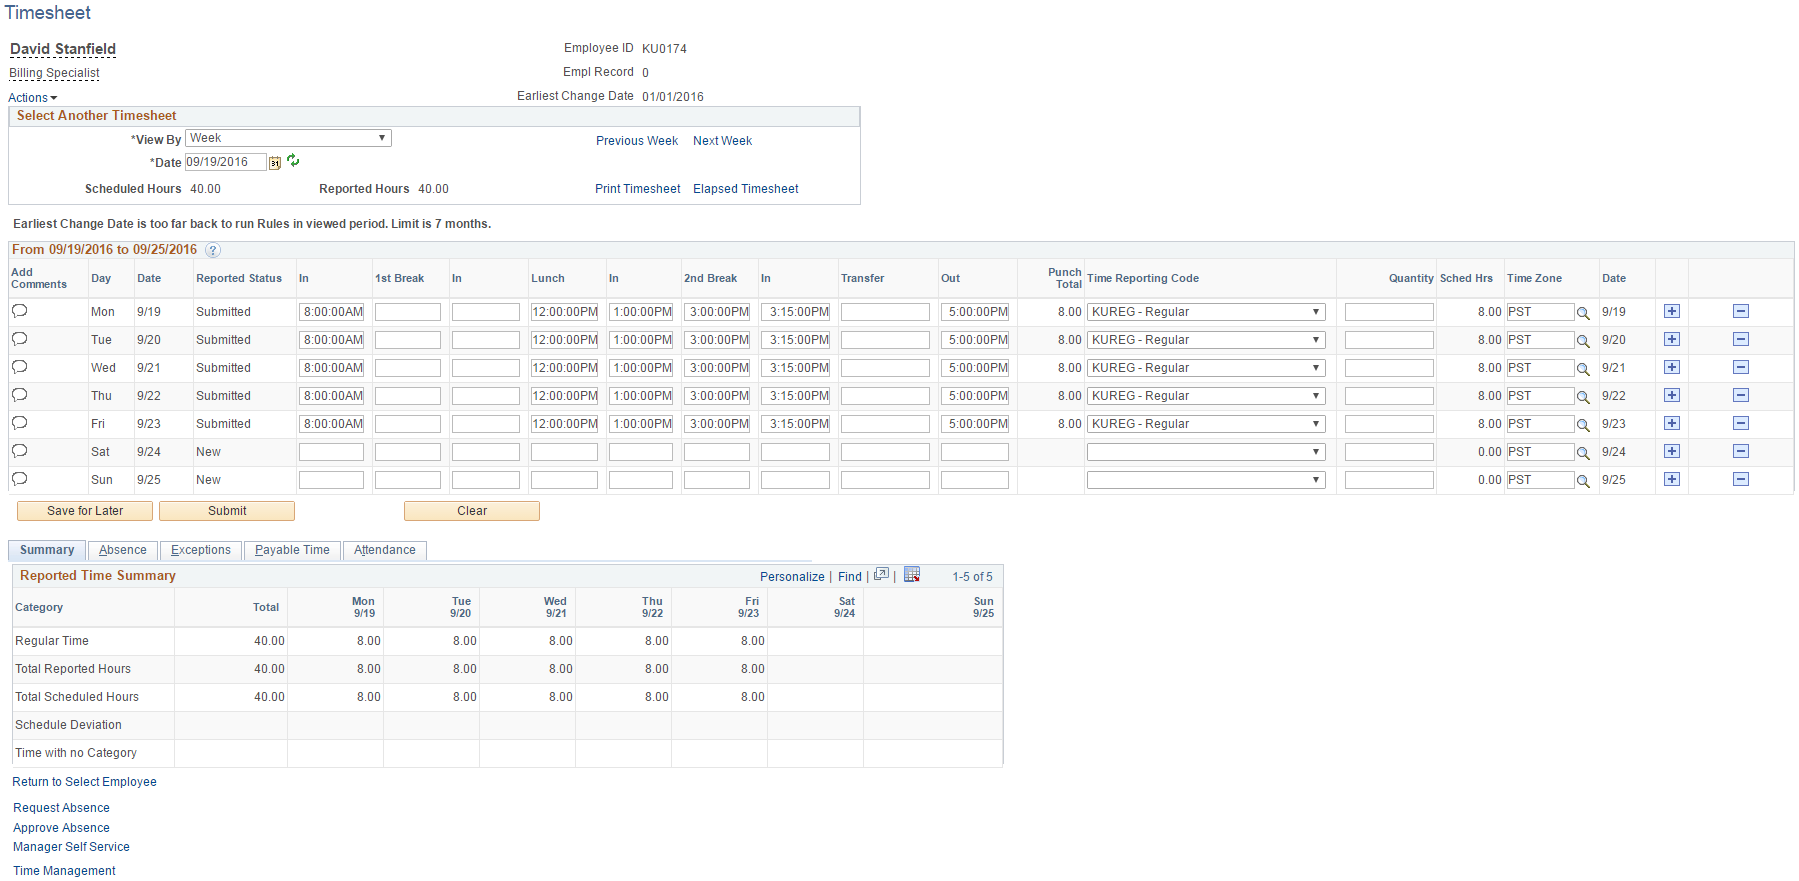
The Timesheet page enables the manager to work with an employee's reported time in more detail. You can adjust entries, select some or all incidences of time needing approval and click either the Approve or Deny buttons.
The placement of the Comments icon on the Timesheet page depends on the type of Timesheet that is displayed, either punch or elapsed. The comment icon is in the first column of the time grid on the punch timesheet. Click it to access the Comments page. For elapsed timesheets, the comment icon is included in the Reported Time Status grid that you can access using the link below the Apply Rules button. The Reported Time Status link and grid are not displayed on punch timesheets.
The manager can navigate to the previous or next employee in the list that was generated on the Approve Reported Time page by clicking the Previous Employee or Next Employee links.
Click the Submit button to validate reported time and set the status to Needs Approval. Time that has no errors after being validated is set to Needs Approval. If the user is reporting more time or modifying time for an existing row that has already been processed, and has a status of Approved, then the whole day (or row) is again set to a status of Needs Approval.
After clicking the Approve or Deny buttons, the manager is transferred to a confirmation page. To return to the Timesheet page click the OK or CANCEL button.
Reported Time that does not need approval is set to a status of Submitted.
If an Absence Event cannot be entered or approved in Timesheet, use the Request Absence or Approve Absence Go To links. You cannot return to the Timesheet after you have navigated beyond the Approve Absence Request or Request Absence pages.
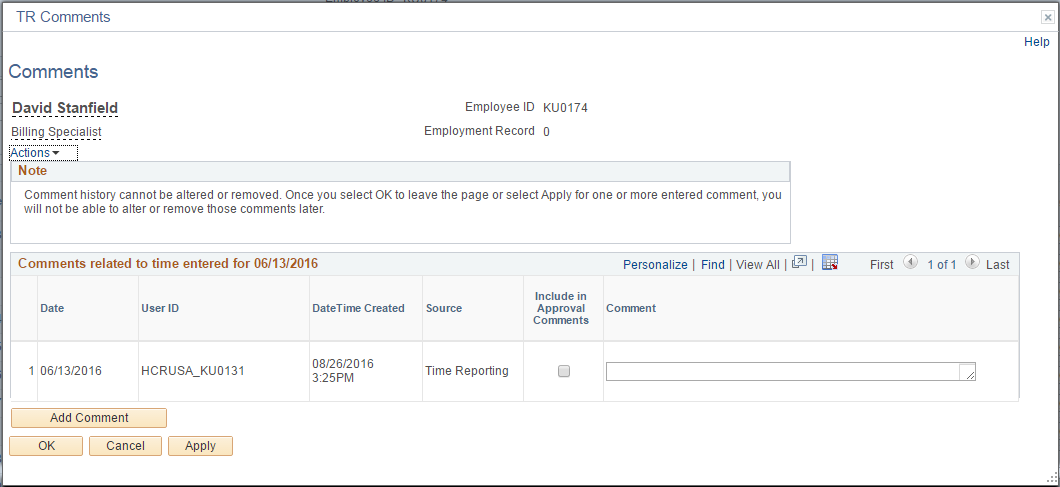
Use the Comments page (TL_TR_COMMENT) to add comments to timesheet information.
Navigation
Click the Comments icon on the timesheet.
Image: Comments page
This example illustrates the fields and controls on the Comments page. You can find definitions for the fields and controls later on this page.
|
Field or Control |
Definition |
|---|---|
| Include in Approval Comments |
Select to add the comments to the Approval Framework for the approval instance. |
| Comment |
Enter any comments regarding the time entered. |
Use the Payable Time Detail page (TL_MNG_PAY_DET_VW) to review details of payable time after online rules are run.
Navigation
Click the Apply Rules button on the Timesheet page.
Image: Payable Time Detail page
This example illustrates the fields and controls on the Payable Time Detail page. You can find definitions for the fields and controls later on this page.

See Timesheet Page.
Click the Absence Event - select to view link on the Timesheet page.
Image: Absence Events grid
This example illustrates the fields and controls on the Absence Events grid. You can find definitions for the fields and controls later on this page.
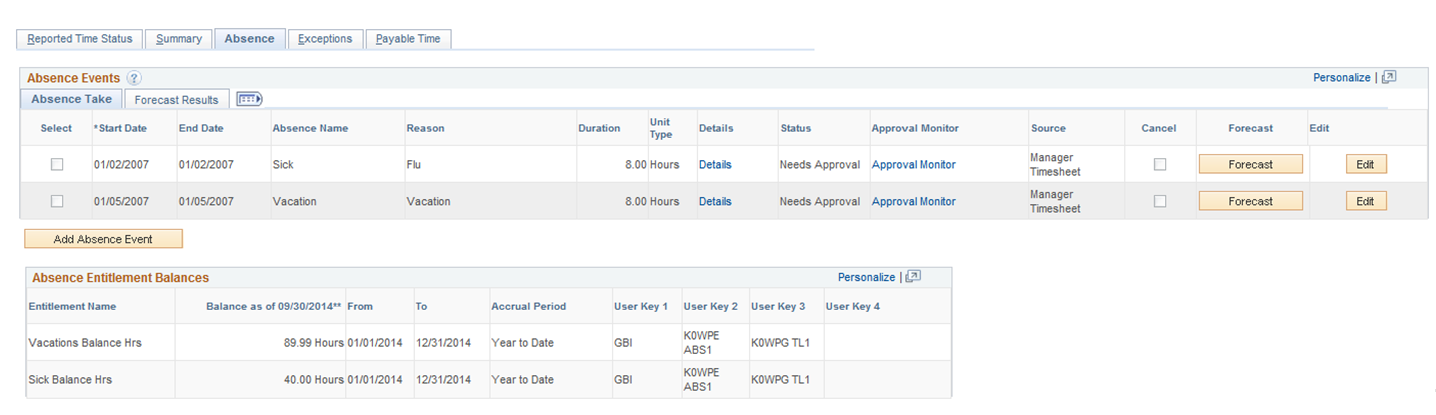
The Absence Events section is collapsed by default when you access the Timesheet page.
The Absence Events grid on the Timesheet page enables the manager to review, add, change, and approve absence events.
|
Field or Control |
Definition |
|---|---|
| Edit |
Click this button to edit, submit, cancel or forecast the absence request. The edit button is disabled when you are adding a new absence. Note: You can edit only one absence event at a time so as to avoid confusion with absence validation messages. |
| Cancel |
This check box is enabled only when editing an absence. The event will be cancelled when you click the Save or Submit buttons. Depending on the cancellation rule defined in the Country Take component, the absence could be deleted from the database or the status could be set to cancelled. |
| Forecast |
When adding or editing an absence event, click this button to forecast the absence event information for this employee. Note: The Forecast button is enabled only if defined in the Country Take component for the absence that is being reported. The Forecast column is not displayed if no absence events in the grid are set up to enable forecasting. |
| Submit |
Click this button to submit the entries on the Timesheet page. After submitting, you can approve the entry. |
The Absence Entitlement Balances grid displays Absence Entitlement balances as of the last time the absence process was completed and finalized.
If the employee is enrolled in compensatory or leave plans, those balances are displayed in a separate grid.
See Forecasting Absence Entitlement Balance During Absence Entry.
Click the Details link in the Absence Events grid to access this page.
Image: Absence Request Details
This example illustrates the fields and controls on the Absence Request Details. You can find definitions for the fields and controls later on this page.
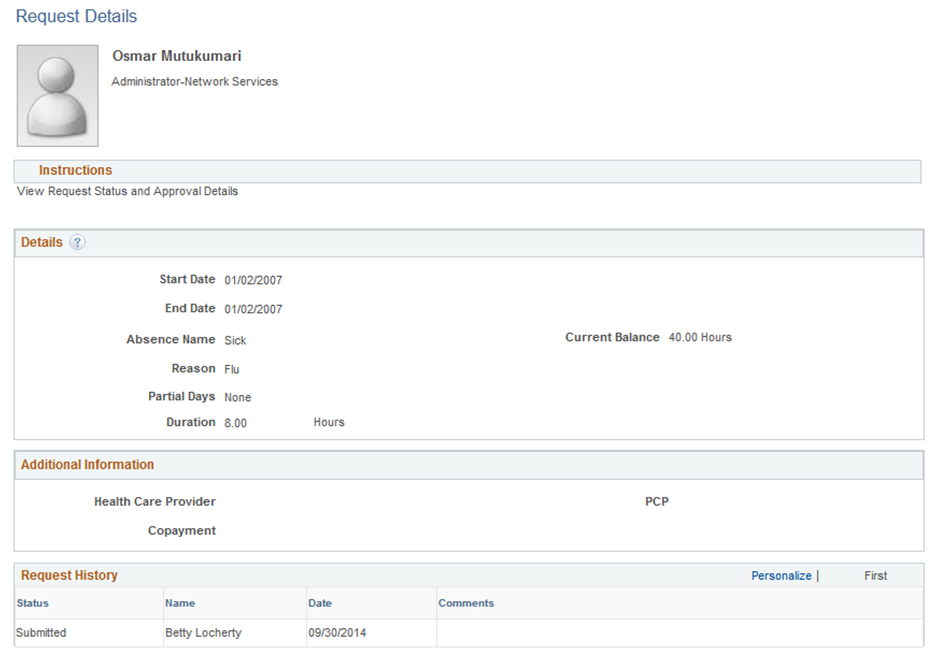
This page is displayed automatically when you select an absence that requires additional information, regardless of whether the partial days options have been enabled.
Details
|
Field or Control |
Definition |
|---|---|
| Start Date |
Select the first day of the absence event. The field option defaults to the current date. If there is a break in the absence, enter each event separately. For example, if you are out sick for two days, return to work for three days, and are out sick again, enter two absence events. If the absence includes a weekend (say, Thursday to Monday), enter one absence event. |
| End Date |
Select the last day of the absence event. If you leave this field empty and the Calculate End Date option on the Country Take (setup) page is selected, the system automatically determines the end date based on the begin date, duration, and partial days options. |
| Original Start Date |
Select the original start date of the absence event. Enter a date if the absence has legal or payment implications based on the original start date of the absence. This field is visible when Display Original Begin Date is selected on the Absences page of the Country Take component. Note: Careful consideration is needed when enabling this field in self-service. Incorrect data entered in this field might lead to incorrect eligibility calculations and payment for one or more events. |
| Filter by Type |
Select the absence type. The selection you make in this field will limit or filter the selections available in the Absence Name field. |
| Absence Name |
Select the absence name from the available options. The options available depend on the selection in the Filter by Type field, the absence Takes that are enabled in the Country Take setup, and the elements for which the employee is eligible. Note: If you change the value in the Absence Name field on this page, all existing information regarding the event is reset. The system prompts you to continue before it resets the data. |
| Reason |
Select a reason from the available options. The reasons available depend on your selections in the previous fields. Absence reasons are linked to the Absence Name (Take) through the Absence Take Type. |
| Partial Days |
Specify which days of the absence event are partial days. If the Calculate End Date or Duration option is enabled on the Absence (setup) page, and the Unit Type is Hours, the system does consider any partial hours or half-day entries that are entered in this group box when it calculates the end date or duration. For example, an employee has a work schedule of 8 hours per day, Monday through Friday. The employee reports an absence from Monday, January 8, 2007 through Wednesday, January 10, 2007. Then employee takes a half day off on Monday and full days off for the rest of the absence. Example 1: The Country Take set up is defined as follows:
With these settings, to correctly enter the absence data the employee should report:
Example 2: The Country Take set up is defined as follows:
With these settings, to correctly enter the absence data the employee should report:
Warning! If the absence unit type is defined in days in the Country Take setup, we do not recommend using partial days options. Note: Data that you enter in the following fields is used in the absence calculation process only if the data is referenced by your absence formulas. The available options in the Partial Days field when the absence is calculated in days include:
Depending on the option that you select, up to two check boxes appear that allow you to specify which days of the absence event are half days. Select the check boxes that are appropriate for the absence event. |
| Duration |
Enter Duration by days or hours. You do not have to enter Duration if the Calculate Duration button is enabled on the Absence (setup) page. The system calculates the duration of the absence in hours or days when you click the Calculate End Date or Duration button. The behavior of this field depends on the settings on the Absence (setup) page. The value is automatically calculated if the Calculate End Date option is selected.
|
| Calculate End Date or Duration |
Click this button to have the system calculate the end date of an absence event based on the entries in the Start Date and Duration fields, or to calculate the Duration based on entries in the Start Date and End Date fields. Note: When the Calculate End Date and Calculate Duration options are both selected on the Date Rules page of the Country Take component, one of these two options is entered in the If both entered recalculate field. This ensures that when an absence event is reported with values entered in both the Duration and End Date fields, only one of the fields is recalculated when the Calculate End Date or Duration button is clicked. |
Additional Information
The fields that are displayed in this group box depend on how your organization sets up self service for Absence Management during the implementation process.
Comments
The Requestor Comments field enables the employee to enter free form text related to the absence request that becomes part of the record and is visible throughout the approval process. Comments display on the Absence Details page.
|
Field or Control |
Definition |
|---|---|
| OK |
Click this button to have the system perform validations regarding required fields and issue error messages if information is missing. Also, if Partial Days options are used incorrectly, error messages are displayed indicating which data needs must be corrected before the Timesheet page is displayed. |
| Cancel |
Click this button to discard any modifications that you made. |
See Request Absence Page.
The Forecast Results tab is displayed in the Absence Events grid after the absence event Forecast process is completed.
Image: Absence Forecast Results tab
This example illustrates the fields and controls on the Absence Forecast Results tab. You can find definitions for the fields and controls later on this page.

After the Forecast process is completed, a message is displayed beneath the Absence Event link to indicate the absence forecast status and time stamp. The Forecast Results tab displays the Forecast Value returned for each of the absence events. Click the Forecast Details link to review the list of returned values for each absence event.
Depending on the Country Take configuration, some absences may require forecasting to submit for approval. Depending on the Forecast Value returned, some absences may not be eligible to be submitted if they do not meet the forecasting eligibility criteria defined in the Country Take component.
See Forecasting Absence Entitlement Balance During Absence Entry.
Access the Absence grid with events awaiting approval:
Select the Absences that require approval. Absences with a status of Needs Approval, Error, and Denied can be approved.
You can approve multiple absence events in the Absence Events grid on the manager's Timesheet. If at least one of the events requires forecasting before approval, a validation error is issued that requires you to run the Forecast process. If multiple events are forecasted, a message is displayed indicating that forecasting completed successfully. Click the Forecast Details link that is displayed in the Forecast Results tab to verify the forecast results for each of the events.
Absence Source
The Source column of the Absence Events grid displays the source of entry of the absence event. Depending on the entry source, some events can be modified on the Timesheet page. This table lists the combinations of entry source, the label displayed in the Source column, and indicates in which applications the event can be modified:
|
Source of Entry |
Label Displayed |
Can be modified in . . . |
|---|---|---|
|
Absence Event Entry |
Administrator |
Absence Event Entry |
|
Time and Labor |
Time and Labor |
Absence Event Entry |
|
Third Party |
Third Party |
Absence Event Entry Third Party |
|
Employee Absence Self Service |
Employee |
Absence Event Entry Employee Timesheet Manager Timesheet |
|
Manager Absence Self Service |
Manager |
Employee Timesheet Absence Event Entry Manager Timesheet |
|
Employee Timesheet |
Employee |
Absence Event Entry Employee Timesheet Manager Timesheet |
|
Manager Timesheet |
Manager |
Absence Event Entry Employee Timesheet Manager Timesheet |
Note: On Timesheets, you can approve absence events that are entered using Employee and Manager Absence Self-service pages or Employee and Manager Timesheets only if they are defined to allow entry in Time and Labor in the Country Take component.
Note: When the timesheet is the entry source for an absence, the system uses the Time and Labor approval setup. Although the country take may have approval defined, if you do not have Time and Labor approval set up the absence is auto-approved.