Reporting Time
This section lists common elements and discusses how to assess employees' time at a summary level, enter, view, or change employee's time, use mass time, and select employees for mass time.
|
Page Name |
Definition Name |
Usage |
|---|---|---|
|
TL_MSS_TIMESHEET |
You can view all employees' time whether they need approval or not. To approve an employee's time, you need to either display the employee's timesheet or navigate using the Approve Reported Time link. |
|
|
TL_RPTD_PCH TL_RPTD_ELP |
Report time and task details for a day, week, or time period for either punch or elapsed time reporters. |
|
|
TL_MASS_WHO |
Managers select employees for mass time reporting. |
|
Field or Control |
Definition |
|---|---|
| Time Reporting Elements and Task Reporting Elements |
The self-service pages that employees use to report time include fields for selecting time reporting and task reporting elements. The employee's time reporting and task reporting templates determine which fields are displayed. If data is reported in error for invalid time or task elements (through a TCD, Mass Time, or Rapid Time Reporting pages, for example), those time reporting or task fields are also displayed so that employees can make corrections. The self-service pages that managers use to report an employee's time include fields for all time reporting elements, regardless of the employee's time reporting template. The task fields vary, depending on the employee's time reporting template: if the Task Profile option is selected on the template, the self-service pages display a task profile field; if the Task Template option is selected on the template, the self-service pages display the task fields for the task template assigned to the employee's taskgroup. If data is reported in error for invalid time task elements (through a TCD, Mass Time Reporting, or Rapid Time Reporting pages, for example), those fields are displayed on the self-service pages so that managers can make corrections. |
| Timesheet page |
Both punch time and elapsed time are reported using the Timesheet navigation component. When selected through the Manager Self Service component, the Report Time - Select Employee page displays a list of the manager's employees. By clicking the employee name link, the manager can select the employee for whom to report time. The Timesheet page that appears is based on the Time Reporter Type value selected on the Create or Maintain Time Reporter Data pages, which determine whether punch or elapsed information is displayed. |
Use the Report Time - Timesheet Summary page (TL_MSS_TIMESHEET) to you view all employees' time whether they need approval or not.
Navigation
Image: Report Time—Timesheet Summary
This example illustrates the fields and controls on the Report Time—Timesheet Summary. You can find definitions for the fields and controls later on this page.
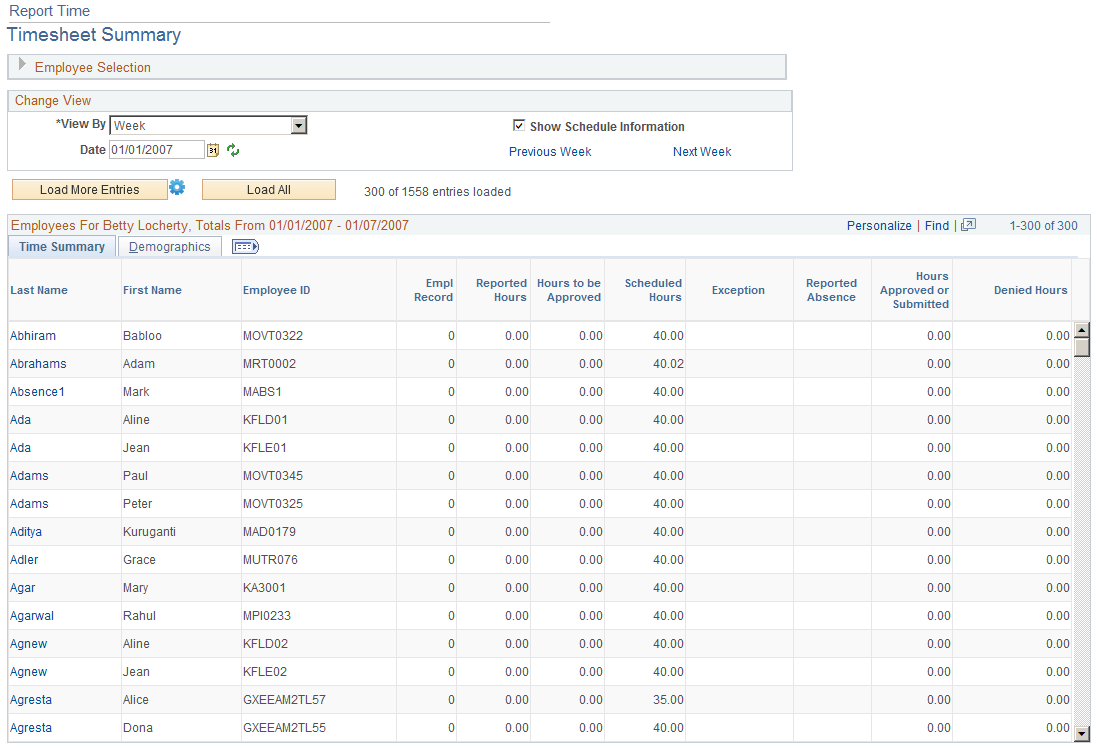
Note: The previous screenshot does not display the all of the fields on the page. Scroll to the right to view the entire page on your system.
The Report Time—Timesheet Summary page is the initial interface for managers to approve or deny time for their employees. This page provides managers with the following functionality:
Summary information about their employee's reported hours, based on the date range specified.
Summary totals for each employee indicating hours needing approval, total reported hours, total scheduled hours, hours that have already been approved, and hours that have been denied.
Summary totals of time reported to TRC Categories defined by the customer.
Details of time that has been submitted by the employee versus time that is still in a saved, not submitted, status.
Access to approve or deny time for an individual or group of employees.
Access an employee's timesheet where a manager can view or edit details about the time reported.
Ability to scroll from one day or week to the next to review if there are employees needing time approved.
Ability to filter on employees with exceptions.
Employee details such as Job Description, Department, Workgroup, or other fields specified on the manager search options page.
Ability to navigate quickly to and from the Report Time – Timesheet Summary page.
An icon is displayed in the Reported Absence column if absence data exists for an employee within the date range that you specify on the Timesheet Summary page.
Managers cannot approve absence events using the Approve Reported Time Summary page. Managers must access the employee's detailed timesheet to approve an absence event.
See Approve Reported Time - Timesheet Summary Page.
The Report Time – Timesheet Summary page includes these fields:
|
Field or Control |
Definition |
|---|---|
| Employee Selection Criteria |
An expandable/collapsible group box used to select a group or individual employee for approval. This group box also includes the Get Employees button. The fields displayed here are a result of the Include In Criteria selected on the Manager Search Options. If the Manager Search Options are blank, then the default display is derived from the 'Manager Search Defaults' on the Time and Labor Installation page. |
| View By |
This field determines how much reported time you see in the summary list. The page refreshes each time you select an option. The options are: Day, Week, All Time Before to or All Time After. Day: Select to display any reported time with a status of Needs Approval or Denied for the day specified. Week: (The default). Select to display any reported time with a status of Needs Approval or Denied for the week specified. This field looks at what the user has specified on their User Preferences for the Start Day of the Week field. If the user has specified Monday as their start day of week, then the results list begins each week with a Monday date. For example, if the user enters a date of 03/01/04 (Tuesday) in the Date field and clicks on the refresh button, the system displays a date range of 02/28/04 (Monday) through 03/06/04 (Sunday). |
| Date |
The default is today's date when you first access this page. If the View By option is Week, the system will check the User Preferences for the "Start Day of Week" specified and display the week accordingly If the View By option is All Time Before or All Time After , the system looks at the date that has been entered and returns a list of employees who have time needing approval prior to or in the future of that date. |
| Refresh button |
Select to refresh the page and employee list after the user changes a date. |
| Grid Title Bar |
This group box title includes manager's name and the date range being viewed. |
| Grid columns |
The columns: Select, Name, Reported Hours, Hours To Be Approved, Scheduled Hours, Exception, Approve/Submitted Hours and Denied Hours are static. All of these columns will be displayed when using the view by Day or Week options. Users can configure up to three TRC Category columns to be displayed along with Employee Selection Criteria fields that are selected as Include in List. They include: Select – Check this box to select a time reporter for approval or denial. Name – Click on the individual time reporter's link to be taken to the timesheet. Reported Hours – Displays the total number of hours reported. Hours To Be Approved – Total hours needing approval. Scheduled Hours – Displays the total number of scheduled hours. Exception – Displays an icon indicating that an exception(s) exist. Approve/Submitted Hours – Displays the total number of approved or submitted hours. Denied Hours – Displays the total number of denied hours. |
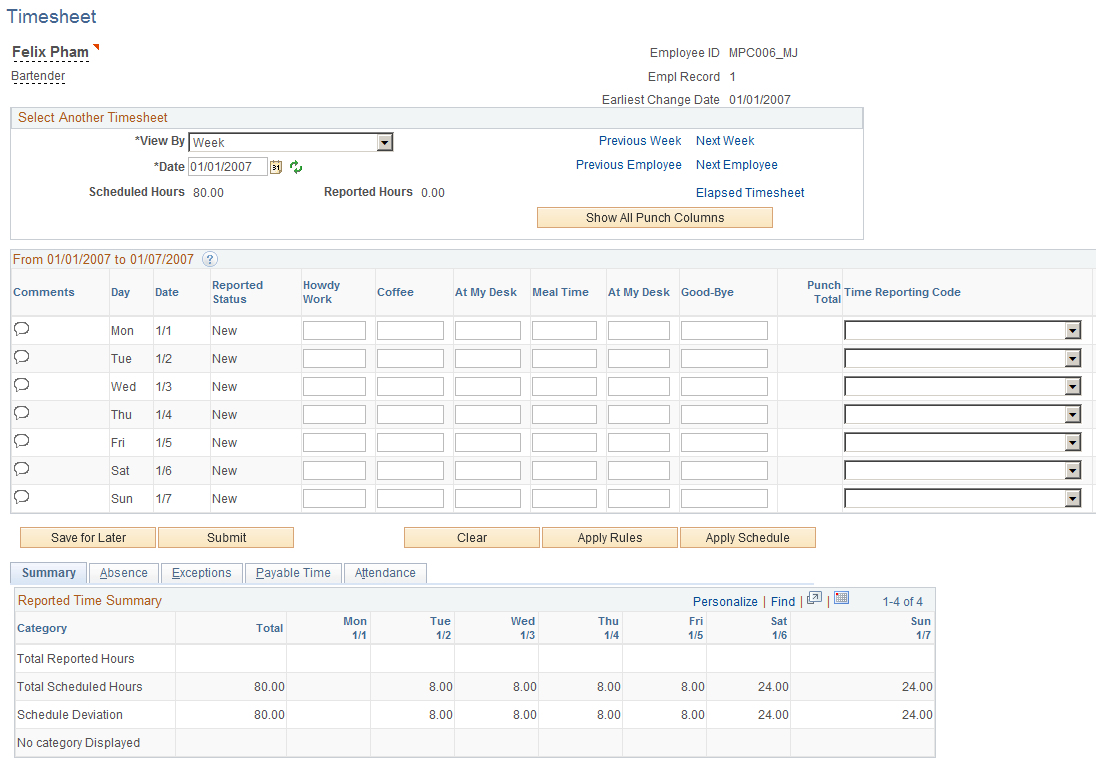
Use the Timesheet page ( TL_RPTD_PCH ) to report time and task details for a day, week, or time period for either punch or elapsed time reporters.
Navigation
Image: Timesheet page
This example illustrates the fields and controls on the Timesheet page. You can find definitions for the fields and controls later on this page.
|
Field or Control |
Definition |
|---|---|
| Apply Rules |
Click this button to launch an online process that immediately applies rules to the reported time. If the rules are applied successfully, the Payable Time is displayed in the Payable Time grid, and the payable time status is set to Approved or Needs Approval. If exceptions are created, they are displayed in the Exceptions grid. Note: This button is displayed if the Run from Apply Rules Button option is enabled in the Real Time Rules field on the Time and Labor Installation page during implementation. |
| Clear |
Click this button to remove entries from the gird that have not been saved or submitted. This button only appears on Punch timesheets. |
| Apply Schedule |
Select to load the employee’s time entries for the specified period in the grid on this page. The system uses the employee’s work schedule to populate the grid. If the employee has any submitted or saved entries in this time period, then this function is not available, and the Apply Schedule button is not displayed on the page. This prevents conflicts between entries already on the timesheet and entries that might be applied from the employee’s schedule. The only exceptions to the rules for disabling this function and the Apply Schedule button are:
Note: Based on the configuration of the time reporting template, this button may not be available. |
Use the Mass Time - Select Time Reporters page (TL_MASS_WHO) to select employees for mass time reporting.
Navigation
Image: Mass Time – Select Time Reporters
This example illustrates the fields and controls on the Mass Time – Select Time Reporters. You can find definitions for the fields and controls later on this page.
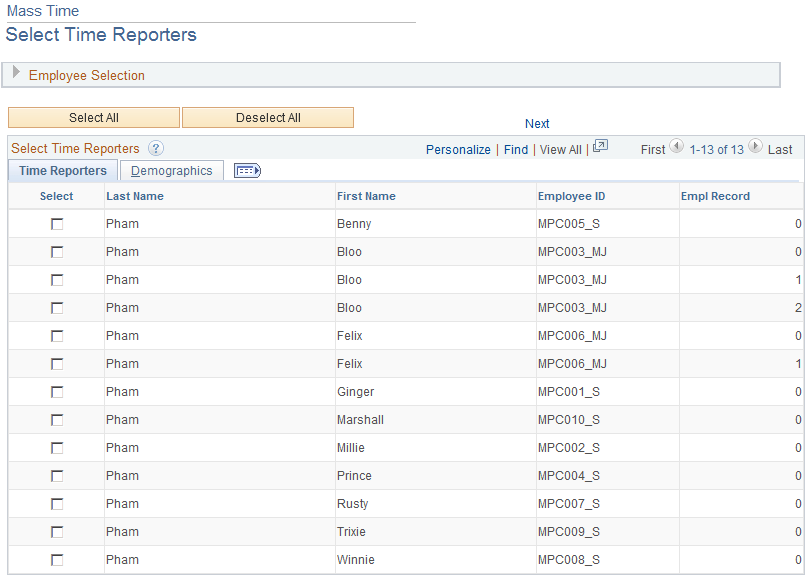
The Mass Time Reporting feature enables a manager to report time in several different ways for their employees by using a template type format. The user is asked a series of questions about who they want to report time for, when they want to report the time for, and how they want to report that time. Depending on how the user answers the questions, the system generates time for a specific person or group and for either a specific date or a range of dates.
Managers use Mass Time Reporting to save time and keystrokes when reporting time. It enables the manager to easily report time using an employee's schedule, or to report different attributes of time for a period rather than having to enter them in manually for each day in the specified period.
Managers can use this page to report time for an employee or a group of employees using Time and Labor's Group Security. To report time for more than one person at the same time, the selected employees must share some of the same time reporting attributes. For example, suppose that you are reporting time for a group of employees using a specific time reporting code (TRC), that time reporting code must exist in the TRC programs to which the employees are assigned. Otherwise, the system generates an exception to indicate that the reported TRC is not in the specified employee's TRC program.
Note: To use Mass Time Reporting, the time reporter must be assigned to a schedule.
|
Field or Control |
Definition |
|---|---|
| Select All |
Select the employees for whom you want to report time by selecting the check box beside their names once the list appears. You can also click the Select All button to indicate that you want to report time for all of the employees on the list. |
| Next |
After selecting which employees you want to report time for, click this button to go to the next segment of the page, the Mass Time - Select Time Reporting Method page, when you finish selecting the employees. |
Information on the Mass Time Reporting pages is included in the Using Self-Service Components section.