15Inventory and Order Management
Inventory and Order Management
This chapter describes the inventory and order management process in Oracle’s Siebel Consumer Goods. Topics include:
About Inventory and Order Management
Sales representatives, presales representatives, and delivery representatives often capture orders, invoice, and collect payments. In addition to these primary sales responsibilities, they might also collect payment for outstanding billings, exchange products with other delivery representatives, and deposit payments at the local bank. All these activities are part of the inventory and order management process.
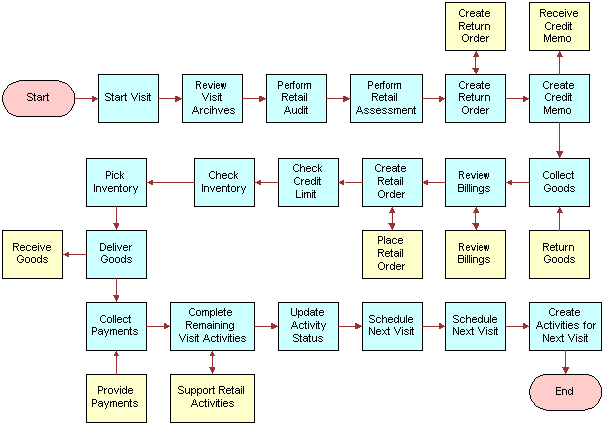
A business process is a set of activities organized to achieve a business objective. A business process model depicts the flow of work that users or software applications typically follow to complete a sequence of tasks. The Conduct Retail Visit subprocess business flow shows a greater level of detail for the high-level tasks represented in a business process diagram.
The following figure shows an example of a Conduct Retail Visit subprocess business flow, which includes the following steps:
Prepare for and Start the Visit
Review Visit Archives
Perform Retail Audit
Perform Retail Assessment
Create Return Order
Create Credit Memo
Collect Goods.
Review Billings
Create Retail Order
Check Credit Limit
Check Inventory
Pick Inventory
Deliver Goods
Collect Payments
Complete Remaining Visit Activities
Update Activity Status
Schedule Next Visit
Create Activities for Next Visit
For more information about inventory and order management, see the following documents on the Siebel Bookshelf:
Siebel Pricing Administration Guide
Siebel Product Administration Guide
Siebel Order Management Guide
Scenario for Managing Inventory and Orders
Delivery sales representatives perform the process in this example scenario for managing inventory and orders. Your company might follow a different process according to its business requirements.
Ace Corporation East just bought a new van to use in the delivery of inventory to different outlets. A delivery sales representative at Ace Corporation East drives of the van. He decides to associate the new delivery van with Ace Corporation East’s physical location. Before he goes on his first delivery in the van, he registers some information about the van, for example, the van’s millage. Also, he makes sure that the van’s inventory on the laptop matches the physical inventory in the van. He is now ready to make the deliveries.
The delivery sale representative drives to the first retail outlet and makes the initial delivery. Also, at this point, he checks for outstanding invoices, collects payments, and records payments. He also talks with the stores manager at the outlet about any orders that the stores manager wants to place, and records these orders. He is now ready to make his next delivery.
Over the course of the day, the delivery sales representative might collect payments and decide to deposit these payments at a designated bank. He must record these deposits.
Process of Managing Inventory and Orders
This topic lists the tasks that sales representatives typically perform to manage inventory and orders. Your company might follow a different process according to its business requirements.
The following list shows the tasks that end users perform to manage inventory and orders:
Associating Assets with Inventory Locations (End User)
A van sales representative can associate assets with inventory locations.
This task is a step in Process of Managing Inventory and Orders.
To associate assets with an inventory location
Navigate to the Inventory Location Management screen.
In the Inventory Locations list, select the inventory location to which you want to associate assets, and click the select button in the Asset field.
In the Pick Asset dialog box, select the appropriate records, and click OK.
Recording Van Information (End User)
Before leaving the depot, a van sales representative verifies the van identification information and records the van’s mileage.
This task is a step in Process of Managing Inventory and Orders.
To record van information
Navigate to the Inventory Location Management screen.
Drill down on the Name field hyperlink for an inventory location, and click the Readings view tab.
Verify that the Van Plate number and Serial number are correct.
Scroll down to the Asset list, create a new record, and complete the necessary fields.
The following table describes some fields.
| Field | Comments |
|---|---|
Reading |
Enter the van’s current mileage. |
U/M |
The unit of measure specified when the asset is set up. |
Time Taken |
The time that you note the mileage. This time might be before or at the time that you create this record. |
Reading # |
A unique ID number for each reading. |
Created |
The time that you create this record. |
Complete |
Select this check box to commit the record when you complete it. |
Verifying Van Inventory (End User)
Before visiting outlets, a van sales representative needs to verify that the inventory on the laptop matches the physical inventory in the van. The representative verifies the inventory by performing a cycle count.
This task is a step in Process of Managing Inventory and Orders.
To perform a cycle count
Navigate to the Cycle Counting screen, then the Cycle Count List view.
Create a new Cycle Count record, and drill down on the Status field hyperlink.
In the Cycle Count form, record the start time, and change the status to In Progress.
In the Products list, click List Products.
The list of products for the cycle count appears.
Note: Clicking List Products displays all products in the current van inventory belonging to a sales representative. Various products are also associated with a correct product status, for example, Good or Defective.Verify the count of the stock in your van, and enter the amounts of each item in the Count column.
Note: You can also use the Count UOM1 and Count UOM2 fields to capture the count of the physical inventory. These fields represent two units of measure that are related by case pack, which is a value the administrator sets up. Updates to the Count UOM1 and Count UOM2 fields also update Count when it is committed based on the case pack.When you finish entering the amounts for your inventory, click Count Complete.
The Cycle Count records are converted to read-only.
Click the Variance view tab to compare your count with the original inventory.
To update inventory with the current count, select those products with variances greater than or less than zero, and click Adjust.
When your cycle count is complete, record the end time, and change the status to Done.
Reviewing Billings (End User)
A common activity at retail outlets is reviewing billings. The sales representative reviews all outstanding invoices, collects payments, and records payments. The following procedure assumes a Review Billings activity is assigned to the visit.
This task is a step in Process of Managing Inventory and Orders.
To review outstanding invoices, collect a payment, and record a payment
Navigate to the Visit Execution screen.
From the Activities list, drill down on the Review Billings hyperlink in the Activity Type field.
The All Invoices view in the Accounts screen appears, showing all outstanding invoices for the current account.
Drill down on the Invoice # field hyperlink for an invoice record.
The Invoice Line Items view in the Invoices screen appears.
Click the Payments view tab, and in the Payments list, create a new payment record.
Click the select button in the Payment # field.
The Pick Payment dialog box appears showing all residual payments or credits that you can apply to the current invoice.
To pay an invoice, you can collect a new payment from the customer, or use existing credit.
To collect a new payment from the customer, perform the following steps:
In the Pick Payment dialog box, create a new record.
Enter the payment amount in the Amount field.
Note: The payment amount cannot exceed the amount in the Total Due field on the invoice.Select a value from the Method drop-down list.
Click Save, and then click OK.
The payment record details appear in the Payments list.
To use an existing credit to pay the invoice, perform the following steps:
In the Pick Payment dialog box, select a record for the current account.
Note: This record is an open credit memo or a residual payment credited to the customer.Enter the amount to apply to the invoice in the Amount field.
-
Click OK.
Taking Retail Orders (End User)
At retail outlets, another frequent activity for sales representatives is taking retail orders. For more information, see the chapter about creating a quote or sales order in Siebel Order Management Guide.
In the procedure in this topic, the application completes the following actions when you click Invoice in the Sales Order form:
Checks each line item to see if sufficient on-hand stock exists to fulfill the order.
If enough inventory exists, checks if the order total exceeds the Available Credit.
Changes the status of the order to Billed.
Removes all zero-quantity line items.
Creates the invoice.
Opens the Invoice Line Items view.
In the procedure in this topic, the application completes the following actions when you click Deliver from the Invoice Line Items view:
Updates the inventory base on the order.
Changes the status of the invoice to Delivered or Booked.
Checks the invoice balance against the account’s available credit.
This task is a step in Process of Managing Inventory and Orders.
To take a retail order
Navigate to the Sales Orders screen, then the List view.
Create a new sales order record.
Drill down on the Order # field hyperlink.
The Catalog view appears.
Click the Line Items view tab, and enter the order details.
The Start Price and List Tax fields are automatically populated based on the product listed. The Bonus Quantity, Extended Tax, and Price fields are calculated based on the quantity.
You can enter Order Qty for two units of measure in the fields Qty Ordered (UOM1) and Qty Ordered (UOM2). For more information about Qty UOM1 and Qty UOM2, see Verifying Van Inventory (End User).
When the order is complete, click Book in the Sales Order form.
The order status changes to Booked.
To generate an invoice, click Invoice in the Sales Order form.
From the Invoice Line Items view, click Deliver.
For information about collecting payment for the invoice, see Reviewing Billings (End User).
Recording Deposits (End User)
As a van sales representative, you might need to deposit payments that you collect during the day. You can record the deposit information.
This task is a step in Process of Managing Inventory and Orders.
To record a deposit
Navigate to the Payments screen, then the Deposit Payments view.
Create a new deposit record.
In the Deposits list, drill down on the Deposit Date field hyperlink.
From the Payments list, select all the payments that are included in the deposit.
In the Deposit form, click Deposit.