6Products with Attributes
Products with Attributes
This chapter describes how to create product classes and product class hierarchies. Product classes provide a central location for defining product attributes. Products inherit the attributes of the product classes to which they belong. This chapter includes the following topics:
Component-Based Versus Attribute-Based Pricing
Users to select the features of two types of customizable products:
Products with components. Customers can choose the product's components. For example, when customers buy a computer, they can choose the monitor, keyboard, and mouse they want.
Attribute-based products. Customers can choose the product's attributes. For example, when customers buy a shirt, they can choose its color.
In most cases, it is clear which one of these two a product is. However, in some cases, the product administrator must decide whether to let users select options as product components or as attributes. For example, if a PC monitor comes in three sizes, 14-inch, 17-inch, and 21-inch, then those monitors could be offered as:
Three separate products with three different prices, which are used as three component products within a customizable PC product.
One monitor product with a Screen Size attribute that includes three values (14, 17, and 21), which is used as one component product within a customizable PC Product.
You must decide how to set up products with components, in a way that will be effective as the product hierarchy and its circumstances change.
About Product Attributes
Product attributes are characteristics of a product that a customer can choose. For example, you sell a product in three colors. As part of creating this product, you would define an attribute called Color and assign it the three colors. As part of purchasing the product, customers would choose one of the colors.
A product attribute has two parts: the name of the attribute and the possible values of the attribute. For example, you could define an attribute with the name Color and the values red, green, or blue. The allowable values for an attribute are called the attribute domain. In a configuration session, the user can select only one value for an attribute.
Components of a product are not attributes. For example, you sell a desktop computer. Customers can select one of several types of CD-ROMs when configuring this product. Having a CD-ROM is a characteristic of this product, but the CD-ROMs are components, not attributes.
Product attributes and product features are similar concepts. They both describe characteristics of the product that are of interest to customers. However, feature definitions do not create configurability. For example, you could define a feature: "Comes in three colors, red, green, and blue." This feature definition can be displayed to the user as a message only. It does not create the mechanism for choosing the color. To create that, you must define a product attribute and assign it the values red, green, and blue.
You can define attributes directly in the administration interface. You do not need to create database table extensions or new field definitions in Oracle's Web Tools.
Attributes are implemented in a way that allows users to select the desired attribute value when they configure the product. For example, when a user creates a quote, the Color attribute displays in the interface, and the user can select the desired value.
About Product Classes
Product classes provide a way to organize and administer product attributes. When you assign a product to a product class, it automatically inherits all the attributes defined for that product class. Product classes let you define what attributes are maintained for products, assign those attributes to the products, and maintain those attributes in a consistent fashion.
When you define an attribute for a product class, you specify both the attribute name and the range of values that the attribute can have. This range of values is called the attribute domain. For example, for a product class called blanket, you define an attribute called color and define its domain to be green, red, and blue. Every blanket you assign to this product class inherits the attribute color and its possible values.
Subclasses are product classes that have a parent product class. Subclasses have the following characteristics:
Subclasses can be nested as deeply as needed. This forms the product class hierarchy.
Subclasses inherit the attributes of their parent product class. As you nest downward, each subclass inherits the entire set of attributes from the product classes above it.
You can modify the definitions of inherited attributes. If you do so, this breaks inheritance from the parent product class. Changes to attribute definitions in the parent product class are not inherited by modified attributes in subclasses.
You can define additional attributes for the subclass, beyond the attributes of the parent product class.
You can define attributes at the product class or subclass level. You cannot define an attribute at the product level. At the product level, users can only select the attribute's value.
About the Product Class Hierarchy
The product class hierarchy allows you to organize and manage product attributes. It is separate from the mechanisms you use to organize products themselves, such as product lines and product categories.
For example, you have the product class hierarchy in the following figure. The product class called Class has two attributes defined on it, Attribute 1 and Attribute 2. Class also has a subclass called Subclass. Subclass has Attribute 3 defined on it and contains one product, called Product C.
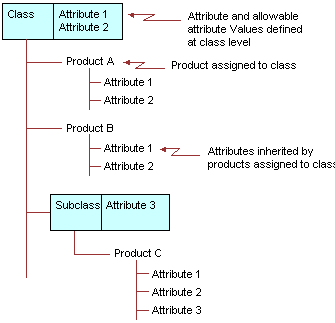
Subclass inherits Attribute 1 and Attribute 2. It also has an attribute definition of its own, Attribute 3. Product C, assigned to Subclass, inherits all three attribute definitions.
In the Administration - Product screen, then the Product Classes view, you can create product classes, organize them into hierarchies, and define attributes for them. By clicking the Structure view tab, you can view the Class Explorer, which gives you an overview of the entire product class hierarchy system.
About Attribute Domains
When you define an attribute, you must define the domain of possible values for the attribute.
About Defining Attribute Domains
There are the following methods for defining the domain:
List of values. You can list the specific values the attribute can have. When users configure a product, they select one of the values from a drop-down menu. For example, the attribute Color could have the list of values red, green, or blue.
A special case of a list of values domain is a list of values that contains only one value. This is useful for creating attributes that you use for managing resources. For example, you could create an attribute called slots-consumed for a product class of computer expansion cards. Typically, each card requires one expansion slot. You would create a list of values containing only the number 1, and would set 1 as the default value. You could then write rules that subtract the value of this attribute from a resource called slots-available each time the user picks an expansion card.
Parametric search can be used to search for attribute values.
Attribute-based pricing can only use attribute values that have been defined as elements in a list of values (LOV). Attribute-based pricing requires the discrete values that appear in an LOV.
Free form. This domain allows free form user input. During runtime, it provides a blank field where the user can make any desired entry.
Parametric search cannot be used to search for attribute values.
Business Component (Buscomp) field. This domain is defined by a field in a business component. For example, you can define an attribute called Account and associate it with the Name field in the Account business component. When users configure a product, they see an attribute called Account. They can then open a picklist and select the desired account. This domain type can be used only for products that are configured in Siebel Product Configurator selection pages.
Parametric search cannot be used to search for attribute values.
This chapter covers the list of values and free form domain types. For information about the Business Component field type, see Product Attributes with Business Component Domains.
Domain Data Types
The data type you specify in the attribute definition determines how the application interprets the values in the domain. For example, you define an attribute with a list of values domain. You define the attribute values to be 1, 5, 10. To write configuration rules that perform numeric computations using these values, you must select the data type Integer or Number when defining the attribute.
The domain of an attribute can be one of the following data types:
Boolean. Use this data type when the user's input is true or false, yes or no. If you specify the Integer data type for these inputs, the application assigns 1 for True or Yes inputs. False and No are assigned 0.
Number. The attribute value can be any positive or negative real number. In Boolean expressions, numbers greater than 0 are interpreted as true. Omit commas when specifying the domain. For example, enter 10,000 as 10000.
Note: When you specify a number, make sure that the number of fractional digits is consistent with the regional or locale setting, defined in the Administration - Data, then the Locale view. If you do not, rules written against the attribute may not behave as anticipated, because the UI displays the number based on the regional or locale setting.Integer. The attribute value can be any positive or negative whole number. If a computation results in a fractional amount, the result is rounded to the nearest whole number. In Boolean expressions, integers greater than 0 are interpreted as true. Omit commas when specifying the domain. For example, enter 10,000 as 10000.
String. The attribute value can be letters, numbers, or any combination. Attributes with this data type cannot be used as operands in a computation or as the result of a computation. The only arithmetic operator that can be used with this data type is = (equals). For example, you can write rules that test if the user has picked a specific string from a list of values.
Date. The attribute value is interpreted as a date and must be in the correct date format. The system administrator sets date format defaults. Arithmetic computations using dates is not supported. For example, you cannot increase or decrease a date using a computation. All comparison operations are supported for dates. For example, you can compare two dates and determine whether one is earlier than (<), later than (>), or the same as (=) another date. Data type mismatches cause the user's input to be rejected, or can cause indeterminate results. For example, comparing a date data type to an integer data type.
About Hidden Attributes
When you place a check mark in the Hidden field in an attribute definition, the attribute does not display in the Quote, Order, Agreement, or Asset views or customizable product selection pages. For example, if you assign a product to a product class that has hidden attribute A1. When you add this product to a quote and select Dynamic Attributes, A1 does not display.
Use hidden attributes to create configuration parameters that customers do not need to see. For example, you could define a hidden attribute whose value is the number of bays required for a chassis. You could then write configuration rules that use the value of this attribute to monitor the number of available bays during a configuration session.
Upgrade users. Use hidden attributes as a replacement for virtual products.
Scenario for Creating Products with Attributes
This topic gives one example of how attributes may be used. You may use attributes differently, depending on your business model.
A business sells work shirts that have the following attributes:
All brands of shirts come in the sizes S, M, L, XL.
All brands of shirts come in the colors tan, green, blue, and brown.
Some brands of shirts give the customer the option of personalizing the shirt by adding the company name.
Customers must pay extra for the XL size work shirt and for personalized work shirts.
To set up these attributes, the product administrator:
Creates attribute definitions:
The attribute Work Shirt Size has the domain S, M, L, XL.
The attribute Work Shirt Color has the domain tan, green, blue, brown.
The attribute Work Shirt Personalization has the domain Y, N.
Creates product classes:
The product class Work Shirt is associated with the attributes Work Shirt Size and Work Shirt Color.
The product class Personalized Work Shirt is a subclass of the product class Work Shirt. From the product class Work Shirt, it inherits the attributes Work Shirt Size and Work Shirt Color. It is also associated with the attribute Work Shirt Personalization.
Associates all its work shirt products with these product classes:
If the work shirt cannot be personalized, it is associated with the product class Work Shirt.
If the work shirt can be personalized, it is associated with the product class Personalized Work Shirt.
Sets up attribute pricing to reflect the extra cost of the XL and personalized work shirts.
Process of Creating Products with Attributes
To create products with attributes, perform the following tasks:
Creating Attribute Definitions. First you create attribute definitions, with the domain for each attribute.
Creating Product Classes in a Hierarchy. Then you create the hierarchy of product classes. For each product class, you select attribute definitions that you created in the previous step.
Associating Attributes with a Product. Then you associate products with product classes. The products inherit all the attributes of the product class.
Setting Up Attribute Pricing. If these attributes affect price, you must set up attribute pricing.
Creating Attribute Definitions
First, you create definitions of all the attributes that will be associated with your product.
This task is a step in Process of Creating Products with Attributes.
To create an attribute definitions
Navigate to the Administration - Product screen, then the Attribute Definitions view.
In the Attribute Definitions list, add a new record.
In the Attribute field of the new record, enter a name for this attribute.
The Locked Flag is automatically selected.
In the Versions list, click the Work Space version.
In the Details list, add a new record and complete the necessary fields, described in the following table.
Field Comments Data Type
Select the data type for the domain of this attribute. For more information, see About Attribute Domains.
Domain Type
Select the type of the domain for this attribute. Options are Free Form and Enumerated. For more information, see About Attribute Domains.
Unit of Measure
Optionally, select the unit of measure for this attribute, such as day, month, dollar, dozen.
If you selected Enumerated as the domain type, you must enter all the values for the domain by adding new records to the Attribute Values list and completing the necessary fields, described in the following table.
Field Comments Value
Enter a valid value for the attribute.
Sequence
Enter a value to control the order of evaluation of constraints for attributes and relationships.
Note: If you enter a number in the Value field containing digits to the right of a decimal, these digits might automatically round up in the field display. For example, if you enter the number 12.349, the field might display 12.35. If digits automatically round up in the field display, an error results when you customize a product that uses this attribute, and you cannot select this attribute. Number rounding occurs if the Data Type field is Number, the Domain Type field is Enumerated, and the Number Fractional Digits field for your locale (in the Administration - Data screen, then the Locale view) is set to a number less than the number of digits that you enter to the right of the decimal. To avoid number rounding and the consequent error, increase the number in the Number Fractional Digits field and restart the server.When you are finished, deselect the Locked Flag.
Creating Product Classes in a Hierarchy
Next you create product classes. This task is a step in Process of Creating Products with Attributes.
You create and manage product class hierarchies by specifying a parent product classes when defining product classes. Subclasses inherit the domains of their parent product classes. For more information, see About the Product Class Hierarchy.
You can view the hierarchy in by clicking the Structure view tab. This view contains a tree display that shows the hierarchy in a manner very similar to the Microsoft Windows file Explorer. You can expand or collapse classes and subclasses as needed to view the hierarchy. The portion of the hierarchy in which you are located displays in the Classes list.
To create a product class
Navigate to the Administration - Product screen, then the Product Classes view.
In the Product Classes list, add a new record, and enter a name for the class in the Product Class field.
The Locked Flag is automatically selected
In the Versions record, complete the necessary fields. Some fields are described in the following table.
Field Comments Parent Product Class
If this product class is a subclass, select the parent product class. This controls the product class's location in the class hierarchy.
Searchable
Select this field to make the product class available for parametric search.
In the Versions list, click the name of the Work Space version.
Click the Display Name view tab.
Add a record to the Display Name list, for each language that the product will be displayed in, and complete the necessary fields, described in the following table.
Field Comments Display Name
Enter the name that will be seen by customers using the application in this language.
Language
Select a language code, such as ENU for American English.
Click the Attributes view tab.
In the Attributes list, add new records for all the attributes in this product class, and complete the necessary fields, described in the following table.
Field Comments Name
Enter a name for this attribute
Attribute Definition
Select the definition for this attributes. Definitions are available if they were created as described in Creating Attribute Definitions.
Default Value (Display)
Enter the default value that the end user sees when the product is initially displayed. The attribute has this value unless the end user selects a different value. However, if you write rules that manipulate the attribute value, the Siebel Product Configurator engine can override the default value.
Note: Fields that include (Display) in their names are translations of the value in the administrator's location. Fields without (Display) in their names are in the default or Language Independent Code (LIC) location.Rejected Value (Display)
This field is relevant when an attribute is marked as required. If the attribute is required, the value in this field is the value that Siebel Product Configurator interprets to be not valid. The attribute will be marked as not entered, if this is the attribute's value.
To use this checkbox, follow the instructions in Setting Up Required Attributes.
Required
Select this checkbox to require the user to select a value for this attribute. To use this checkbox, follow the instructions in Setting Up Required Attributes.
Read Only
Select this check box to make this attribute read-only, so the user cannot change the default value.
Hidden
Select this check box to prevents the attribute from displaying in quote, agreement, order, or asset views or customizable product selection pages.
Unit of Measure
Optionally, select the unit of measure for this attribute, such as day, month, dollar, dozen.
Searchable
Select this checkbox to allow this attribute and its values to be used in parametric searches. For example, if the attribute is Color, you can search for products that have Color = Red.
Inherited
This checkbox is selected if the attribute value is inherited from a parent product classes. Read-only.
Modified
This checkbox is selected if properties of the inherited attribute such as Read-only, Default, and Rejected were overridden by the user.
Click the Structure view tab and verify that this product class displays in the correct location in the class hierarchy.
When you are finished, release the Product Class record, so other users can work on this product class.
The new product class definition appears in the Product Classes list.
Associating Attributes with a Product
To associate attributes with a product, you assign the product to a product class. The product inherits all the attributes of the product class or subclass to which it is assigned.
This task is a step in Process of Creating Products with Attributes.
To associate a product with a product class
Navigate to the Administration - Product screen, then the Product Definitions view.
In the Versions list, in the record for the Work Space version, in the Product Class field, select the product class.
Setting Up Attribute Pricing
If these attributes affect price, you must set up attribute pricing. For example, if you charge more for products in the largest sizes or for products of certain colors, you must set up pricing for the attributes that customers pay extra for.
For more information, see the topic about attribute pricing in Siebel Pricing Administration Guide.
Setting Up Required Attributes
You can set up attributes to require users to select values for them.
If you do not enter values in the mandatory fields where attributes are required, then Siebel Product Configurator displays an error message.
If you click Finish It!, Siebel Product Configurator does not complete required attributes for the user, as it completes required cardinalities. Instead, it displays an error message saying that the configuration is incomplete.
To set up required attributes, follow these steps:
Set up the attribute values as usual. If it is an enumerated attribute, include in the list of possible values a value that would not be acceptable for this attribute. This value must match the type of the attribute, for example 999 in the type is numeric. Give this value a display name that will be displayed as an error message and that will be displayed in the control telling the user to select a value; for example, give it the display name Select a Color. For more information about setting up attribute values, see Creating Attribute Definitions.
Attach the attribute to a product class, and select the Required field. As the rejected and default value for the product class, enter 999, the value for the message. Because it is the default value, it is displayed in the drop-down control for the attribute. For more information about attaching an attribute to a product class, see Creating Product Classes in a Hierarchy.
Note: As an alternative to designating an attribute as required in the product class definition, you can designate it as required in the product definition after the attribute has been attached to the product through the product class assignment. This gives the administrator the flexibility to have the same attributes on a product class required on some products and not required on other products.Attach the product class to the product. The product inherits the rejected value from the product class. For more information about attaching a product to a product class, see Associating Attributes with a Product.
Setting a Read-Only Value for an Attribute of a Product
When you set the value of an attribute for a product, it cannot be changed by either the user, a configuration rule, or the Siebel Product Configurator engine. One example, is when you want to set an attribute value so that provide and consume rules can use it to add or subtract from a defined resource.
For example, you create an attribute called Slots Required for a product class containing expansion cards. Some cards take up one expansion slot; some take up two. You could define a list of values containing the integers 1 and 2 and make it the domain for Slots Required. For each expansion card you would then set the value of this attribute at 1 or 2. Users cannot change this value when configuring the product, and configuration rules cannot change this value.
You would then write a provide rule that increases a Slots Available resource when the user picks a chassis. For the expansion card product class, you would write a consume rule that reduces Slots Available by the value of Slots Required, each time the user picks an expansion card. In this fashion, you use attribute values as constants that interact with a defined resource to manage a consumable configuration variable.
To set an attribute value for a product
Navigate to the Administration - Product screen, then the Product Definitions view.
In the Products list, select and lock the desired product.
In the Versions list, click the Work Space version.
Click the Attributes view tab.
The Attributes list appears, displaying all the product's attributes inherited from its product class or subclass.
In the record for the desired attribute:
Select the desired attribute value in the Default Value field.
Select the Read Only checkbox.
Creating a Siebel Product Configurator Engine Read-Only Attribute
When you create an attribute that is Siebel Product Configurator engine read-only, it cannot be changed by the Siebel Product Configurator engine or a configuration rule. Siebel Product Configurator engine read-only attributes can only be changed by the user. This feature enables users to define attributes that can serve as an input to compute a valid solution but will not be updated as part of computing the solution. You can create a Siebel Product Configurator engine read-only attribute using the ConstraintReadOnly UI property. One example, is when you do not want the Siebel Product Configurator engine to overwrite specific attribute values.
For example, you create an attribute called Age to capture the user's age that defaults to an empty string. You would then write a rule that excludes the Under 18 Insurance Charge product when the Age attribute is greater than 18.
If the user sets the Age attribute value at 25, then the product Under 18 Insurance Charge appears in red in the UI because it is excluded. When the user tries to select the Under 18 Insurance Charge product, the application displays a configuration conflict error message. If the Age attribute is set to ConstraintReadOnly = Y, the UI does not display a Proceed option and the age attribute remains at 25 and the user cannot select the Under 18 Insurance Charge product.
If the Age attribute is set to ConstraintReadOnly = N, the UI displays the Proceed option. The proceed option selects the Under 18 Insurance Charge product and resets the Age attribute to a null value. The Age attribute value that is retrieved by Siebel Product Configurator will serve as a static input to compute a valid solution. If a valid solution cannot be found, then the engine will generate an error message without a Proceed option. The absence of the Proceed option prevents Siebel Product Configurator from overwriting the value of the Age attribute.
To create a Siebel Product Configurator engine read-only attribute:
Navigate to the Administration - Product screen, and then Product Definitions view.
In the Products list, select and lock the desired product.
In the Versions list, click the Work Space version.
Click the Properties view tab.
In the explorer display of the product on one side of the screen, select the desired read-only attribute.
In the Properties list, add a new record and complete the fields. Some fields are described in the following table.
Field Comments Name
Enter ConstraintReadOnly.
Value
Enter a value for the property. The value is either Y or N.
Creating a Configuration Session Specific Computed Attribute
You can define an attribute that is specific to the configuration session. The attribute value is computed during the start of the configuration session, but it is not synchronized to the line items or the database. The attribute is treated as a virtual attribute for a product and is accessible within the Siebel Product Configurator user interface, constraints, scripts and properties.
One example is when you want to capture an attribute value whose sole purpose is to trigger a product's constraints. For example, you create an attribute called Additional Fee with a domain value of Yes and No, where the default value is set to No. You then write a requires rule that selects products Late Fee and Finance Charge when Additional Fee = Yes. When the user launches Siebel Product Configurator, and sets the Additional Fee = Yes, the constraints are triggered and Additional Fee products are selected. Note that when you exit from Siebel Product Configurator, you will not be able to see the Additional Fee attribute displayed in the line item attribute applets. Thus reducing the number of attributes that are captured in the database primarily for computational purposes.
To create a configuration session specific computed attribute
Navigate to the Administration - Product screen, then the Product Definitions view.
In the Products list, select and lock the desired product.
In the Versions list, click the Work Space version.
Click the Properties view tab.
In the explorer display of the product on one side of the screen, select the name of the root product.
In the Properties list, add a new record and complete the fields. Some fields are described in the following table.
Field Comments Name
Enter NoSave.
Value
Enter a value for the property. The value is either Y or N.
In the explorer display of the product on one side of the screen, select the attribute.
Enter the same information for the attribute that you entered for the product in Step 6.
Binding an Attribute Value to a Line Item Integration Component Field
You can create an attribute and bind the value to a quote, an order, or an asset item field. When you start the configuration session, the value from the business component field is loaded into the product instance's attribute value. When you exit the configuration session, the attribute value is copied to the target business component field value. This attribute is accessible in the Siebel Product Configurator user interface, constraints, scripts, and properties. If there is any data inconsistency between the field data and the product instance, then a warning window displays at the start and end of the configuration session. Note that the business component field that is mapped to the attribute value must exist in the corresponding line item integration components for quotes, orders or asset. This streamlines the order capture process by enabling users to provide line item characteristics within Siebel Product Configurator thereby preventing users from writing constraints or scripts to enable back and forth data exchange between attribute values and line item fields.
For example, you may want to create an attribute value to represent the Billing Account. The Billing Account is tracked in the line item field. The product administrator sets the property LineItemICField = Billing Account for the Billing Account Attribute.When the configuration session is started, the Billing Account attribute is defaulted to the business component Billing Account field. The end user has the option to overwrite the defaulted value. When the user exits Siebel Product Configurator, the user's selection is copied back to the business component.
To bind an attribute value to a line item
Navigate to the Administration - Product screen, then the Product Definitions view.
In the Products list, select and lock the desired product.
In the Versions list, click the Work Space version.
Click the Properties view tab.
In the explorer display of the product on one side of the screen, select the desired attribute.
In the Properties list, add a new record and complete the fields. Some fields are described in the following table.
Field Comments Name
Enter LineItemICField.
Value
Enter a value for the property. The value is the LineItem field name.
Note: If the LineItemICField is mapped to a Currency field, then this field has a limit of 10 digits.
Defining a UI Property Using an Attribute Value from a Line Item Integration Component Field
After you bind an attribute value to a line item, you can use that attribute value in the Siebel Product Configurator user interface, constraints, scripts, and properties.
This section shows you how to use the value to define a user interface property. There is general information about defining a user interface property in Defining a UI Property. If the value is from an integration component field, you must also do the following:
The Line Item fields must be present in the Line item Integration Components and in the SIS OM PMT Service.
If asset-based ordering is enabled, you must modify the following integration objects: SIS OM Quote, SIS OM Order, SIS Order Asset
If asset-based ordering is not enabled, you must modify the following integration objects: 7.7 Asset Integration Object, 7.7 Quote Integration Object, 7.7 Order Entry Integration Object
Then you can define the UI property using the following procedure.
To define a UI property using an attribute value from a line item integration component field
In Web Tools, open a workspace and then navigate to Object Explorer.
For more information on using the workspace dashboard, see Using Siebel Tools.
Add custom fields to the Line Item Integration components and SIS OM Payment Service.
Deliver the workspace.
In the Siebel Business Application, bind the line item field to the attribute.
For more information, see Binding an Attribute Value to a Line Item Integration Component Field.
Changing Inherited Properties of Attributes
When you associate an attribute with a product class, it is inherited by all member subclasses. If you edit an attribute on the product class where it was originally defined, the changes propagate to all member subclasses. The attribute definition is uniform for all subclasses that inherit it.
Subclasses can have two kinds of attributes: local and inherited. A local attribute is one that is defined on the subclass. An inherited attribute is one that is inherited from a parent product class.
You customize an inherited attribute domain by editing its definition at the subclass level. When you edit an inherited attribute definition, the changes propagate to all members of the subclass, including other subclasses under that subclass.
Editing an inherited attribute permanently breaks attribute inheritance for the fields you edit. Editing the domain of an inherited attribute permanently prevents an attribute from inheriting domain changes from its parent attribute.
If you delete the parent product class attribute, it is not deleted from subclasses where inheritance is broken. (The attribute definition is deleted from all subclasses where inheritance has not been broken.)
For example, you have the class hierarchy in the following figure. Product Class A has one subclass called Subclass B. Subclass B has one subclass called Subclass C. Class A has Attribute A defined on it. Subclass B has attribute B defined on it. Subclass C has Attribute C defined on it. Subclass B inherits Attribute A from Class A. Subclass C inherits Attribute A from Class A and Attribute B from Subclass B.

In Subclass B, you edit the domain of Attribute A by entering a new list of values and default Value. Subclass B no longer inherits changes to these fields from Attribute A in Class A, its parent attribute.
When you edit a local or inherited attribute, the changes propagate to all members of the product class or subclass. In the example, the new values propagate to Attribute A in Subclass C.
There are restrictions on which fields you can edit for inherited attribute properties. These restrictions are shown in the following table.
Table Editable Fields in a Subclass Inherited Attribute Properties
| Field | Editable? |
|---|---|
Name |
Yes. Breaks inheritance for all fields. Same as defining new attribute. |
Data Type |
Yes. Breaks inheritance for all fields. Same as defining new attribute. |
Default Value |
Yes. Breaks inheritance for this field. |
Required |
Yes. Breaks inheritance for this field. |
Display Name |
Yes. Breaks inheritance for this field. |
Parametric Search |
Yes. Breaks inheritance for this field. |
Unit of Measure |
Yes. Breaks inheritance for this field. |
Description |
Yes. Breaks inheritance for this field. |
To change an inherited property of an attribute
Navigate to the Administration - Product screen, then the Product Definitions view.
In the Products list, select and lock the desired product.
In the Versions list, click the Work Space version.
Click the Attributes view tab.
In the list applet, select the attribute you want to change.
In the desired record in the Attributes list, change the property of the attribute.
You can change all the fields except Name and Attribute Definition.
Viewing Changes in the Inherited Properties of Attributes
You can view changes that users have entered to override the inherited properties of an attribute.
To view changes in inherited properties of an attribute
Navigate to the Administration - Product screen, then the Product Definitions view.
In the Products list, select and lock the desired product.
In the Versions list, click the Work Space version.
Click the Attributes view tab.
In the list applet, select the attribute whose changes you want to view.
From the Attributes list menu, select Show User Input.
A text file appears, with a list of changes that users made to the inherited properties.
Restoring the Inherited Properties of an Attribute
If users have changed the inherited properties of an attribute, you can discard all these changes and restore the inherited properties.
To restore the inherited properties of an attribute
Navigate to the Administration - Product screen, then the Product Definitions view.
In the Products list, select and lock the desired product.
In the Versions list, click the Work Space version.
Click the Attributes view tab.
In the list applet, select the attribute whose properties you want to restore.
From the Attributes list menu, select Restore.
Changing the Hidden or Required Settings for a Product Attribute
When you define an attribute at the class level, you can set the attribute to be hidden or required:
Hidden attributes do not display in the Quote, Order, Agreement, or Asset views.
Required attributes are those where the user must select a value for the attribute. The value of the attribute cannot be blank.
Attribute definitions propagate automatically to all the products that belong to the product class. However, you can change the Hidden flag and the Required flag settings for an attribute at the product level. This lets you manage the hidden or required settings for attributes product by product.
You can use the hidden setting to simplify your product class system. For example, if a product class has 8 attributes and a product has 7 of these attributes, you can put the product in this class and hide the eighth attribute. You do not have to create a special subclass with 7 attributes for the product.
To change the hidden or required settings for attributes of a product
Navigate to the Administration - Product screen, then the Product Definitions view.
In the Products list, select and lock the desired product.
In the Versions list, click the Work Space version.
Click the Attributes view tab.
In the Explorer applet, select the attribute you want to hide.
In the Attributes list, in the record for the attribute, select the Hidden checkbox.
To change the hidden or required settings for attributes of a product class
Navigate to the Administration - Product screen, then the Product Classes view.
In the Product Classes list, select and lock the desired product class.
In the Versions list, click the Work Space version.
Click the Attributes view tab.
In the Attributes list, in the record for the attribute, select the Hidden checkbox.
About Managing Product Classes
You can manage product classes in the following ways:
Viewing Related Objects for Product Classes
The Product Class Cross References view allows you to view the objects that are related to a product class, including:
Subclasses. Classes that are a child to the product class
Products. Products that have the product class as a parent product class
Relationships. Objects that use the product class to form relationships
Attribute Adjustments. Attribute Adjustments that use the product class
The user can drill down on any of these line item to display the administration view for that object.
To view related objects for a product class
Navigate to the Administration - Product screen, then the Product Classes view.
In the Product Classes list, select the class whose related objects you want to view.
In the Versions list, click the name of version whose related objects you want to view.
Click the Cross Reference view tab.
In the Cross Reference link bar, click Subclasses, Products, Relationship, or Attribute Adjustments to view lists of related objects.
Editing a Product Class Definition
Editing a class definition record does not change the attributes defined on the class. However, if you change the parent class name of a subclass to another already-existing class name, this changes the location of the subclass in the class hierarchy and can change which attributes the products in the subclass inherit.
For example, a subclass SC1 has parent class PC1, which has three attributes defined on it A1, A2, A3. This means SC1 inherits attributes A1, A2, A3. Class PC2 has attributes A4, A5, A6 defined on it. If you change the parent class of subclass SC1 from PC1 to PC2, this changes the attributes inherited by SC1 to A4, A5, A6. You have moved SC1 from being a subclass of PC1 to being a subclass of PC2.
If you are changing the parent-class name for class, do the following first.
To prepare a product class for a parent-class name change
Run a query in the Products list to identify all the products assigned to the class.
Analyze how changing the parent class name of the class will affect the attributes inherited by these products.
Identify all pricing rules defined for the attributes inherited by the class.
Note which rules must be changed to reflect the new parent class name and any new attributes.
Identify all configuration rules that refer to inherited attributes of the class.
Note which rules must be changed to reflect the new parent class name and any new attributes.
If you are changing the class name, do the following first.
To prepare a product class for name change
Identify all pricing rules defined for the attributes inherited by the class.
Note which rules must be changed to reflect the new parent class name and any new attributes.
Identify all configuration rules that refer to inherited attributes of the class.
Note which rules must be changed to reflect the new parent class name and any new attributes.
Identify all product with components relationships of type Class and Dynamic Class that have been defined using the class.
Note which relationships need to be redefined to reflect the new class name.
Identify any customizable product UI properties defined for the class.
Note any UI property definitions that must be revised to reflect the new class name.
If you are changing a class definition, do the following first.
Before editing a class definition, make sure you have fully analyzed the impact on attribute inheritance.
Also make sure you have analyzed the impact on pricing rules, configuration rules, and UI design.
To edit a class definition
If you are changing the parent class name of a class, verify that all the steps in preparing the class for a parent-class name change are complete. You must do this using the Work Space version of the parent class.
If you are changing a class name, verify that all the steps in preparing a class for name change are complete.
Navigate to the Administration - Product screen, then the Product Classes view.
In the Product Classes list, select and lock the desired record.
In the Versions list, click the Work Space version.
Modify fields, user interface definitions, constraints, and other information as needed.
Deleting Product Class Records
You cannot delete a product class record. If you no longer want to use the product class, you can deactivate all versions rather than deleting the product class.
Before doing this, verify that the product class is not used for defining any active products.
If you have a large number of inactive versions for a given product class, you can delete the versions using the CleanupSingleObject method of the ISS Authoring Import Export Service. For more information, see Siebel Order Management Guide.
To expire or deactivate a product class
Navigate to the Administration - Product screen, and then the Product Classes view.
In the Product Classes list, select and lock the desired product class.
In the Versions view, deselect the Active checkbox for the Work Space version.
Release the Work Space version.
Exporting or Importing Product Classes
You can export a product class or the whole product class structure to another database. When you export a product class, the following parts are included in the export:
The parent product class of the product class you are exporting plus all the subclasses of the parent product class. When you export a product class, the export contains not just the product class you selected, but the portion of the product class structure to which it belongs.
Attribute definitions for the product classes and all subclasses.
List of values definitions associated with attribute definitions. List of values are exported in the current language only.
The products in the product classes are not exported.
When you export the whole product class structure, all product classes and subclasses are exported, along with the items previously listed. Products are not exported.
When you export a product class or the product class structure, an XML file is created in a location you specify. The XML file contains the exported product class structure. When you import this product class structure, the application reads the XML file and synchronizes the product class system of the import database to the XML file. The XML file takes precedence, and the product class system is modified to reflect the portion of the product class system in the XML file.
For example, in the XML file the subclass shoes, has the parent product class footwear. In the import database the subclass shoes has the parent product class Wardrobe. After importing the XML file, the subclass shoes will have the parent product class footwear.
Use the following process to update the product class structure in database B with changes from database A.
Back up database B.
Export the desired product classes from database A.
Import the product classes to database B.
Compare the updated product class structure and list of values definitions in database B with database A.
Verify that components in affected products with components in database B have the correct attributes.
Use the following process to update both the products and product class structure in database B with changes from database A:
Use the previous process to update the product class structure in database B.
Export the products from database A, except products with components.
Import the products into database B. Verify that the products are in the correct product classes and inherit the correct attributes.
Export products with components from database A.
Import products with components to database B. For each product with components, verify that the component products are present and have the correct attributes.
To export a product class or the whole product class structure
Review the processes listed in the previous section.
Navigate to the Administration Product screen, then the Product Classes view.
In the Product Classes list, select the product class you want to export.
In the Versions list, select the version you want to export.
From the Versions menu, choose Export Version.
The Export Versioned Object dialog box appears.
In the dialog box, click Object(s) Only to export the product class or click Full Structure to export the whole product class structure.
A Save As dialog box appears.
Browse to the location where you want to store the file, specify the file name, and then click Save.
The application creates an XML file containing the exported product class structure and stores it at the location you specified.
When you import a product class structure, you must import the entire contents of the export file. You cannot choose which product classes in the file to import.
To import a product class structure
Review the processes above.
Navigate to the Administration - Product, then the Workspace Projects view.
Select the desired workspace record.
From the applet-level menu, select Import Contents.
The new product class structure is imported into the database.
About Managing Attribute Definition Records
You can manage attribute definition records in the following ways:
Viewing Related Objects for Attribution Definitions
The Attribute Definition Cross References view allows you to view the objects that are related to an attribute definition, including:
Class. Product classes that contain the Attribute Definition
Smart Part Number. Smart Part Numbering that makes use of the Attribute Definition
To view related objects for an attribute definition
Navigate to the Administration - Product screen, then the Attribute Definitions view.
In the Attribute Definitions list, select the definition whose related objects you want to view.
In the Versions list, click the version whose related objects you want to view.
Click the Cross References view tab.
In the Cross References link bar, click the Class or Smart Part Number link to view lists of related objects.
Editing Attribute Definitions
When you edit attribute definitions, you modify the attribute domain.
To edit an attribute definition
Navigate to the Administration - Product screen, then the Attribute Definitions view.
In the Attribute Definitions list, select and lock the desired attribute definition.
In the Versions list, click the Work Space version.
In the Details view, edit the definitions as necessary.
Deleting Attribute Definitions
You cannot delete an attribute definition. If you no longer want to use the attribute, you can deactivate all versions
Before doing this, verify that the attribute is not used in any configuration rules, or for attribute-based pricing.
To expire or deactivate an attribute definition
Navigate to the Administration - Product screen, then the Attribute Definitions view.
In the Attribute Definitions list, select the desired attribute definition.
In the Versions view, deselect the Active checkbox for the Work Space version of the attribute definition.
Release the Work Space version.
Viewing Product Attributes
If a product has been assigned to a product class, it inherits all the attributes defined on the product class. You can verify that you have defined product classes and associated them with products correctly by viewing the attributes for the products.
To view a product's attributes
Navigate to the Administration - Product screen, then the Product Definitions view.
In the Products list, select the desired product.
In the Versions list, click the name of the desired version.
Click the Attributes view tab.