13Siebel Configurator Web Templates
Siebel Product Configurator Web Templates
As of Siebel CRM 17.0, the SIEBSRVR_ROOT\webtempl directory is not part of the Siebel Server installation and is not migrated. The Siebel Web templates are now located in the Siebel database. For more information on Siebel Web templates, see Siebel Installation Guide for the operating system you are using.
This chapter explains how to customize the Web templates that are used to create Siebel Product Configurator selection pages. It includes the following topics:
About Customizable Product Web Templates
Customizable Product Web templates control all aspects of how selection pages display. You can customize the look and feel of selection pages by modifying these templates.
Customizable Product Web templates are stored in the database. The templates that control display of selection pages begin with eCfg. There are four types of Web templates used by Siebel Product Configurator.
Base Theme. The base theme defines an HTML table-based page layout. This layout is used for all selection pages and provides the basic look and feel. The base theme calls the required product theme, which displays in one or more table cells created by the base theme.
Product Theme. The product theme template defines how selection items and options are displayed. The one-page theme displays all the configurable items on one selection page. The tab themes display items on a series of tabbed pages. The wizard theme leads the user from one selection page to the next. Product themes also create table layouts that define how items display within the cells of the base theme. Product themes contain for-each loops that iterate through the customizable product and identify relationships, items, attributes, and so on. Product themes call group themes and control themes.
Group Theme. If you use a tab or wizard theme, you determine what items appear on a page by defining groups. All the items in one group display on one page. A group theme template specifies how a group displays on a page.
UI control template. UI control templates define what type of UI control is used for selecting items. You can choose from several types of check box, radio button, and text box controls. The control template iterates through each group, identifies all the items, and then creates a form that displays the items for selection. The forms display in the table cells created by the product theme.
Web templates are not themselves HTML files, but they do contain a combination of HTML tags and JavaScript commands.
These commands are used in Web templates as follows:
HTML table commands. These commands are used to define page layout. Control templates create tables and then create forms that display in these tables. Control template tables display in the cells created by product theme templates. Product theme templates displays in cells created by the base theme template.
JavaScript. JavaScript commands are used to create arrays for storing data about the customizable product obtained from the UI service. They are also used in control templates to create forms.
od-include. This command specifies the name of a template to include. This command links the Web templates together. During iterative processing this command causes the Web Engine to dynamically retrieve, insert, and parse the included Web template.
od-iterator. This command provides iterative processing. It traverses the customizable product beginning at the product root and identifies specified parts for display. The CfgLoop Type specifies the type of items to be identified, such as group, relationship, or attribute.
od-type="control". This XML element defines what control type to display with an item. To define a UI property, you substitute a variable name for the value of the CfgFieldName attribute in this element. Inserting UI property variables in Web templates is how you customize the way an item displays.
Web templates are used by the Frame Code Engine to create HTML selection pages, as shown in the following.
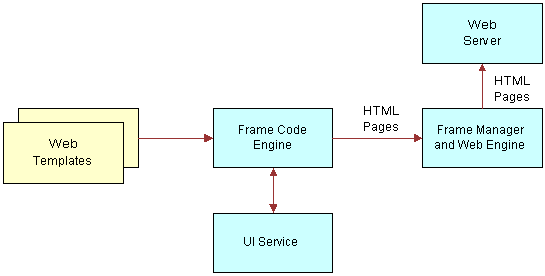
When a customizable product is called for display, an instance is created and stored in memory. The Frame Code Engine requests information about the product from the UI service and uses it to provide the values required in the Web templates. The Frame Code Engine then builds selection pages and forwards them to the Web Engine Frame Manager. The pages are then provided to the Web Server.
About UI Properties in Web Templates
The Properties view lets you customize the way items display in a configuration session. You do this by defining a UI property for the desired items. The UI property definition is a name-value pair where the variable name is one you have entered in the Web template that controls the display of the item. The value can be a string, HTML commands, XML commands, or JavaScript that defines what you want to display instead of the default item name.
The Properties view displays all the items in the customizable product. To change how Web templates display, you can define UI properties of the following items:
Customizable Product Name (root product)
Attribute
Relationship
Group
Linked Item
Resource.
For more information about using the Properties view, see Siebel Product Configurator UI Properties.
The Web Engine uses for-each loops to iterate through each level of a customizable product. At each level, it determines what items occupy that level and what Web template to use for displaying the items. When you modify a Web template and assign it to group member, the template is used to control the display of all the group member's items. For example, if you assign a radio button control template to a relationship containing five items. The control template is used to define how each of the five items displays. Thus, if you have inserted a UI property variable in the radio button control template, then you must define a UI property for all five items.
About UI Property Values
The value you assign to a UI property name for an item can be text, HTML commands, or JavaScript commands. If the value includes HTML or JavaScript commands, it is important to test them for correctness before entering them in the Properties view.
If you do not test the commands and they have errors, this can prevent display of the selection pages. If the value is a text string that does not include commands, you do not need to test it.
You test the commands included in the value of the UI property name by inserting them in an HTML file and checking that they display correctly in a Web browser. Observe the following guidelines for including HTML commands or JavaScript in a UI property name value:
Avoid using tags or tag attributes common only to Internet Explorer or to Netscape.
Use DHTML commands with caution. Thoroughly test them before using them as the value of a UI property name.
HTML statements must be self-contained and complete. Use opening and closing tags.
Use table tags very carefully. Make sure the table you define is sized correctly for the space it will occupy.
If you insert JavaScript using the <Script> tag, avoid statements that manipulate the document. Also avoid routines that rely on specific page content. If the content is not present, the script may fail and the page may not display.
Do not use animated images or animated text.
HTML Text Formatting Commands
You can use HTML text formatting commands to enhance the way an item name displays. Here are several examples:
You can define a UI property value that adds formatting to the item name. For example, you want the item name Lamp to display in boldface. You would assign the following UI property value to the item Lamp: <b>Lamp</b>.
You can add a message next to an item. If the message is lengthy consider creating a small, two-cell table. Put the item name in the first cell, and put the explanation in the adjacent cell. The value of the UI property name for the item would then be the HTML table commands, including the item name and message. The base theme and product theme Web templates use tables to layout the Web pages. This means the table you create for the item will be located within a cell of the table that contains the whole Web page. Carefully review the table structure of the base theme and product theme Web templates before creating tables for UI properties.
The following HTML tag types can be used as values for UI property names:
Text markup tags (<b>, <em>, and so on)
Table tags
Content presentation and flow tags (<address>, <nobr>, <plaintext>, and so on)
Formatted list tags
Rule, image, and multimedia tags (<img>, <map>, <marquee>)
Forms tags (<button>, <input type> and so on.). You can use these tags to pass user input to JavaScript routines that are part of the UI property name value.
Hyperlinks. You must include Target = ""in the link tag (<a>) definition. This causes the link to load in a new browser window. If the link loads in the session browser window, the user will have to click the Back button to return to the session. This can cause the session to lose its context and can cause Web Engine problems.
Do not use the following tag types in UI property name values:
Header tags (<base>, <basefont>, and so on)
Skeletal/Layout tags (<frameset>, <body>, and so on)
Images
Use the HTML <img> tag as the UI property value when you want to retrieve and display images. You can shorten the path specification for the src attribute by storing the images in the same directory as other images used by the Web Engine.
The Web Engine stores its images in the following installation directory (Windows path syntax):
Siebel_SWSM_Root\applicationcontainer\webapps\siebel\images
When you specify the src path in the <img> tag, you only need to specify the IMAGES directory and the file name. For example, you want to retrieve red.gif from the IMAGES directory and use it to replace the attribute name Red. In the Properties view, you would assign a UI property name to the Red attribute and specify the following value (Windows path syntax):
<img src="IMAGES\red.gif">
Before validating the UI design, you must test this value to make sure it behaves as expected in the browser. Here is an example of an HTML file for testing image retrieval (Windows path syntax):
<html>
<head>
<base href="C:\Siebel_SWSM_Root\applicationcontainer\webapps\siebel\images">
</head>
<body>
img src="IMAGES\red.gif">
</body>
</html>
Add HEIGHT and WIDTH attributes to the <IMG> tag to make the image the correct size. Consider making the image somewhat smaller than needed and then increasing its size when you validate the UI design. This prevents the image from causing page layout problems when you first validate it.
Creating a New Web Template
The most common reason for creating a new Web Template is to insert UI property variables in the template to change how an item in a customizable product displays. The best way to create a new Web template is to modify an existing template and save it to a new file name.
The process for setting up a new template has two steps:
Create a new Web template.
Add the new template to the appropriate dialog box
To create a new Web template
Navigate to the Administration - Product screen, then the Product Definitions view.
In the Products list, select and lock the desired product.
In the Structure menu, select User Interface.
Click the magnifying icon.
The Pick User Interface Style dialog opens.
In the Pick User Interface Style dialog, locate the required template.
Make a note of this template name, it is required in Step 7.
In Oracle Web Tools, create a new workspace.
Open the Web Templates view, and query for the template name from Step 5.
Copy this template, and rename it.
From the Type menu, assign a template type to your Web template.
At this point, you can click the new Web template to make any required modifications. This is required when you create base theme, product theme or UI control templates.
Deliver the workspace.
The next step is to add the new template to the dialog box.
To add a Web template to the dialog box
Click the magnifying icon.
This opens the Pick User Interface Style window.
Click the plus icon (+).
In the Template field, click the magnifying icon.
In the Query field, enter an asterisk (*) to list all Base Template templates.
Select the new Web template you created.
In the Pick User Interface Style window, enter the following information:
Name: Enter a descriptive name. For example: Modified Base Theme.
Template: Enter the filename of the template you created.
Description (Optional): Enter a brief description of the template.
Click Save and OK.
Modifying the Display Name of a Customizable Product
This topic explains how to modify the customizable product name in the base theme. The base theme defines the basic page container within which the product theme displays. The base theme includes a header that contains the customizable product name that is stored in the Siebel database. You can define a UI property that changes the name of the customizable product or adds artwork or other formatting.
To change the name of the customizable product in a base theme, you insert a variable in the base theme Web template. This variable tells the Web Engine to get the item name from a defined UI property rather than using the customizable product name.
To change the display name of the customizable product, perform the following tasks:
Creating a New Base Theme Template. You do this by saving a copy of the base theme template. Then you insert a variable name in the new template.
Assigning the New Base Theme Template. Assign the new base theme template to the customizable product.
Defining a UI Property for the Customizable Product. This value is what displays in the selection pages.
Creating a New Base Theme Template
You must create a new Web template to customize the display name of the customizable product. You do this by copying an existing base theme template. Then you insert a UI property variable into the copy. Finally, you assign the new Web template as the base theme for the customizable product.
To insert a UI property variable into a base theme Web template, you must locate the od-type=”element” that governs the display of the customizable product name. The base themes have the same basic layout:
The first <Table> tag creates the page container. Additional <Table> tags partition the page vertically.
There are no od-iterator loops in the template.
Near the start of the file, refer to the first <table> tag. Within the table definition, locate the "Product Title" comment. After the comment locate the first od-type="control" element.
One of the attributes of this element is CfgFieldName = "CxObjName".
Replace CxObjName with the name of the UI Property variable. The name must be preceded with a period (.). For example: ".NewProductName".
To create a new base theme template
Navigate to the Administration - Product screen, then the Product Definitions view.
In the Products list, select and lock the desired product.
In the Structure menu, select User Interface.
Click the magnifying icon.
The Pick User Interface Style dialog opens.
In the Pick User Interface Style dialog, locate the required base theme template.
Make a note of this template name, it is required in Step 7.
In Oracle Web Tools, create a new workspace.
Open the Web Templates view, and query for the base theme template name from Step 5.
Copy this template, and rename it.
From the Type menu, select Base Theme template.
-
Click the new Web template name, and make the following modifications:
Locate the od-type="control" element containing the CfgFieldName= "CxObjName" attribute.
Replace "CxObjName" with a UI property variable name and save the file.
The variable name must begin with a period (.). For example: ".NewProductName". Verify that the variable name is enclosed in quotes.
Deliver the workspace.
Assigning the New Base Theme Template
To assign the new base theme template to the customizable product, you first add the template to the Pick UI Style dialog box. Then you select it as the base theme.
To assign the new base theme template to the customizable product
Click the magnifying icon.
This opens the Pick User Interface Style window.
Click the plus icon (+).
In the Template field, click the magnifying icon.
In the Query field, enter an asterisk (*) to list all Base Template templates.
Select the template you created in Creating a New Base Theme Template.
In the Pick User Interface Style window, enter the following information:
Name. Enter a descriptive name. For example: Modified Base Theme.
Template. Enter the filename of the template you created.
Description (Optional). Enter a brief description of the template.
Click Save and OK.
Defining a UI Property for the Customizable Product
The last step is to define a UI property for the customizable product.
To define a UI property for the customizable product
Navigate to the Properties view for the customizable product.
In the explorer applet displaying the contents of the customizable product, click the name of the customizable product. It is the first item listed.
In Item Display Properties, add a new record and complete the necessary fields:
Name. Enter the name of the UI property variable you entered in the base theme template. Do not include the period (.) that begins the name.
Value. Enter the customizable product name you want to display. Include any HTML formatting needed.
Example of Modifying the Display Name of a Customizable Product
You have a customizable product called Premier Workstation. You want to display your company logo beside the product name in the base theme. The logo filename is logo1.gif. You have placed the file in the Siebel installation subdirectory C:\Siebel_SWSM_Root\applicationcontainer\webapps\siebel\images.
Use the User Interface view to create the Web pages for configuring the customizable product. Validate the customizable product, and verify that the pages display correctly.
To create a new base theme Web template and assign it to the customizable product
Navigate to the Administration - Product screen, then the Product Definitions view.
In the Products list, select and lock the desired product.
In the Structure menu, select User Interface.
Click the magnifying icon.
The Pick User Interface Style dialog opens.
In the Pick User Interface Style dialog, locate the required base theme template.
Make a note of this template name, it is required in Step 7.
In Oracle Web Tools, create a new workspace.
Open the Web Templates view, and query for the base theme template name from Step 5.
Copy this template, and rename it.
From the Type menu, assign the required template type to your Web template.
Click the new Web template and make the following modifications:
Locate the od-type="control" element. Set CfgFieldName=".NewProductName". The first character in the variable name must be a period (.). The variable name must be surrounded by quotes. Save the file.
In the customizable product Work Space record, click the select button in the Base Theme field and open the dialog box.
Click Add and add the new template. Then, select it as the base theme template.
Deliver the workspace.
To define a UI property for the customizable product
Navigate to the Properties view and select the customizable product.
Define a UI property for it as follows:
Name. NewProductName. Do not put a period before the name. This is the variable name you inserted in the template file.
Value. <img src="\images\logo1.gif"> Premier Workstation.
Modifying the Display Name of Groups
This topic explains how to modify group names that display in the product themes. For example, you can use UI property definitions to define what displays on each tab in a tabbed product theme.
To change the name of a group in a product theme, you insert a variable in the product theme Web template. This variable tells the Web Engine to get the item name from a defined UI property rather than using the group name you defined in the User Interface view.
To change the display name of a group, perform the following tasks:
Creating a New Product Theme Template. You do this by saving a copy of the product theme template. Then you insert a variable name in the new template.
Assign the New Product Theme Template. Assign the new product theme template to the customizable product.
Define a UI Property for all the Groups. For each group name, you give the variable the desired value. This value is what displays in the configuration Web pages.
You must define a UI property for all the group names, not just the ones you want to change. This is because the product theme template determines the display name of the all the groups. When you insert a UI property variable in the template, the Web Engine gets all the group names from UI property definitions.
Creating a New Product Theme Template
You must create a new Web template to customize the display of group names. You do this by copying an existing product theme template. Then you insert a UI property variable into the copy. Finally, you assign the new Web template as the product theme for the customizable product.
To insert a UI property variable into a product theme Web template, do the following:
Locate the od-type="control" element that governs the display of the group name:
Tab Theme. Locate the first od-case tag. It is located near the start of the file.
Single Page Theme. Locate the first od-iterator tag.
Wizard Theme. Locate the first od-iterator tag.
Beneath the location specified previously, locate the first od-type="control" element. It defines the group data record. One of the attributes of this element is CfgFieldName = "CxGroupName".
Replace CxGroupName with the name of the UI Property variable. The name must be preceded with a period (.). For example: ".NewGroupName".
To create a new product theme template
Navigate to the Administration - Product screen, then the Product Definitions view.
In the Products list, select and lock the desired product.
In the Structure menu, select User Interface.
Click the magnifying icon.
The Pick User Interface Style dialog opens.
In the Pick User Interface Style dialog, locate the required product theme template.
Make a note of this template name, it is required in Step 7.
In Oracle Web Tools, create a new workspace.
Open the Web Templates view, and query for the product theme template name from Step 5.
Copy this template, and rename it.
From the Type menu, assign the required template type to your Web template.
-
Click the new Web template name, and make the following modifications:
Locate the od-type="control" element containing the CfgFieldName= "CxGroupName" attribute.
Replace "CxGroupName" with a UI property variable name and save the file.
The variable name must begin with a period (.). For example: ".NewGroupName". Verify that the variable name is enclosed in quotes.
Deliver the workspace.
Assign the New Product Theme Template
To assign the new product theme template to the customizable product, you first add the template to the Pick UI Style dialog box. Then you select it as the product theme.
To assign the new product theme template to the customizable product
Click the magnifying icon.
This opens the Pick User Interface Style window.
Click the plus icon (+).
In the Template field, click the magnifying icon.
In the Query field, enter an asterisk (*) to list all Product Template templates.
Select the template you created in Creating a New Product Theme Template.
In the Pick User Interface Style window, enter the following information:
Name. Enter a descriptive name. For example: Modified Tab Theme.
Template. Enter the filename of the template you created.
Description (Optional). Enter a brief description of the template.
Click Save and OK.
Define a UI Property for all the Groups
The last step is to define a UI property for all the groups.
To define a UI Property for all the groups
Click the Properties view tab.
In the box displaying the contents of the customizable product, select the first group in the Group section.
In Item Display Properties, add a new record and complete the necessary fields:
Name. Enter the name of the UI property variable you entered in the product theme template. Do not include the period (.) that begins the name.
Value. Enter the group name you want to display. Include any HTML formatting needed.
Save the new record.
Perform these steps for all the groups.
Open the Item Display Properties menu and click Validate.
This starts a configuration session. Verify that the group names display correctly.
Example of Modifying the Display Name of Groups
You have a customizable product that has three groups: Group A, Group B, and Collection C. You want to change the name of Collection C to Group C in the selection pages.
Use the User Interface view to create the Web pages for configuring the customizable product. Validate the customizable product, and verify that the pages display correctly.
To create a new product theme template and assign it to the customizable product
Navigate to the Administration - Product screen, then the Product Definitions view.
In the Products list, select and lock the desired product.
In the Structure menu, select User Interface.
In Base Theme, click the magnifying icon.
The Pick User Interface Style dialog opens.
In the Pick User Interface Style dialog, locate the required product theme template.
Make a note of this template name, it is required in Step 7.
In Oracle Web Tools, create a new workspace.
Open the Web Templates view, and query for the product theme template name from Step 5.
Copy this template, and rename it.
From the Type menu, assign the required template type to your Web template.
Click the new Web template and make the following modifications:
Locate the od-type="control" element. Set CfgFieldName=".NewProductName". The first character in the variable name must be a period (.). The variable name must be surrounded by quotes. Save the file.
In the customizable product Work Space record, click the select button in the Base Theme field and open the dialog box.
Click Add and add the new template. Then, select it as the product theme template.
Deliver the workspace.
To define a UI property for each of the groups
Click the Properties view tab and select Collection C in the Group section.
Define a UI property for it as follows:
Name. NewGroupName. Do not put a period before the name. This is the variable name you inserted in the template file.
Value. Group C.
Select Group A.
Define the UI property for it as follows:
Name. NewGroupName. Do not put a period before the name.
Value. Group A.
Select Group B.
Define the UI property for it as follows:
Name. NewGroupName. Do not put a period before the name.
Value. Group B.
Open the Item Display Properties menu and click Validate.
This starts a configuration session. Verify that the group names display correctly.
Modifying the Display Name of Items
This topic explains how to modify the display name of an item, such as an attribute, relationship, linked item, or resource. A common reason for doing this is that you want the item name that the customer sees to be different than the name you have in the product table for a specific version of the customizable product.
For example, a computer component is called 256 MB disk drive in the product table. However, in an upcoming offering, you want to call this item the Standard 256 MB Disk. Rather than change the item name in the product table, you can change it using the Properties view. This change is specific to the customizable product and is stored with it when you release the product. You can use the Properties view to change item names with each release of a customizable product, without having to change the item name in the product table.
To change the display name of an item, you insert a variable in the UI control Web template that governs display of the item. This variable tells the Web Engine to get the item name from a defined UI property.
To change the display name of a relationship item in the form, perform the following tasks:
Creating a New UI Control Template. You do this by saving a copy of the UI control template you selected in the User Interface view. Then you insert a variable name in the new template.
Assigning the New UI Control Template. Assign the new template to the item.
Defining a UI Property for the Item. Define a UI Property for the item.
Creating a New UI Control Template
You must create a new UI control template to customize the display of an item. You do this by copying an existing template. Then you insert a UI property name variable into the copy. Finally, you assign the new template as the UI control template for the item.
To insert a UI property variable into a Web template, you must locate the od-type="control" element that governs the display of the item. The UI control Web templates all have the same basic layout:
An od-include statement reads in a header file. This file places the relationship name at the start of the form that will contain the items.
An od:iterator loop iterates through the relationship in the customizable product and loads its items into an array.
A second od-iterator loop reads the array and constructs the form.
A variable called DisplayValue near the beginning of the second od-iterator loop defines what item name appears next to each instance of the control in the form.
The DisplayValue variable is set equal to an od-type="control" element that contains an attribute CfgFieldName= "CxObjName". Replace CxObjName with the name of the UI property variable. The name must be preceded with a period (.). For example: ".NewName".
To create a new UI control template
Navigate to the Administration - Product screen, then the Product Definitions view.
In the Products list, select and lock the desired product.
In the Structure menu, select User Interface.
Click the magnifying icon.
The Pick User Interface Style dialog opens.
In the Pick User Interface Style dialog, locate the required UI control template.
Make a note of this template name, it is required in Step 7.
In Oracle Web Tools, create a new workspace.
Open the Web Templates view, and query for the UI control template name from Step 5.
Copy this template, and rename it.
From the Type menu, assign the required template type to your Web template.
Click the new Web template and make the following modifications:
Locate the od-type="control" element containing the CfgFieldName= "CxObjName" attribute.
Replace "CxObjName" with a UI property variable name and save the file.
Click Add and add the new template. Then, select it as the base theme template.
The variable name must begin with a period (.). For example: ".NewName". Verify the variable name is enclosed in quotes.
Assigning the New UI Control Template
To assign the new Web template to a group item, you first add the template to the Pick UI Style dialog box. Then you select it as the template for an item in the group.
To assign the new UI control template
Click the magnifying icon.
This opens the Pick User Interface Style window.
Click the plus icon (+).
In the Template field, click the magnifying icon.
In the Query field, enter an asterisk (*) to list all UI Control templates.
Select the template you created in Creating a New UI Control Template.
In the Pick User Interface Style window, enter the following information:
Name. Enter a descriptive name. For example: Modified Tab Theme.
Template. Enter the filename of the template you created.
Description (Optional). Enter a brief description of the template.
Click Save and OK.
In Group Item List, save the revised record.
Defining a UI Property for the Item
The last step is to assign the variable in the new Web template to the item. Then you enter a value for the variable. The value you enter is what displays in a configuration session.
For example, if you assigned the template to a relationship, you must define a UI property for each item in the relationship.
To define a UI Property for the item
Click the Properties view tab.
In the box displaying the contents of the customizable product, select the item on which you want to define the UI property.
In Item Display Properties, add a new record and complete the necessary fields:
Name. Enter the name of the UI property variable. Do not include the period (.) that begins the name.
Value. Enter the value you want to the variable to have for this item.
Save the new record.
Open the Item Display Properties menu and click Validate.
This starts a configuration session. Verify that the item names display correctly.
Example of Modifying the Display Name of Items
You have a customizable product that includes a relationship called Hard Drives. This relationship contains several disk drives. Along with the name of each drive, you want to display a picture of the drive. You want to assign radio buttons as the UI control for selecting the drives.
To prepare for defining the UI Property
Use the User Interface view to create the selection pages for configuring the customizable product.
Validate the customizable product, and verify that the pages display correctly.
Create a .gif or .jpg for each hard drive.
Test each file by displaying it in a browser. Use the HTML <img> tag to set the exact size of each image. The <img> tag will be the value you assign to the UI Property variable.
To create a new UI control template and assign it to the Hard Drives relationship
Navigate to the Administration - Product screen, then the Product Definitions view.
In the Products list, select and lock the desired product.
In the Structure menu, select User Interface.
In the User Interface view, select the group containing the Hard Drives relationship.
In Group Item List, select the Hard Drives relationship.
Open the Pick User Interface Style dialog box and make a note of the radio button template assigned to the relationship.
This is required in Step 8.
In Oracle Web Tools, create a new workspace.
Open the Web Templates view, and query for the radio template name from Step 5.
Copy this template, and rename it to eCfgModifiedRadioButton.
From the Type menu, assign the required template type to your Web template.
Open the new template and do the following:
Locate the od-type="control" element containing the CfgFieldName= "CxGroupName" attribute.
Replace "CxGroupName" with CfgFieldName= ".NewName"
The variable name must begin with a period (.). For example: ".NewName". Verify that the variable name is enclosed in quotes.
Save the file.
Deliver the workspace.
Click the magnifying icon.
This opens the Pick User Interface Style window.
Click the plus icon (+).
In the Template field, click the magnifying icon.
In the Query field, enter an asterisk (*) to list all UI Control templates.
Select the template you just created.
In the Pick User Interface Style window, enter the following information:
Name. Enter a descriptive name. For example: Modified Radio Button.
Template. Enter the filename of the template you created.
Description (Optional). Enter a brief description of the template.
Click Save and OK.
In the User Interface view Group Item List, select the relationship containing the hard drives.
Open the Pick UI Style dialog box and click Add to add the new template.
Select the new template as the control template for the Hard Drives relationship.
Click OK and Save.
To define a UI property for each of the Hard Drives
Navigate to the Properties view and select the first drive in the Hard Drives relationship.
Define a UI property for it as follows:
Name. NewName. Do not put a period before the name. This is the variable name you inserted in the template file.
Value. Enter the HTML syntax for displaying the drive name and retrieving the image.
Repeat these steps to define a UI property for each hard drive in the relationship.
Open the Item Display Properties menu and click Validate.
This starts a configuration session. Verify that the item names display correctly.
Siebel Product Configurator Web Templates for Open UI
Siebel Product Configurator in Open UI provides a set of Web templates that are enabled for responsive Web design. These templates provide the user with two panes, giving the user the choice of using a tab or wizard approach to customizing products.
As delivered, these Web templates must be used together and cannot be used with other Siebel Product Configurator Web templates.
These templates are described in the following table.
Table Open UI Web Templates for Siebel Product Configurator
| File Name | Name | Description |
|---|---|---|
ecfgproducttabs_v14 |
Tab Product Theme OUI |
The product tab theme displays the product configuration UI with tabs and with Previous and Next buttons to navigate between groups. |
ecfggroupstandard_v14 |
Standard Group Theme OUI |
The group theme displays a div section (which is like a table row) for each relationship that is part of the group definition. |
ecfgcontrolcomboprice_v14 |
Combo Box with Price OUI |
The control combo price theme displays the products that are part of the relationship as option items in a combo box. |
sisomecfgbaseautorepricetwocol_v14 |
SIS OM base Theme With Auto Pricing OUI |
The base theme displays two parts in the configuration page. The first section displays the product details, pricing and any messages associated with the product configuration, and the second section displays the product configuration UI. |
ecfgcontrolradioprice_v14 |
Radio Buttons with Price OUI |
The control radio price theme displays the products that are part of the relationship as option buttons. |
ecfgcontrolcheckprice_v14 |
Check Box with Price OUI |
The control check price displays the products that are part of the relationship as check box options. |
ecfgobjmessages_v14 |
n/a |
This template controls the product related information that is displayed in the second section. |
ecfgportheader_v14 |
n/a |
This template controls the header for the div section displayed for the relationship. |
ecfgportfooter_v14 |
n/a |
This template controls the footer for the div section displayed for the relationship. |
ecfgtoplevelbuttons_v14 |
n/a |
This template displays various action buttons that control the product configuration. |
ecfgobjglobalsignals_v14 |
n/a |
This template displays the various messages that are generated during the configuration process. |
About Customizing Configurator Templates for Open UI
The Open UI framework for Configurator uses the following architecture, as you can see in the following figure.
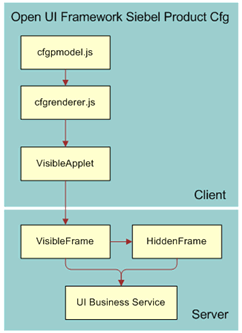
The Siebel Web Templates function as follows:
Open UI uses <DIV> and <CLASS> tags to replace the <TABLE>, <TR>, and <TD> tags UI attributes.
Open UI removes the inline scripts embedded with <SCRIPT> tags.
In the Object Manager (written in C++), Open UI functions as follows:
The applet (Cfg Cx Runtime Instance Frame (JS HI)) is the only point of communication. All requests from the client (browser) are delegated through it.
There is no longer server generated JavaScript. Necessary data is packaged into a payload so that the client model renderer can process it and generate proper scripts.
In the client (browser), Open UI functions as follows:
ConfiguratorPM (cfgpmodel.js) is extended using the PresentationModel (pmodel.js) architecture of Open UI. It maintains the product instance changes and handles the communication between the UI and the Server.
ConfiguratorPR (cfgrenderer.js) is extended from PhysicalRenderer (phyrenderer.js) architecture of Open UI. It handles the rendering and evaluating of UI elements from ConfiguratorPM.
Customizations of Web Templates must use libraries that have been extended to accommodate the extended PresentationModel or Renderer. These extended libraries are also compliant with Open UI's architecture.
All customizations are placed in extended libraries for easier upgrades.