5Administering Benefits Cases
Administering Benefits Cases
This chapter describes the tasks that administrators perform to administer benefits cases. It includes the following topics:
About Controls for Benefit Data
In Siebel Public Sector, the records that contain benefit data have a hierarchical relationship with each other. The following image shows this hierarchical relationship.
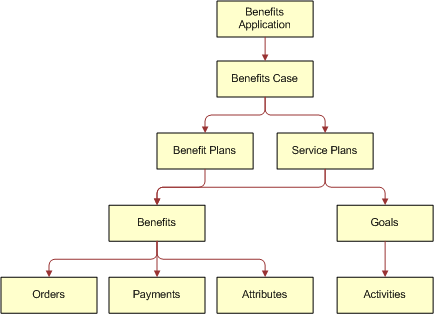
Details about this benefit data hierarchy follow:
A benefits application can include a benefits case.
A benefits case can include benefit plans and service plans.
A benefit plan can include benefits.
A service plan can include benefits and goals.
A benefit can include orders, payments, and attributes.
A goal can include activities.
The Status field value of a given record in the benefit data hierarchy, the Status field value of the records that are before the given record (the parent record and grandparent record), and the Status field value of the record that is after the given record (the child record) can determine the following controls:
The operations, such as create, update, and delete, that users can perform for the given record.
The buttons that are enabled (or available for use) when users select the given record.
The valid transitions of the Status field value for the given record.
Administrators can access state models to change preconfigured information relating to categories for Status field values, operation controls for benefit data, button controls for benefit data, and transition controls of Status field values for benefit data. For more information about changing state models, see Siebel Applications Administration Guide.
The following state models are preconfigured in Siebel Public Sector:
PUB Application Status (for benefits application records)
HLS Case (for benefits case records)
HLS Case - SM (for parent benefits case records)
PUB Case Benefit Plan (for benefit plan records)
PUB Case Benefit Plan Line Item (for benefit records)
PUB Case Benefit Plan Payments (for benefit payment records)
HLS Case Service Plan (for service plan records)
State models are not preconfigured in Siebel Public Sector for benefit orders, benefit attributes, goals, and activities.
Categories for Status Field Values
Status field values for records that contain benefit data are associated with the following categories:
Positive. The record will undergo further processing before it reaches the end of its life cycle (for example, an active benefits case or a pending benefit).
Negative. The record has reached the end of its life cycle (for example, a closed benefits case or a completed benefit).
Garbage. The record is currently inactive or was terminated before it reached the end of its life cycle (for example, an inactive benefits case or a cancelled benefit).
The categories of Status field values for records that contain benefit data are preconfigured in Siebel Public Sector. For each of these categories, the following table shows the Status field values for benefit data records. Benefit data records that are excluded from this table have no preconfigured categories of Status field values.
Some of the records in this table can have Status field values that do not appear in the table. These Status field values (except for the Submitted value for a benefits case record) do not affect the operation controls for the records, the button controls for the records, and the transition controls for Status field values.
Administrators can configure the information in this table by changing the Category Name field in the States view for each applicable state model in the State Models view of the Administration - Application screen. They can add new categories in the Categories view for each applicable state model in the State Models view of the Administration - Application screen.
Table Status Field Values of Categories for Benefit Data Records
| Record | Status Field Values of Positive Category | Status Field Values of Negative Category | Status Field Values of Garbage Category |
|---|---|---|---|
Benefits Case |
Active and Rejected |
Closed |
Inactive |
Benefit Plan |
Active, Pending, and Approved |
Completed and Archived |
Inactive |
Benefit |
In Progress, Pending, and Approved |
Completed |
Inactive and Cancelled |
Benefit Payment |
Pending, Approved, Rejected, Request Failed, and Submitted-Pending |
Processed and Paid |
Inactive and Cancelled |
Service Plan |
Active, Pending, and Approved |
Completed and Archived |
Inactive |
Operation Controls for Benefit Data
The valid operations for records that contain benefit data are preconfigured in Siebel Public Sector. Operations, such as create, update, and delete are enabled (or available) only under certain conditions. The following table shows the conditions under which each operation is disabled (or unavailable) for benefit data records. Benefit data records that are excluded from this table have no preconfigured operation controls. To view the Status field values for categories, see Categories for Status Field Values.
Administrators can configure the information in this table by changing the No Update and No Delete fields in the States view for each applicable state model in the State Models view of the Administration - Application screen and by changing the No Insert, No Update, and No Delete fields in the Child Operation Restriction applet in the States view.
Table Conditions to Disable Operations for Benefit Data Records
| Record | Create Operation | Update Operation | Delete Operation |
|---|---|---|---|
Benefits Applic. |
None. |
The Status field value of the benefits application is Cancelled or Processed. |
The Status field value of the benefits application is Processed. |
Benefits Case |
None. |
The Status field value of the original benefits case for an appeal case is not in the positive category. The Status field value of the benefits case is Submitted. |
The Status field value of the benefits case is in the positive or negative category. |
Benefit Plan |
The Status field value of the parent benefits case is not in the positive category. The Status field value of the parent benefits case is Submitted. |
The Status field value of the parent benefits case is not in the positive category. The Status field value of the benefit plan is in a garbage category. The Status field value of the parent benefits case is Submitted. |
The Status field value of the benefit plan is in the positive or negative category. The Status field value of the parent benefits case is Submitted. |
Benefit |
The Status field value of the parent benefit plan is not in the positive category. The Status field value of the grandparent benefits case is Submitted. |
The Status field value of the parent benefit plan is not in the positive category. The Status field value of the benefit is in a garbage category. The Status field value of the grandparent benefits case is Submitted. |
The Status field value of the benefit is in the positive or negative category. The Status field value of the grandparent benefits case is Submitted. |
Benefit Payment |
The Status field value of the parent benefit is not in the positive category. The Status field value of the great-grandparent benefits case is Submitted. |
The Status field value of the parent benefit is not in the positive category. The Status field value of the benefit payment is in a negative or garbage category. The Status field value of the great-grandparent benefits case is Submitted. |
The Status field value of the payment is in the positive or negative category. The Status field value of the great-grandparent benefits case is Submitted. |
Benefit Attribute |
The Status field value of the parent benefit is not in the positive category. The Status field value of the great-grandparent benefits case is Submitted. |
The Status field value of the parent benefit is not in the positive category. The Status field value of the great-grandparent benefits case is Submitted. |
The Status field value of the great-grandparent benefits case is Submitted. |
Service Plan |
The Status field value of the parent benefits case is not in the positive category. The Status field value of the parent benefits case is Submitted. |
The Status field value of the parent benefits case is not in the positive category. The Status field value of the service plan is in a garbage category. The Status field value of the parent benefits case is Submitted. |
The Status field value of the service plan is in the positive or negative category. The Status field value of the parent benefits case is Submitted. |
Goal |
The Status field value of the parent service plan is not in the positive category. The Status field value of the grandparent benefits case is Submitted. |
The Status field value of the parent service plan is not in the positive category. The Status field value of the grandparent benefits case is Submitted. |
The Status field value of the grandparent benefits case is Submitted. |
Activity |
The Status field value of the grandparent service plan is not in the positive category. The Status field value of the great-grandparent benefits case is Submitted. |
The Status field value of the grandparent service plan is not in the positive category. The Status field value of the great-grandparent benefits case is Submitted. |
The Status field value of the great-grandparent benefits case is Submitted. |
Button Controls for Benefit Data
Buttons in the user interface can control the operations that users perform for records that contain benefit data. These buttons are enabled (or available for use) only if a selected record (and sometimes a related record) has a designated Status field value. The following table shows the conditions under which these buttons are disabled (or unavailable for use) for benefit data records. Benefit data records that are excluded from this table have no preconfigured button controls.
Administrators can disable these buttons by changing the No Invoke Method field in the States view for each applicable state model in the State Models view of the Administration - Application screen and by changing the No Invoke Method field in the Child Operation Restriction applet in the States view.
Table Conditions to Disable Buttons for Benefit Data Records
| Record | Button Name | Condition |
|---|---|---|
Benefits Applic. |
Cancel Application |
The Status field value of the benefits application is Cancelled or Processed. This button appears on a self-service Web site for Siebel Public Sector Self Service. |
Benefits Case |
Scan Changes |
The Status field value of the benefits case is Closed, Inactive, or Submitted. |
Regenerate All |
The Status field value of the benefits case is Closed, Inactive, or Submitted. |
|
Appeal |
The Status field value of the benefits case is Inactive or Submitted. |
|
Submit |
The Status field value of the benefits case is Closed or Inactive. |
|
Recall |
The Status field value of the benefits case is Closed or Inactive. |
|
Benefit |
Create Order |
The Status field value of the benefit is Completed, Inactive, or Cancelled. The Status field value of the grandparent benefit case is Submitted. |
Cancel Order |
The Status field value of the benefit is Completed, Inactive, or Cancelled. The Status field value of the grandparent benefit case is Submitted. |
|
Benefit Payment |
Send Payment |
The Status field value of the payment is Processed, Paid, Inactive, or Cancelled. The Status field value of the parent benefit is Completed, Inactive, or Cancelled. The Status field value of the grandparent benefit case is Submitted. |
Activity |
Create Benefit |
The Status field value of the grandparent service plan is Completed, Archived, or Inactive. The Status field value of the great-grandparent benefit case is Submitted. |
Transition Controls of Status Field Values for Benefit Data
The valid transitions of Status field values for records that contain benefit data are preconfigured in Siebel Public Sector. The transitions of Status field values are enabled (or available) only under certain conditions. The following table shows the conditions under which each transition between categories is enabled for benefit data records. Benefit data records that are excluded from this table have no preconfigured transition controls. To view the Status field values for categories, see Categories for Status Field Values.
Administrators can configure the information in this table by changing the Rule Expression field in the Transitions view for each applicable state model in the State Models view of the Administration - Application screen. Transitions to a positive category and transitions from a garbage category to a negative category are not included in the preconfigured Siebel Public Sector application.
Table Conditions to Enable Transitions Between Categories for Benefit Data Records
| Record | Transition from Positive Category to Negative Category | Transition from Positive or Negative Category to Garbage Category |
|---|---|---|
Benefits Case |
The Status field value of any child benefit plan or service plan is in the negative or garbage category. The Status field values of any appeal case for an original benefits case is in the negative or garbage category. |
The Status field value of any child benefit plan or service plan is in the garbage category. The status field values of any appeal case for an original benefits case is in the garbage category. |
Benefit Plan |
The Status field value of any child benefit is in the negative or garbage category. |
The Status field value of any child benefit is in the garbage category. |
Benefit |
The Status field value of any child benefit payment is in the negative or garbage category. The Status field value of any child benefit order is Closed, Inactive, or Cancelled, or any child benefit order has no order number. |
The Status field value of any child benefit payment is in the garbage category. The Status field value of any child benefit order is Inactive or Cancelled, or any child benefit order has no order number. |
Service Plan |
The Status field value of any child benefit is in the negative or garbage category. |
The Status field value of any child benefit is in the garbage category. |
About Associating Nonbenefits Cases with Master Cases
By default, cases for a benefit or appeal category are associated with master cases. However, by default, cases for nonbenefit categories, such as investigation, immigration, and tax, are not associated with master cases. Administrators must set up this association for manually created cases.
By default, for benefit and appeal category cases, agents see both the manually and automatically created cases in the case list for a master case. For nonbenefit category cases, agents see the manually created cases in the case list for a master case if the administrator sets up the association between nonbenefit category cases and master cases.
Automatically Created Cases
Agents can upload an application to automatically create a case record. Also, agents can automatically create an appeal case. A case that is automatically created is associated with the master case for the primary contact in the application. Because an agent does not upload an application or process an appeal for a nonbenefit category, automatically created cases do not apply to nonbenefit category cases.
The Upload Case Category user property in the HLS Case business component determines the category of automatically created cases that are associated with a master case. For cases that are automatically created from uploaded applications, you can associate only one category of cases with a master case. The value in this user property is Benefit.
Manually Created Cases
Instead of uploading an application or processing an appeal to automatically create a case, agents can enter data directly into Siebel Public Sector to manually create a case. When an agent manually creates a case for the benefit category, that case is associated with the master case for the primary contact in the case. However, when an agent manually creates a case for a nonbenefit category, that case is not associated with a master case. For information about associating these cases for nonbenefit categories with master cases, see Associating Manually Created Cases with Master Cases.
Additionally, a manually created case is associated with a master case only if the manually created case has a primary contact. If the case primary contact is the same as the primary contact for an existing master case, then the case is associated with that existing master case. If the case primary contact is not the same as the primary contact for any existing master case, then Siebel Public Sector creates a new master case, and the case is associated with that new master case.
Roadmap for Administering Benefits Cases
This roadmap consists of processes and tasks that administrators typically perform when administering benefits cases. Your agency might follow a different roadmap according to its business requirements.
To administer benefits cases, administrators perform the following processes and tasks:
Process of Configuring Applications
This process consists of tasks that administrators typically perform when configuring applications. Your agency might follow a different process according to its business requirements.
To configure applications, administrators perform the following tasks:
This process is a step in Roadmap for Administering Benefits Cases.
Configuring Citizen Access to Cases for Applications
If the check box for the Web Access field is selected for a contact in the Contacts view of the Cases screen, then that contact can view details about the case on a self-service Web site.
By default, this field is automatically selected for the primary contact of a case for an application that a citizen submits on a self-service Web site. If the user who submits this application is not the primary contact of the case, then this field is also automatically selected for that user. Administrators can configure this default behavior to automatically grant case access to all of the application contacts or to none of the application contacts.
This task is a step in Process of Configuring Applications.
To configure citizen access to cases for applications
Log in to Siebel Tools or Web Tools as an administrator and create a new workspace.
Select Business Component in the Object Explorer, and then select the PUB Application Upload business component.
Lock this business component so that you can change it.
Navigate to Business Component, then Business Component User Prop in the Object Explorer, and select the Enable Web Access user property.
Enter one of the following values to designate the contacts who can access cases for applications:
Primary. The Web Access field is automatically select for the primary contact in an application and the user who submits the application for the primary contact.
All. The Web Access field is automatically select for all contacts in an application.
None. The Web Access field is automatically select for no contacts in an application.
Deliver the changes to the Integration Branch.
Unlock the business component.
Setting Up a Siebel Audit Trail for Submitted Applications
If administrators set up a Siebel Audit Trail for submitted applications, then agents can see detail about prior submissions of the application when they are reviewing a submitted application. When administrators set up a Siebel Audit Trail, they designate the field detail that agents can view. By default, no detail appears, and agents see no data in the Audit Trail view of the Applications screen. If administrators set up a Siebel Audit Trail, then agents see the designated data in the Audit Trail view of the Applications screen.
This task is a step in Process of Configuring Applications.
To set up a Siebel Audit Trail for submitted applications
Navigate to the Administration - Audit Trail screen.
In the Audit Trail Buscomp list, create a new record, and select PUB Application in the Bus Comp field.
In the Field view, add the fields that you want to appear when an agent accesses the Audit Trail view of the Applications screen.
For example, you can add the Status field and the Reason Rejected field so that agents can see whether prior submissions of an application were rejected.
Click Update Audit Cache in the Audit Trail Buscomp list.
If you subsequently change the fields for this business component, then you must click Update Audit Cache again.
Configuring Contact Matching
When an agent performs contact matching, the social security number fields in the submitted application are compared to the social security number fields in contact records in Siebel Public Sector to find matching contact records. Administrators can configure the criteria for contact matching by specifying other data fields, such as the date of birth and last name for the contact, to include in this comparison processing. They can also configure the contact fields that appear during the contact matching process when the agent views matching contact records and creates a new contact record. These contact fields are populated with available data from the submitted application.
Administrators can also disable contact matching so that an agent can upload the data in a submitted application into Siebel Public Sector without finding matching contact records for that application. They can also designate that agents must match all contact records before they can upload an application. For more information, see Finding Matching Contact Records.
This task is a step in Process of Configuring Applications.
To configure contact matching
Log in to Siebel Tools or Web Tools as an administrator and create a new workspace.
Select Business Component in the Object Explorer, and then select the PUB Application Contact Matching VBC business component.
Lock this business component so that you can change it.
Navigate to Business Component, then Business Component User Prop in the Object Explorer, and configure the following user properties:
For the ContactMatchingFields user property, enter a comma separated list of the contact fields that Siebel Public Sector uses when finding matching contact records.
For the DefaultFields user property, enter a comma separated list of the contact fields that appear when agents create a new contact during contact matching.
For the ContactMatchingEnabled user property, enter N to disable contact matching.
For the EnableContactMatchingCheckBeforeUpload user property, enter Y to indicate that agents must perform contact matching for all contacts in an application.
Deliver the changes to the Integration Branch.
Unlock the business component.
Setting Up Verification Templates
Administrators must set up the templates that agents use as a guideline to verify the information in submitted benefits applications. These templates determine the specific items in submitted applications that agents must verify.
After agents use a template to verify information in submitted applications, an administrator can change that template. However, this changed template does not apply to the previous agent verifications. After an agent uses a verification template, an administrator cannot delete that template. (The trash can icon for the template and the template items become disabled.)
This task is a step in Process of Configuring Applications.
To set up a verification template
Navigate to the Administration - Case screen, then the Verification Templates view.
In the Verification Templates list, create a new record, and complete the fields as appropriate.
The following table describes some of the fields.
Field Description Template Name
Type the name of the template.
Case Type
Select the type of benefits or immigration program applicable to the case. For cases that are automatically created from applications submitted on a self-service Web site, this field in the case has a value of Other, but agents can change this value. Additional values include Food Stamps, Medical Assistance, Cash-Financial Assistance, Child Care, Unemployment, Visa, Passport, and Citizenship.
After an agent uses this template to verify information in submitted applications, you cannot change this field. (This field becomes read-only.)
Description
Type a description of the purpose of the template.
Active
Select this check box to indicate that agents can select this template when they verify applications.
In the Information Items list that appears after the Verification Templates list, add the application items that the agent must verify.
Note: If you do not add items to the template, then agents cannot select the template in the Template Name field of the Verification Plans view.The following table describes some of the fields.
Field Description Order
Type a number for this item. When an agent uses this template, this field indicates the order in which this item appears relative to the other items in the template.
Name
Type the name of the item that the agent must verify when using this template.
Description
Type a description of the item.
Process of Configuring Benefits for Cases
This process consists of tasks that administrators typically perform when configuring benefits for cases. Your agency might follow a different process according to its business requirements.
To configure benefits for cases, administrators perform the following tasks:
This process is a step in Roadmap for Administering Benefits Cases.
Setting Up Benefits Programs
Administrators can set up benefits programs, associate benefits with those programs, and associate products with those benefits. The preconfigured Siebel Public Sector application includes some setup benefits programs. Before you can associate products with benefits, you must set up the products on the Administration - Product screen. For more information, see Siebel Product Administration Guide.
If you use the Oracle Policy Automation rulebase to calculate benefits, then make sure that the benefits programs and associated benefits that you set up in Siebel Public Sector also exist in the Oracle Policy Automation rulebase. The row Ids for the benefits programs in Siebel Public Sector are used to create the benefit plans in the Oracle Policy Automation rulebase.
The following table shows the benefits programs and benefits for the preconfigured, sample rulebase for Oracle Policy Automation. For more information, see About the Sample Rulebase.
Table Benefits Programs and Benefits for Sample Rulebase
| Benefits Program | Benefit |
|---|---|
Food Stamp |
SNAP (Supplemental Nutrition Assistance Program) |
TANF |
TANF (Temporary Assistance for Needy Families) |
Child Welfare |
Child Care |
In the List of Values view of the Administration - Data screen, administrators can edit the available values for program codes, benefit codes, and transaction codes to include the appropriate values for your organization. The following table shows the Type field value in the List of Values view for each of these codes. For more information about editing LOVs, see Siebel Applications Administration Guide.
Table Type Field Values for Codes
| Code | Type Field |
|---|---|
Program |
PS_BNFT_PROGRAM |
Benefit |
PS_BNFT_CATEGORY |
Transaction |
PUB_BNFT_ADM_TXN_CODE |
If you select the Inactive Flag field of a program or benefit in the Program Benefits Administration view of the Administration - Case screen, then users cannot select the program or benefit for a benefits case.
This task is a step in Process of Configuring Benefits for Cases.
To set up a benefits program
Navigate to the Administration - Case screen, then the Program Benefits Administration view.
In the Programs list, create a new record, and complete the fields as appropriate.
In the Benefits list, create new records for the benefits in the program.
The following table describes some of the fields.
Field Description Benefit Code
Select a code that describes the benefit.
Transaction Code
Select the transaction code for the benefit code. If Siebel Public Sector is integrated with PeopleSoft Enterprise Payables, then the transaction code is automatically transmitted to PeopleSoft Enterprise Payables and determines the accounting distribution (the general ledger accounts) for payments that are associated with this benefit.
Note: If you do not create at least one record for a benefit in the program, then users cannot create benefits for the benefit plans that are part of that program.In the Products list, create new records for the products in each benefit.
Setting Up Benefits for Service Plans
Administrators must associate benefits with service plans, and associate products with those benefits. Before you can associate products with benefits, you must set up the products on the Administration - Product screen. For more information, see Siebel Product Administration Guide.
If you select the Inactive Flag field of a benefit in the Program Benefits Administration view of the Administration - Case screen, then users cannot select the benefit for a service plan.
This task is a step in Process of Configuring Benefits for Cases.
To set up benefits for a service plan
Navigate to the Administration - Case screen, then the Program Benefits Administration view.
In the Programs list, select the record with a Service Plan value in the Program Code field.
Note: All of this fields in this record are read-only. You cannot update or delete this record.In the Benefits list, create new records for the benefits in the service plan.
The following table describes some of the fields.
Field Description Benefit Code
Select a code that describes the benefit.
Transaction Code
Select the transaction code for the benefit code. If Siebel Public Sector is integrated with PeopleSoft Enterprise Payables, then the transaction code is automatically transmitted to PeopleSoft Enterprise Payables and determines the accounting distribution (the general ledger accounts) for payments that are associated with this benefit.
Note: If you do not create at least one record for a benefit in the service plan, then users cannot create benefits for service plans.In the Products list, create new records for the products in each benefit.
Configuring the Eligibility Button and Screening Button
Users click the Eligibility button to automatically assign benefits to cases and the Screening button to screen cases for benefits eligibility. To implement the functionality for these buttons, administrators can use Oracle Policy Automation Connector to integrate Siebel Public Sector with an application that determines benefits. For more information about installation, see Oracle Policy Automation Connector for Siebel Installation Guide.
Oracle Policy Automation Connector for Siebel Developer’s Guide on Oracle Technology Network includes information about data mapping between an application that determines benefits and Siebel Public Sector. The Eligibility button and Screening button function correctly only if the value that you select in the Mapping Name field in the Administration - Policy Automation screen matches an input in the value for the appropriate user property in the HLS Case business component in the preconfigured Siebel Public Sector application.
This task is a step in Process of Configuring Benefits for Cases.
To configure the Eligibility button and Screening button
Log in to Siebel Tools as an administrator.
Select Business Component in the Object Explorer, and then select the HLS Case business component.
Navigate to Business Component, then Business Component User Prop in the Object Explorer.
Complete one of the following steps:
For implementations applicable to releases before Innovation Pack 2015, Patchset 5, note the input value after Configuration Name in the Value field of the Named Method 8 and Named Method 9 user properties in the preconfigured Siebel Public Sector application.
For implementations applicable to release Innovation Pack 2015, Patchset 5 or later and to integrations with Oracle Policy Automation 12.2, note the input value after Configuration Name in the Value field of the Named Method 12 and Named Method 13 user properties in the preconfigured Siebel Public Sector application.
For implementations applicable to release Innovation Pack 2015, Patchset 5 or later and to integrations with Oracle Policy Automation 10.4, inactivate the Named Method 12 and Named Method 13 user properties, and activate the Named Method 8 and Named Method 9 user properties. Then note the input value after Configuration Name in the Value field of the Named Method 8 and Name Method 9 user properties in the preconfigured Siebel Public Sector application.
In Siebel Public Sector, navigate to the IO Mappings view of the Administration - Policy Automation screen.
Note the Mapping Name field value for the PUB Sample Intake Contact integration component.
If the Mapping Name field value does not match the input value, then change either the Mapping Name field value or the input value.
Associating Manually Created Cases with Master Cases
When an agent manually creates a case for a nonbenefit category, that case is not associated with a master case. To associate these cases for nonbenefit categories with master cases, the administrator must perform the procedure in this topic. For more information, see About Associating Nonbenefits Cases with Master Cases
This task is a step in Roadmap for Administering Benefits Cases.
To associate manually created cases with a master case
Log in to Siebel Tools or Web Tools as an administrator and create a new workspace.
Select Business Component in the Object Explorer, and then select the HLS Case business component.
Lock this business component so that you can change it.
Navigate to Business Component, then Business Component User Prop in the Object Explorer.
In the Value field of the Associate Master for Categories property, enter the category names of the manually created cases that you want to associate with a master case.
Separate each category name with a semicolon (;), for example, Benefit; Tax.
Deliver the changes to the Integration Branch.
Unlock the business component.
Enabling Effective Dating
Effective dating is useful for capturing historical values in the fields that affect the benefits determination for citizens. Tracking these historical values increases the accuracy of the benefits determination. For example, if a citizen’s income affects the benefits determination, and if an agent learns of a change in the citizen’s income two months after the change is effective, then the agent can enter the new income value in Siebel Public Sector and date that value two months earlier. Consequently, the effective date of the income change, and not the date that the agent changes the income in Siebel Public Sector, is used to redetermine benefits for the citizen.
If you do no enable effective dating, then no functionality is available when users click the Link History button in a view.
This task is a step in Roadmap for Administering Benefits Cases.
To enable effective dating
Navigate to the Administration - Application screen, then the System Preferences view.
Select the record with the EnableEffectiveDating system preference name.
Change the System Preference Value field of the record to True.
To implement your change, re-start the Siebel Server.
Implementing Effective Date Tracking
Administrators can implement effective date tracking for the fields and records that affect the benefits determination. Administrators implement effective date tracking so that the following functionality is available:
Agents can select the effective dates for the values in designated fields.
Effective dates are assigned to the values in designated fields that are populated with data received from an external application, such as a self-service Web site.
Agents can select the effective dates for the records that they add to and deactivate from designated views.
Effective dates are assigned to records that are added to and deactivated from designated views because of data received from an external application, such as a self-service Web site.
Only agents with proper authority can complete the following actions:
Change the Status field value for entries in the Effective Date dialog box and in the Link History dialog box to Cancelled or Approved.
Delete entries with a Status field value of Cancelled or Approved in the Effective Date dialog box and in the Link History dialog box.
Change the date range for entries with a Status field value of Approved in the Effective Date dialog box and in the Link History dialog box.
Administrators implement effective date tracking in the Administration - Effective Dating screen. If the preconfigured business components in the Administration - Effective Dating screen do not include a business component that contains the fields and records for which administrators want to implement effective date tracking, then they can add this business component to the Administration - Effective Dating screen. For more information, see Process of Setting Up Effective Dating for Additional Business Components.
When effective dating exists for a field in a view, an effective date button appears in the field if you click that field. When effective dating exists for the records that users add to and deactivate from a view, functionality is available when users click the Link History button in that view.
This task is a step in Roadmap for Administering Benefits Cases.
To implement effective date tracking
Navigate to the Administration - Effective Dating screen.
The Effective Dating Buscomp list shows the business components for which effective date tracking is implemented.
(Optional) If you want to change the starting date of effective date tracking for a business component, then change the date in the Start Date field to a later date.
Select or clear the Allow In Place Field Edit check box for a business component as follows:
Select this check box so that a user can change the value in an effective dating field for the business component without clicking the effective date button in the field.
Clear this check box so that a user must click the effective date button in the field for the business component to change a value in the field.
A dialog box appears when the user clicks the effective date button, and the user must enter the effective start date of the field value in this dialog box.
To implement effective date tracking for selected fields in a business component, complete the following steps:
In the Effective Dating Buscomp list, select the appropriate business component for the fields.
Navigate to the Field view.
In the list of effective dating fields, create a new record, and complete the fields as appropriate.
The following table describes some of the fields.
Field Description Field
Select a value to designate effective date tracking for a field.
Enable Future Dating
Select this check box to indicate that agents are allowed to enter a date later than the current date when they designate a date range for the value in the field.
Enable Status
Select this check box to indicate a Status field appears in the Effective Date dialog box for the field.
Agents use the Status field to designate whether the rules engine uses the field value to determine benefits. If the Status field value is Approved, then the rules engine uses the field value to determine benefits. If the Status field value is Pending, Rejected, or Cancelled, then the rules engine does not use the field value to determine benefits. If you select this check box, then existing field values are assigned a Status field value of Approved.
If necessary, display the field in the user interface using one of the following methods:
If the field is available for display in the view, then navigate to the view, select Columns Displayed in the menu that appears when you click the cogwheel icon, and display the field in the view.
If the field is not available for display in the view, then use Siebel Tools to display the field in the view.
To implement effective date tracking for the records that users add to and deactivate from a view of a screen, complete the following steps:
In the Effective Dating Buscomp list, select the appropriate business component for the screen.
Navigate to the Child Buscomp view.
In the list of effective dating child business components, create a new record, and complete the fields as appropriate.
The following table describes some of the fields.
Field Description Link Name
Select a value to designate effective date tracking for the records that users add to and deactivate from a view of the screen. For some examples of Link Name fields for views, see the following table.
M/M
Displays a check in the check box if the records in the screen and view have a many-to-many relationship. You must repeat the steps in Step 5 for the other side of this relationship.
For example, if you implement effective dating for the records in the Contacts view of the Households screen, then you must also implement effective dating for the records in the Households view of the Contacts screen.
Enable Future Dating
Select this check box to indicate that agents are allowed to enter a date later than the current date when they designate a date range for the record.
Enable Status
Select this check box to indicate a Status field appears in the Link History dialog box for the record.
Agents use the Status field to designate whether the rules engine uses the record to determine benefits. If the Status field value is Approved, then the rules engine uses the record to determine benefits. If the Status field value is Pending, Rejected, or Cancelled, then the rules engine does not use the record to determine benefits. If you select this check box, then existing records are assigned a Status field value of Approved.
To designate the agents with the cancellation and approval authority for the fields in Step 4 and the records in Step 5 for which you select the Enable Status check box, complete the following steps:
In the Effective Dating Buscomp list, select the appropriate business component for the field values and records.
Navigate to the Position view.
In the list of positions, create new records, and complete the fields as appropriate.
If no records exist in the list of positions, then all agents have cancellation and approval authority.
Click Clear Cache to implement effective date tracking in your current Siebel Public Sector session for your designated fields and records.
To implement effective date tracking, you can also log out of Siebel Public Sector after you designate effective date tracking for fields and records, and then log in to Siebel Public Sector.
The following table includes examples of Link Name fields for business components and views.
Table Link Name Fields for Business Components and Views
| Link Name Field | Business Component | View |
|---|---|---|
Contact/CUT Address |
Contact |
Addresses List view of the Contacts screen |
Contact/FIN Contact Income |
Contact |
Income view of the Contacts screen |
Contact/PUB Contact Expense |
Contact |
Expenses view of the Contacts screen |
Contact/PUB Contact Financial Asset |
Contact |
Financial Assets view of the Contacts screen |
Household/Contact |
Household |
Contacts view of the Households screen |
Process of Setting Up Effective Dating for Additional Business Components
This process consists of tasks that administrators typically perform when setting up effective dating for an additional business component that is not preconfigured for effective dating. Your agency might follow a different process according to its business requirements. For more information about completing the tasks in this topic, see Configuring Siebel Business Applications.
The following business components are preconfigured for effective dating:
Contact
CUT Address
FIN Contact Income
Household
PUB Contact Expense
PUB Contact Financial Asset
PUB Related Contact Expense
PUB Related Contact Financial Asset
PUB Related Contact Income
To set up effective dating for an additional business component, administrators perform the following tasks:
Setting Up Effective Dating for Records with One-To-Many Links
Setting Up Effective Dating for Records with Many-To-Many Links
This process is a step in Roadmap for Administering Benefits Cases.
Setting Up Effective Dating for Fields
To set up effective dating for the fields in an additional business component that is not preconfigured for effective dating, complete the tasks in this topic. In this topic, you set up effective dating for the fields in the Account business component as an example, but you can set up effective dating for the fields in another business component.
To set up effective dating for fields, complete the following tasks:
Creating and Updating the Tables for Effective Dating Fields
Creating and Updating the Business Components for Effective Dating Fields
This task is a step in Process of Setting Up Effective Dating for Additional Business Components.
Creating and Updating the Tables for Effective Dating Fields
First, you create a history table for the table for the base business component, and you update the table for the base business component.
To create and update the tables for effective dating fields
Log in to Siebel Tools or Web Tools as an administrator and create a new workspace.
Determine the table for the base business component that contains the fields for which you want to set up effective dating.
In this example, the name of the table for the appropriate fields in the Account business component is S_PARTY. (For party-based business components, such as Account, Contact, and Household, the name for the table is S_PARTY.)
Note: To determine this table name, navigate to Business Component in Object Explorer, and find the base business component. This table name appears in the Table column for the base business component.Lock the PUB Effective Dating project, and create a history table in this project with a name that is consistent with the name of the table for the base business component.
In this example, the name of the history table is S_ORG_EXT_ED. For party-based business components, use a history table name that is consistent with the extension table name for the party-based business component.
The following table includes the values in the columns for the column names in the history table.
Name User Name User Key Seq Null-able Re-quired Physical Type Length Default PAR_ROW_ID
Parent Id
1
N
Y
Varchar
15
None
FIELD_NAME
Field Name
2
N
Y
Varchar
75
None
FIELD_VALUE
Field Value
None
Y
N
Varchar
250
None
EFF_START_DATE
Effective StartDate
3
N
Y
Date
7
None
EFF_END_DATE
Effective EndDate
None
Y
N
Date
7
NULL
LINK_ED_FLG
Link ED Flag
None
N
Y
Character
1
N
LAST_RECONCILED_NUM
Eligibility Processed
None
N
Y
Integer
None
-1
INTER_ROW_ID
Intersection Table Row Id
4
Y
N
Varchar
15
None
Note: For the PAR_ROW_ID column name, the Foreign Key Table column value is S_PARTY.Add column names to the table for the base business component.
The following table includes the values in the columns for the additional column names in the table for the base business component.
Name User Name Nullable Required Physical Type Length Default ED_DELETED_FLG
ED Deleted
N
Y
Character
1
N
ED_ENABLED_FLG
ED Enabled
N
Y
Character
1
Y
Apply the changes to the tables to the Siebel database.
Deliver the changes to the Integration Branch.
Creating and Updating the Business Components for Effective Dating Fields
After you create and update the tables for effective dating fields, you create a history business component for the history table, and you update the base business component.
To create and update the business components for effective dating fields
Use the wizard to create the history business component in the PUB Effective Dating project using the history table.
In this example, the name of the history business component is Account History.
The following table includes the field and column names for the history business component.
Field Name Column Name Join Type Field Name
FIELD_NAME
None
DTYPE_TEXT
Field Value
FIELD_VALUE
None
DTYPE_TEXT
Effective Start Date
EFF_START_DATE
None
DTYPE_UTCDATE
Effective End Date
EFF_END_DATE
None
DTYPE_UTCDATE
Created By UserName
LOGIN
S_USER
DTYPE_TEXT
In the base business component, add fields.
The following table includes the values in the columns for the field names in the base business component.
Name Column Force Active Predefault Value ED Deleted Flag
ED_DELETED_FLG
True
N
ED Enabled Flag
ED_ENABLED_FLG
True
N
In this example, the base business component is Account.
In the base business component, add the ED BusComp user property with a value of the name of the history business component.
In this example, the base business component is Account, and the name of the history business component is Account History.
For each field in the base business component for which the Required column is selected, add the ED Control Expr user property and include the following value for this user property:
Required Field Name IS NOT NULL.In this value, Required Field Name is the name of field in the base business component for which the Required column is selected.
This step ensures that field effective dating is implemented after a user creates a record, and not when the user creates the record.
In the PUB Effective Dating project, create a new link between the base business component and the history business component.
Use this link to add the history business component to the business object for the base business component.
In this example, the business object for the base business component is Account.
Deliver the changes to the Integration Branch.
Configuring the Dialog Box for the Effective Date Button
After you create and update the business components for the effective dating fields, you configure the dialog box that appears when users click the effective date button for the base business component.
To configure the dialog box for the effective date button
Copy the Contact Field ED Popup Applet, rename the copied applet with the name of the base business component for which you want to set up effective dating fields, and change the business component for the applet to the history business component for the history table.
In this example, the name of the copied applet is Account Field ED Popup Applet.
Note: In the List Columns for the applet, make sure that the Field Value field, Effective Start Date field, and Effective End Date field appear in the user interface. Also, in the Edit List mode for the applet layout, make sure that the following controls are mapped in the web layout: NewRecord, DeletedRecord, NewQuery, EDRefreshBusComp, PopupQueryComboBox, SetFieldContext, and CloseApplet.Deliver the changes to the Integration Branch.
Setting Up the View of Field History
To set up the view of history for the field values in an additional business component that is not preconfigured for effective dating, complete the tasks in this topic. In this topic, you set up the Account History view for the field values in the Account business component as an example, but you can set up the view of history for the field values in another business component.
To set up the view for field history, complete the following tasks
This task is a step in Process of Setting Up Effective Dating for Additional Business Components.
Creating the Applet for Field History
First, you create the applet for field history.
To create the applet for field history
Copy the Contact ED History List Applet, rename the copied applet with the name of the base business component for which you want to set up an applet for field history, and change the business component for the applet to the history business component.
In this example, the name of the copied applet is Account ED History List Applet.
Note: Make sure that the copied applet is in only the Edit List mode and that the Search Specifications column for the copied applet is the same as the Search Specifications column for the original applet.Set the column values for the copied applet so that the applet is read-only.
The following table includes the values in some columns for the applet.
No Delete No Insert No Merge No Update True
True
True
True
Note: In the List Columns for the applet, make sure that the Field Name field, Field Value field, Effective Start Date field, Effective End Date field, Created By UserName field, and Created field appear in the user interface.Set the user properties in the copied applet so that the applet is read-only.
The following table includes the values in the columns for the user property names in the copied applet.
Name Value CanInvokeMethod: CopyRecord
False
CanInvokeMethod: DeleteRecord
False
CanInvokeMethod: NewRecord
False
CanInvokeMethod: WriteRecord
False
Deliver the changes to the Integration Branch.
Creating and Positioning the View of Field History
After you create the applet for field history, you create and position the view of field history.
To create and position the view of field history
In the business object for the base business component, if the base business component is an independent entity (or a primary business component), then create the view of field history in the PUB Effective Dating project, and include the applet for field history in this view.
Create a string reference for the name of the view of field history in the Symbolic Strings project.
In this example, the name of the view of field history is Account History.
Include the form applet for the base business component at the start of the view and the applet of field history at the end of the view.
In this example, Account is a primary business component in the Account business object. The name of the view of field history is Account History View, and this view contains the Account Form Applet (in Base and Edit modes) at the start of the view and the Account ED History List Applet (in Edit List mode) at the end of the view. You can navigate to the View Web Template Item for the new view to make sure that the correct modes appear in the Applet Mode column for each applet.
In the business object for the base business component, if the base business component is related to another business component with a one-to-many link, then include the applet for field history in the existing view.
Include the form applet for the base business component at the start of the view, the form or list applet for the other business component in the middle of the view, and the applet of field history at the end of the view.
If necessary, add the view of field history in the appropriate screen, enter a value in the Sequence column for the view to position the view relative to other views in the screen, and select the string reference from Step 1 in the Viewbar Text - String Reference column.
In this example, the appropriate screen is the Accounts screen.
If necessary, add the screen that includes the view of field history to the Siebel Public Sector application, and enter a value in the Sequence column for the screen to position the screen relative to other screens in the Siebel Public Sector application.
In this example, the Accounts screen is already added in the Siebel Public Sector application, so you do not have to complete this step and the next step.
Deliver the changes to the Integration Branch.
Registering the View of Field History in Siebel Public Sector
After you create and position the view of field history, you register that view in Siebel Public Sector. To see the view in the user interface, you must log out of Siebel Public Sector after you register the view, and then log in to Siebel Public Sector.
To register the view of field history in Siebel Public Sector
Navigate to the Administration - Application screen, then the Views view.
In the Views list, create a new record with a View Name field of the name of the view of field history.
In this example, the name of the view of field history is Account History View.
In the Responsibilities list for this view, create new records for the responsibilities of the users who want access to this view.
Setting Up Effective Dating for Records with One-To-Many Links
To set up effective dating for records with one-to-many links, complete the tasks in this topic. In this topic, you set up effective dating for the records in the Opportunities view of the Accounts screen as an example. The records in the Accounts screen have a one-to-many link with the records in the Opportunities view. In this example, the parent business component is Account, and the child business component is Opportunity.
To set up effective dating for records with one-to-many links, complete the following tasks:
Creating and Updating the Tables for One-To-Many Effective Dating Records
Creating and Updating the Business Components for One-To-Many Effective Dating Records
Configuring the Dialog Box for the Link History Button for One-To-Many Records
Configuring the Link History Button and Inactive Field in the User Interface for One-To-Many Records
Configuring the Menu Items in the User Interface for One-To-Many Records
This task is a step in Process of Setting Up Effective Dating for Additional Business Components.
Creating and Updating the Tables for One-To-Many Effective Dating Records
First, you create a history table for the table for the child business component, and you update the table for the child business component.
To create and update the tables for effective dating records
Log in to Siebel Tools or Web Tools as an administrator and create a new workspace.
Determine the table for the child business component that contains the records for which you want to set up effective dating.
In this example, the name of the table for the records in the Opportunity business component is S_OPTY.
Note: To determine this table name, navigate to Business Component in Object Explorer, and find the child business component. This table name appears in the Table column for the child business component.Lock the PUB Effective Dating project, and create a history table in this project with a name that is consistent with the name of the table for the child business component.
In this example, the name of the history table is S_OPTY_ED.
The following table includes the values in the columns for the column names in the history table.
Name User Name User Key Seq Nullable Required Physical Type Length Default PAR_ROW_ID
Parent Id
1
N
Y
Varchar
15
None
FIELD_NAME
Field Name
2
N
Y
Varchar
75
None
FIELD_VALUE
Field Value
None
Y
N
Varchar
250
None
EFF_START_DATE
Effective StartDate
3
N
Y
Date
7
None
EFF_END_DATE
Effective EndDate
None
Y
N
Date
7
NULL
LINK_ED_FLG
Link ED Flag
None
N
Y
Character
1
N
INTER_ROW_ID
Intersection Table Row Id
4
Y
N
Varchar
15
None
Note: For the PAR_ROW_ID column name, the Foreign Key Table column value is S_OPTY.Add column names to the table for the child business component.
The following table includes the values in the columns for the additional column names in the table for the child business component.
Name User Name Nullable Required Physical Type Length Default ED_DELETED_FLG
ED Deleted
N
Y
Character
1
N
ED_ENABLED_FLG
ED Enabled
N
Y
Character
1
Y
Apply the changes to the tables to the Siebel database.
Deliver the changes to the Integration Branch.
Creating and Updating the Business Components for One-To-Many Effective Dating Records
After you create and update the tables for effective dating records, you create a history business component for the history table, and you update the child business component.
To create and update the business components for effective dating records
Use the wizard to create the history business component in the PUB Effective Dating project using the history table.
In this example, the name of the history business component is Opportunity History.
The following table includes the field and column names for the history business component.
Field Name Column Name Join Type Field Name
FIELD_NAME
None
DTYPE_TEXT
Field Value
FIELD_VALUE
None
DTYPE_TEXT
Effective Start Date
EFF_START_DATE
None
DTYPE_UTCDATE
Effective End Date
EFF_END_DATE
None
DTYPE_UTCDATE
Created By UserName
LOGIN
S_USER
DTYPE_TEXT
In the child business component, add fields.
The following table includes the values in the columns for the field names in the child business component.
Name Column Force Active Predefault Value ED Deleted Flag
ED_DELETED_FLG
True
N
ED Enabled Flag
ED_ENABLED_FLG
True
N
In this example, the child business component is Opportunity.
In the child business component, add the ED BusComp user property with a value of the name of the history business component.
In this example, the child business component is Opportunity, and the name of the history business component is Opportunity History.
In the PUB Effective Dating project, create a new link between the child business component and the history business component.
Use this link to add the history business component to the business object for the parent business component.
In this example, the business object for the parent business component is Account.
Deliver the changes to the Integration Branch.
Configuring the Dialog Box for the Link History Button for One-To-Many Records
After you create and update the business components for the effective dating records, you configure the dialog box that appears when users click the Link History button for the child business component.
To configure the dialog box for the Link History button
Copy the Income Link ED Popup Applet, rename the copied applet with the name of the child business component for which you want to set up effective dating records, and change the business component for the applet to the history business component for the history table.
In this example, the name of the copied applet is Opportunity Link ED Popup Applet.
Note: In the List Columns for the applet, make sure that the Effective Start Date field and Effective End Date field appear in the user interface. Also, in the Edit List mode for the applet layout, make sure that the following controls are mapped in the web layout: NewRecord, DeletedRecord, NewQuery, EDRefreshBusComp, and CloseApplet.Deliver the changes to the Integration Branch.
Configuring the Link History Button and Inactive Field in the User Interface for One-To-Many Records
After you configure the dialog box for the Link History button, you configure the Link History button and the Inactive field in the appropriate applet in the user interface. The Inactive field indicates whether the record is active or inactive.
To configure the Link History button and the Inactive field in the user interface
Determine the applet that will display the Link History button and the Inactive field.
In this example, the Opportunity List Applet will display the Link History button and the Inactive field.
For the applet, add the LinkHistory control.
The following table includes the values in the columns for the LinkHistory control.
Caption - String Reference HTML Only HTML Type Method Invoked Runtime Select the string reference for the Link History current string value.
True
MiniButtonEdit
ShowPopup
True
Note: To select a different button name, you must first create a string reference for the button name in the Symbolic Strings project and then deliver the changes to the Integration Branch.Right-click the applet, select Edit Web Layout, move the Link History button to the Edit List mode of the applet.
Note: If the Edit List mode is not available for the applet, then move the Link History button to the mode of the applet in the view that contains the applet. To determine this mode, navigate to View Web Template Item for the view that contains the applet in Object Explorer. This mode appears in the Applet Mode column for the applet.For the applet, add user properties to the LinkHistory control.
The following table includes the values in the columns for the user property names in the LinkHistory control.
Name Value Mode
Edit List
Popup
The name of the copied applet for the dialog box. For more information, see Configuring the Dialog Box for the Link History Button for One-To-Many Records.
Display the ED Deleted Flag field in the applet, and select the string reference for the Inactive current string value in the Caption - String Reference column.
Deliver the changes to the Integration Branch.
Configuring the Menu Items in the User Interface for One-To-Many Records
After you configure the Link History button and the Inactive field in the user interface, you configure the menu items in the appropriate applet in the user interface.
To configure the menu items in the user interface
Determine the applet that will include the menu items.
In this example, the Opportunity List Applet will include the menu items.
For the applet, add the menu items.
The following table includes the values in the columns for the menu items.
Command Menu Text Menu Text - String Reference PUB Show All ED
Show All
Select the string reference for the Show All current string value.
PUB Show Active ED
Active Items
Select the string reference for the Active Items current string value.
PUB Undelete ED
Undelete Record
Select the string reference for the Undelete Record current string value.
For the applet, add user properties.
The following table includes the values in the columns for the user property names in the applet.
Name Value CanInvokeMethod: EDQueryShowActive
True
CanInvokeMethod: EDQueryShowAll
True
CanInvokeMethod: SetEDQueryMode
True
Deliver the changes to the Integration Branch.
Setting Up Effective Dating for Records with Many-To-Many Links
To set up effective dating for records with many-to-many links, complete the tasks in this topic. In this topic, you set up effective dating for the records in the Contacts view of the Accounts screen as an example. The records in the Contacts view have a many-to-many link with the records in the Accounts screen. In this example, the parent business component is Account, and the child business component is Contact.
To set up effective dating for records with many-to-many links, complete the following tasks:
Creating and Updating the Tables for Many-To-Many Effective Dating Records
Creating and Updating the Business Components for Many-To-Many Effective Dating Records
Configuring the Dialog Box for the Link History Button for Many-To-Many Records
Configuring the Menu Items in the User Interface for Many-To-Many Records
This task is a step in Process of Setting Up Effective Dating for Additional Business Components.
Creating and Updating the Tables for Many-To-Many Effective Dating Records
First, you create a history table for the intersection table, and you update the intersection table. The intersection table relates to the parent and child business component.
To create and update the tables for effective dating records
Log in to Siebel Tools or Web Tools as an administrator and create a new workspace.
Determine the intersection table that contains the records for which you want to set up effective dating.
In this example, the name of the intersection table for the records in the Account business component and the Contact business component is S_PARTY_PER.
Note: To determine this table name, navigate to Link in Object Explorer, and find the link that contains the parent and child business component. This table name appears in the Inter Table column for the link.Lock the PUB Effective Dating project, and create a history table in this project with a name that is consistent with the name of the intersection table.
In this example, the name of the history table is S_PARTY_PER_ED.
The following table includes the values in the columns for the column names in the history table.
Name User Name User Key Seq Null-able Re-quired Physical Type Length Default PAR_ROW_ID
Parent Id
1
N
Y
Varchar
15
None
FIELD_NAME
Field Name
2
N
Y
Varchar
75
None
FIELD_VALUE
Field Value
None
Y
N
Varchar
250
None
EFF_START_DATE
Effective StartDate
3
N
Y
Date
7
None
EFF_END_DATE
Effective EndDate
None
Y
N
Date
7
None
LINK_ED_FLG
Link ED Flag
None
N
Y
Character
1
Y
Note: For the PAR_ROW_ID column name, the Foreign Key Table column value is S_PARTY_PER.Add column names to the intersection table.
The following table includes the values in the columns for the additional column names in the intersection table.
Name User Name Nullable Required Physical Type Length Default ED_DELETED_FLG
ED Deleted
N
Y
Character
1
N
Apply the changes to the tables to the Siebel database.
Deliver the changes to the Integration Branch.
Creating and Updating the Business Components for Many-To-Many Effective Dating Records
After you create and update the tables for effective dating records, you create a history business component for the history table, and you update the parent and child business components.
To create and update the business components for effective dating records
Use the wizard to create the history business component in the PUB Effective Dating project using the history table.
In this example, the name of the history business component is Account Contact ED.
The following table includes the field and column names for the history business component.
Field Name Column Name Join Type Field Name
FIELD_NAME
None
DTYPE_TEXT
Field Value
FIELD_VALUE
None
DTYPE_TEXT
Effective Start Date
EFF_START_DATE
None
DTYPE_UTCDATE
Effective End Date
EFF_END_DATE
None
DTYPE_UTCDATE
Created By UserName
LOGIN
S_USER
DTYPE_TEXT
Deliver the changes to the Integration Branch.
In the PUB Effective Dating project, create the links between the parent or child business components and the history business components.
The following table includes the parent business components, child business components, history business components, source fields, and destination fields for each link in this example.
Link Name Parent Business Component Child Business Component History Business Component Source Field Destination Field Account/Account History
Account
None
Account History
Id
Parent Id
Contact/Contact History
None
Contact
Contact History
Id
Parent Id
Account/Account Contact ED
Account
None
Account Contact ED
Contact/Account.Id
Parent Id
Contact/Account Contact ED
None
Contact
Account Contact ED
Account/Contact.Id
Parent Id
Use these links to add the history business components to the two business objects for the parent and child business components.
The following table includes the links to use to add the history business components to the business objects for the parent and child business components in this example.
Link Name History Business Component Business Object Account/Account History
Account History
Account
Contact/Contact History
Contact History
Account
Contact/Account Contact ED
Account Contact ED
Account
Account/Account History
Account History
Contact
Contact/Contact History
Contact History
Contact
Account/Account Contact ED
Account Contact ED
Contact
Add a field to the parent and child business component.
The following table includes the values in the columns for the field name in the parent and child business component.
Business Component Name Join Column Type Account
Contact/Acount.ED_DELETED_FLG
S_PARTY_PER
ED_DELETED_FLG
DTYPE_FLG
Contact
Account/Contact.ED_DELETED_FLG
S_PARTY_PER
ED_DELETED_FLG
DTYPE_FLG
Add user properties to the parent and child business component.
The following table includes the values in the columns for the user property names in the parent and child business component.
Business Component Name Value Account
ED Link BusComp:Contact/Account
Account Contact ED
Contact
ED Link BusComp:Account/Contact
Account Contact ED
Deliver the changes to the Integration Branch.
Configuring the Dialog Box for the Link History Button for Many-To-Many Records
After you create and update the business components for the effective dating records, you configure the dialog box that appears when users click the Link History button for the child business component.
In this example, you do not configure the dialog box for the Link History button because this dialog box is already configured. If this dialog box is not configured for your child business component, then complete the steps in this procedure.
To configure the dialog box for the Link History button
Copy the Contact Link ED Popup Applet, rename the copied applet with the name of the child business component for which you want to set up effective dating records, and change the business component for the applet to the history business component for the history table.
Note: In the List Columns for the applet, make sure that the Effective Start Date field and Effective End Date field appear in the user interface. Also, in the Edit List mode for the applet layout, make sure that the following controls are mapped in the web layout: NewRecord, DeletedRecord, NewQuery, EDRefreshBusComp, and CloseApplet.Deliver the changes to the Integration Branch.
Configuring the Link History Button and Inactive Field in the User Interface for Many-To-Many Records
After you configure the dialog box for the Link History button, you configure the Link History button and the Inactive field in the appropriate applet in the user interface. The Inactive field indicates whether the record is active or inactive.
In this procedure, you configure the Link History button and the Inactive field in the Contacts view of the Accounts screen, but, if necessary, you can also configure the Link History button and the Inactive field in the Accounts view of the Contacts screen.
To configure the Link History button and the Inactive field in the user interface
Determine the applet that will display the Link History button and the Inactive field.
In this example, the Account Contact List Applet will display the Link History button and the Inactive field.
For the applet, add the LinkHistory control.
The following table includes the values in the columns for the LinkHistory control.
Caption - String Reference HTML Only HTML Type Method Invoked Runtime Select the string reference for the Link History current string value.
True
MiniButtonEdit
ShowPopup
True
Note: To select a different button name, you must first create a string reference for the button name in the Symbolic Strings project and then deliver the changes to the Integration Branch.Right-click the applet, select Edit Web Layout, move the Link History button to the Edit List mode of the applet.
Note: If the Edit List mode is not available for the applet, then move the Link History button to the mode of the applet in the view that contains the applet. To determine this mode, navigate to View Web Template Item for the view that contains the applet in Object Explorer. This mode appears in the Applet Mode column for the applet.For the applet, add user properties to the LinkHistory control.
The following table includes the values in the columns for the user property names in the LinkHistory control.
Name Value Mode
Edit List
Popup
The name of the copied applet for the dialog box. For more information, see Configuring the Dialog Box for the Link History Button for Many-To-Many Records.
Display the Account/Contact.ED_DELETED_FLG field in the applet, and select the string reference for the Inactive current string value in the Caption - String Reference column.
Deliver the changes to the Integration Branch.
Configuring the Menu Items in the User Interface for Many-To-Many Records
After you configure the Link History button and the Inactive field in the user interface, you configure the menu items in the appropriate applet in the user interface.
In this procedure, you configure the menu items in the Contacts view of the Accounts screen, but, if necessary, you can also configure the menu items in the Accounts view of the Contacts screen.
To configure the menu items in the user interface
Determine the applet that will include the menu items.
In this example, the Account Contact List Applet will include the menu items.
For the applet, add the menu items.
The following table includes the values in the columns for the menu items.
Command Menu Text Menu Text - String Reference PUB Show All ED
Show All
Select the string reference for the Show All current string value.
PUB Show Active ED
Active Items
Select the string reference for the Active Items current string value.
PUB Undelete ED
Undelete Record
Select the string reference for the Undelete Record current string value.
For the applet, add user properties.
The following table includes the values in the columns for the user property names in the applet.
Name Value CanInvokeMethod: EDQueryShowActive
True
CanInvokeMethod: EDQueryShowAll
True
CanInvokeMethod: SetEDQueryMode
True
Deliver the changes to the Integration Branch.
Process of Configuring Appeal Cases
This process consists of tasks that administrators typically perform when configuring appeal cases. Your agency might follow a different process according to its business requirements.
To configure appeal cases, administrators perform the following tasks:
This process is a step in Roadmap for Administering Benefits Cases.
Configuring Case Categories for Appeal Cases
In the preconfigured Siebel Public Sector application, the Appeal button is enabled only for cases that have a Category field of Benefit. Administrators can enable this button for additional case categories.
This task is a step in Process of Configuring Appeal Cases.
To configure the case categories for appeal cases
Log in to Siebel Tools or Web Tools as an administrator and create a new workspace.
Select Business Component in the Object Explorer, and then select the HLS Case business component.
Lock this business component so that you can change it.
Navigate to Business Component, then Field in the Object Explorer.
In the Calculated Value column of the CanAppealCategories field, change the value to the following text:
IIF(([Category]=LookupValue("PUB_CASE_CATEGORY_TYPE","Benefit")) OR
([Category]=LookupValue("PUB_CASE_CATEGORY_TYPE","New_Category")) OR
([Category]=LookupValue("PUB_CASE_CATEGORY_TYPE","New_Category")) OR
([Category]=LookupValue("PUB_CASE_CATEGORY_TYPE","New_Category")),"Y","N")
In this text, New_Category is the value for the Category field of the case. You can designate any number of Category field values.
Note: The preconfigured value for the Calculated Value column of the CanAppealCategories field isIIF([Category]=LookupValue("PUB_CASE_CATEGORY_TYPE","Benefit"),"Y","N").Deliver the changes to the Integration Branch.
Unlock the business component.
Setting Up Format in Snapshot Files for Appeal Cases
When users create an appeal case, a snapshot file is automatically created in the Attachments view for the evidence record of that case. This snapshot file contains the field values for the original case, for the active benefit plans that are associated with that case, and for the benefits that are associated with those benefit plans.
This task is a step in Process of Configuring Appeal Cases.
If Oracle Business Intelligence is not integrated with Siebel Public Sector, then administrators can set up an XML format for this snapshot file.
To set up the format in snapshot files for appeal cases
Navigate to the Administration - Application screen, then the System Preferences view.
Select the record with the PUB Appeal Case Snapshot Type system preference name.
Change the System Preference Value field as follows:
To set up an XML format in snapshot files, enter XML.
The default value for this field is XML.
To set up a BIP format in snapshot files, enter BIP.
To implement your change, re-start the Siebel Server.
Setting Up Format for BIP Reports
If Oracle Business Intelligence is integrated with Siebel Public Sector, then administrators can set up a BIP (Business Intelligence Publisher) format for this snapshot file. BIP formats include PDF, HTML, and Microsoft Word.
To set up a format for the BIP report
Navigate to the Administration - BI Publisher Reports screen, then the Reports - Standard Templates view.
Select the record with Appeal Report in the Report Name field and AppealsReport in the Template field.
In the Output Type field, select a format for the BIP report.
Click Upload Files.
Changing Fields in Snapshot Files for Appeal Cases
In the preconfigured Siebel Public Sector application, the Appeal Case integration object determines the fields that appear in the snapshot files for appeals. To change these fields, administrators can create a new integration object that contains the appropriate fields. Then they can designate this new integration object in selected user properties for the appropriate case types in the HLS Case business component.
After administrators complete the procedure in this topic, they must complete additional tasks. For information about these additional tasks, see Configuring Snapshot Files for Appeal Cases.
This task is a step in Process of Configuring Appeal Cases.
To change the fields in snapshot files for appeal cases
Log in to Siebel Tools or Web Tools as an administrator and create a new workspace.
Select Integration Object in the Object Explorer, and select the Appeal Case integration object.
Copy the Appeal Case integration object, rename the copied integration object, and the change the integration components and fields to designate the fields that you want to appear in snapshot files for appeal cases.
Navigate to Business Component, and select the HLS Case business component.
Lock this business component so that you can change it.
Navigate to Business Component, then Business Component User Prop.
For the case types that are applicable to the new integration object, change the following user properties:
For the applicable Appeal Case IO for: Case Type user properties, change the value to the name of the new integration object.
For the corresponding Appeal Case Report Name for: Case Type user properties, change the value to the name of the report. This step applies only to BIP (Business Intelligence Publisher) snapshot files.
Deliver the changes to the Integration Branch.
Unlock the business component.
Configuring Snapshot Files for Appeal Cases
After administrators change the fields in BIP (Business Intelligence Publisher) snapshot files for appeal cases, they must complete additional tasks. General information about these tasks follows. For more detailed information about these tasks, see Siebel Reports Guide.
This task is a step in Process of Configuring Appeal Cases.
To configure snapshot files or appeal cases
Generate a sample XML data file for the snapshot file.
After administrators change the fields in XML snapshot files for appeal cases, they must complete this task.
Use Oracle Business Intelligence Publisher Add-in for Microsoft Word to configure the layout template for the BIP snapshot file.
For more information about configuring report templates, see Business Intelligence User Guide, which is available from the application menu in the add-in application. (Select Start, Programs, Oracle BI Publisher Desktop, and then BI Publisher User Guide.)
Register the layout template for the BIP snapshot file.
Make sure that you select the same report name and integration object that you designate when you change the user properties for the HLS Case business component. For more information, see Changing Fields in Snapshot Files for Appeal Cases.
Associate the registered BIP snapshot file with the Attachments view for evidence records in cases.
Setting Up Quality Assurance Templates
Administrators must set up the templates that agents use as a guideline to review cases. These templates determine the specific items in cases that agents must review for purposes of quality assurance. These quality assurance reviews determine whether the case is processed according to agency procedures and governmental regulations.
After agents use a template to review cases, an administrator can change that template. However, this changed template does not apply to the previous agent reviews. After an agent uses a quality assurance template, an administrator cannot delete that template. (The trash can icon for the template and the template items become disabled.)
This task is a step in Roadmap for Administering Benefits Cases.
To set up a quality assurance template
Navigate to the Administration - Case screen, then the Quality Assurance Templates view.
In the Quality Assurance Templates list, create a new record, and complete the fields as appropriate.
The following table describes some of the fields.
Field Description Template Name
Type the name of the template.
Case Type
Select the type of benefits or immigration program applicable to the case. For cases that are automatically created from applications submitted on a self-service Web site, this field in the case has a value of Other, but agents can change this value. Additional values include Food Stamps, Medical Assistance, Cash-Financial Assistance, Child Care, Unemployment, Visa, Passport, and Citizenship.
After an agent uses this template to review completed cases, you cannot change this field. (This field becomes read-only.)
Description
Type a description of the purpose of the template.
Active
Select this check box to indicate that agents can select this template when they review cases.
In the Quality Assurance Items list that appears after the Quality Assurance Templates list, add the case items that the agent must review.
Note: If you do not add items to the template, then agents cannot select the template in the Template Name field of the QA Plans view.The following table describes some of the fields.
Field Description Order
Type a number for this item. When an agent uses this template, this field indicates the order in which this item appears relative to the other items in the template.
Name
Type the name of the item that the agent must review when using this template.
Description
Type a description of the item.