3Fundamentals of Creating SmartScripts
Fundamentals of Creating SmartScripts
This chapter describes the fundamentals of creating SmartScripts. It includes the following topics:
About SmartScript Elements
Questions are the main element or object inside a SmartScript and include such attributes as answers and data indicating how a question is displayed. Questions are joined together with branches. Groups of questions are contained inside pages. Scripts are the broadest element and contain groups of pages. Every aspect of each script element—from text properties, to branches, to events invoking related views in your Siebel application—can be modified without affecting the other elements.
SmartScript also contains event handlers that support Siebel VB and Siebel eScript methods and interactions with outside processes. For more information, see Extending Scripts with Siebel VB and Siebel eScript.
The following figure displays each script element and its place within the hierarchy of elements.
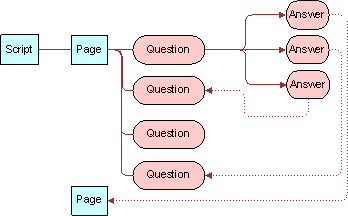
The following table describes each script element in more detail.
Table SmartScript Elements
| Element | Description |
|---|---|
Scripts |
Scripts are the highest-order containers of script elements.
Note: Both conceptually and procedurally, the process of defining a script and adding pages to it closely resembles the process of creating a page and adding questions to that page.
|
Pages |
Pages are groups of questions that are displayed together in a view when a script is executed. Pages must contain related questions, and questions must proceed in the order required by the workflow. Because pages are stored separately from the script itself, they can be used more than once in a script and can be used in multiple scripts. |
Questions |
There are two forms of question script elements:
|
Answers |
Answers are script elements that represent answers to questions. Answers appear as data entry fields or as one of several types of UI elements including check boxes, drop-down lists, or picklists. Questions and answers are linked by a one-to-many relationship. |
Branches |
Branches are transfers of control inside a SmartScript that determine the display sequence of pages or questions. All movement within a script must be explicitly defined using branches. There are two types of branches in SmartScript: script branches and page branches. Script branches transfer control from a question in one page to a question in another page, while page branches transfer control from one question to any other question within a single page.
Note: Page branches override script branches.
Most SmartScripts contain questions with multiple mutually exclusive answers. For example, a question might ask whether a customer is making a deposit to, rather than a withdrawal from, an account. The possible answers require different subsequent questions. Therefore, you must create a separate branch for each possible answer. At other times, a SmartScript user might need to interrupt the expected flow of a script. For example, if a loan agent makes a call to offer a credit card but discovers that the target works for a competing bank, it makes no sense to continue with the standard script; end the call as quickly, and as smoothly as possible by branching to the end of the script.
Caution: There are no built-in safeguards to prevent you from creating branches that result in closed loops of questions. Therefore, you must test all your branches to be sure that they have an exit.
|
About Data Storage in Siebel SmartScript
You can store answers gathered using SmartScripts in a number of ways. You also have the option of not storing questions at all. Storage methods are listed as follows:
In a generic answer table. This table is always available without further configuration. This storage method is particularly useful when data is to be summarized later through an external system. Data stored in answer tables can be extracted for external processing by using the Siebel Enterprise Integration Manager. For more information, see Siebel Enterprise Integration Manager Administration Guide.
In a particular business component field. For more information, see Configuring Siebel Business Applications.
If a script’s Save Session parameter is set to Finished, Always, or Finished/Timeout Save, and a question’s Save Answer Table check box is selected, the script session information, including the questions and answers, can be viewed in the Script Sessions view of the Administration - SmartScript screen.
Store answers in the business component fields when the SmartScript is collecting data that is represented in the system's business objects. For example, the caller information collected during a script-controlled transaction must result in a new or updated record in the Contact business component.
Questions that accept answers, but do not store them, can be used to determine which branch to follow. For example, a consumer information center might supply both information about rebate offers and answer questions about product safety. The question of which of these topics is the reason for a call might not be relevant to the particular call record, but the answer probably determines which pages of the script must be displayed.
Viewing SmartScripts
This topic describes how to view SmartScripts in an employee application, or as an administrator.
To view saved SmartScripts in an employee application
From the employee application home page, navigate to SmartScripts screen > My Saved Sessions view.
The list of saved SmartScript sessions for the employee appears.
To view saved SmartScripts as an administrator
Navigate to Administration SmartScript screen > Script Sessions view.
You can restart a script from this view that has been saved using the Finish Later button. If the contact ID is set during the script, it is saved in the script sessions table. As a result, a script session can be viewed because of its association with a contact in the Contacts screen.
Guidelines for Creating SmartScripts
Create all your questions and answer elements first, then create the structure of your script. Perform these steps in the following order:
Understand your business scenario, and map out your design.
Create questions and translations. For more information, see About Creating Questions.
Create answers. For more information, see Creating Answers.
Create pages.
Create the script.
Add questions to pages.
Add pages to the script.
For more information, see the following topics:
Script Design Tips
While detailed script design is outside the scope of this guide, use the following general guidelines when you create scripts:
Use a conversational writing-style that seems to be part of a natural dialogue between the agent and an interested customer or prospect.
Use a flexible script that allows the agent to respond to unforeseen questions, comments, and objections.
Use a general script that addresses the needs of all potential customers or prospects, without forcing them into preexisting categories that might not match their needs.
Creating Pages
You create pages in the Pages view of the Administration - SmartScript screen.
To create a page
Navigate to Administration - SmartScript screen > Pages view.
Create a new record.
Enter the name of the page in the Names field.
In the First Question field, select the question that you want to appear first on the page.
Translating Pages
Page translations are titles shown in specified languages for the individual page tabs displayed in the SmartScript agent’s view. Page translations must be specified for all languages in which the script runs.
To create a translation for a page title
Navigate to Administration - SmartScript screen > Pages view.
In the Pages list, select the page you want to translate.
Click the Translations view tab and create a new record.
In the Language field, select a language.
In the Label field, enter the translation of the page’s title.
Creating Scripts
A script is the root element of a SmartScript. Scripts contain pages that contain questions. Questions contain question translations and answers. Branches between elements define the structure of the script within which the elements appear. You create scripts in the Administration - SmartScript view.
To create a script
Navigate to Administration - SmartScript screen > Scripts view.
Create a new record, and complete the necessary fields.
Some fields are described in the following table.
Field Description Script
Enter a name for the script.
Type
Select the script type to limit the SmartScripts that display in particular applications. For example, the scripts that Self Service uses must be of type Instructions or Troubleshooting.
First Page
Select the first page to appear in the script. Alternatively, you can create a new first page from the Pick Page dialog box that appears.
Save Session
Select one of the following values:
Always
The session record and answers are saved whether the script is completed normally or canceled.
Finished
The session record and answers are saved only when the script is completed normally, and the agent clicks Finish. This is the default setting.
Finished/Timeout Save
The session record and answers are saved when the script is completed normally and the agent clicks Finished or when the session times out.
Never
The session record and answers for the script are never saved.
Note: Only answers to questions that are marked Save Answer Table are saved.Jumping Allowed
Allows users to navigate in any order through the script using the SmartScript explorer or the Previous button.
Business Component
SmartScripts to be invoked from the Script button on the Account, Contact, or Opportunity screens must have this field set to one of those business components. When the Script button is selected, the SmartScript that has the BusComp value equal to the business component of the current applet invokes automatically.
Description
A description of the SmartScript. You can use this description to build indices of SmartScripts.
Estimated duration
Reference field for how long a script is expected to take to complete.
Duration In
Units for the estimated duration.
Organization
Specify the organization whose members have access to the script.
On Cancel Go to View
View to go to when the Cancel button is selected.
On Finish Go to View
View to go to when the Finish button is selected.
If you define views in the GotoView method for the Script_Finish event, make sure that the event logic accommodates the view that you designate in this field. For example, the Script_Finish event might facilitate navigation to different views based on different conditions. If none of the conditions exist, then the event can facilitate navigation to the view that you designate in this field. If a conflict exists between the view that you designate in this field and the view that the Script_Finish event designates, the view that you designate in this field is in effect.
Create translations for the script title as described in Translating Scripts.
Attach other pages to the script as described in Adding Pages and Branches to Scripts.
Translating Scripts
Script translations are translations to different languages of the individual Script titles displayed the SmartScript screen.
To create a translation for a script title
Navigate to Administration - SmartScript screen > Scripts view.
Select the script whose title you want to translate.
Click the Translations view tab, create a new record, and complete the necessary fields as described in the following table.
Field Description Language
Select a language.
Label
Enter the translation of the script title.
Dashboard Text
Enter the text and parameters to appear in the dashboard. For more information, see Modifying the Customer Dashboard.
Note: The Customer Dashboard is available only in employee applications.Released
The value in this field is generated by the application when you release a script. If the check box is selected, it indicates that the translation and its associated script have been released. For more information, see About Releasing SmartScripts.
Date
The value in this field is generated by the application when you release a script. It indicates the date when the translation and its associated script were released. For more information, see About Releasing SmartScripts.
About the Script Designer and Page Designer
Use the Script Designer and Page Designer to create scripts using a graphical user interface (GUI).
The SmartScript Script Designer and the SmartScript Page Designer screens are similar. The Designer view workspace appears towards the end of both screens. The palette provides page or question icons (depending on which designer view) and branch icons in both views that allow you to join the different elements. You drag script elements onto the workspace to create your scripts. A list of pages appears on the Page Designer screen while the SmartScript Script Designer screen displays a form with details of the current script.
After you drag an element into the workspace, you can move it to any location. Pages and questions are connected with branches by dragging the branch into the designer and making sure the ends of the branch connect to the connection points on the question or page node. A connection is made when the branch and node connect to display a large box. In the workspace, you can double-click pages or questions that have branches to or from them. Double-clicking on a page in the Script Designer takes you to the Page Designer, where you can further define the page. Double-clicking on a question in the Page Designer takes you to the SmartScript Question Administration view, where you can further define the question. You can double-click branch icons to change the question from which it is branching. (To change the question to which a branch is pointing, you must disconnect the branch, and reconnect it.)
The four points displayed on each element icon on the workspace are called connection points. Use the connection points to attach branches to elements. From the shortcut menu (right-click) you can add points to a branch. You can drag the points on branches to reshape the branch. This feature is useful when two branches are overlaying each other in the workspace.
In the workspace, the shortcut menu (right-click) provides changes to the way the designer is viewed, such as zoom, and persists until you navigate to another view. These options are described in the following table.
Table Script Designer and Page Designer Shortcut Menu
| Shortcut Menu | Description |
|---|---|
Edit |
Allows you to perform the following edits on elements in the workspace:
|
Layout |
Allows you to perform the following edits on elements in the workspace:
|
Zoom |
Zooms the workspace in or out by selected percentages. |
Connection Points |
Turns the connection points displayed on elements on and off. |
Show Grid |
Turns the grid on and off. |
Snap to Grid |
Aligns elements with the grid lines during a move. |
Autosize |
Extends the workspace after you drag an object to the extent of the workspace. |
Adding Questions and Branches to Pages
You can add questions and branches to pages to design the flow for the page. You can add each question or branch element using the drag-and-drop (copy and paste) GUI of the Page Designer.
To add questions and branches to a page
Navigate to Administration - SmartScript screen > Pages view.
Select a page to which you want to add questions.
Click the Designer view tab.
Note: If you arrived at this view from the Script Designer, the page you double-clicked is already selected in the Pages list applet.Copy and paste the question icon from the Page Designer palette to the workspace.
The Pick Question dialog box appears.
Select a question from the list, and click OK.
Repeat Step 4 and Step 5 to add another question.
Drag a branch icon from the palette to connect these two questions with a branch.
Align the arrowless end of the branch with a connection point on the question from which you want to branch.
If you select a question with multiple answers, SmartScript gives the option to select an answer for the branch to use or a default branch. A default branch covers the case when a user’s answer is not covered by another branch. If you choose not to create a default branch, SmartScript requires you to choose an answer to branch from.
Drag the arrow end of the branch to align it with a connection point on the question to which you want to branch.
To view the branches within a page
Navigate to Administration - SmartScript screen > Pages view.
Click the Branches view tab, and select All Branches from the Visibility filter.
The Branches list appears, displaying all branches within the page.
Adding Pages and Branches to Scripts
Adding pages to scripts involves a nearly identical process to adding questions to pages as described in Adding Questions and Branches to Pages.
To add pages and branches to a script
Navigate to Administration - SmartScript screen > Scripts view.
Select the script into which you want to add or modify pages.
Click the Designer view tab.
The workspace for the selected script appears.
Drag the page icon from the Script Designer palette to the workspace.
The Page Pick dialog box appears.
Select a page name, and click OK.
To add branches to a script
Drag the branch icon from the Script Designer palette to the workspace, and align the arrowless end of the branch with a connection point on the page from which you want to branch.
The Pick Question dialog box appears.
Select a question from the list, and click OK.
Drag the arrow end of the branch to align it with a connection point on the page to which you want to branch.
The Pick Question dialog box appears.
Select a question from the list and click OK.
To continue adding the required branches and pages to the script, repeat Step 1 to Step 4
.
To view the branches between pages
Navigate to Administration - SmartScript screen > Scripts view.
Click the Branches view tab, and select All Branches from the Visibility filter.
The Branches list appears and displays all branches between the pages in the script.
Use this list to make sure that all the necessary branches have been added.
About Releasing SmartScripts
After you have completed and tested your script, you are ready to release it. Though it is optional to release a script, it is recommended to release it to improve its loading speed. It is also recommended that you release scripts if you intend to save a script during execution and resume its execution at a later time. If you do release the script, it will not be possible to resume it from a saved session.
Release scripts only when you are ready for production. Otherwise, you must release scripts again after each change made so that the change is visible when testing.
Releasing a script saves a precompiled version of the SmartScript definition and all the associated code (VB or eScript). Releasing a script saves the release-compiled script to a file on the file system. It also updates the SmartScript definition to indicate that a release file exists and creates a pointer to the release file in its server location.
When a user invokes a released script, the SmartScript engine looks for a release copy of the script on the server. If the SmartScript engine does not find a release copy of the script on the server, it copies a release copy of the script from the file system to the server and then executes the script from there. If a released version of the script does not exist on either the server or the file system, an error is generated. If a script is not released, Siebel SmartScript must compile and execute the script from the server, which causes the script to load more slowly.
When you release a script, you must select the translation of the script that you want to release. If a script has multiple translations, you must release each translation individually.
About the Release Process
The following is an overview of the release process and how it works in your environment:
The released file is created and put on the Siebel File System under the Siebel File System root directory; no subdirectory exists. This released file is saved as a SAF file, which is compressed in the same manner as all the other Siebel File System files are compressed.
If a client starts the SmartScript, the compiled version is downloaded from the Siebel File System to the following directory on the server machine:
[siebsrvrdir]\ServerDataSrc\files\sscript directoryThe file is renamed as .ssc file.
If a client starts the SmartScript again, the file is read from server machine without accessing FileSystem.
Releasing Scripts
This topic describes how to release a script.
To release a script
Navigate to Administration - SmartScript screen > Scripts view.
Select the script you want to release.
Click the Translations view tab and select the translation you want to release.
From the Scripts menu click Release.
After a script is released, a check mark appears in the Released field of the translation record.
Deleting the Released Version of a Script
Deleting the released version of a script erases the pointer to the script file. Each subsequent execution of the script is compiled from the database every time you run the script. This mode is the same as the development mode.
To delete the released version of a script
Navigate to Administration - SmartScript screen > Scripts view.
Select the script that you want to delete.
Click the Translations view tab, and select the translation you want to delete.
From the Scripts menu, select Unrelease.
The released version of the script is deleted.