Configuring Workstation Translations
Configuring Translations for Required Files
-
OPS Text
-
POS Core Text
-
Payment Cash
To configure translated text files for required files:
-
Select the Enterprise, click Setup, and then click Languages.
-
Double-click the appropriate language record to open it.
-
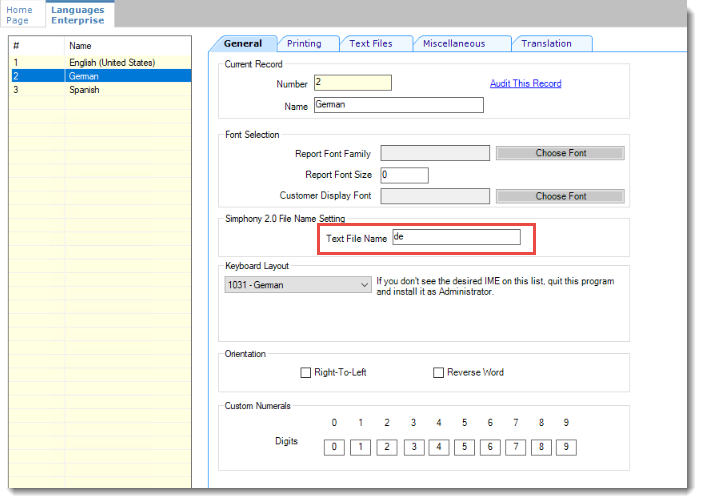
Click the General tab, and apply the appropriate language abbreviation in the Text File Name field. Refer to the table of standard language abbreviations below these steps as an example.
Figure 9-1 General Tab

-
Click Save to complete. If you are using an Android client or a non-standard language (e.g. any language other than the 20 standard languages that are included with Simphony), proceed to the following steps.
-
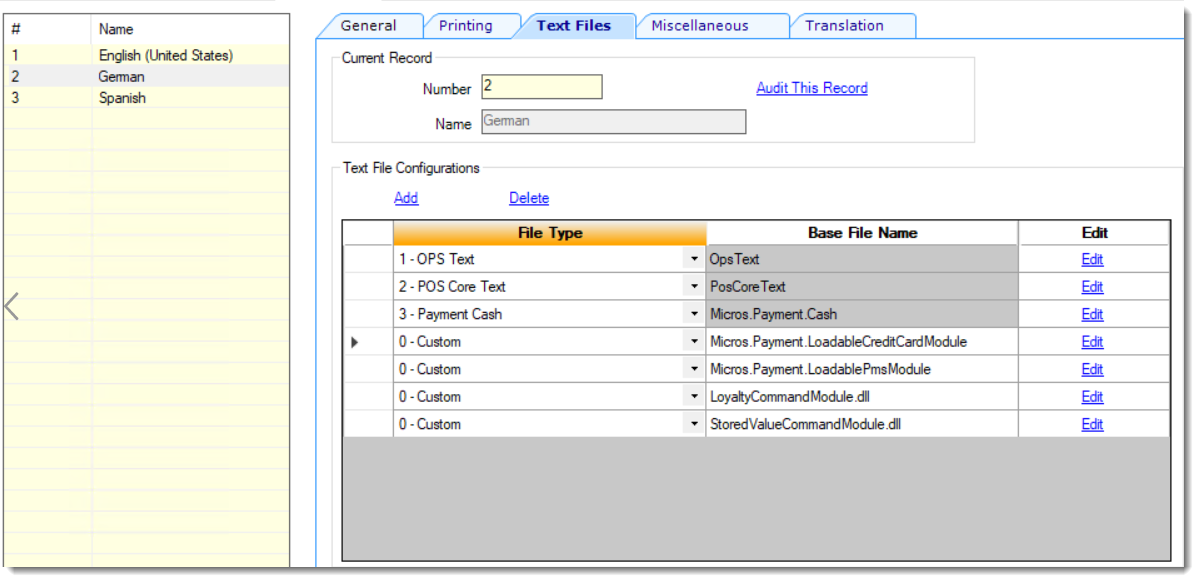
Click the Text Files tab.
Figure 9-2 Text Files Tab

-
Click the Add link in the Text File Configurations section, and then select the desired file type from the File Type drop-down list.
-
Click the Edit link, and then click the Import from a file link.
-
Browse to the
[Drive Letter]:\MICROS\Simphony2\Tools\Translationsfolder, and then select the file corresponding to your language. Use following sample German translation text file names as an example:-
For an OPS Text file, select OpsText_de.xml to translate to German.
-
For a POS Core Text file, select PosCoreText_de.xml to translate to German.
-
For a MICROS Payment Cash file, select MicrosPaymentCash_de.xml to translate to German.
-
-
Click Open, click OK, and then click Save.
Note:
Text files uploaded to EMC are available to use for all client types.Table 9-4 Sample Translation Files and Used Abbreviations for Language Settings
| Language | Sample OpsText Filename | Abbreviation |
|---|---|---|
|
English |
OpsText.xml |
No Abbreviation |
|
German |
OpsText_de.xml |
de |
|
Spanish |
OpsText_es.xml |
es |
|
Italian |
OpsText_it.xml |
it |
|
French |
OpsText_fr.xml |
fr |
|
Danish |
OpsText_da.xml |
da |
|
Dutch |
OpsText_nl.xml |
nl |
|
Arabic |
OpsText_ar.xml |
ar |
|
Portuguese |
OpsText_pt.xml |
pt |
|
Finnish |
OpsText_fi.xml |
fi |
|
Japanese |
OpsText_ja.xml |
ja |
|
Korean |
OpsText_ko.xml |
ko |
|
Norwegian |
OpsText_no.xml |
no |
|
Portuguese (Brazil) |
OpsText_pt_BR.xml |
pt_BR |
|
Russian |
OpsText_ru.xml |
ru |
|
Swedish |
OpsText_sv.xml |
sv |
|
Thai |
OpsText_th.xml |
th |
|
Turkish |
OpsText_tr.xml |
tr |
|
Chinese (Simplified) |
OpsText_zh_CN.xml |
zh_CH |
|
Chinese (Traditional) |
OpsText_zh_TW.xml |
zh_TW |
Configuring Translations for Custom Files
The following steps are required only for Android clients and non-standard language users.
-
Micros.Payment.LoadableCreditCardModule
-
Micros.Payment.LoadablePmsModule
-
LoyaltyCommandModule.dll
-
StoredValueCommandModule.dll
To configure translated text files for custom files:
-
Select the Enterprise, click Setup, and then click Languages.
-
Double-click the appropriate language record to open it.
-
Click the General tab and set the language abbreviation. Refer to Step 3 from the previous section, if you have not set your language abbreviation.
-
Click the Text Files tab.
-
Click the Add link in the Text File Configurations section, and then select 0 – Custom from the File Type drop-down list.
-
Click the Edit link, and then click the Import from a file link. For standard language users, Simphony's preset translation files are automatically sent through the Service Host Download package.
-
Browse to the
[Drive Letter]:\MICROS\Simphony2\Tools\Translationfolder, and then select the desired custom text file corresponding to your language.For example, if you are adding a translation text file for StoredValueCommandModule.dll, browse to that folder in the Translations folder, and select the desired language. Use following sample German translation text file name as an example:-
StoredValueCommandModule.dll_de.xml
-
-
Click Open, and then click OK.
-
Repeat Steps 3 through 5 for each custom file.
-
Click Save.
Configuring Translation Files for Non-Standard Languages
The following steps apply to users who need to create a translation file for a non-standard language (e.g. any language other than the 20 standard languages that are included with Simphony).
-
Select the Enterprise, click Setup, and then click Languages.
-
Create a custom language record by clicking the Add icon in the toolbar. Click OK to save the custom language record.
-
Click the General tab and set the language abbreviation in the Text File Name field. Refer to this site and find the appropriate language abbreviation in the ISO 639–1 column.
-
Click the Translation tab and select the desired Text File Type.
-
In the Translated Text column of the Text Elements section, manually translate each text element listed in the desired language. For example, if the non-standard language is Czech, manually translate each text element to its Czech equivalent.
-
After translating each text element, click Export to a File in the Text File section. The custom text file name is automatically generated from the text in the Text File Name field of the General tab. For example, when setting up a translation file for OPS Text in Czech, the file name displays as OpsText_cz.xml if the abbreviation was set to cz.
-
Navigate to the appropriate text file type folder, click Save, and then click OK.
-
The non-standard language translation file is now available for use when adding and importing in the Text Files tab.