Configuring Screen Look Ups for Menu Items
You can assign each menu item definition to a maximum of 8 different SLUs in table view of the Menu Item Maintenance module. Assigning multiple SLUs to a menu item allows flexibility in building POS client pages that are customized to use dine in, take away, and carry out, and shows the menu items supported by the order type.
- Select the Enterprise, property, revenue center, or zone, click Descriptors, and then click Menu Item.
- Insert a new record, enter a name for the menu item screen look up (for example, Breakfast) in the Record Name field, and then click OK.
- Repeat Step 2 to add more SLUs, and then click Save.
- Select the Enterprise, property, revenue center, or zone, click Configuration, and then click Menu Item Maintenance.
- To assign a SLU, click the ellipsis point (...) button adjacent to the menu item First Name, select the SLU, and then click OK.
To assign another SLU to the menu item, select the SLU from the SLU 2 column. You can assign up to 8 SLUs per menu item. Duplicate SLUs do not appear on the same workstation page.
- (Optional) To assign a SLU sort priority:
- Double-click a menu item, and then click General.
- Select the relevant SLU from the Touchscreen Properties section.
Use the SLU 2, SLU 3, and so on for multiple SLUs.
- Enter a SLU Sort Priority (between 1-99) for the menu item.
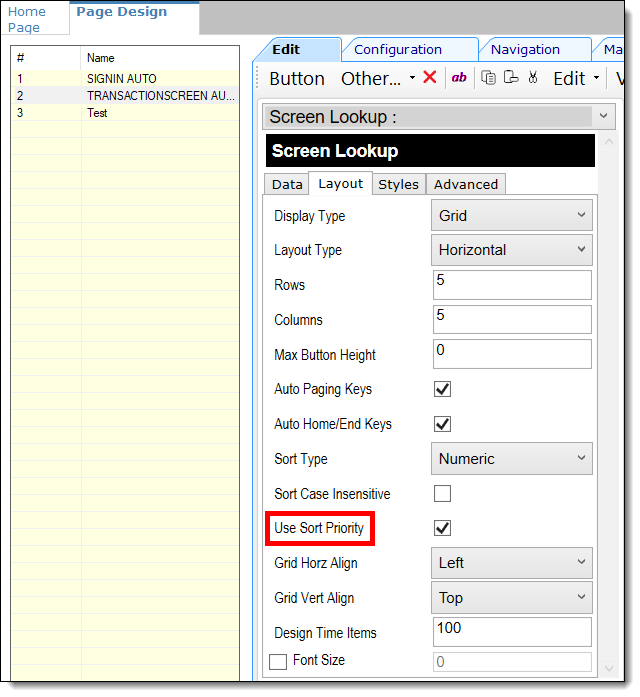
Use this field when Page Design Layout option, Use Sort Priority, is enabled from the Screen Lookup settings. When configured, menu items with Sort Priority 1 appear on the screen first, followed by menu items with Sort priority 2, and so on up to Sort Priority 99, and then finally Sort Priority 0 items.
Figure 25-1 Page Design Screen Lookup (SLU) Layout Settings

- Select the Enterprise, property, revenue center, or zone, click Configuration, and then click Page Design.
- Double-click the transaction page on which you want the screen look up to appear on the workstation.
- Click Other in the Page Design toolbar, and then click Sales SLU.
- Select Menu Item from the Type drop-down list, select SLU as the Property, and then select the menu item screen lookup as the Value.
- Select the Menu Item Display Name, and then click Save.
- If the revenue center uses hand held POS client devices:
- Select Dynamic SLU as the Property, and then select a menu item screen look up group as the SLU Value.
- Enter a non-zero value for the Visual State(s).
The application uses the Visual State value to link menu item screen look ups with their corresponding Visual State buttons, which workstation operators use to change the menu items that appear in the Dynamic SLU.
- To add more screen look ups to the Dynamic SLU, click Add.
- Select the Menu Item Display Name, and then click Save.
- Insert buttons for each screen look up that you added to the Dynamic SLU.
For example, if you added five screen look up groups to the Dynamic SLU, insert five buttons.
- Select Function from the Type drop-down list, and then select Visual State from the Function list.
- In the Arguments field, enter the Visual State value that you assigned to a screen look up group in Step 12-b.
- Click Save.