Configure SSL for Oracle Access Management 12c
Introduction
This tutorial shows you how to configure SSL for the Oracle Access Management 12c domain.
This is the sixth tutorial in the series Getting Started with Oracle Access Management 12c. Read them sequentially.
- Getting Started with Oracle Access Management 12c Series - Overview
- Install Oracle Database for Oracle Access Management 12c
- Create an Oracle Database for Oracle Access Management 12c
- Install Oracle Access Management 12c
- Configure Oracle Access Management 12c
- Configure SSL for Oracle Access Management 12c
- Configure Oracle Unified Directory for Oracle Access Management 12c
- Install and Configure Oracle HTTP Server for Oracle Access Management 12c
- Create and Configure a WebGate
- Protect an Application Deployed in WebLogic Server with Oracle Access Management 12c
Objective
To configure SSL for the Oracle Access Management 12c domain.
Prerequisites
- To have followed Configure Oracle Access Management 12c
- OpenSSL 1.0.2 or later. This is only required if you need to generate your own Certificate Authority for testing purposes.
Create Keystores and Certificates
Create a Java Keystore
-
Launch a terminal window as
oracleand run the following command to create a java keystore:mkdir /u01/app/oracle/admin/domains/oam_domain/keystore cd /u01/app/oracle/admin/domains/oam_domain/keystore keytool -genkey -alias <alias> -keyalg RSA -keysize 2048 -sigalg SHA256withRSA -dname <dn> -keypass <password> -keystore <keystore> -storepass <password>For example:
mkdir /u01/app/oracle/admin/domains/oam_domain/keystore
cd /u01/app/oracle/admin/domains/oam_domain/keystore
keytool -genkey -alias server_cert -keyalg RSA -keysize 2048 -sigalg SHA256withRSA -validity 36500 \
-dname "CN=oam.example.com,OU=Security,O=Example Company,L=Redwood Shores,ST=California,C=US" \
-keypass <password> -keystore oam_keystore.jks -storepass <password>
Replace
<password>with a password of your choice.Note:
CN=oam.example.comshould be set to the host.domain of the server where OAM is installed.Make note of the values for
-alias,-keystore,-keypass, and-storepassas these are used later in this tutorial.
Create a Certificate Signing Request
-
Create a Certificate Signing Request (CSR) using the following command:
keytool -certreq -v -alias <alias> -file <filename> -sigalg SHA256withRSA -keypass <password> -storepass <password> -keystore <keystore>For example:
keytool -certreq -v -alias server_cert -file server.csr -sigalg SHA256withRSA -keypass <password> -storepass <password> -keystore oam_keystore.jksMake sure you use the same
-alias,-keypassandstorepassfrom Step 1.Note: If you see the
Warning: The JKS keystore uses a proprietary formatin this or subsequents steps you can ignore this error.The output should look similar to the following:
Certification request stored in file <server.csr>
Submit this to your CA
The CSR should look similar to the following:
$ cat server.csr -----BEGIN NEW CERTIFICATE REQUEST----- MIIC+DCCAeACAQAwgYIxCzAJBgNVBAYTAlVTMRMwEQYDVQQIEwpDYWxpZm9ybmlh MRcwFQYDVQQHEw5SZWR3b29kIFNob3JlczEYMBYGA1UEChMPRXhhbXBsZSBDb21w etc... rhEZEIfvX7jTu6b9Vxy2/RR2sYpQpOlKVMWqBdA1E8UdWaFDXtTOAC+d1FcUrZPw XybKIozSa3lCW+pJ/HCNN30qWiA3Pb76Vi+hlicgXPcUZeYcN2xNM5VXLzY= -----END NEW CERTIFICATE REQUEST----- -
The CSR should be sent to a Certificate Authority (CA) of your choice in order to generate a certificate. The CA should send back the server certificate and root CA certificate(s) that signed the certificate. For the purposes of this tutorial the certificates returned are saved as
server.crtandca.crtfor the server certificate and CA certifcate respectively.Note: If you do not have a CA you can generate your own for testing purposes. Instructions on how to do this are in the next section.
-
Once the certificates are recieved copy them to the
/u01/app/oracle/admin/domains/oam_domain/keystoredirectory.
Create a Certificate Authority and Generate the Server Certificate
Note: This section should only be followed if you do not have a Certificate Authority (CA) and need to generate your own CA for testing purposes.
-
Create a working directory to create the CA files, for example:
/stage/ssl:mkdir /stage/ssl cd /stage/ssl -
Generate a 4096-bit private key (
ca.key) for the root Certificate Authority (CA):openssl genrsa -out ca.key 4096The output will look similar to the following:
Generating RSA private key, 4096 bit long modulus ................................................................................................................................................++ .....................++ e is 65537 (0x10001) -
Create a self-signed root CA certificate (
ca.crt):openssl req -new -x509 -days 3650 -key ca.key -out ca.crtWhen prompted enter the details to create your CA. For example:
You are about to be asked to enter information that will be incorporated
into your certificate request.
What you are about to enter is what is called a Distinguished Name or a DN.
There are quite a few fields but you can leave some blank
For some fields there will be a default value,
If you enter '.', the field will be left blank.
-----
Country Name (2 letter code) [XX]:US
State or Province Name (full name) []:California
Locality Name (eg, city) [Default City]:Redwood City
Organization Name (eg, company) [Default Company Ltd]:Example Company
Organizational Unit Name (eg, section) []:Security
Common Name (eg, your name or your server's hostname) []: Example Company Certificate Authority
Email Address []:
No output is returned to the screen.
-
Use the CA to generate a certificate from the CSR created in the previous section:
openssl x509 -req -days 36500 -in /u01/app/oracle/admin/domains/oam_domain/keystore/server.csr -CA ca.crt -CAkey ca.key -set_serial 01 -out server.crtThe output will look similar to the following:
Signature ok subject=/C=US/ST=California/L=Redwood Shores/O=Example Company/OU=Security/CN=oam.example.com Getting CA Private Key -
Copy the
server.crtandca.crtto the/u01/app/oracle/admin/domains/oam_domain/keystore/directory:cp server.crt ca.crt /u01/app/oracle/admin/domains/oam_domain/keystore/
Import the certificates into the keystore
-
Run the following command to import the certificates into the keystore:
cd /u01/app/oracle/admin/domains/oam_domain/keystore/
keytool -import -v -noprompt -trustcacerts -alias <alias> -file <rootca_file> -keystore <keystore> -storepass <password>
For example:
keytool -import -v -noprompt -trustcacerts -alias rootcacert -file ca.crt -keystore oam_keystore.jks -storepass <password>The output will look similar to the following:
Certificate was added to keystore [Storing oam_keystore.jks]Note: If your CA has more than one CA certificate in the chain, then you must repeat the above for each certificate using a different alias each time. For example:
keytool -import -v -noprompt -trustcacerts -alias rootcacert2 -file ca2.cer -keystore oam_keystore.jks -storepass <password> -
Import the Server Certificate into your keystore by running the following command:
keytool -import -v -alias <alias> -file <server_cert_file> -keystore <keystore> -keypass <password> -storepass <password>For example:
keytool -import -v -alias server_cert -file server.crt -keystore oam_keystore.jks -keypass <password> -storepass <password>The output will look similar to the following:
Certificate reply was installed in keystore [Storing oam_keystore.jks] -
View the contents of the keystore by running the following command:
keytool -list -v -keystore oam_keystore.jks -storepass <PASSWORD>The output will look similar to the following:
Keystore type: JKS
Keystore provider: SUN

Your keystore contains 2 entries

Alias name: rootcacert
Creation date: Jun 1, 2022
Entry type: trustedCertEntry

Owner: CN=Example Company Certificate Authority, OU=Security, O=Example Company, L=Redwood City, ST=California, C=US
Issuer: CN=Example Company Certificate Authority, OU=Security, O=Example Company, L=Redwood City, ST=California, C=US
Serial number: c3ed8cc19663b1c5
Valid from: Wed Jun 01 09:44:06 GMT 2022 until: Sat May 29 09:44:06 GMT 2032
Certificate fingerprints:
	    SHA1: 5F:F8:C0:B9:CE:1C:75:85:04:C0:23:D0:63:5E:CC:3B:B4:1F:13:B6
	    SHA256: BA:8B:9E:E2:16:BD:59:EF:BC:77:4D:10:F7:9C:D3:7B:A6:77:B7:CF:8F:E3:DB:14:44:1E:75:5E:BD:A8:A0:28
Signature algorithm name: SHA256withRSA
Subject Public Key Algorithm: 4096-bit RSA key
Version: 3

Extensions:

#1: ObjectId: 2.5.29.35 Criticality=false
AuthorityKeyIdentifier [
KeyIdentifier [
0000: FD D2 44 11 5F BE 18 12   59 A0 2B 89 37 68 E2 2D  ..D._...Y.+.7h.-
0010: 5D 00 D3 5D                                        ]..]
]
]

#2: ObjectId: 2.5.29.19 Criticality=false
BasicConstraints:[
  CA:true
  PathLen:2147483647
]

#3: ObjectId: 2.5.29.14 Criticality=false
SubjectKeyIdentifier [
KeyIdentifier [
0000: FD D2 44 11 5F BE 18 12   59 A0 2B 89 37 68 E2 2D  ..D._...Y.+.7h.-
0010: 5D 00 D3 5D                                        ]..]
]
]

 *******************************************
 *******************************************

Alias name: server_cert
Creation date: Jun 1, 2022
Entry type: PrivateKeyEntry
Certificate chain length: 2
Certificate[1]:
Owner: CN=oam.example.com, OU=Security, O=Example Company, L=Redwood Shores, ST=California, C=US
Issuer: CN=Example Company Certificate Authority, OU=Security, O=Example Company, L=Redwood City, ST=California, C=US
Serial number: 1
Valid from: Wed Jun 01 10:28:02 GMT 2022 until: Fri May 08 10:28:02 GMT 2122
Certificate fingerprints:
	    SHA1: C3:5B:FC:E1:38:60:9A:62:D1:C8:07:CC:36:6F:60:8E:BF:A8:B9:25
	    SHA256: 4A:29:8F:85:D0:5E:9A:49:94:AE:10:F6:77:36:36:BC:4E:75:45:ED:F6:4F:B3:5E:E0:FE:FC:83:1D:DB:BC:9E
Signature algorithm name: SHA256withRSA
Subject Public Key Algorithm: 2048-bit RSA key
Version: 1
Certificate[2]:
Owner: CN=Example Company Certificate Authority, OU=Security, O=Example Company, L=Redwood City, ST=California, C=US
Issuer: CN=Example Company Certificate Authority, OU=Security, O=Example Company, L=Redwood City, ST=California, C=US
Serial number: c3ed8cc19663b1c5
Valid from: Wed Jun 01 09:44:06 GMT 2022 until: Sat May 29 09:44:06 GMT 2032
Certificate fingerprints:
	    SHA1: 5F:F8:C0:B9:CE:1C:75:85:04:C0:23:D0:63:5E:CC:3B:B4:1F:13:B6
	    SHA256: BA:8B:9E:E2:16:BD:59:EF:BC:77:4D:10:F7:9C:D3:7B:A6:77:B7:CF:8F:E3:DB:14:44:1E:75:5E:BD:A8:A0:28
Signature algorithm name: SHA256withRSA
Subject Public Key Algorithm: 4096-bit RSA key
Version: 3

Extensions:

#1: ObjectId: 2.5.29.35 Criticality=false
AuthorityKeyIdentifier [
KeyIdentifier [
0000: FD D2 44 11 5F BE 18 12   59 A0 2B 89 37 68 E2 2D  ..D._...Y.+.7h.-
0010: 5D 00 D3 5D                                        ]..]
]
]

#2: ObjectId: 2.5.29.19 Criticality=false
BasicConstraints:[
  CA:true
  PathLen:2147483647
]

#3: ObjectId: 2.5.29.14 Criticality=false
SubjectKeyIdentifier [
KeyIdentifier [
0000: FD D2 44 11 5F BE 18 12   59 A0 2B 89 37 68 E2 2D  ..D._...Y.+.7h.-
0010: 5D 00 D3 5D                                        ]..]
]
]

 *******************************************
 *******************************************
Configure OAM for SSL
In this section you configure the OAM AdminServer to use SSL using the keystore generated earlier.
-
Launch a browser and access the WebLogic Server Console at
http://oam.example.com:7001/console. Login asweblogic/<password>. -
In the Change Center click Lock and Edit.
-
In the Domain Structure pane, under oam_domain navigate to Environment > Servers. Click on AdminServer.
-
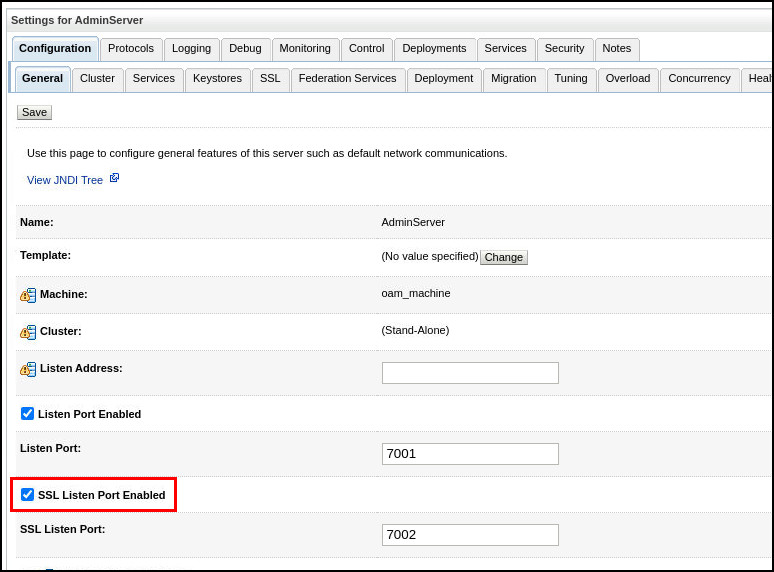
In the General tab, click the SSL Listen Port Enabled checkbox. Click Save:

-
Click on the Keystores tab. In the Keystores tab, under Keystores click Change:

-
In the Keystores drop down list, select Custom Identity and Custom Trust. Click Save.
-
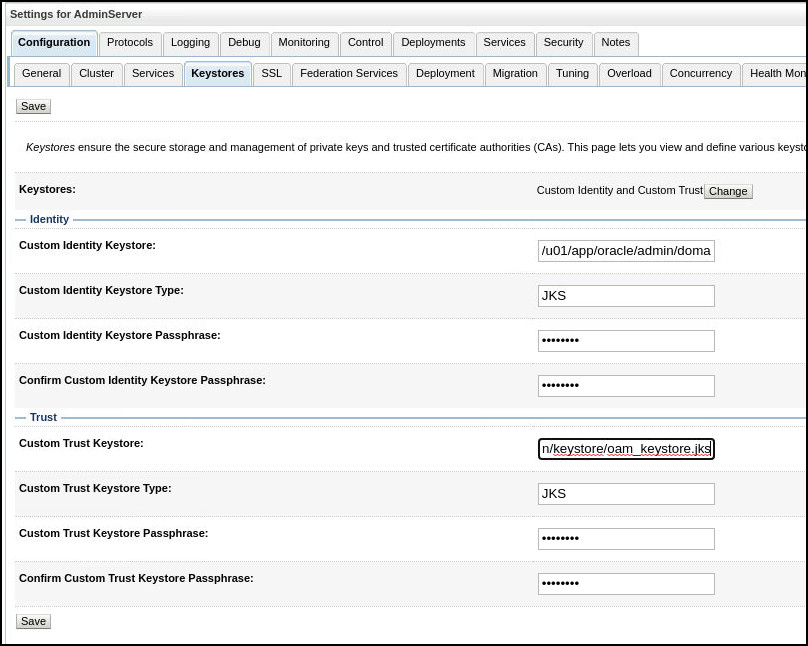
Fill out the Keystore fields as follows and click Save:
Field Value Custom Identity Keystore /u01/app/oracle/admin/domains/oam_domain/keystore/oam_keystore.jksCustom Identity Keystore Type JKSCustom Identity Keystore Passphrase <password>Confirm Custom Identity Keystore Passphrase <password>Custom Trust Keystore /u01/app/oracle/admin/domains/oam_domain/keystore/oam_keystore.jksCustom Trust Keystore Type JKSCustom Trust Keystore Passphrase <password>Confirm Custom Trust Keystore Passphrase <password>For example:

-
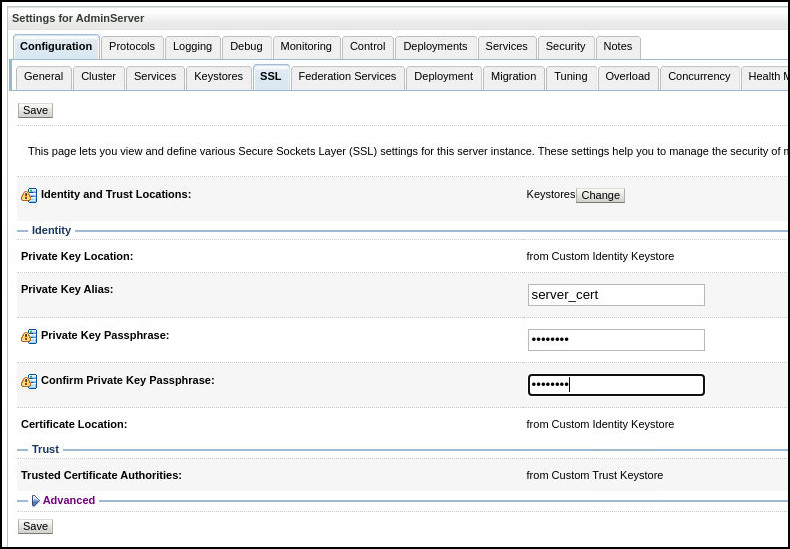
Click on the SSL tab. Fill out the fields as follows and click Save:
Field Value Private Key Alias server_certPrivate Key Passphrase <password>Confirm Private Key Passphrase <password>For example:

-
Expand the Advanced section and under Hostname Verification select None from the drop down list. Click Save.
-
In the Change Center click Activate Changes.
-
Test you can access the WLS Console via SSL e.g
https://oam.example.com:7002/console. Login asweblogic/<password>. -
In the Change Center click Lock and Edit.
-
In the Domain Structure pane, under oam_domain navigate to Environment > Servers. Click on oam_server1.
-
Repeat steps 4-10 above for oam_server1.
-
In the Change Center click Lock and Edit.
-
In the Domain Structure pane, under oam_domain navigate to Environment > Servers. Click on oam_policy_mgr1.
-
Repeat steps 4-10 above for oam_policy_mgr1.
-
Test you can access the Policy Manager Console via SSL e.g
https://oam.example.com:14151/access. Login asweblogic/<password>.
Change Load Balancing settings to SSL
-
Launch a browser and access the WebLogic Server Console at
https://oam.example.com:7002/oamconsole. Login asweblogic/<password>. -
Navigate to Configuration and then under the Settings tile select View > Access Manager.
-
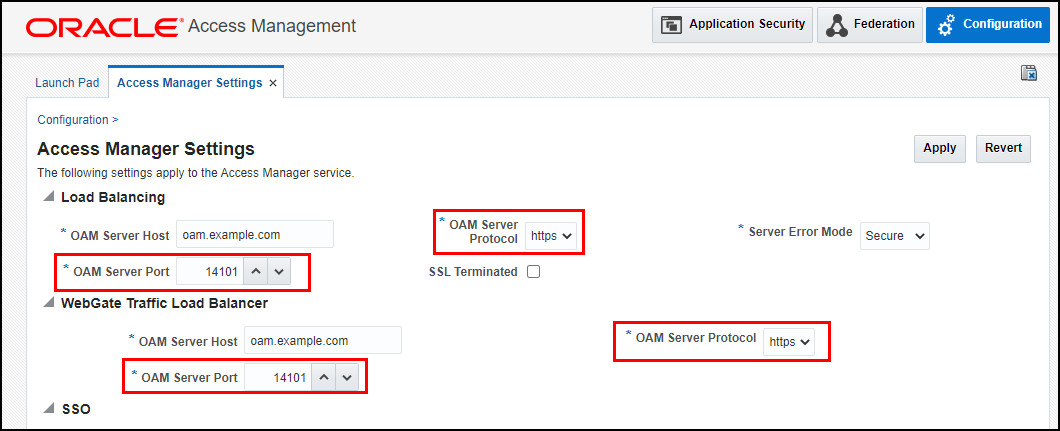
Under Load Balancing and WebGate Traffic Load Balancer set the following and click Apply:
- OAM Server Protocol:
https - OAM Server Port:
14101
For example:

- OAM Server Protocol:
-
Restart the
oam_server1server:cd /u01/app/oracle/admin/domains/oam_domain/bin ./stopManagedWebLogic.sh oam_server1 ./startManagedWebLogic.sh oam_server1
Next Tutorial
Configure Oracle Unified Directory for Oracle Access Management 12c.
Feedback
To provide feedback on this tutorial, please contact idm_user_assistance_ww_grp@oracle.com.
Acknowledgements
- Author - Russ Hodgson
Configure SSL for Oracle Access Management 12c
F59033-01
June 2022
Copyright © 2022, Oracle and/or its affiliates.