| Oracle® Retail Science Cloud Services User Guide Release 18.0.002 F17712-02 |
|

 Previous |
 Next |
This chapter describes the Attribute Extraction Cloud Service module.
Attribute Extraction (AE) is an enterprise-specific solution that uses machine learning to extract product attributes from free-form product description strings.
The application's embedded science and automation helps you to extract the attributes (such as brand, color, flavor, and so on) of each product in a particular category and to normalize the attribute values by correcting short forms, mis-spellings, and other inconsistencies. The product attributes can be used by Demand Transference, Customer Decision Trees, Advanced Clustering, and other retail applications that require product attributes in a structured format.
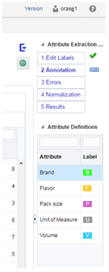
The AE Cloud Service module consists of the following tabs: Overview, Edit Labels, Annotation, Errors, Normalization, and Results. You use the Overview tab to select one of the previously added product categories or to add a new category. You use the Edit Labels to define category-specific attributes that you want to extract. In the Annotation and Errors tabs, you follow an iterative process to extract attributes and correct any mislabeled attributes. In the Normalization tab, you can use the embedded List of Values (LOV) or create your own LOV to standardize the attribute values. You use the Results tab to review and export the table of attributes.
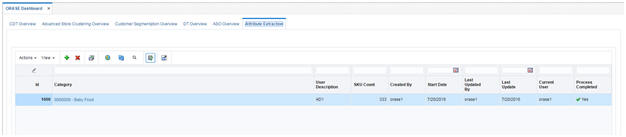
The Overview tab displays general information about the product categories previously added by you and other users. You can view this information to determine which user has created each category, when it was last updated, and whether or not the attribute extraction process is complete.
To use the attribute extraction process, you can either select one of the existing categories or you can add a new category. Note that only one copy of each category can exist at any time.
To add a new category, click the Add icon. In the pop-up screen, select a category from the list and enter a description. Then click OK to return to the Overview tab.
To select a category and start the attribute extraction process, simply click on its name in the overview table.
The AE overview tab is shown in Figure 7-1.
Figure 7-1 Attribute Extraction Overview Tab
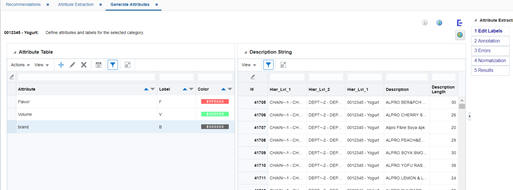
The Edit Labels tab is used to define category-specific attributes and their labels for the selected category. Defining attributes and labels is the first step in the attribute extraction process. You can return to this tab at any time to add, remove, or modify the attributes.
On the right hand side of the tab, you can view the description strings of the products in the selected category as well as three levels of hierarchy for the products. The hierarchy that is shown in the Attribute Extraction tables is based on the product hierarchy data that was loaded for the AE application. (See the Implementation Guide for further information about the hierarchy.) To add an attribute, click the Add icon. In the pop-up screen, enter the attribute name and attribute label and select a color. The attribute label must be a single character (the characters "o" or "O" are not permitted) and must be unique for each attribute.
The attributes, labels, and colors that you define in the Edit Labels tab are displayed on the right hand side of all other screens for your reference.
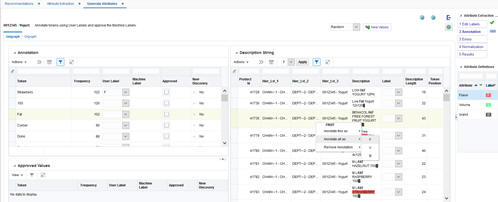
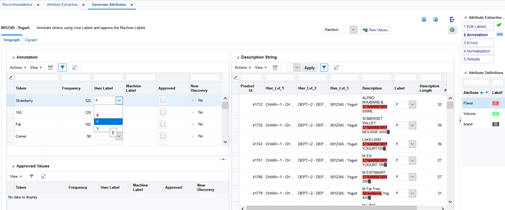
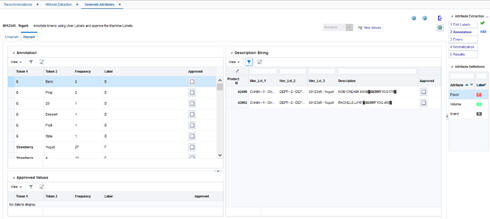
The Annotation tab is used to assign labels to a single token (referred to as a unigraph) or combination of two adjacent tokens (referred to as a digraph). A token is defined as an alphabetic or numeric sequence of characters in a description string. For example, the string "ABC vanilla yogurt 500gr" is a description that consists of the following five tokens (or unigraphs): "ABC", "vanilla", "yogurt", "500"and "gr". At the same time, it consists of the following digraphs: "ABC vanilla", "vanilla yogurt", "yogurt 500" and "500 gr".
The Annotation tab provides two screens to annotate unigraphs and digraphs.
In the Unigraph screen in Annotation tab, you can assign attribute labels to tokens, run the machine learning algorithm to find new attribute labels, and review and approve machine-recommended labels.
On the top left of Unigraph screen, you see the Annotation section that contains a table listing all tokens along with the following fields:
Table 7-1 Annotation Fields
| Field | Description |
|---|---|
|
Frequency |
The number of times the token appears across all product description strings |
|
User Label |
The label you have assigned to the token |
|
Machine Label |
The label recommended by the machine learning algorithm |
|
Approved |
A check box used to approve and apply the machine label to the token |
|
New Discovery |
A Yes/No flag that indicates whether or not the machine-recommended label is a new discovery from the most recent run |
In the Annotation section, shown in Figure 7-4, you can perform one of the following tasks for each token:
Table 7-2 Annotation Section Tasks
| Task | Description |
|---|---|
|
Change/assign the user label |
Select a value from the drop-down menu to change the label or assign a label to a token. (Values in the drop-down menu are the attribute labels that you defined in the Edit Labels tab.) The user label is applied to all instances of the token across all product description strings. |
|
Approve a machine label |
Check the Approve check box to assign the machine-recommended value to a token. Once you check the box, the token with the approved machine label is moved from the top tables to the bottom table (the Approved Values section). |
Figure 7-4 Annotation Tab with Label Tokens in Unigraph Screen
The Approved Values section on the bottom left displays the tokens that you have approved so far. You can uncheck the Approve check box in this section to remove the approved machine label and move the token back to the top table.
The Description String section on the right side of the Unigraph screen displays all description strings that contain a token selected on the left, along with the length of the strings and position of the selected token in the string, as well as the product hierarchy. The Label column is populated based on the user label or approved machine label for the token. All labeled tokens are colored based on the colors you assigned in the Edit Labels tab. The token selected on the left (in the Annotation section) is shown using a bold font.
You can perform one of the following tasks in the Description Strings section:
Table 7-3 Description Strings Section Tasks
| Task | Description |
|---|---|
|
Change or remove the label for one instance of the selected token |
Use the inline drop-down menu in the label column to change or remove the label of the token in a particular description string. Alternatively, right click on any token and use the first option in the menu (Annotate this as) to assign a label to a particular instance. Use the third option in the menu (Remove Annotation -> Remove this label) to remove the label for a particular instance |
|
Change or remove the label for multiple instances of any of the tokens |
Select multiple rows using the Ctrl or Shift keys. Then, change the label using the drop-down list at the top of the table and click Apply. To remove the label for multiple rows, change the label to NULL by selecting the first option in the drop-down list at the top of the table.Alternatively, to change or remove the label for ALL instances of a token, right click on any token and use the second option in the menu (Annotate all as) to assign a label to all instances, or use the third option in the menu (Remove Annotation -> Remove all labels) to remove the label for all instances.Example: if you wish to change the label of a token for all products that belong to a certain department, you can first filter the hierarchy columns based on department. Then, select all of the rows using the Shift key and change the label for all selected rows using the drop-down list at the top of table and click Apply. |
Once you assigned labels to some of the tokens in Unigraph screen, you may use the New Values button to run the machine learning algorithm that finds new attributes and recommends labels based on the labels that you have assigned and approved so far. Alternatively, you may go to the Digraph screen and label some digraphs before running the algorithm. Note that assigning and approving unigraph and digraph labels and running the algorithm to find new values is an iterative process; so you can repeat these two steps as frequently as you want until you are satisfied with the quality of the results and number of attributes extracted. If the machine learning algorithm does not find enough new values, it is an indication that it requires more information to discover the patterns and be able to recommend new values, and you might want to label some more unigraphs and digraphs before re-running the algorithm.
To run the machine learning algorithm, first select a mode from the drop-down menu next to the New Values button on the top right. You can select from the following three modes:
Table 7-4 Machine Learning Algorithm Modes
| Mode | Description |
|---|---|
|
Random |
Randomly partitions the data into a training set and a test set to be used by machine learning algorithm. |
|
By attribute |
If you select this mode, you will be prompted to select one attribute. The data is then partitioned in such way that all description strings that have one or more tokens labeled as the selected attribute are used as the training set. The remaining descriptions strings are used as test set. |
|
By annotation |
The description strings that are 80% labeled are used as training set. The remaining descriptions strings are used as test set. |
The By Attribute mode is most effective in the early stages, where very few attribute values have been identified.
Note that after you click the New Values button, it may take few seconds for the machine learning algorithm to run and find new attributes. Then a pop-up message shows how many new values were found. The Machine Label and New Discovery columns in the Annotation section on the top left will be populated to show the new labels and indicate which tokens were labeled by the machine in the most recent run.
The Digraph is used for labeling two adjacent tokens (as opposed to a single token) with the same attribute. The Digraph screen consists of an Annotation section on the top left for labeling digraphs, an Approved Values section on the bottom left, and a Description String section on the right for labeling individual instances of a digraph.
On the top left of Digraph screen, you see the Annotation section that contains a table listing all combinations of adjacent tokens (labeled as "token1" and "token2") where exactly one of the two tokens has been labeled and the other token has no label assigned or approved. The token that already has a label is shown using a bold font.
Other fields in this section are as follows:
Table 7-5 Diagraph Fields
| Field | Description |
|---|---|
|
Frequency |
The number of times that the two tokens are adjacent to one another across all product description strings. |
|
Label |
The label you have assigned to or approved for one of the tokens. (The token that is shown in bold font already has this label.) |
|
Approved |
A check box used to approve and apply the label of labeled token to the unlabeled token. |
If you think the two tokens are of the same attribute type indicated by the label, check the Approved check box to apply the label to both tokens. Once you check the box, the approved row is moved from the top table to the bottom table (the Approved Values section).
The Approved Values section on the bottom left displays the adjacent tokens that you have approved so far. You can uncheck the approve check box in this section to remove the approved row and return it to the top table.
The Description String section on the right side of the Digraph screen displays all description strings that contain the adjacent tokens selected on the left, as well as the product hierarchy. All labeled tokens are colored based on the colors you assigned in the Edit Labels tab. The two tokens selected on the left (in the Annotation section) are shown using a bold font.
You can do one of the following in the Description Strings section:
Table 7-6 Description Strings Section Tasks
| Task | Description |
|---|---|
|
Remove the label of the originally unlabeled token for one instance |
If you believe the combination of two tokens must not be labeled the same in one or few description strings, un-check the Approved check box to remove the label for the token that was not originally labeled. Note that the token that was originally labeled (i.e., the token displayed in bold font in the Annotation section on the left) remains as labeled and is not affected. |
|
Change or remove the label for one or all instances of any of the tokens |
As with the Unigraph screen, you can use the right click menu on any token and use the Annotate this as option to assign a label to a particular instance or use the Annotate all as option to assign a label to all instances of the token. To remove the label for a particular instance or all instances of the token, use Remove annotation -> Remove this label and Remove annotation -> Remove all labels. |
Figure 7-6 Annotation Tab Diagraph Screen
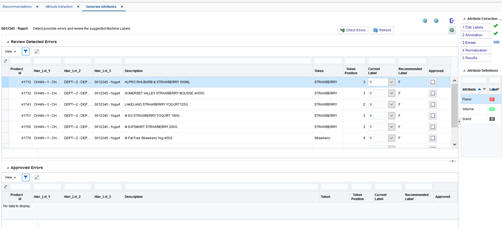
The Errors tab is used to review the instances where the current attribute type assigned to a token is different from the attribute type recommended by the machine. You can review these potential user errors and fix them if needed. For each instance, you can take one of the following actions:
Table 7-7 Error Tab Actions
| Action | Description |
|---|---|
|
Approve the Recommended Label |
Check the Approved check box to approve the Recommended Label. The approved instance will be moved from the top table to the bottom table. You can use the check box in the bottom table to undo the approval. |
|
Change the Current Label |
If neither the Current Label nor the Recommended Label is correct, use the drop-down list to change the Current Label. Do not check the Approved check box in this case. If the Current Label is correct, no action is needed. |
It is recommended that you review the errors after you complete the annotation step and extract the attributes. However, you can navigate to the Error tab at any time to review the errors and change or approve the labels for some or all instances.
After you extract the attributes, you can use the Normalization tab to correct mis-spellings, sort forms, and other inconsistencies in the attribute values to makes sure that each attribute value is displayed in a consistent form across all product descriptions. For example, strawberry is a flavor that may appear in many different forms such as "sberry", "strawb", and ""strberry" across description strings. The purpose of using the Normalization screen is to convert all these different forms to the correct form (i.e., strawberry).
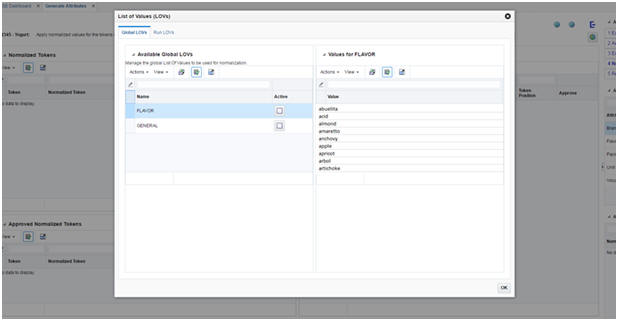
To run the spell-correcting algorithm, you can use one of the pre-defined List of Values (Global LOVs) or you can create your own LOV (Run LOVs) specific to one attribute. To use either of the LOVS, click the List of Values button on the top right.
To select a Global LOV, check the Active check box next to it. There are two Global LOVs: flavor (la ist of all different flavors) and general (a comprehensive list of English words). You can click the row for each LOV to see all the values in the list. If you select the flavor LOV, it will only be used to correct the values of the flavor attribute. If you select the general LOV, it will be used for correcting the values of all attribute types.
Figure 7-8 Normalization Tab with Global List of Values
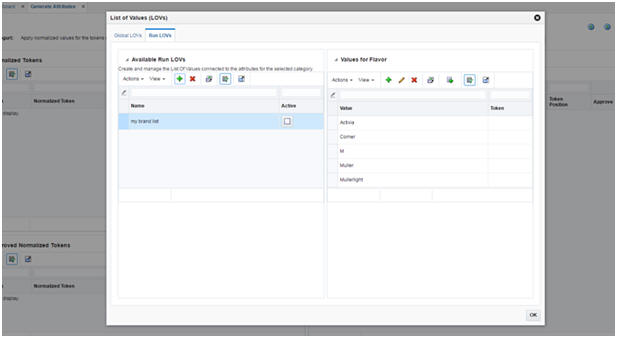
To create a new Run LOV or select an existing Run LOV, navigate to the RUN LOVs tab in the pop-up screen. To create a new list, click the Add button on the left table (Available Run LOVs). Then select the attribute that you want to create the list for and assign a name to the LOV. You can also pre-populate the list with tokens that are labeled as the selected attribute and appear more than a certain number of times across all description strings. The reason for this option is that usually the tokens with high frequency have the correct form and spelling. For example there may be few instances of "sberry" and "strawb", but most certainly there are many instances of "strawberry". So the high frequency tokens are likely to have the correct form and can be used by the spell correcting algorithm.
After you create a Run LOV, you can edit or remove the values in the list or add new values. To edit or remove values, select a row in the right table and use the Edit or Delete button. To add a new value, click the Add button on the top of table on the right.
In addition to adding a new value to the list (to be used by the spelling correction algorithm), you can define a value/token pair so that all instances of the token across all description strings are replaced by the defined value. This is a useful option when the data has lots of abbreviations and short forms that may be difficult to correct using a spelling correction algorithm. For example if the name "Hello Kitty" is a brand that appears as "HK" in many of the description strings, then you can define a pair as "Hello Kitty|HK" to have all instances of "HK" replace by "Hello Kitty".(Note that the correct value and the token must be separated by a pipe delimiter (|)).
Once you are done adding the Run LOV and editing the values, make sure to check the Active check box on the left table to select the list.
Figure 7-9 Normalization Tab with Run List of Values
After you select a Global or Run LOV, click the OK button to close the pop-up screen and return to the Normalization tab. You can see the active LOVs on the bottom right of the screen.
To run the spell correcting algorithm, click the Normalize button. It may take few seconds for the algorithm to run. When the run is complete, the recommended corrections are displayed in the Normalized Tokens table on the top left. This table has the following fields:
Table 7-8 Normalized Tokens
| Field | Description |
|---|---|
|
Token |
The token identified by the algorithm as misspelled. |
|
Normalized token |
The recommended correct value for the token or the value that you defined for replacement (i.e., the value/token pair). |
|
Frequency |
The number of times the token appears across all product description strings. |
|
Approved |
A check box used to approve and apply the recommended correct value. |
You can perform one of the following in Normalization tab:
Table 7-9 Normalization Tab Tasks
| Task | Description |
|---|---|
|
Edit the normalized token |
If you do not agree with the recommended correction and want to edit the normalized token, you can edit the text in the Normalized Token column before approving it. |
|
Approve/reject the normalized token for all instances |
Check the Approved check box to replace all instances of the token with a normalized token. The approved rows will be moved from top table to the bottom table (Approved Normalized Tokens). To undo the approval, uncheck the check box in the bottom table. |
|
Approve/reject the normalized token for one instance |
When you click on a row in the Normalized Token table, all descriptions that contain the selected token will be displayed in the description strings table on the right. You can approve or reject individual instances of the normalization by checking or un-checking the Approved check box in the right table. |
|
Clear all recommended corrections |
To clear all recommended normalized tokens, click the Reset button on top of the Normalized Tokens table on the top left. |
|
Refresh |
It is recommended that you click the Refresh button on the top right after you make changes to a LOV or select/deselect a LOV. |
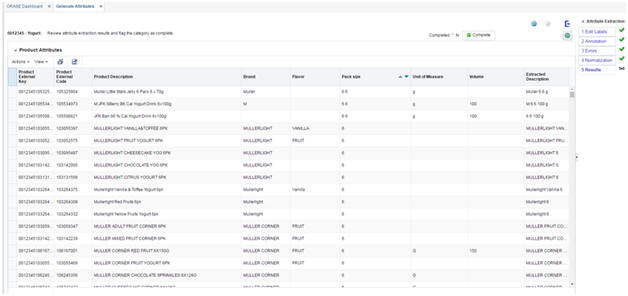
The Results tab is used to view the table of attributes. You can export the results into a spreadsheet. You can click the Complete button on the top right to change the status of the category in the overview tab to a value of "complete". This indicates that the attribute extraction process for this category is complete. Other users who log in to the application may decide to work on incomplete categories.
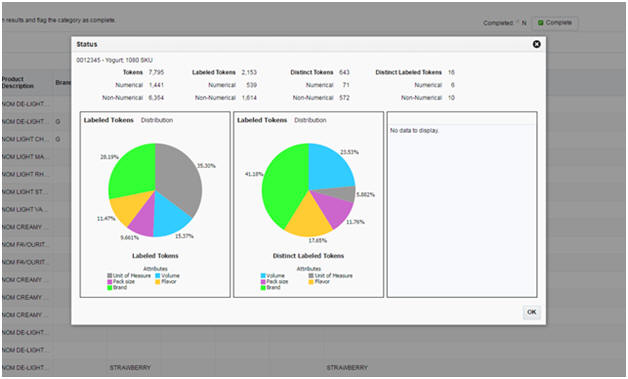
The Status screen is accessible from every tab. To open, click the pie chart button on the top right.
In the Status screen, you can see the progress of the attribute extraction process. It displays different statistics, including total number of tokens, number of distinct tokens, and number of labeled tokens.
You can also see the breakdown of labeled tokens by attribute type. To see the list of all distinct values for a certain attribute, click the respective section of the attribute in any of the pie charts.