| Oracle® Retail Science Cloud Services User Guide Release 18.0.002 F17712-02 |
|

 Previous |
 Next |
This chapter described the use of the Demand Transference Science Cloud Service module.
Demand Transference (DT) helps you to compare products based on their similarities in order to determine what, if any, products customers might buy if the product they want to buy is for some reason unavailable. In this way, planning and ordering can be optimized. DT calculates similarities by comparing the attributes of the two products. If you are using CDT in conjunction with DT, you also have available the similarities calculated by CDT, which are based on customer-supplied transaction data.
The DT Cloud Service module consists of three tabs: Overview, Generate Models, and Manage Models. You use the Overview tab to keep track of the status of each stage during the main work you do with the application within the Generate Models tab. You use the Manage Models tab to evaluate the demand elasticity results and override the Maximum Substitutable Demand Percentage value, if that is needed.
When you use the DT Cloud Service module, you follow this general iterative process to create and manage DT models:
Data Setup. You define the categories to be used in the DT calculation.
Data Filtering. You configure filters that remove input data that might cause errors in the calculation or that can lead to inaccurate or unreliable results.
Similarity Calculation. You calculate similarities and assess the results of the calculation.
Elasticity Calculation. You calculate the assortment elasticities and assess the results in terms of substitutable demand, which is the percentage of demand of a SKU that is retained when the SKU is deleted from the stores where it is selling.
Escalation. When you are satisfied with your results, you can set the escalation path you can set the escalation path to fill in the holes for partitions whose DT models were removed during pruning by setting up a search path through the segment hierarchy and the location hierarchy. Then you can set a version of the DT model as complete.
Manage Models. Use this tab to set time intervals for evaluating your results and to override the value for the maximum substitutable demand percentage.
The Overview tab displays information that you can view and use to monitor the progress of the DT stages as well as to view some aggregate statistics and the DT results from the last successful run.
This tab contains the following sections:
Generation Stage Status
Aggregate Statistics
Calculation Report
The Generation Stage Status table displays the current status of each of the DT stages.
Click the Refresh icon to update the fields and see the latest status for each stage.
You can use the status information to monitor the progress of each stage. It contains the following fields, which can be arranged and viewed, but not modified.
Table 3-1 Generation Stage Status Fields
| Field Name | Description |
|---|---|
|
Stage Name |
A row exists in the table for each DT stage that provides detailed status information. The five stages are Data Setup, Data Filtering, Similarity, Elasticity, and Escalation. |
|
Start Date |
The date and time when a run for the stage most recently started. |
|
End Date |
The date and time when a run for the stage most recently ended. |
|
Stage Status |
The current status of the stage: Not Started, Not Started (Scheduled for Later), Processing, Completed Successfully, Stopped/Paused, Cancelled, or Failed. |
The following table provides an explanation of the different values for the status of a stage.
Table 3-2 Stage Status Values
| Stage Status | Description |
|---|---|
|
Not Started |
This indicates that the stage has not yet been initiated. This can occur when you first begin to create a DT model or when you update an existing version. |
|
Not Started (Scheduled for Later) |
This indicates that the stage is scheduled to start after the previous stage is complete. |
|
Processing |
This indicates that the stage is currently being processed. |
|
Stopped/Paused |
This indicates either that the stage has been stopped by the application or that the user has chosen to stop the process (for example, to make a change to an option). In the later case, once any background processing has stopped, the user can re-run the stopped stage. |
|
Completed Successfully |
This indicates that the stage has been successfully processed. |
|
Completed with Errors |
This indicates that the stage was able to complete the processing of all requested CDTs, but one or more CDTs encountered errors during the run and were not able to complete successfully. This most commonly occurs when the data used for a CDT is not available or is too sparse to produce a result. |
|
Cancelled |
This indicates that the database has cancelled the execution of the stage either because of missing data or an exception. The user should review the RSE_LOG_MSG log to determine the problem. |
|
Failed |
This indicates that a problem occurred during the processing. |
The Aggregate Statistics table displays statistical details about the existing DT model versions.
Click the Refresh icon to update the fields and see the latest information in this table.
Each existing version has a row in the table. The table contains the following fields, which can be arranged and viewed but not modified.
Table 3-3 Aggregate Statistics Fields
| Field Name | Description |
|---|---|
|
Version |
User-created name that uniquely identifies this DT model version |
|
Created By User |
The user name of the person who created this version. |
|
Distinct Categories |
The number of categories associated with this version. |
|
Distinct Locations |
The number of locations associated with this version. |
|
Distinct Customer Segments |
The number of customer segments associated with this version. |
|
Number of Models Generated |
The number of DT models that have been calculated for this version. |
The Calculation Report displays the DT model results from the last successful run, if one has occurred.
Here you can review information by Location or by Customer Segment.
Click the Refresh icon to update the fields and see the latest information in this table.
The Calculation Report contains the following fields:
Table 3-4 DT Calculation Report Fields
| Field Name | Description |
|---|---|
|
Node |
Identifies the node name. |
|
Calculation Status |
Yes indicates that the calculation is complete. No indicates that the calculation is not complete. |
|
Exclusion Status |
Yes indicates that data has been pruned. No indicates that data has not been pruned. |
|
Assortment Elasticity |
A number calculated by the application that is a parameter in the DT model. A larger magnitude indicates larger overall transference. |
|
Creation Date |
The date when the version whose data is displayed was created. |
|
Created By User |
The login name of the person who created the version. |
The Generate Models tab is used to configure, run, evaluate, modify, and deploy a DT model. The process is divided into five stages that must be run in order. You can return to a stage you have already completed and make changes, but if you do, you must re-run that stage and all the stages that follow that stage, as the calculations are invalidated by the modifications you just made to the settings in that stage.
The five stages are:
Table 3-5 Generate Models Tab: Stages
| Stage Name | Description |
|---|---|
|
Data Setup |
Select the nodes for the DT model calculations. |
|
Data Filtering |
Filter out input data that may result in inaccurate or unreliable answers. |
|
Similarity Calculation |
Calculate the similarities in customer demand. |
|
Elasticity Calculation |
Calculate the assortment elasticities for customer demand. |
|
Escalation |
Set the escalation path for the DT model. Use the Escalation Report to evaluate the results of the escalation. |
The Data Setup stage is used to add and delete the categories to be used in the DT model generation process.
Process
Here is a high-level process for setting up the data for DT.
Select the category or categories you want to calculate DT models for.
Click Next to go to the Data Filtering stage.
Use this table to add categories you want to include in the DT model calculation or delete categories that you want to remove from the DT model calculation.
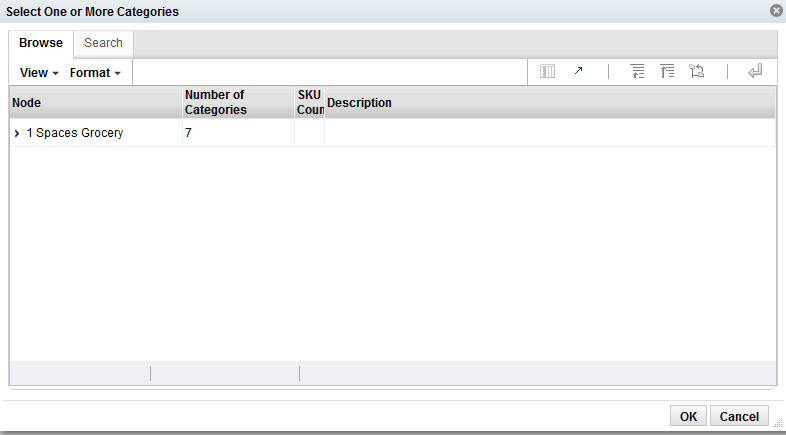
To display a list of available nodes and the categories included in those nodes, click the Add icon. You see the Select One or More Categories dialog box, which contains two tabs, Browse and Search. You can use either tab to find the categories you are looking for.
The Browse tab displays a table with the following fields:
Table 3-6 Category Selections: Browse
| Field Name | Description |
|---|---|
|
Node |
The node tree structure can be expanded in order to view its categories. |
|
Number of Categories |
The number of categories within the node that has been selected. The number can help you understand the amount of processing required for the calculation. |
|
SKU Count |
The number of SKUs in a category. A category with too few SKUs may not produce good DT models. |
|
Description |
A description that provides additional information about the category. |
Select the category or categories within the node that you want to be part of the DT model and click OK.
The Search tab displays a table with the following fields:
Table 3-7 Category Selections: Search
| Field Name | Field Description |
|---|---|
|
ID |
An external code used to identify the category in other systems such as CMPO. |
|
Name |
The category name. |
|
Short Description |
A description that provides additional information about the category. |
|
Level Description |
A description of the level of the merchandise hierarchy that the node belongs to. |
Select the category or categories within the node that you want to be part of the DT model and click OK.
Your selections are displayed in the Category Selections table.
After selecting the categories, click Next to go to the Data Filtering stage.
The Data Filtering stage applies to all the categories that you select in the Data Setup stage. You should set the filters based on the histograms for each filter. The histograms help identify what data is actually outlier data, as compared to the rest of the data. In most cases, the default settings should be sufficient. However, if a histogram shows a flatter distribution, then you should consider modifying the default settings.
Process
Here is the high-level process for setting up and running data filtering.
Enter the appropriate values into the Filter Setup text entry boxes.
Click Run in order to filter the data.
Review the filtering results in the Data Filtering Summary table and the Data Filtering histograms.
After reviewing the results, if necessary, make changes to the values for the filters in Filter Setup and re-run the stage.
When you are satisfied with the results, click Next to go to the Similarity Calculation stage.
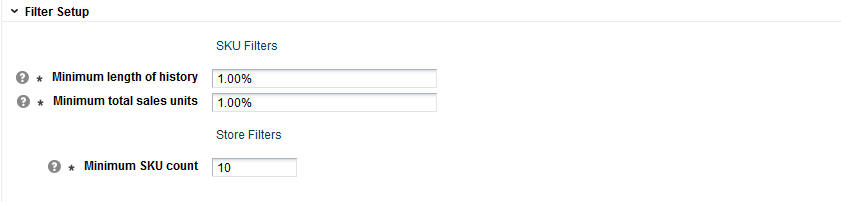
You configure the following filters in order to filter out data you consider unacceptable from the calculation of the DT model.
Table 3-8 Data Filters
| Filter Name | Description |
|---|---|
|
Minimum Length of History |
This filter prunes SKU-segment-store combinations that have a short transaction history. The threshold is defined as a percentage of the median value for the category. The default value is 1%. |
|
Minimum Total Sales Units |
This filter prunes SKU-segment-store combinations that have a small number of total sales units during a given sales history for a specified customer segment and store. The threshold is defined as a percentage of the median value for the category. The default value is 1%. |
|
Minimum SKU Count |
This filter is applied after the above two filters and looks at the remaining data to determine if a store does not have enough SKUs. The threshold is defined as a set number of SKUs per store. The default value is 10 SKUs. |
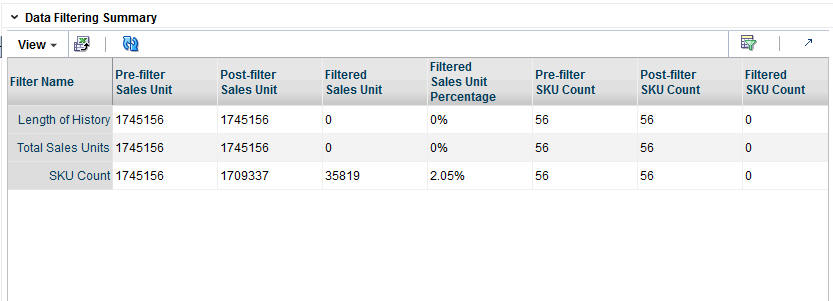
The following information is provided after the filtering is complete and quantifies the amount of data filtered out for baseline history, total sales units, sales amounts, and SKU counts. Use this information to assess the effects of filtering.
Click the Refresh icon to update the fields and see the latest information for this table.
Table 3-9 Data Filter Summary Fields
| Field Name | Field Description |
|---|---|
|
Filter Name |
The relevant filter of the three listed above. |
|
Pre-filter Sales Unit |
Amount prior to the application of the filter. |
|
Post-filter Sales Unit |
Amount remaining after the application of the filter. |
|
Filtered Sales Unit |
Amount filtered. |
|
Filtered Sales Unit Percentage |
Amount filtered, expressed as a percentage. |
|
Pre-filter SKU Count |
Amount prior to application of the filter. |
|
Post-filter SKU Count |
Amount remaining after application of the filter. |
|
Filtered SKU Count |
Amount filtered. |
|
Filtered SKU Count Percentage |
Amount filtered, expressed as a percentage. |
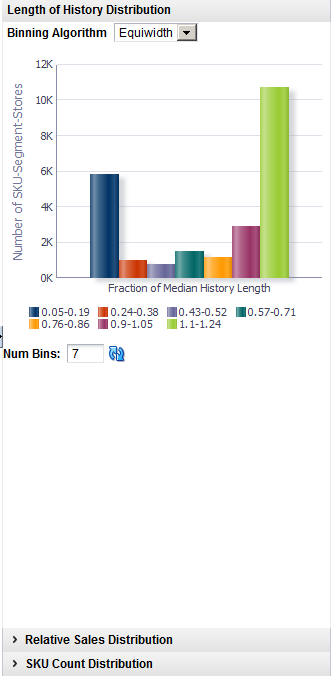
The following histograms illustrate the effects of filtering. You can use the information displayed in the histograms to adjust the configuration of the filters in order to eliminate outlier data. If you modify the filters, you must re-run the stage.
For information about adjusting the display of the histograms, see the Chapter 1, "Getting Started."
Table 3-10 Data Filtering Histograms
| Histogram Name | Description |
|---|---|
|
Length of History Distribution |
Displays the percentage of median history length relative to the number of SKU-segment-stores. |
|
Relative Sales Distribution |
Displays the percentage of median category sales relative to the number of SKU-segment-stores. |
|
SKU Count Distribution |
Displays the percentage of the median category SKU count relative to the number of segment-stores. |
Figure 3-9 DT Length of History Distribution Histogram
Similarity in demand can be determined using either transaction-based data or attribute data. You can calculate the similarity using each type of data, if both types are available. You can only view the most recent run in the UI, so in order to compare runs, you must query the database to obtain the results from earlier runs.
Each category has its own set of similarities, relevant to the SKUs that are in that category. A similarity is calculated for each pair of historical SKUs in a category.
If transaction-based similarities are available, it is recommended that you use them instead of attribute-based similarities. Note that transaction-based similarities are only available through the Customer Decision Tree application.
Process
Here is the high-level process for calculating similarities:
Enter a unique name for the version of the DT model to be calculated.
Select the source of the data to be used: transaction-based or attributed-based. Transaction-based data is only available from the Customer Decision Tree generation.
Use the check boxes to indicate whether or not only top level processing should occur for location or customer segment.
Customize the ranking of the category attributes if necessary.
Click Run to start the calculation.
Review the calculation results in the Similarity Display.
After reviewing the results, if necessary make changes to the values for the calculation in the Version Setup and Category Attribute Setup and then re-run the stage.
When you are satisfied with the results, click Next to go to the Elasticity Calculation stage.
At the top of this stage you see two text boxes and two check boxes that you use to configure the parameters for the calculation.
Table 3-11 Version Setup: Fields
| Field Name | Field Description |
|---|---|
|
Version Name |
Assign a name to each version of a DT model calculation. This allows you to create and save more than one version of a DT model. The version name you assign here is used in the Calculation Report, Aggregate Statistics table, and in the Manage DTs tab. Version names can be re-used; however, if the version name in question has active DT models, then you will see a warning that the active DT models will be removed from the version if you do re-use the version name. |
|
Select the Source of Similarities |
Use this option to define the type of data used in the calculation: transaction data or attribute data. Transaction-based data uses similarities calculated by Customer Decision Tree using transaction-based data. Attribute-based data calculates similarities within DT based on the attribute values associated with every SKU in the category. |
|
Process Location Top Level Only |
Check this option if you want DT models to be calculated for the Location Chain only. You can select this option in order to decrease the amount of time it takes the system to perform the calculation. |
|
Process Customer Segment Top Level Only |
Check this option if you want DT models to be calculated for the Customer Segment Chain only. You can select this option in order to decrease the amount of time it takes the system to perform the calculation. |
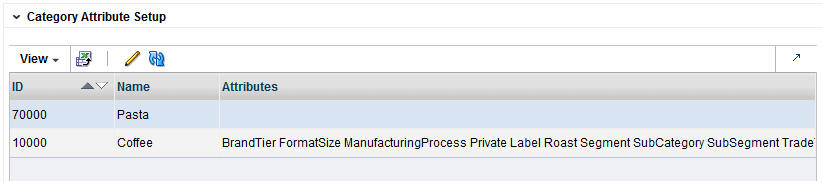
Once you select the source for the similarities, you will see either Category Attribute Setup, if you have selected to use attribute-based similarities, or Transaction-based Similarity Availability Per Category, if you have selected to use transaction-based similarities.
The application, using historical data, determines a specific weight for the category attributes. You can optionally change this weight and assign your own weight to the attributes for a category.
The weights indicate the importance of the attribute to the customers when they are making purchasing decisions. The attribute with the highest weight is the one the customer considers first when making a purchase. The system-generated weights are determined by the application from historical sales data. However, if a user disagrees with those weights, the user can override them. For example, in the case of coffee, the system may assign a weight of 0.7 to brand and 0.2 to size. This indicates that brand is historically more important to the customer than size when purchasing coffee. If the user disagrees with this analysis and thinks that brand and size are actually much closer together, the user can assign a weight of 0.5 to brand and 0.4 to size.
The Category Attribute Setup table displays the following:
Highlight the category you want to adjust the weights for and click the Edit icon. You see the Category Attributes Setup dialog box.
Table 3-12 Category Attributes Setup
| Field | Description |
|---|---|
|
ID |
An external code used to identify the category in other systems such as CMPO. |
|
Name |
The category name. |
|
Attribute |
The specific attribute you are configuring. |
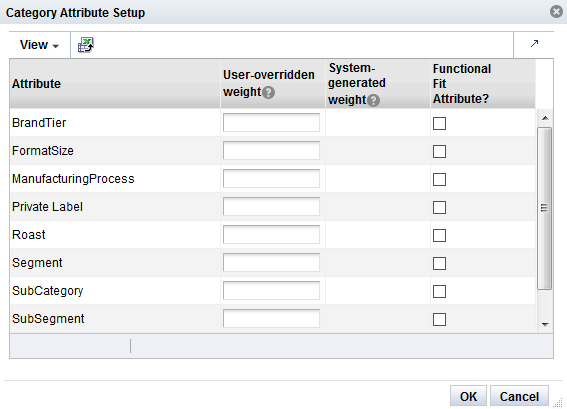
The Category Attributes Setup pop-up lists the categories you are calculating DT models for. The system-assigned weights are also displayed.You can adjust the weight for all the attributes or a subset of the attributes.
The Category Attributes Setup dialog box contains the following fields. For each attribute you want to assign a custom weight to, enter a number between 0.000 and 1.000. For attributes that have no substitutes (such as windshield wipers of a specific length), the Functional Fit check box is checked by the system, so that similarities are not calculated for these attributes. When you are finished configuring the category attributes, click OK.
Table 3-13 Category Attribute Setup Fields
| Field | Description |
|---|---|
|
Attribute |
The category attribute to assign a weight to. |
|
User-Overridden Weight |
The user-defined weight for the attribute. |
|
System-Generated Weight |
The system-generated weight for the attribute. |
|
Functional Fit Attribute? |
This is checked by the system if the attribute has no substitutes. |
After you have finished configuring the similarity parameters, click Run to calculate the similarities. You see the results via the Similarity display table.
The Transaction-Based Similarity table displays the following:
Table 3-14 Transaction-Based Similarity Availability Per Category
| Field | Description |
|---|---|
|
ID |
An external code used to identify the category in other systems such as CMPO. |
|
Name |
The category name. |
|
Description |
A description that provides additional information about the category. |
|
Available |
A flag that indicates that a CDT version that contains data for this category has been made active. |
|
Available As Of |
Indicates the date that the CDT version was activated. This information can help you identify whether the CDT results are recent, or if they are potentially too old to use. For example, if the CDT data became available two years ago, you may consider that data to be out of date. |
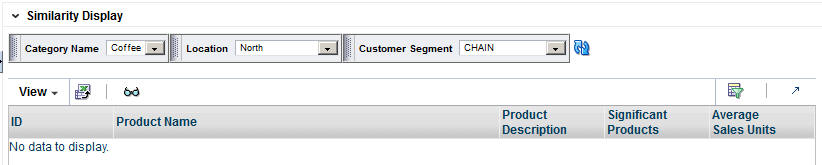
The Similarity Display table shows the list of SKUs for which similarities have been calculated so that you can sort and analyze the results. You can search through the list of results by Category Name, Location, or Customer Segment.
Click the Refresh icon to update the fields and see the latest information in this table.
Table 3-15 Similarity Display
| Field | Description |
|---|---|
|
ID |
An external code used to identify the category in other systems such as CMPO. |
|
Product Name |
The name identifying the product. |
|
Product Description |
A detailed description of the product. |
|
Significant Products |
A list of products that have High or Very High similarity. The threshold for how many products are considered significant can be configured in the database. |
|
Average Sales Units |
The average number of units used in the calculation. |
Click the See Similarities icon to see detailed results for a specific set of SKUs.
The detailed results include the following fields:
Table 3-16 Similarity Display Results
| Field Name | Field Description |
|---|---|
|
ID |
The product SKU. |
|
Product Name |
The name identifying the product. |
|
Product Description |
A detailed description of the product. |
|
Similarity Strength |
An indication of the similarity for the product: Very High, High, Medium, Low, Very Low. |
|
Similarity Value |
The calculated value for the similarity, from 0 to 1. A higher value indicates a higher degree of similarity. |
|
Similarity Code |
The numeric value associated with the similarity: 4 = Very High, 3 = High, 2 = Medium, 1 = Low, 0 = Very Low. |
When you are satisfied with the Similarity results, click Next to go to the Elasticity Calculation stage.
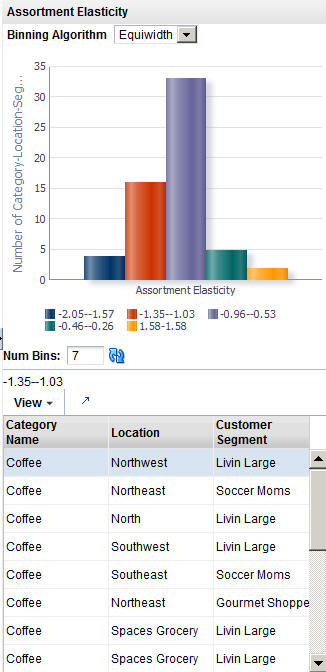
During the Elasticity Calculation stage, the assortment elasticity is calculated. You do not configure any parameters. Click Run to initiate the calculation.
The assortment elasticity should not be a positive value because the transference model does not work properly if the value is positive. In addition, it should not be a null value because a null value indicates that the calculation of assortment elasticity failed and did not produce an assortment elasticity value. If an assortment elasticity value is positive, it must be replaced with a negative value. The replacement occurs during the escalation process.
Process
The elasticity calculation is a background process. You use this stage to view the results. Note that the substitutable demand information is displayed and the percentages for the DT models are calculated after you set the time intervals within the Manage Models tab.
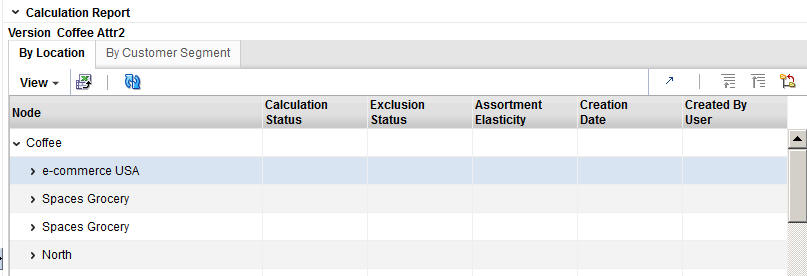
The Calculation Report lists the status of the elasticity calculation and the exclusion, either by Location or by Customer Segment. An assortment elasticity is calculated for each category/location/segment combination selected during the Data Setup stage and the Calculation stage. The numerical result of the calculation, an output of DT generation, is used by Manage Models to calculate substitutable demand percentages.
The Calculation Report has two tabs: By Location and By Customer Segment. Each tab has the following fields:
Table 3-17 Calculation Report Fields
| Field | Description |
|---|---|
|
Node |
The node tree structure can be expanded in order to view its categories |
|
Calculation Status |
Indicates whether or not (Yes/No) the elasticity calculation has occurred. |
|
Exclusion Status |
Indicates whether or not (Yes/No) pruning has occurred. |
|
Creation Date |
The date when the version whose data is displayed was created. |
|
Created By User |
The login name of the person who created the version. |
|
Assortment Elasticity |
A number calculated by the application that is a parameter in the DT model. A larger magnitude indicates larger overall transference. |
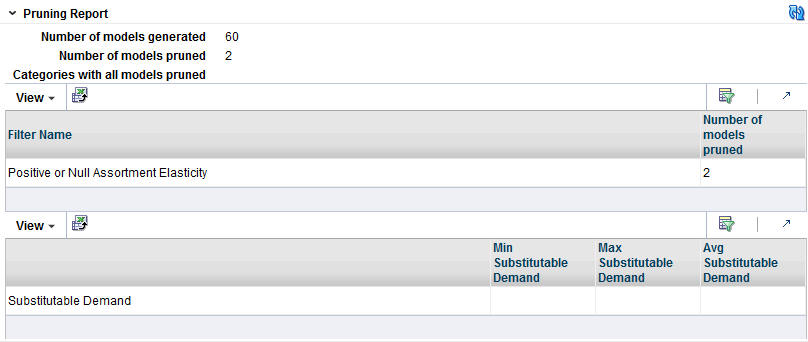
The Pruning Report displays statistics about the results of data pruning.
The Pruning Report contains the following fields:
Table 3-18 Pruning Report Fields
| Field | Description |
|---|---|
|
Number of Models Generated |
The number of DT models produced by the calculation. |
|
Number of Models Pruned |
The number of DT models pruned by the calculation. |
|
Categories with All Models Pruned |
The names of the categories for which all DT models have been pruned. |
|
Positive or Null Assortment Elasticity |
The Assortment Elasticity (AE) value is a negative number used in calculating substitutable demand percentages and demand transference effects. A positive AE value may be produced as a result of missing or unreliable input data for some partitions. Such meaningless transference effects must be pruned. In addition, if a null AE value is generated, it must also be pruned. |
|
Substitutable Demand |
Substitutable demand is a measure of how much demand is retained by the rest of the assortment when an item that is removed. When the item is removed, a portion of its demand is transferred to the remainder of items in the assortment. These values are populated when you set up the time intervals in the Manage Models tab and run the calculation there. |
Figure 3-16 DT Assortment Elasticity Histogram
The Escalation stage is used to fill in the holes for partitions whose DT models were removed during pruning by setting up a search path through the customer segment hierarchy and the location hierarchy. The DT models used to fill in the holes are not used by Manage Models calculations.
Process
Here is the high-level process for setting up an escalation.
Enter a series of numbers to indicate the escalation rank, which determines the order in which the escalation occurs.
Click Run to start the escalation process.
Review the escalation results in the Escalation Report.
After reviewing the results, if necessary, make changes to the escalation ranks and re-run the stage.
When you are satisfied with the results, you can complete the version and make the version active so that it is available for other applications to use.
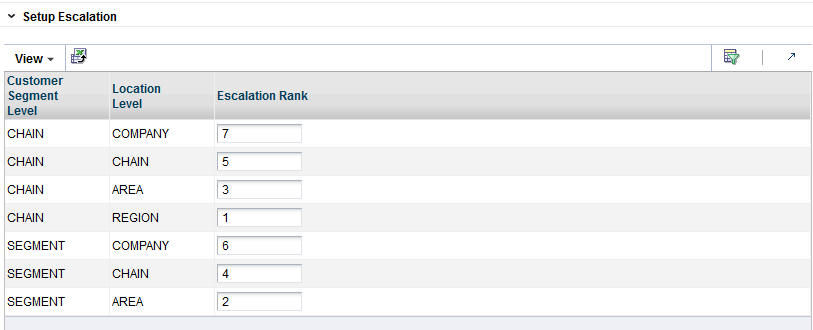
Escalation occurs along the customer segment hierarchy and the location hierarchy. Here is an example of an escalation path:
The following fields are required to set up the escalation.
Table 3-19 Setup Escalation
| Field | Description |
|---|---|
|
Customer Segment Level |
Identifies the customer segment level in the escalation. |
|
Location Level |
Identifies the location level in the escalation. |
|
Escalation Rank |
Used to assign the ranks for the escalation, which determines the order in which the escalation occurs. |
Here is an example of an escalation path.
Table 3-20 Example of Escalation Path
| Segment Level | Location Level | Escalation Rank |
|---|---|---|
|
Segment chain |
Location chain |
8 |
|
Segment chain |
Region |
7 |
|
Segment chain |
Location area |
6 |
|
Segment chain |
Store cluster |
5 |
|
Segments |
Location chain |
4 |
|
Segments |
Region |
3 |
|
Segments |
Location area |
2 |
|
Segments |
Store cluster |
1 |
You fill in the order of numbers. Every row must have an ordering number, and no ordering number can be re-used.The escalation path is specific to the user and the current version that the user is working on.The default ordering is to go up the location hierarchy first, and then up the segment hierarchy, as shown in the example above. The reason is that the segment hierarchy has only two levels, and so its top level is very general.
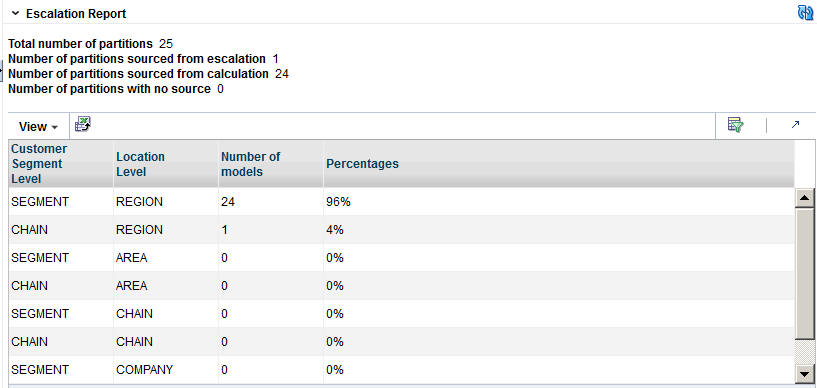
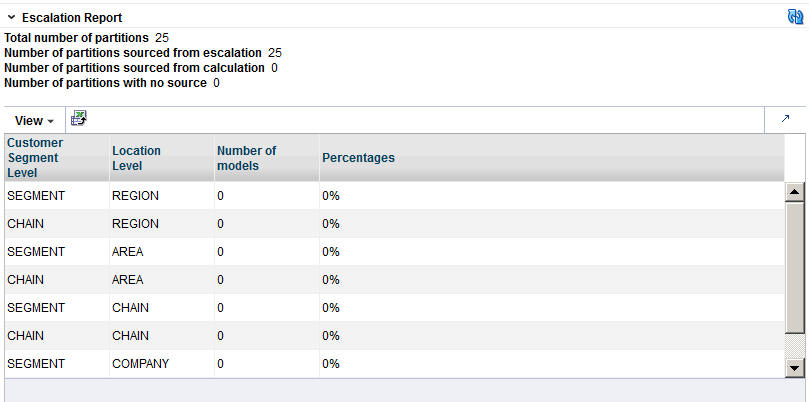
The Escalation Report breaks down the numbers to provide counts for the number of positions filled with higher-level DT models and the number of partitions that have not been changed by escalation. In addition, the fraction of DT models for each partition is displayed.
Table 3-21 Escalation Report
| Field Name | Description |
|---|---|
|
Total Number of Partitions |
The number of partitions in the version. |
|
Number of Partitions Sourced from Escalation |
The number of partitions removed during escalation. |
|
Number of Partitions Sourced from Calculation |
The number of partitions removed during calculation. |
|
Number of Partitions with No Source |
A partition that does not have a model assigned to it because all models related to the partition have been pruned. |
|
Customer Segment Level |
Identifies the customer segment level. |
|
Location Level |
Identifies the location level. |
|
Number of Models |
The number of partitions that are trying to have a model assigned. This is generally the number of customer segments by the number of locations. |
|
Percentages |
The percentage of partitions that have been assigned a model from a given escalation level. |
When a version is complete, the results for the version are activated so that other applications can use the information. The similarity data that has been calculated during the generation process is also activated for use.
After the completion of this step, the intermediate results from each stage are removed from the database and can no longer be used.
Be aware that once a version is completed, it cannot be completed again unless a different version is completed first. Changes made to the version's data after completing it will not be copied to the relevant output tables.
You can set up various time intervals to use in the evaluation of a version of a DT and configure the value for maximum substitutable demand and see how different maximum values affect the substitutable demand. This allows you to change the maximum value to one you find more suitable. You can see the percentage of demand of a SKU that is retained when the SKU is deleted from the stores where it is selling. This is the substitutable demand percentage. In this way you can evaluate the accuracy and usability of the elasticity calculation.
Substitutable demand is a measure of how much demand is retained by the rest of the assortment when an item is removed. When the item is removed, a portion of its demand is transferred to the remainder of items in the assortment. This portion is considered the retained demand. If the magnitude of the assortment elasticity is larger, then the amount retained will be higher. By examining the retained demand, you can evaluate the assortment elasticity value to see if its magnitude is too large. The key value to examine is the maximum substitutable demand percentage. For a given category, you may decide that this value is too large.
Process
Here is the high-level process for determining suitable substitutable demand values and thus suitable DT models.
Set up the time intervals you are interested in.
Select the versions you want to evaluate.
Click the Calculate icon to obtain an initial set of percentages.
Enter various values for maximum substitutable demand and use the Edit icon to enter override values for Maximum Substitutable Demand Percent and the Calculate icon to determine the impact.
You can use the Revert icon to restore the original percentage values.
When you are satisfied with the results, you can choose which version to make active using the Set Version as Complete icon.
The time interval defines the span of time for the sales history to be used to determine the amount of history that is retained when SKUs are dropped. A group of intervals can be defined. Gaps between intervals are permitted; however, intervals cannot overlap.
You should select a time interval for which the historical assortments are reasonably representative of the assortments that will be used in the CMPO application. Because the time interval is used to calculate the substitutable demand information, selecting a representative interval provides substitutable demand information that is highly relevant to the actual application of demand transference in CMPO. Typically, the most representative time period is a recent time interval, since that is generally when assortments are most similar to the current assortments. If you use a time period that is not recent, you run the risk of using assortments that are not as similar to the current ones. You should also make sure not to select an interval that is too large, because a large interval necessarily includes several assortment changes within that interval. An interval size of approximately four weeks is recommended.
The fields that define a time interval are:
Table 3-22 Setup Time Interval: Fields
| Field Name | Field Description |
|---|---|
|
Fiscal Year |
The fiscal year for the time interval. |
|
Fiscal Period |
The fiscal period within the fiscal year (Fiscal Quarter, Fiscal Period, or fiscal Week). |
|
Start |
The time unit when the time interval specified in Fiscal Period begins. |
|
End |
The time unit when the time interval specified in Fiscal Period ends. |
You can vary the value for the maximum substitutable demand percentage and see the impact on selected categories or versions.
Figure 3-20 DT Calculate Substitutable Demand Percentages
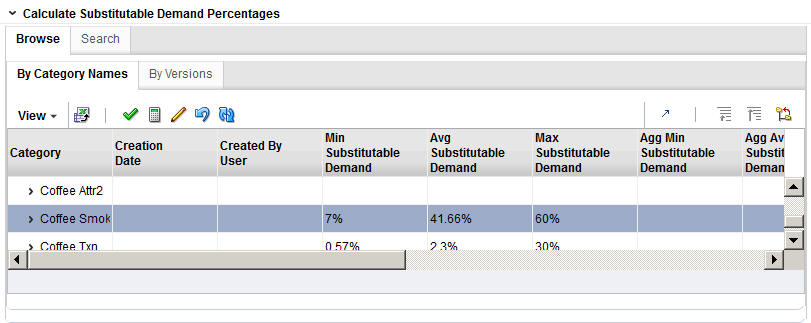
You can browse by Category Names or by Versions. You can also search by name or by creation user. You see the following DT model data displayed:
Table 3-23 Browsing
| Field Name | Description |
|---|---|
|
Category/Version |
The name of the category. |
|
Creation Date |
The date when the version was created. |
|
Created By User |
The user name of the person who created this version. |
|
Min Substitutable Demand |
The percentage value for the minimum substitutable demand. |
|
Avg Substitutable Demand |
The percentage value for the average substitutable demand. |
|
Max Substitutable Demand |
The percentage value for the maximum substitutable demand. |
|
Agg Min Substitutable Demand |
The aggregated value for the minimum substitutable demand. |
|
Agg Avg Substitutable Demand |
The aggregated value for the average substitutable demand. |
|
Agg Max Substitutable Demand |
The aggregated value for the maximum substitutable demand. |
|
Calculation Status |
Indication of whether or not (Yes/No) the calculation is complete. |
|
Completion Status |
Indication of whether or not (Yes/No) the status is active. |
|
Completion Date |
The date when the status became active. |
|
Completion User |
The user name of the person who activated the version. |
Once you have made a selection, click the Edit icon and enter an override value between 0% and 100% for the Maximum Substitutable Demand Percent. Click the Calculate icon to initiate the calculation. To revert the calculation, click the Revert icon.
Once you have determined the substitutable demand value you want, you can click the Complete icon to make the version active.
The Escalation Report breaks down the numbers to provide counts for the number of positions filled with higher-level DT models and the number of partitions that have not been changed by escalation. In addition, the fraction of DT models for each partition is displayed.
Table 3-24 Escalation Report
| Field Name | Description |
|---|---|
|
Total Number of Partitions |
The number of partitions in the version. |
|
Number of Partitions Sourced from Escalation |
The number of partitions removed during escalation. |
|
Number of Partitions Sourced from Calculation |
The number of partitions removed during calculation. |
|
Number of Partitions with No Source |
A partition that does not have a model assigned to it because all models related to the partition have been pruned. |
|
Customer Segment Level |
Identifies the customer segment level. |
|
Location Level |
Identifies the location level. |
|
Number of Models |
The number of partitions that are trying to have a model assigned. This is generally the number of customer segments by the number of locations. |
|
Percentages |
The percentage of partitions that have been assigned a model from a given escalation level. |