3 Manage General Ledger Cross Reference
The GL Cross Reference Maintenance screen allows users to build and maintain the accounting segments necessary to interface ReIM transactions to external financial systems.
Search for a General Ledger Cross Reference
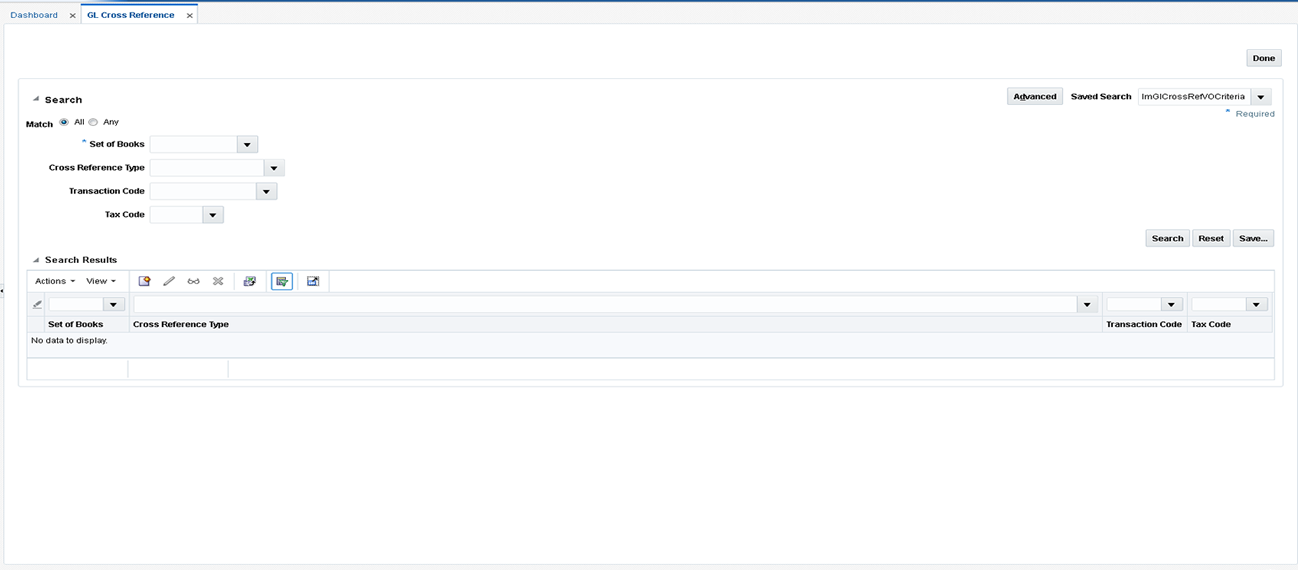
The GL Cross Reference window provides a way in which to search for already defined GL cross references.
Navigate: From the Tasks menu, select Foundation > GL Cross Reference. The GL Cross Reference window opens.
-
From the GL Cross Reference window, use the following criteria to search for existing GL cross references:
Table 3-1 GL Cross Reference Search Fields
Field Description Set of Books
Enter the set of Books associated for which you wish to search.
Cross Reference Type
Enter the Cross Reference Type to be included in the search. Valid values are:
-
Basic Transactions (BT)
-
Non-merchandise Codes (NMC)
-
Reason Code Actions (RCA)
Transaction Code
The ReIM Transaction Code to be used in the search. Transaction codes represent specific accounting transactions which occur in ReIM which need to be interfaced to an external financial system. Valid values will vary depending on the Cross Reference Type selected.
Tax Code
The Tax Code to be included in the search.
In a tax-off environment the Tax Code field will not be displayed.
-
-
After you have entered the desired search criteria, click Search.
Note:
If you would like to save your search criteria to use at a later date, click Save.Your search results are displayed in the Search Results pane of the GL Options window.
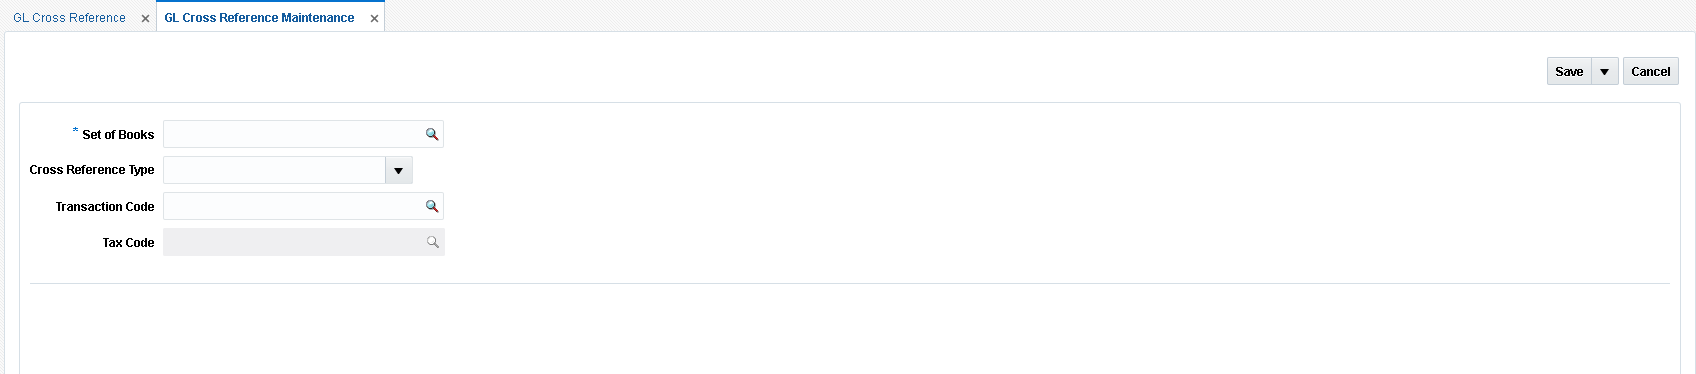
Create a General Ledger Cross Reference
Navigate: From the Tasks menu, select Foundation > GL Cross Reference. The GL Cross Reference window opens.
-
From the Search Results pane of the GL Cross Reference window, select Create from the Action menu. The GL Cross Reference Maintenance window opens.
-
In the Set of Books ID field, enter the identifier that applies to this cross reference.
Note:
If there is only one Set of Books set up in RMS, this field is populated automatically. -
In the Cross Reference Type field, select the account category. Valid values include:
-
Basic Transactions
-
Non-merchandise Codes
-
Reason Code Actions
-
-
In the Transaction Code field, enter the transaction code for the new GL cross reference. Valid values for basic transactions include:
-
TAP – Trade Accounts Payable
-
TAX – Tax
-
UNR – Unmatched Receipt
-
VWT – Variance Within Tolerance
-
DWO – Discrepancy Write Off
-
RWO – Receipt Write Off
-
PPA – Pre-Paid Asset
-
DIRAR – Complex Deal Income Receivable
-
DIRAF – Fixed Deal Income Receivable
-
VCT – Variance Calc Tolerance
-
VCCT – Varance Calc Tax Tolerance
-
CRN – Credit Note
-
TAPNDI – Trade Accounts Payable Non-dynamic item
-
CRNNDI – Credit Note Non-dynamic item
-
TAXNDI – Tax Non-dynamic item
-
TAXRVC – Tax Reverse Charge
-
TAXRVO – Tax Reverse Offset
-
TAXACQ – Tax-Acquisition
-
TAXACO – Tax-Acquisition Offset
For non-merchandise cross reference type use the RMS non-merchandise codes as valid values.
For Reason Code Action cross reference type :
-
The Transaction Code can be sequentially assigned and disabled when in add mode. That is, the sequence number is incremented to assign the next available Transaction Code for Reason Code Actions.
-
This transaction code is then used on the 'Reason Code' Maintenance to assign specific accounting entries to a Reason Code. The structure allows for one Reason Code Action Transaction Code to be used by multiple Reason Codes, thereby reducing setup time.
-
-
In the Tax Code field, enter the tax code associated with the GL cross reference.
Note:
This field is disabled except when a transaction code of 'TAX', 'TAXNDI', 'TAXACQ', 'TAXACO', 'TAXREV', 'TAXxxx', or 'TAXREVO' is being created. -
Click Save to save your changes. Alternatively, from the drop down menu, select Save and Close to save your changes and close the window or Save and Add Another to save your changes and add an additional GL cross reference.
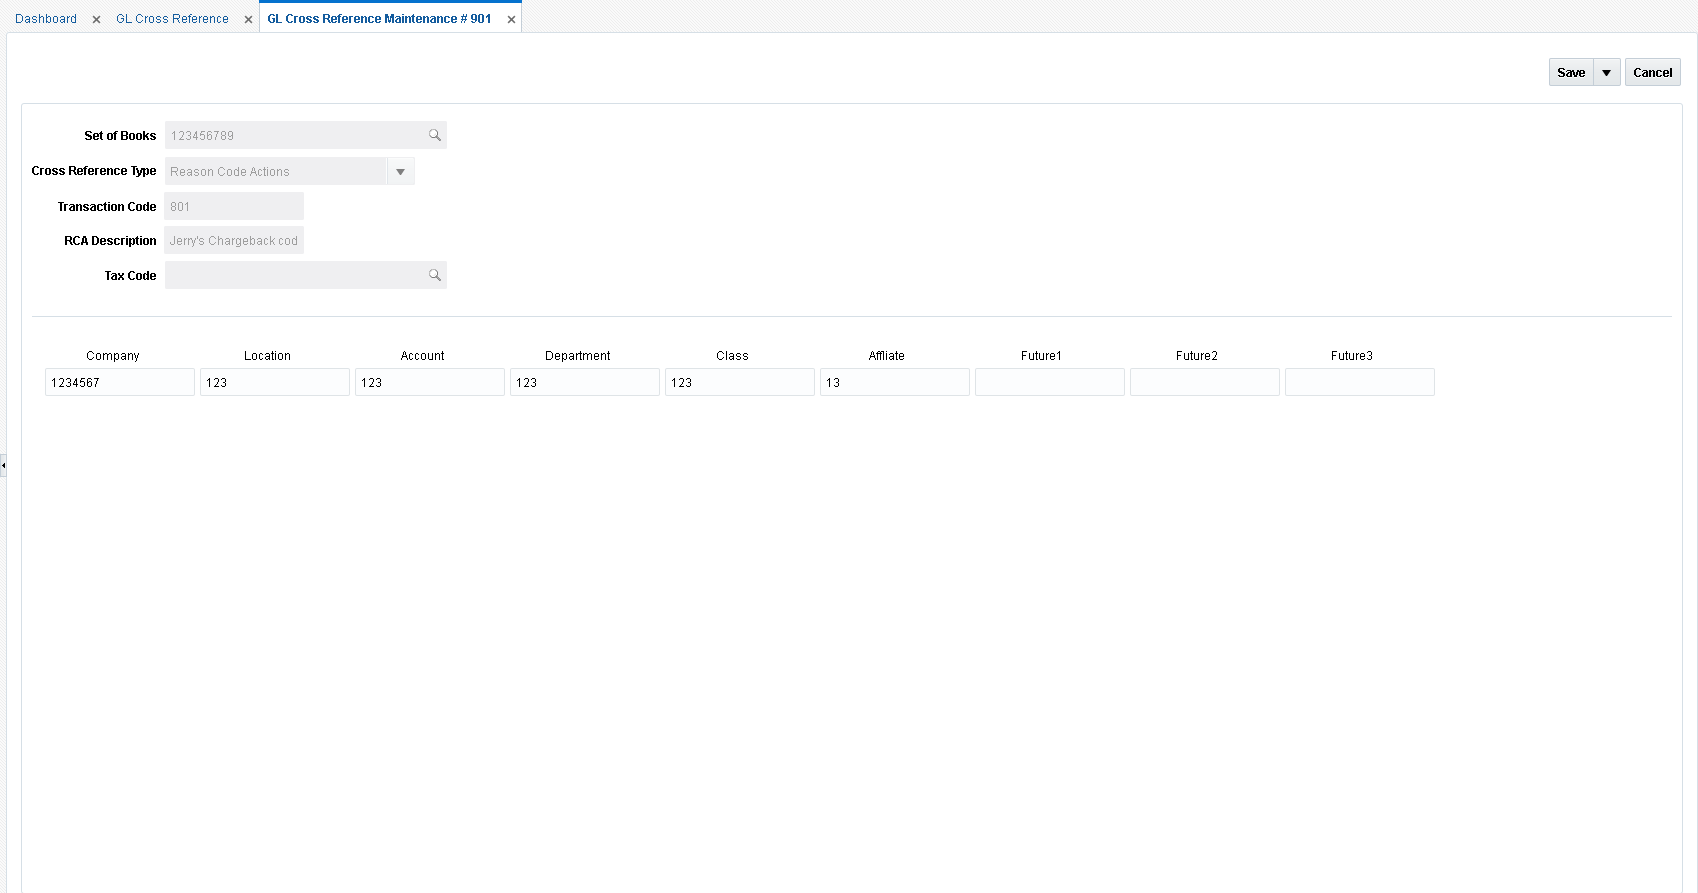
Maintain General Ledger Cross References
Navigate: From the Tasks menu, select Foundation > GL Cross Reference. The GL Cross Reference window opens.
-
Perform a search for the GL cross reference you wish to edit. See Search for a General Ledger Cross Reference for additional information.
-
In the search results pane, select the GL cross reference you want to edit and select Edit from the Action menu. The GL Cross Reference Maintenance window opens.
-
From the GL Cross Reference Maintenance window, update the enabled fields as necessary.
-
Click Save to save your changes. Alternatively, from the drop down menu, select Save and Close to save your changes and close the window or Save and Add Another to save your changes and add an additional GL cross reference.