Defining the User Interface
This task is a step in Process of Adding Custom Objects.
In this topic, you define the form that Siebel CRM Desktop uses to display the custom object. You configure the custom object to use the custom SBL Activity form that resides in the siebel_basic_mapping.xml file that you modified in Creating the Custom Object.
The following figure illustrates the layout of the Activity Form that you create.
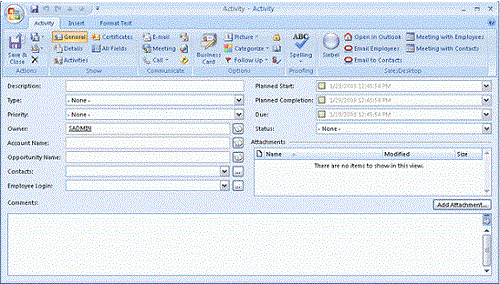
A set of cells describes the form layout. A cell can be empty or it can include a control or a stack. A single stack can include numerous cells. The form is divided into the following parts:
One part includes visible controls.
One part includes hidden controls.
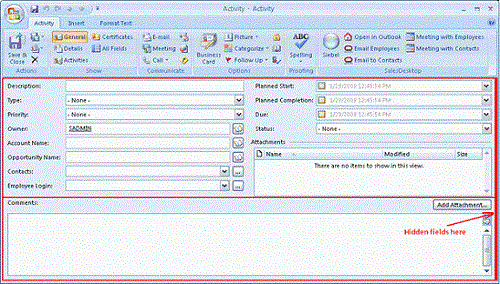
This example uses this configuration because the example uses native Outlook forms as a base for custom forms. Although you can modify the position of a native Outlook control, you cannot remove it entirely from the form. You move the unused controls that are native to Outlook to a location where the user cannot view them. This location is typically a very small cell.
This form is a prototype that helps you visualize the cells, stacks of cells, and the order that you use with the cells and stacks. This visualization helps to reduce the wide range of combinations of cells and stacks that you can describe down to only the cells and stacks that you can support. You can add new fields, remove fields, reorder fields, and apply any other changes during development and testing.
To define the user interface
Use an XML editor to open the forms_12.xml file.
For more information, see Files That the Customization Package Contains.
Divide the form into a visible section and a hidden section. You add the following code to the forms_12.xml file:
<form id="SBL Activity">
  <page id="General" tag="0x10A6" min_height="335" min_width="520">
    <cell>
      <stack layout="horz" padding="10">
      <!-- visible section -->
        <cell>
        <!-visible fields here -->
        </cell>
      <!-- hidden section -->
        <cell size="1">
        <!-hidden fields here -->
        </cell>
      </stack>
    </cell>
  </page>
</form>
Divide the visible section into a start section and an end section, as illustrated in the following figure:
Although not required, this step helps to support the current layout of the form. Add the following code:
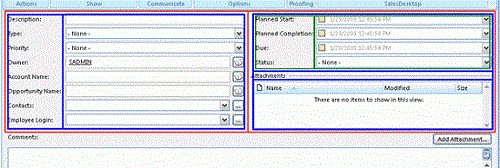
<form id="SBL Activity">
  (……………)
    <!-- visible section -->
      <cell>
        <stack layout="vert" padding="5" spacing="5">
          <!-top section-->
          <cell size="220">
            <!-top section fields here-->
          </cell>
          <!-bottom section-->
          <cell>
            <!-bottom section fields here-->
          </cell>
        </stack>
      </cell>
  (……………)
</form>
Divide the start section into two parts that include two columns, where each column contains a number of fields as illustrated in the following figure:
Add the following code:
<-- top section -->
<cell size=220>
  <stack layout="horz" spacing="5">
    <cell>
      <stack layout="horz" spacing="3">
      <!-- left side captions -->
        <cell size="105">
        </cell>
      <!-- left side fields -->
        <cell>                        </cell>
      </stack>
    </cell>
    <cell>
      <stack layout="vert" spacing="5">
        <cell size="105">
          <stack layout="horz" spacing="3">
          <!-- left side captions -->
            <cell size="110">
            </cell>
          <!-- left side fields -->
            <cell>
            </cell>
          </stack>
        </cell>
        <cell size="13">
          <!-attachments caption and separator here -->
        </cell>
        <cell>
          <!-attachments view here -->
        </cell>
      </stack>
    </cell>
  </stack>
</cell>
Divide the first column into cells where you can place captions for fields, as illustrated in the following figure:

For more information, see XML Code That Creates Cells.
Divide the second column into cells where you can place fields.
The code that you use to complete this step is similar to the code you use in the previous step. You can copy and modify the code that is described in XML Code That Creates Cells.
Define the Comments section of the Activity form, as illustrated in the following figure:

The Comments section is divided into the following parts:
Comments caption and the Add Attachment button
Comments field
To hold the caption and the button, the starting section includes two parts. Another section describes the Add attachment button. It is not described in the section that it relates to according to the button logic. This is not important in this step because you describe the form layout, not the button logic. For more information, see Defining the Logic for Custom Forms.
Add the following code:
<!-- visible section --> <cell> <stack layout="vert" padding="5" spacing="5"> <!-top section--> <cell size="220"> <!-top section fields here--> </cell> <!-bottom section--> <cell size="22"> <stack layout="horz"> <cell> <control id="0x20022" class="static" tab_order="30"> <text>Comments:</text> </control> </cell> <cell size="110" attraction="far"> <control class="button" id="0x20059" tab_order="29" on_click="LinkAttachment()"> <text>Add attachment…t</text> </control> </cell> <cell size="5" attraction="far"></cell> </stack> </cell> <cell> <control id="0x103f" tab_order="31"></control> </cell> </stack> </cell>- Make sure the description you create supports the version of Microsoft Outlook that your users use.
For more information, see Correct Usage of the Forms File and Object ID.