 to access the Navigation List. The Navigation
List displays the list of modules.
to access the Navigation List. The Navigation
List displays the list of modules.This section explains how to perform the initial import of pre-configured pipelines during setup, and how to upload and download pipelines to the application.
Administrators are responsible for uploading pre-configured pipelines once during initial setup. This is a mandatory step. You must upload these pipelines to the environment as part of the initial setup, using the Import Pipelines feature.
To import the ready-to-use pipelines, follow these steps:
1. Navigate to the Applications landing page.
2. Click the
Navigation Menu to access the Navigation List. The Navigation
List displays the list of modules.
3. Click Pipeline Administration. The Administration page is displayed.
4. Follow these steps:
a. Import metadata. This step is mandatory.
i. Click Import Metadata. The metadata is imported and a confirmation message is displayed.
b. To import all ready-to-use pipelines:
ii. Select Import All Pipelines in the Import Pipelines pane. By default, the Import All Pipelines check box is selected.
iii. Click Import. All the ready-to-use pipelines are imported.
c. To import selected pipelines:
iv. Enter the required version of the pipeline to import in the Versions drop-down list. The latest version displays by default.
v. Select the required pipelines to import from the Pipelines drop-down list.
vi. Click Import. The selected pipelines are imported.
NOTE:
If you attempt to upload a pipeline which has already been imported, an error message will display.
The Download/Upload Pipelines feature enables you to download and upload the pipelines available in the application. The pipelines are saved in JSON format which can be uploaded again to the application.
To download pipelines, follow these steps:
1. Navigate to the Administration page.
2. Click Download. The Download Pipeline dialog box displays.
3. Enter the required version of the pipeline to download in the Pipeline Version field. You can only enter numerals here.
4. Select the required pipeline to download from the Pipelines drop-down list.
5. Click Download. The Status dialog box displays Download Complete.
To upload pipelines, follow these steps:
1. Navigate to the Administration page.
2. Click Upload. The Upload Pipeline dialog box displays.
3. Enter the version of the pipeline to upload in the Pipeline Version field. You can only enter numerals here.
4. Select the pipeline to upload from your machine using the Choose File button.
5. Click Upload. The Status dialog box displays Upload Complete.
After importing the ready-to-use pipelines to the application, you may want to configure them to meet your specific business needs. In order to customize these pipelines, you must first create a copy of those pipelines and save it as a new pipeline. You can then configure the newly copied pipeline according to your requirements.
To copy a pipeline, follow these steps:
1. Navigate to the Pipeline Designer page.
2. Click Copy  corresponding
to the pipeline that you want to modify. The Copy Pipeline
dialog box is displayed.
corresponding
to the pipeline that you want to modify. The Copy Pipeline
dialog box is displayed.
3. Provide the details as described in the following table.
Fields to Copy Pipelines and their Descriptions
Field |
Description |
Pipeline to Copy |
Displays the name of the pipeline that you want to copy. |
Copy As |
Enter the name for the new pipeline that you want to create by copying the existing pipeline. |
Description |
Enter the description for the pipeline. |
Add Search Tags |
Enter the keywords for the pipeline. These keywords can be used as search tags while searching for a pipeline. Search tags are also used to group pipelines of the same type. These search tags appear as filters in the pipeline page. |
Type |
Displays the type of pipeline, such as Scenario, Scoring, Data Loading, or Data. |
ATTENTION:
Do not update the Type of data loading, such as SCD, Full load, or Merge.
4. Click Submit. The pipeline is copied.
You can create a new pipeline and then configure the pipeline based on your needs.
To create a pipeline, follow these steps:
1. Navigate to the Pipeline Designer page.
2. Click Add  in
the upper-right corner. The New Pipeline dialog
box is displayed.
in
the upper-right corner. The New Pipeline dialog
box is displayed.
3. Provide the details as described in the following table.
Fields to Create a Pipeline and their Descriptions
Field |
Description |
Name |
Enter the name for the pipeline. |
Description |
Enter the description for the pipeline. |
Add Search Tags |
Enter the keywords for the pipeline. These keywords can be used as search tags while searching for a pipeline. Search tags are also used to group pipelines of the same type. These search tags appear as filters in the Pipeline page. |
Type |
Select the type of pipeline as either Scenario, Scoring, Data Loading, or Data. |
4. Click Create. A new pipeline is created and displayed in the Pipeline page. You can perform the required configurations in the newly created pipeline.
You can configure pipelines that you have created as your requirements change.
NOTE:
Pre-configured Data Pipelines and Pre-configured Scenario Pipelines cannot be edited. You can only edit user-defined pipelines.
To configure a pipeline, follow these steps:
1. Navigate to the Pipeline Designer page.
2. Click the name of the pipeline that you want to configure. The pipeline opens in the Pipeline Designer page.
3. Drag and drop the required widgets from the widgets pane located in the upper-right corner of the designer pane.
4. Hover over
a widget and click Edit  to
configure a widget.
to
configure a widget.
For more information on the widgets in the various types of pipelines, see the following sections:
§ Widgets in Scenario Pipeline
§ Widgets in Scoring Pipelines
§ Widgets in Customer Screening Pipelines
§ Widgets_in_KYC Onboarding_Pipelines
§ Widgets in Watch List Pipelines
Dataset Widget
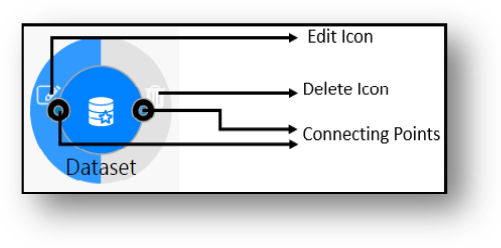
5. Click and hold the connecting point of a widget, and drag and drop to the connecting point of another widget to connect the widgets. If you do not connect the widgets to complete the flow of the pipeline, your pipeline will not work as expected.
6. Click Save  .The
Pipeline Save dialog box is displayed.
.The
Pipeline Save dialog box is displayed.
7. Click OK. The pipeline is configured.
You can edit the description and search tags for user-created pipelines. To edit the pipeline, follow these steps:
1. Navigate to the Pipeline Designer page.
2. Click Edit ![]() corresponding
to the pipeline that you want to modify. The Edit Pipeline
dialog box is displayed.
corresponding
to the pipeline that you want to modify. The Edit Pipeline
dialog box is displayed.
3. Modify the required details.
4. Click Edit. The pipeline details are modified.
NOTE:
Pre-configured Data Pipelines and Pre-configured Scenario Pipelines cannot be edited. You can only edit user-defined pipelines.
The Metadata snippet shows how your scenario pipeline is configured, in detail. It contains information about the pipeline such as the name, description, the dataset the scenario is using, segments and evaluations configured for the scenario, and so on. In addition, it provides the pipeline diagram. This metadata can be used to help auditors understand the logic and parameters of your scenario, as it is currently configured.
NOTE:
This feature is available only for Scenario Pipelines.
To download a metadata snippet, follow these steps:
1. Navigate to the Pipeline Designer page.
2. Click Download  corresponding
to the scenario pipeline for which you want to download the metadata snippet.
The metadata snippet for the selected pipeline is downloaded in .html
format.
corresponding
to the scenario pipeline for which you want to download the metadata snippet.
The metadata snippet for the selected pipeline is downloaded in .html
format.
To delete a pipeline, follow these steps:
1. Navigate to the Pipeline Designer page.
2. Click Delete  corresponding
to the pipeline that you want to delete. The selected pipeline is deleted.
corresponding
to the pipeline that you want to delete. The selected pipeline is deleted.
NOTE:
Pre-configured Data Pipelines and Pre-configured Scenario Pipelines cannot be edited. You can only edit user-defined pipelines.