5 Auto Quantity Limits
Quantity limits allow allocators to limit the quantity allocated to a location for an item on a location. Allocation supports several types of quantity limit constraints: Minimum Net Need, Maximum Net Need, Threshold, Weeks of Supply, Trend, and Minimum Gross Need.
Create Quantity Limits
You can store a default set of quantity limits for the desired merchandise hierarchy and location groups. The auto quantity limits section allows you to set parameters for the allocation at the item/warehouse level demand constraints.
To manage auto quantity limits:
-
From the Tasks menu, select Allocation Foundation > Manage Auto Quantity Limits. The Manage Auto Quantity Limits window appears.
-
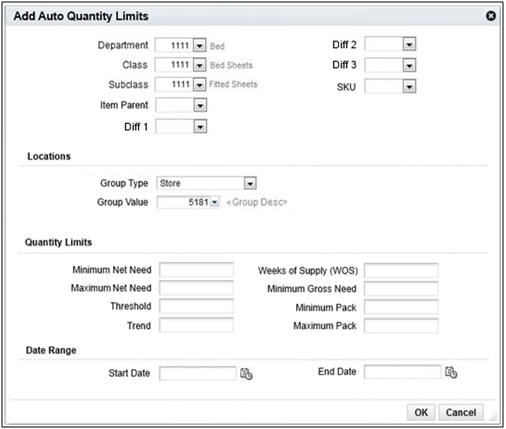
Select Create from the Actions drop down list. The Add Auto Quantity Limits window appears.
-
Enter a Department, or select a value from the LOV.
-
Enter a Class, or select a value from the LOV.
-
Enter a Subclass, or select a value from the LOV.
-
Enter an Item Parent, or select a value from the LOV.
-
Enter a Diff, or select a value from the LOV.
-
Enter a SKU, or select a value from the LOV.
-
From the Locations area, enter the Group Type, or select a value from the LOV.
-
Enter the Group Value, or select a value from the LOV.
-
From the Quantity Limits area, enter the Minimum Net Need.
-
Enter the Maximum Net Need.
-
Enter the Threshold.
-
Enter the Trend.
-
Enter the Weeks of Supply (WOS).
-
Enter the Minimum Gross Need.
-
Enter the Minimum and Maximum Pack. The minimum pack quantity limit ensures that the destination location receives at least this number of packs irrespective of the calculated demand. The maximum pack quantity limit ensures that the store does not receive more than this number of units of the pack item.
Note:
The pack quantity limits can be applied only in cases where the allocation contains only pack items that have been selected to be allocated as a single entity.Note: The available packs is a sum of all the item sources linked with the pack selected by the user in the current allocation.
-
From the Date Range area, enter the Start Date, or select a value by clicking the calendar icon.
-
Enter the End Date, or select a value by clicking the calendar icon.
-
Click OK to save the information and return to the Manage Auto Quantity Limits window. You can now use the Auto Quantity Limits checkbox to load the default quantity limits for creating an allocation for all work flows.