4 Size Profiles
Size Profile refers to the ratio derived out of historical sales figures to give an accurate estimate of the number of items of different sizes or colors that must be allocated to the destination store and applies only to fashion items within Allocation.
Create Size Profiles
A size profile can be created through any of the following procedures:
Create a Size Profile
You can create a size profile based on the criteria defined here:
Non-GID based size profile
-
If the current allocation is using a non-GID based profile, you can create, edit, or delete the size profile details.
-
If there is no data present in the database corresponding to the item/location combination, you can add the size profile details through the system UI.
To create a size profile:
-
From the Tasks menu, select Manage Size Profiles. The Manage Size Profiles window appears.
-
Search and select the size profile that you want to edit.
-
Click the edit icon. The size profile is enabled for editing.
-
Enter a ratio in the Ratio column for each of the items.
-
Click Save to save the size profile.

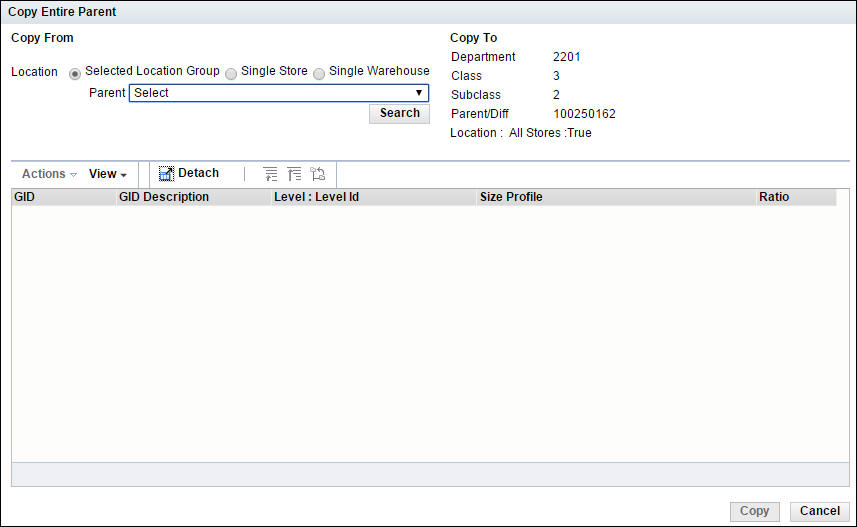
Copy a Parent
To copy a parent:
-
From the Tasks menu, select Manage Size Profiles. The Manage Size Profiles window appears.
-
Search and select the size profile that you want to copy to.
-
Click Copy Entire Parent. The Copy Entire Parent window appears.
-
In the Copy From field, select the parent. The size profile details appear.
Note:
The parent to copy from must have the same sizes and diffs as the parent being copied to. -
Select the size profile. The Copy button is activated.
-
Click Copy. The size profile is copied and the Size Profile window appears.
-
If required, you can edit the ratio in the Ratio column.
-
Click Save to save the size profile.
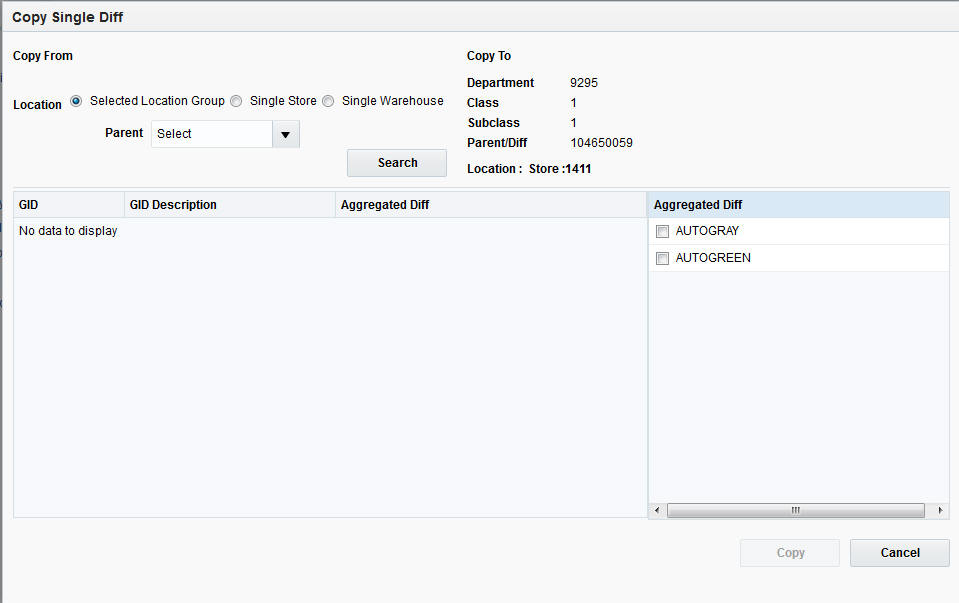
Copy a Single Diff
You can copy size profile ratios from single diff of the selected parent to one or more diffs of the current parent.
To copy a single diff:
-
From the Tasks menu, select Manage Size Profile. The Manage Size Profiles window appears.
-
Search and select the size profile that you want to copy.
-
Click Copy Single diff. The Copy Single diff window appears.
-
In the Copy From field, select the parent. The size profile details appear.
-
Click the Expand icon to view the aggregated diffs available in the size profile.
-
Select the diff from which you wish to copy. The Copy button is activated.
-
Click Copy. The single diff is copied and the Manage Size Profile window appears.
-
If required, you can edit the ratio in the Ratio column.
-
Click Save to save the size profile.
Manage Size Profiles
The following actions can be performed when managing Size Profiles:
Search for Size Profiles
Generation IDs are sets of store size profile data created and maintained in Oracle's Size Profile Optimization (SPO) product. SPO to Allocation is required in order to search and select GIDs.
You can search for a size profile in three different combinations.
-
GID only search – Displays all the records that correspond to the selected GID. The records displayed may be at the same merchandise hierarchy level or different ones.
-
GID and Merchandise Hierarchy combined search – Displays records, common to the selected GID and merchandise hierarchy.
-
Merchandise Hierarchy only – Displays records that correspond to the selected merchandise hierarchy. There may be more than one GID record (Summer Profile, Spring Profile, Winter Profile) but there is always only one set of non-GID records at a given level.
To search for a size profile:
-
From the Tasks menu, select Manage Location Size Profiles. The Manage Location Size Profiles window appears.
-
In the Generation ID field, select an ID for a GID search or a GID merchandise combined search.
-
In the Size Profile Level field, select a level.
-
In the Department field, select the department.
-
If necessary based on the size profile level you selected in step 3, select the class, subclass, parent, or parent/diff.
-
In Location Selection Criteria, select the location for which the size profile must apply. You must select at least one location.
-
In Size Group Selection Criteria, select the size group for the size profile.
-
Click Search. The list of size profiles matching the criteria is displayed.
Edit Size Profiles
You can edit an existing size profile based on the criteria defined here:
GID based size profile
-
If the current allocation is using a GID based profile, you can only edit or delete the size profile.
-
If there is no data present in the database corresponding to the selected GID, then you must either select a different GID or a non-GID based profile. Data addition is not possible for a GID based size profile.
Non-GID based size profile
-
If the current allocation is using a non-GID based profile, you can create, edit, or delete the size profile details.
-
If there is no data present in the database corresponding to the item/location combination, you can add the size profile details through the system UI.
To edit size profiles:
-
From the Tasks menu, select Manage Size Profiles. The Manage Size Profiles window appears.
-
Search and select the size profile that you want to edit.
-
Click the edit icon. The size profile is enabled for editing.
-
Enter a ratio in the Ratio column for each of the items.
-
Click Save to save the size profile.
Warehouse Size Profiles
The following options are available for warehouse size profiles:
-
% to Total
When this option is selected, the system allocates based on the percentage of each size to the total available quantity. This is determined using the following steps -.
Step 1: Determine the percentage availability of each size to the total available quantity to allocate at the source location. Refer to the following table for this calculation:
Style-Color Red Navy Shirt Available Quantity % to Total SKU SM Red Navy Shirt 250 21 SKU MD Red Navy Shirt 300 26 SKU LG Red Navy Shirt 450 38 SKU XL Red Navy Shirt 175 15 Step 2: To allocate 200 units to the destination warehouse based on its need value.
Step 3: Apply the % to Total values obtained in Step 1 against the allocated quantity of 200 units going out to the destination warehouse. The results would be as follows:
Style-Color Red Navy Shirt 200 SKU SM Red Navy Shirt 43 200*21 SKU MD Red Navy Shirt 51 200*26 SKU LG Red Navy Shirt 77 200*38 SKU XL Red Navy Shirt 30 200*15 Size SM = 21% of the total available quantity, 200*21% = 43 units
Size MD = 26% of the total available quantity, 200*26% = 51 units
Size LG = 38% of the total available quantity, 200*38% = 77 units
Size XL = 15% of the total available quantity, 200*15% = 30 units
Total allocated by size to warehouse = 200 units
Note:
The total available quantity refers to the total number of units present in the set of sources selected for an item linked to the specific warehouse within an allocation.Consider the following example:
PO1 for WH1 = 100 units
PO2 for WH2 = 175 units
SOH at WH1 = 55 units
SOH at WH2 = 45 units
-
If both PO1 and SOH are selected as sources for WH1, then the total available quantity for allocations sourced out of WH1 = 100 + 55 = 155 units
-
For WH2, if only SOH is selected as the source, then the total available quantity for allocation sourced out of WH2 = 45 units (ignoring the 175 units present in PO2).
So, based on the source(s) selected within an allocation for a fashion item, the total available quantity is subject to change.
Note:
This method does not apply to What-if allocations which will completely rely on records in the database table ALC_SIZE_PROFILE. An exception is thrown if there are no records in this table just like it works for store locations for this type of an allocation.Any holdback quantity specified in the source warehouse is not considered while determining the warehouse availability.
-
-
WH Sales Curve
This option is valid only for the Demand Source = History. An error pop-up is encountered if you try to apply this option for other demand sources.
When applied, this will apply a curve using a weighted average logic from all the data present in the Issues column from the existing RMS owned ITEM_LOC_HIST table for the warehouse locations. For any store locations, the check-boxes linked with the sales type that are checked will act as an additional filter.
For example, if Regular and Promotional are selected in the Policy window, both these types of sales issues in the ITEM_LOC_HIST table will be considered.
In case of no records present for the warehouse in the table, the allocation will be moved to the Calculation Error state.
Understanding the Manage Size Profiles Window
The Manage Location Size Profiles window allows you to view, edit, and create size profiles, or size curves, at any merchandise hierarchy level including department, class, subclass, parent, diff. Allocation allows you to load size profiles (curves) from Oracle Retail Curve, a module of Oracle Retail Demand Forecasting.
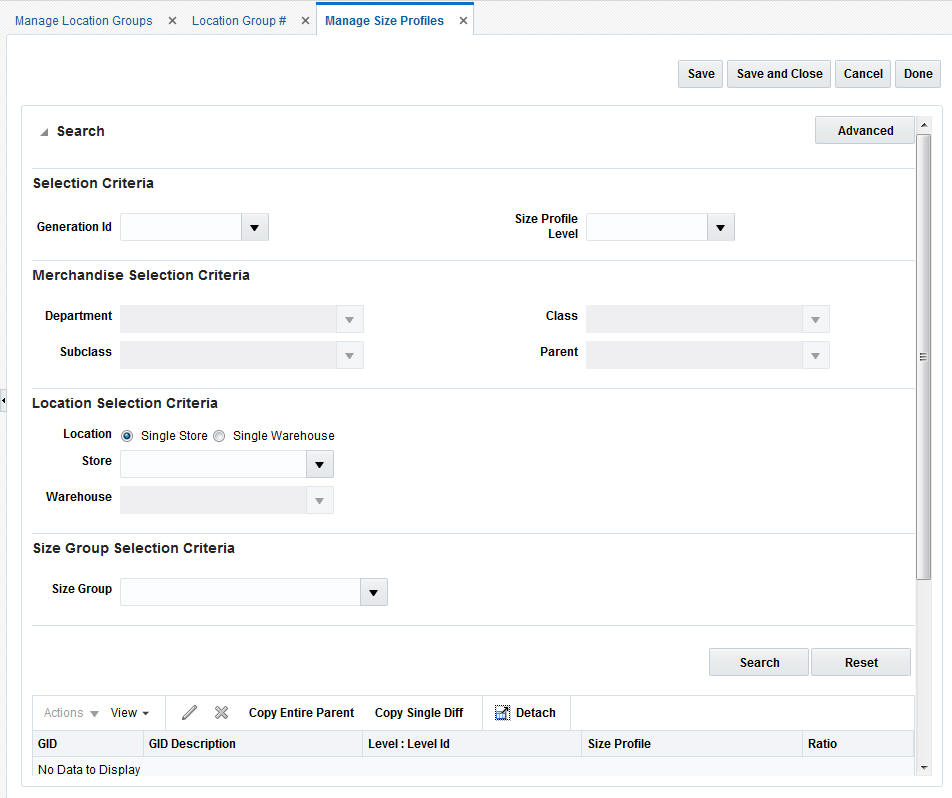
Following are the fields available on the Size Profile window:
-
Generation ID
Indicates the generation IDs (GIDs) sent from Oracle Retail Size Profile Optimization (SPO). GIDs are seasonal store size profiles.
-
Size Profile Level
Indicates the merchandise hierarchy level for which the size profile records are retrieved. This list contains the following values:
-
Department
-
Class
-
Subclass
-
Parent
-
Parent/Diff
-
-
Department
Indicates the Department ID that the size profile is associated with.
-
Class
Indicates the Class ID that the size profile is associated with.
-
Subclass
Indicates the Subclass ID that the size profile is associated with.
-
Parent
Indicates the Parent ID that the size profile is associated with.
-
Parent/Diff
Indicates the Parent/Diff ID that the size profile is associated with.
-
Single Store
Indicates the Store ID used for the size profile search.
-
Single Warehouse
Indicates the Warehouse ID used for the size profile search.
-
Location Group (Advanced search option)
Following are the options available:
-
Store Grade Group
Indicates the Store Grade Group ID the size profile is associated with.
-
Store Grade
Indicates the Store Grade ID the size profile is associated with.
-
Location List
Indicates the Location List ID the size profile is associated with.
-
Location Trait
Indicates the Location Trait ID the size profile is associated with.
-
-
All Stores (Advanced search option)
Indicates that the size profile details for the items in the allocation for all the valid stores for which the item range exists is displayed.
-
All Warehouses (Advanced search option)
Indicates that the size profile details for the items in the allocation for all the valid warehouses for which the item range exists is displayed.
-
Size Group
Indicates the size group linked to the size profile. Displays a list of non-aggregated size groups for the selected merchandise hierarchy and it is applicable to the levels: Department, Class, and Subclass.