3 Create Schedule from a Worksheet
This chapter describes how you can create a scheduled allocation. To create a scheduled allocation, select and review the items, add locations, and assign policies. A Parent Allocation template is created. The template has all the criteria based on which the child or children allocations are scheduled or run.
Note:
Scheduled Allocations are not intended to replace or replicate replenishment type of objectives.Creating an Allocation from the Worksheet
To create an allocation from the Worksheet window:
-
On the Worksheet window, select the items that you want to allocate.
-
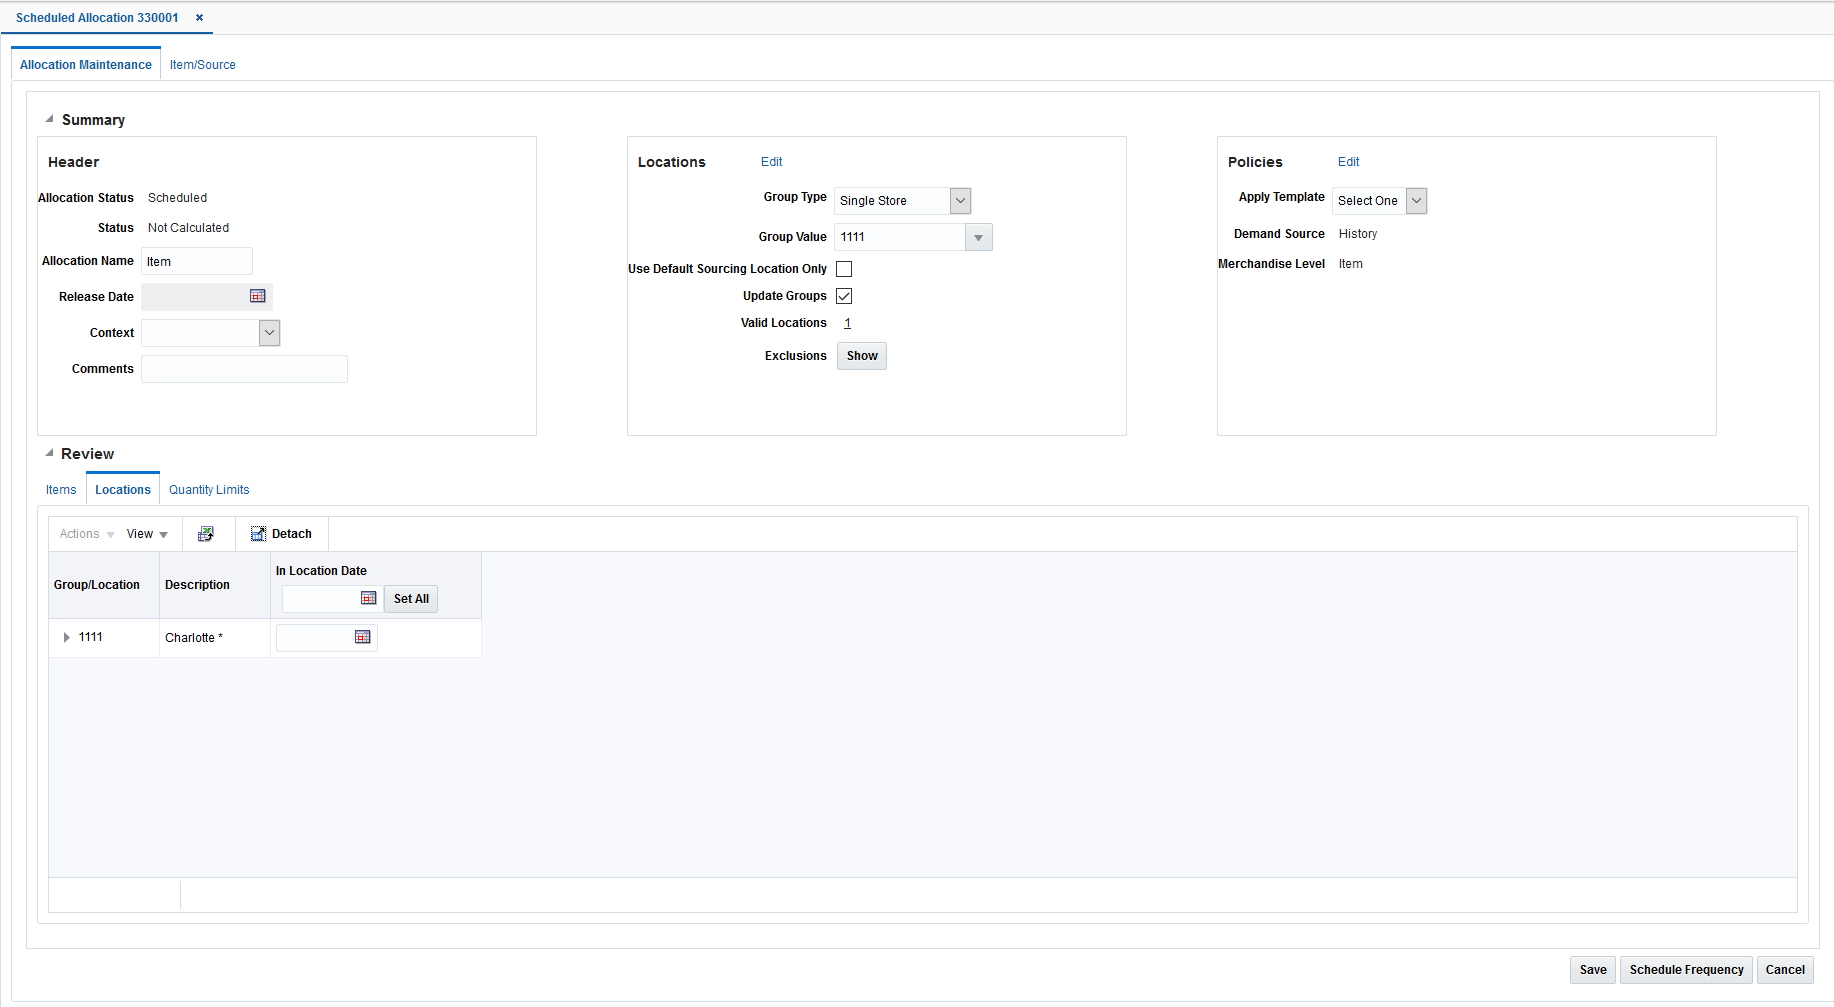
Click Create Schedule. The Allocation Maintenance window appears. You can proceed to select locations and policies for the allocation.
Reviewing Item Information
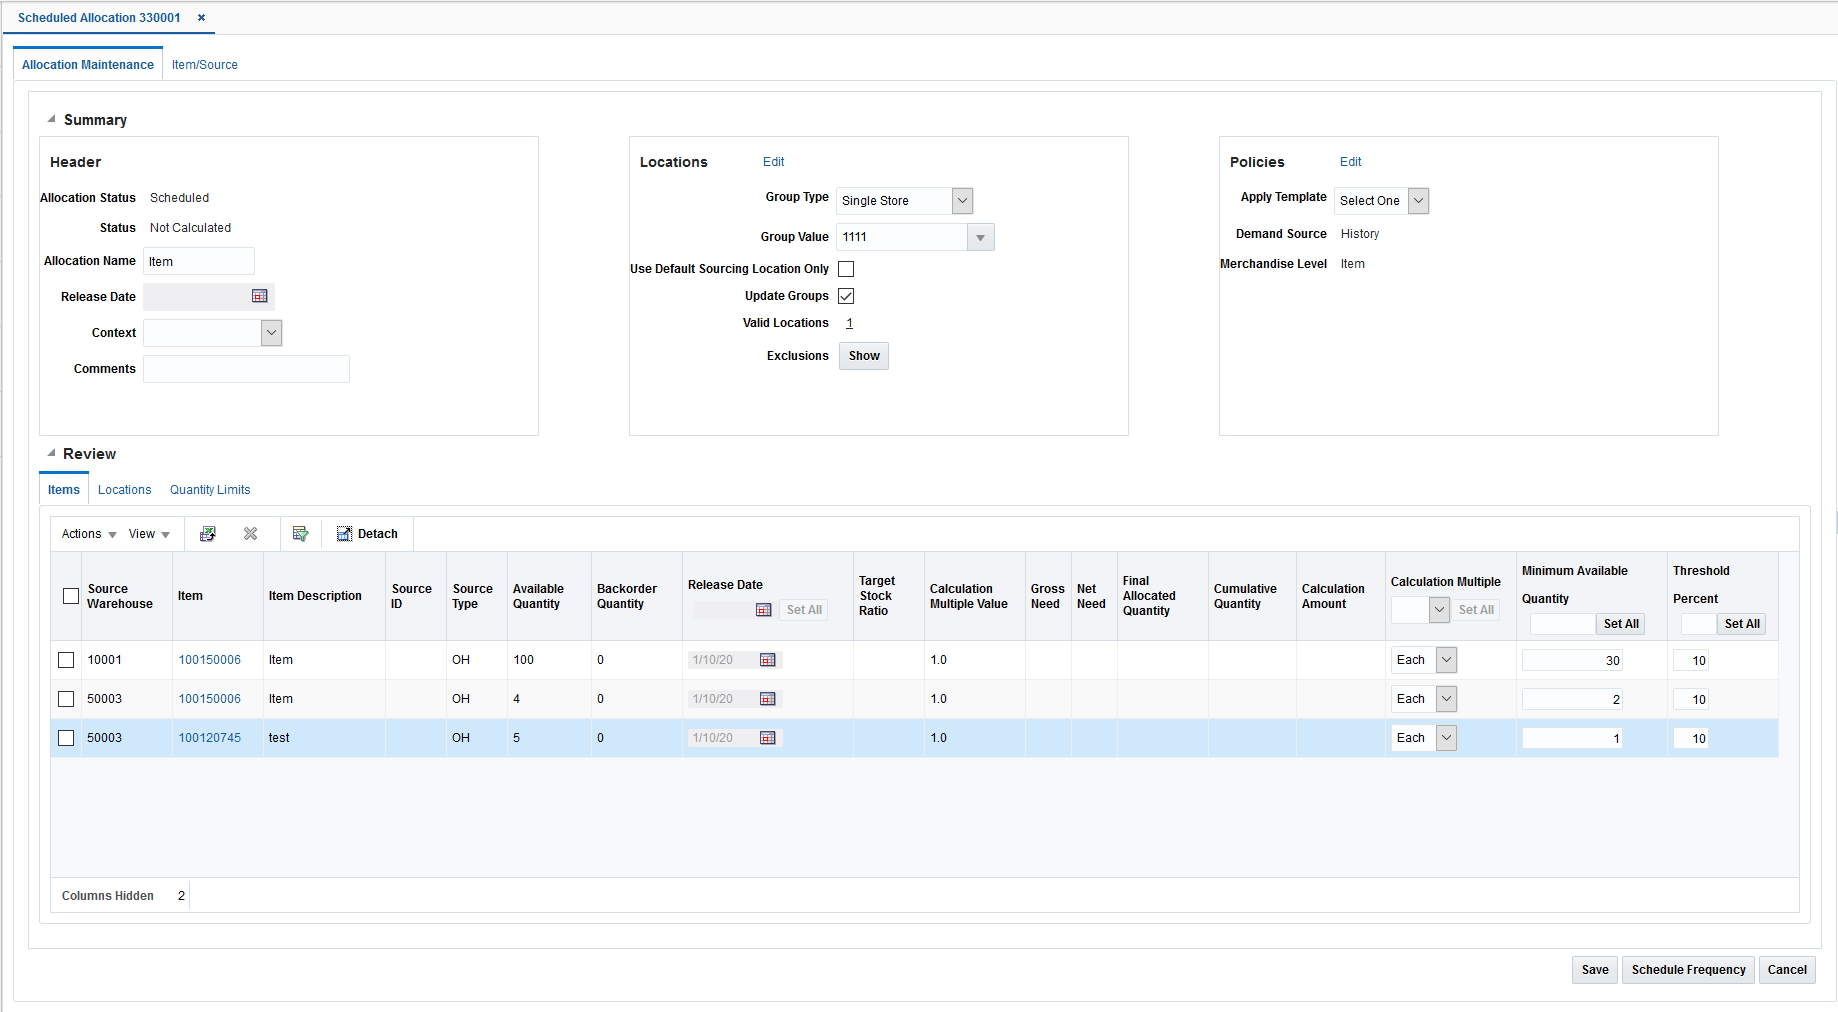
The Review section of the Allocation Maintenance window allows you to view items that were selected for allocation, the quantity available, the calculation multiple, and source information. Here you can specify the holdback quantity/percent.
To review item information:
-
On the Scheduled Worksheet window, click Create Schedule. The Allocation Maintenance window appears.
-
In the Context field, select a reason why the allocation is being created (optional).
-
If you select Promotion in the Context field, select a promotion in the Promotion field.
-
In the Comments field, enter comments or notes as necessary.
Understanding the Item Window
You can view the item details by clicking the Item ID link in the Worksheet or the Allocation Maintenance window. It has the following tabs:
-
Header – This provides the complete item description along with the Merchandise Hierarchy, Differentiators and Supplier details
-
Pricing – The Current Retail and Future Retail (based on the Release Date) values are displayed here at the unit level as well as the total number of allocated units
-
UDAs – This displays any user defined attributes linked with the item in Merchandising
-
Config – Packaging details linked with the item such as the inner, case and pallet values are displayed here.
This pop up also displays an image of the item retrieved from the ITEM_IMAGE table in Merchandising.
Viewing the Item Retail Pricing
In the Item ID column click the item ID for which you want to view the item details. The Item window appears. Select the Pricing tab to view the item retail information.
Note:
The Pricing tab is not available for Non Sellable items.
Release Date
For scheduled allocations, the release date field is not applicable. So the release date field is disabled.
Specifying the Calculation Multiple
Select the calculation multiple from the Calculation Multiple column. Click Set All to apply the multiple to all items in the allocation. The options available are:
-
Each
-
Inner
-
Case
-
Pallet
To specify the calculation multiple of individual items, select the multiple from the Calculation Multiple field next to the item.
Minimum Available Quantity
Specify the minimum available quantity the item must meet for scheduled allocations. This is to ensure that there is enough available quantity to fulfill total store demand or need (accounts for Hold Back values as well). Allocation auto creates an allocation even if the Minimum Available Quantity is not met. However, such allocations remain only in Worksheet Status.
Note:
If you want to specify the minimum available quantity for all the selected items, then specify the quantity in the Minimum Available Quantity field appearing as a horizontal row, and click Set All.If you want to specify different minimum available quantity for different items, then enter the value in the column next to the selected item.
Threshold Percent
Specify the threshold percent the item must meet for scheduled allocations.
Threshold percent is the acceptable tolerance amount between total store/warehouse need or demand, and total available quantity. When total store/warehouse need is greater than total available quantity, the threshold percent is used to prevent the system from spreading the total available quantity too thin. The allocation is auto created but not auto approved or reserved so you must determine if the allocated quantity is acceptable.
Note:
If you want to specify the threshold percent for all the selected items, specify the quantity in the Threshold Percent field appearing as a horizontal row, and click Set All.If you want to specify different threshold percentages for different items, enter the value in the column next to the selected item.
The Threshold Percent is the percent difference between total store/warehouse need and total available quantity. The Store/Warehouse Need can be Gross Need or Net Need.
-
For Gross Need, Threshold Percent = ((Gross Need - Available Quantity)/Net Need) * 100%
-
For Net Need, Threshold Percent = ((Net Need - Available Quantity)/Net Need) * 100% [Net Need = Gross Need - (Stock On Hand + Future Fulfillment)]
The Total Net Need and Available Quantity used for calculating the Threshold Percent are shown when you select these columns from the View > Columns menu in the Review section of the Allocation Maintenance window.
Select Locations
The Add Locations window allows you to choose the location or location groups that can be considered to receive items. By using the grouping tools in the merchandising system, Oracle Retail Allocation allows you to easily add location or location groups to an allocation. Every store group is customizable in Allocation.You may create one of the following complex groups:
-
A union, which includes all locations in the groups selected.
-
An intersection, which includes all locations that are duplicated in the groups selected.
-
An exclude intersection, which includes all locations that are not duplicated in the groups selected.
-
An exclude, which excludes the locations in the groups selected.
Templates are created to apply the same location combination to multiple allocations.
Adding Locations
When you have selected and reviewed the items to allocate, you can select locations and assign stores to the Allocation.
Note:
You can select franchise locations to create an allocation for franchise stores. Allocations can be for only franchise stores or for a combination of franchise and company stores. When an allocation created for one or more franchise stores is approved, a franchise order is created.To add locations:
-
On the Allocation Maintenance window, from the Locations section, select the type of group in the Group Type field. Locations are brought from the selected group into the Allocation.
-
Clear the Use Default Sourcing Location Only check box to allocate to any store from any warehouse.
-
Select Never for the Update Group option to specify that location groups in this allocation should not be updated even if the Merchandising location groups (or the Allocation Group) change.
-
Click Edit Location. The Add Locations window appears.
-
Select the location group using the following lists:
-
Location List
-
Location Trait
-
Allocation Group
-
Store Grade List
-
Single Store
-
Single Warehouse
You can also select the All Stores and All Warehouses option.
-
-
Click the
 icon. The location groups matching the search criteria are displayed in the Group View tab.
 -
If you want to delete any stores before creating the location group, do the following:
-
Select the Location View tab. The stores available in the selected location groups are displayed.
-
Select the stores or warehouses you want to delete.
-
Click the delete icon.
-
-
Select the groups you want to combine to form a new location group.
-
Click the Union, Intersection, Exclude, or Exclude Intersection button to form the desired combination.
-
Optionally, enter a name in the Group Name field and click Save As to save the new location group.
-
Click Apply. The new location group is applied to the Allocation. You can review the selected locations in the Review section of the Allocation Maintenance window.
Select Policies
An allocation determines need by using a policy and policy modifiers. You determine how the policy gathers information by selecting Level, Calculation Type, Date Range, and Sales History Type.You can customize the level a policy is applied to by using the User Merchandise Level Selection window. Use the window to set the percentage of policies to apply to hierarchies and the time periods to constrain the policies.
Selecting a Policy
To select a policy:
-
From the Worksheet, select the items to allocate.
-
Click Create Allocation. The Allocation Maintenance window appears.
-
In the Rules section, you can select a predefined policy from the Apply Policy list.
-
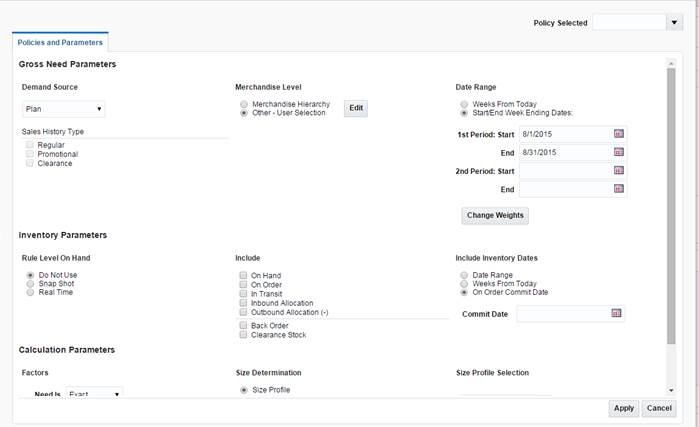
Click Edit link in the Rules section. The Policies window appears.
-
In the Demand Source field, select the source of demand from the list of values:
Note:
Before selecting the source of demand, understand the following:-
History for a warehouse is only applicable at the item level.
-
Plan re-project is not applicable for warehouses.
-
For the policy types which are based on database values/entries such as History, Forecast, Plan, Corporate and Receipt Plan, in case of no records existing at the warehouse level, their need is treated as zero in the same way as it works for store locations.
Table 3-1 Select Demand Source Options
Source Description History
Use the item's historical sales for the date range selected to determine the gross need of item on the allocation.
Corporate Rules
Use custom pre-defined rules to determine the gross need of the item on the allocation.
Manual
Use to allocate fixed quantities of the item on an allocation. You must know the quantity to be allocated to each store which must be manually entered.
History and Plan
Use both the item's sales history and plan for the date range selected to determine the gross need of the item on the allocation.
Forecast
Use the item's forecast for the date range selected to determine the gross need of item on the allocation.
Plan
Use the item's plan for the date range selected to determine the gross need of the item on the allocation.
Receipt Plan
Use the item's receipt plan to determine the gross need of the item in the Allocation system in order to create pre-allocations.
Plan Re-project
Use to compare the item's actual sales to the plan, re-forecast the plan based on performance for the date range selected, and use the re-projected plan to determine the gross need of the item on the allocation.
-
-
In the Sales History Type section, select the check boxes for the type of history to include.
Selecting a Level
On the Policies window, you can select to allocate by hierarchy or user selection.
Allocating by Hierarchy
To allocate using hierarchy:
-
In the Level section, select Hierarchy.
Note:
Pack Distribution mode is not applicable for Item hierarchy. If the component items have more than one distinct department/class/subclass then User Selection must be used. -
Select the hierarchy level to allocate by from the list.
Note:
-
Item need for an allocation is determined by calculating the need for each item on the allocation from the selected rule for the organizational hierarchy level selected.
-
Allocating by User Selection
To allocate using user selection:
-
In the Level section, select User Selection.
-
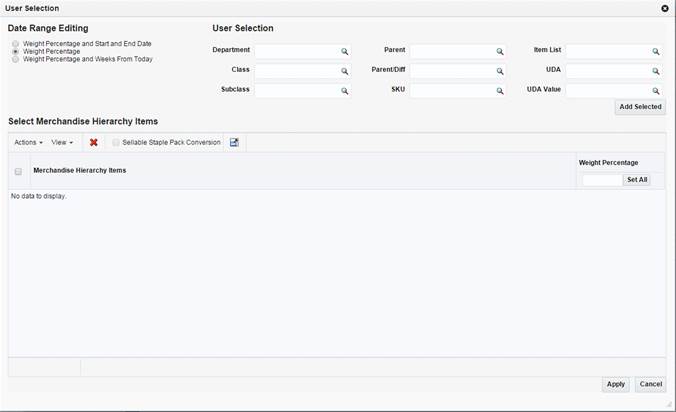
Click Edit. The User Selection window appears.
-
In the Date Range Editing section select an option:
-
Weight Percentage
-
Weight Percentage and Start and End Date
-
Weight Percentage and Weeks from Today
-
-
In the User Selection section enter an ID in the appropriate field to select a merchandise hierarchy level.
-
Click Add. The merchandise hierarchy is added to the Select Merchandise Hierarchy Items section.
-
Enter the weight or percentage to adjust the need calculated for the user selection in the Weight column.
-
Enter the start and end date in the Start Date and End Date column.
Note:
-
The Start Date and End Date columns appear only if you have selected Weight Percentage and Start and End Date option.
-
You need to select two start and end dates when the demand source is History, Forecast, or Plan.
-
-
Enter a number in the Weeks From Today column. This value specifies the number of weeks all approved allocations, direct to store orders, and transfers as stock on hand and future fulfillment, are included at the store or warehouse in the need calculation. The value can range between 1 and 52 only.
Note:
-
The Weeks From Today columns appear only if you have selected Weight Percentage and Weeks from Today option.
-
If no number is entered, the system includes all stock on hand at the store and future inventory regardless of the date on the purchase orders or transfers.
-
Setting Inventory Parameters
The inventory parameters comprise of Rule Level On Hand, Include In Inventory, and Include Inventory Dates.
Selecting Rule Level On Hand
To set Rule Level On Hand:
-
Select one of the following options available in the Rule Level On Hand section:
-
Do Not Use
-
Snap Shot
-
Real Time
Note:
-
When Rule Level On Hand is used with User Selection, the on-hands is based on the rule level of the like merchandise hierarchy selected.
-
For performance purposes, the Rule Level On Hand Snap Shot is stored in a database table which can be refreshed through a batch program to be run at your discretion.
-
Selecting Include in Inventory
Currently, when allocating the net need using either Stock on Hand (SOH) or Rule Level On Hand (RLOH), the values for on-hand is derived from using the summation of five Merchandising Inventory buckets. You can select to include or exclude one or more of these buckets.
To include inventory details:
Include Inventory Dates
In the Include Inventory Dates section, when you enter a date in the On Order Commit Date field, all approved allocations, direct to store orders, and transfers dated on or before the date are included in the calculation of on-hand quantity.
When you enter the number of weeks, it is used to determine how many weeks into the future should be used to pull approved allocations, direct to store orders, and transfers into the calculation for on-hand quantity.
Selecting a Date Range
On the Policies window, you can select the date range.
-
Enter the start date in the 1st Period Start field.
-
Enter the end date in the 1st Period End field.
Note:
You may select a second time period by entering dates in the 2nd period Start and End fields.
Enter the number of weeks to search back or forward, depending on the rule type selected. The system starts searching with the last completed week.
-
Click Change Weights. The Change Weights window appears.
Note:
The date displayed is the end of the week selected as defined in the allocation configuration files. -
Enter the new weights as appropriate.
-
Click OK to save changes.
Selecting a Type
To select a type:
-
In the Type section Need is field, select how the Allocation should determine the quantity of items sent to a location.
-
In the Mode field, select the type of algorithm calculation.
-
In the Allocate To field, select the need type for calculation, values available are Net and Gross.
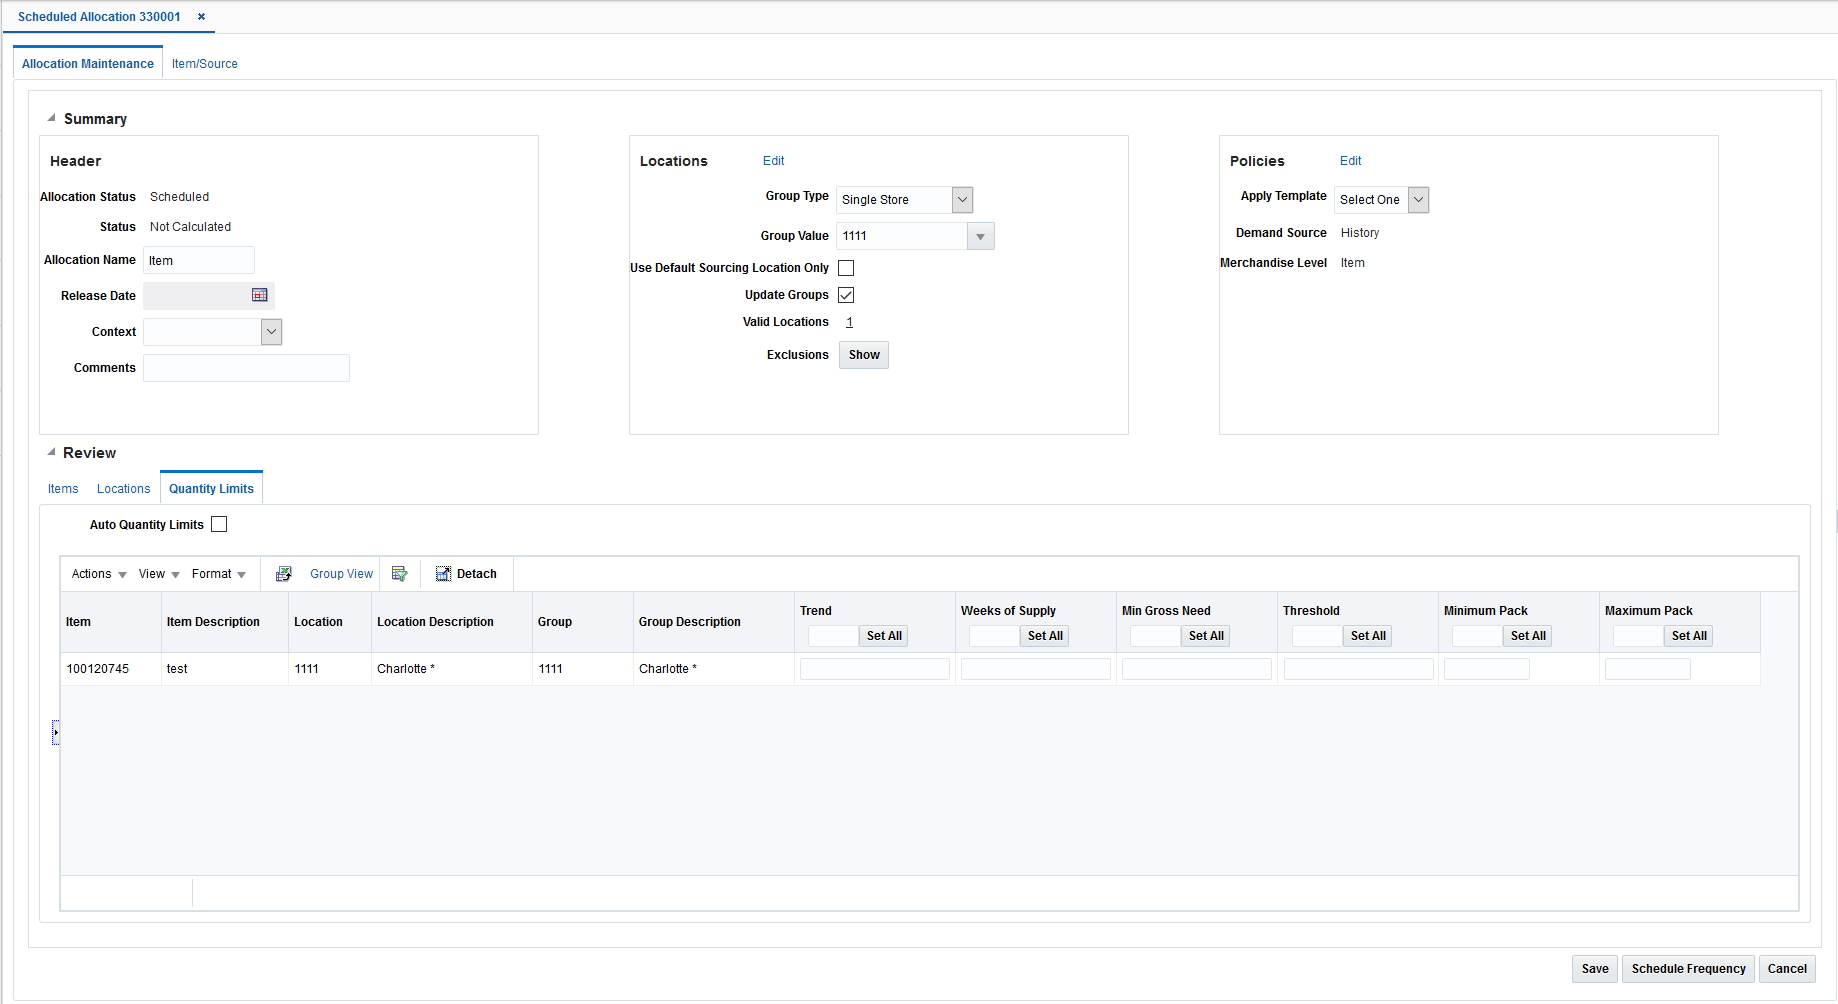
Set Quantity Limits
The quantity limits section allows you to set parameters for the allocation at the item/location level. The section allows you to set the parameters for different stages of the allocation.
To set quantity limits:
-
On the Allocation Maintenance window, select the Quantity Limits tab from the Review section. The Quantity Limits window appears.
-
In the By Location Aggregate field, the location level is set to Store for Simple mode.
-
-
Select Include Inventory Minimum or Include Inventory Maximum to include stock on hand of the item at the location to calculate the net need.
Note:
The Include Inventory Minimum and Include Inventory Maximum check boxes are selected by default. -
Enter the quantity limits at the appropriate intersection for item/location and limiter.

Schedule an Allocation
To schedule an allocation:
-
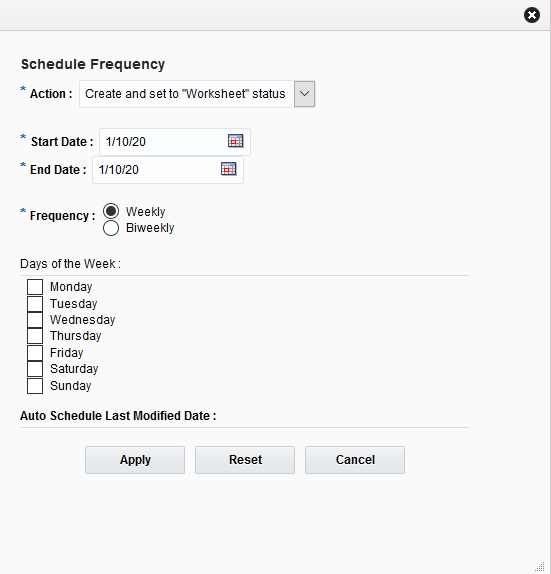
On the Allocation Maintenance window, click Schedule Frequency. The Schedule Frequency window appears.
-
Select an action in the Action field.
-
Enter the start and end dates in the Start Date and End Date.
Note:
Scheduled allocations are only created if the frequency defined falls on or between the start and end dates. Scheduling allocations also depends on batch run time. -
Select either Weekly or BiWeekly depending on when the scheduled allocation has to be run again.
-
Select the day of the week on which the scheduled allocation is created.
Note:
You can select more than one day in a week. Allocation can be scheduled to run twice a week, thrice a week, and so forth. -
The Auto Schedule Last Modified Date is the system generated date/timestamp, which displays the last date/timestamp of when the Auto-Schedule criteria was last modified. This field is non-editable.
-
Click Apply.