4 Manage Clearance Markdowns and Resets
The Clearance Group page allows you to maintain markdowns within a clearance group. Each markdown will contain items selected for the markdown along with the locations where the markdown should be executed.
The Clearance Group screen has three modes; Add, Edit and View. If you enter this screen in View mode, all maintenance options are disabled and the Save, Save and Close, and Cancel buttons are replaced with Done. If you enter in Edit mode the following maintenance options are supported:
Search for a Clearance Group
Perform the following procedure to search for an existing clearance group.
-
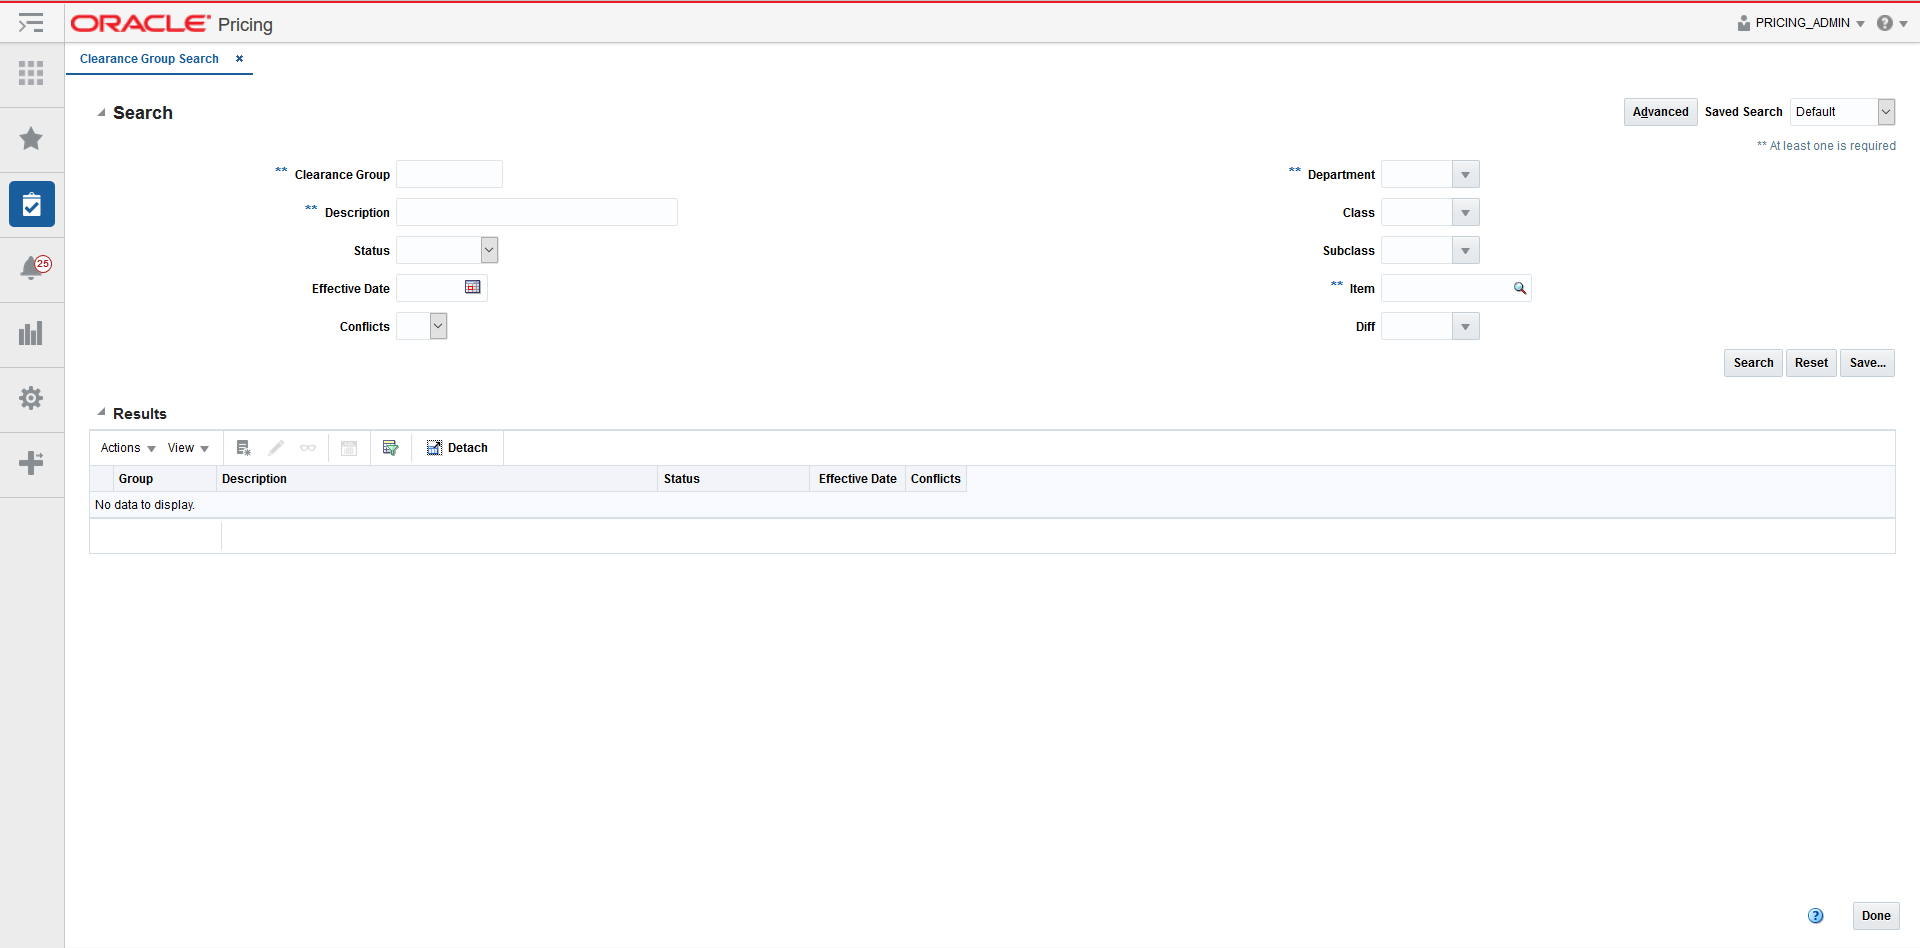
From the Tasks menu, select Manage Clearance Groups under Clearances. The Clearance Group Search page appears.
-
Enter your clearance search criteria using the following fields:
Note:
In order to conduct a clearance search, you must enter at least one of the following; Department, Clearance Group, Description, or Item.Table 4-1 Clearance Search Fields
Field Description Clearance Group
The Clearance Group field allows you to enter a group ID to be used in search criteria.
Description
The Description field allows you to enter a partial description to be used in search criteria.
Status
The Status field allows you to select a status to be used in search criteria. Values for the drop down include: Worksheet, Submitted, Approved, Rejected, Executed, and Processing.
Effective Date
The Effective Date field allows you to enter or select an effective date to be used in search criteria.
Conflicts
The Conflicts field allows you to select one of the following values; Yes, No or NULL (Blank) to be used in search criteria.
Department
The Department field allows you to enter or select a department to be used in search criteria. The department list of values queries all departments.
Class
The Class field allows you to enter or select a class to be used in search criteria. The class list of values queries all classes or all classes for the entered Department.
Subclass
The Subclass field allows you to enter or select a Subclass to be used in search criteria. The subclass list of values queries all subclasses or all subclasses for the entered class.
Item
The Item field allows you to enter or select an item(s) to be used in search criteria. You have the option to go directly to the search icon to look up items.
Diff
The Diff field allows you to enter or select a diff value to be used in search criteria. The diff list of values includes both diff type and diff value.
-
Once your search criteria are entered, click Search. The search results are displayed in the Results pane.
Modify a Markdown or Reset
Editing clearances can be performed on events in multiple statuses with the following conditions:
-
If the Effective Date is in the past, no changes are allowed unless the status of the Clearance is Worksheet, then you have the option to update the Effective Date.
-
If the date that the update is being performed falls within the Effective Date minus the Price Event Processing Days, updates are only allowed for you with emergency security privileges.
To edit a markdown, follow these steps:
-
Perform a search for the clearance group that you want to edit. See Search for a Clearance Group.
-
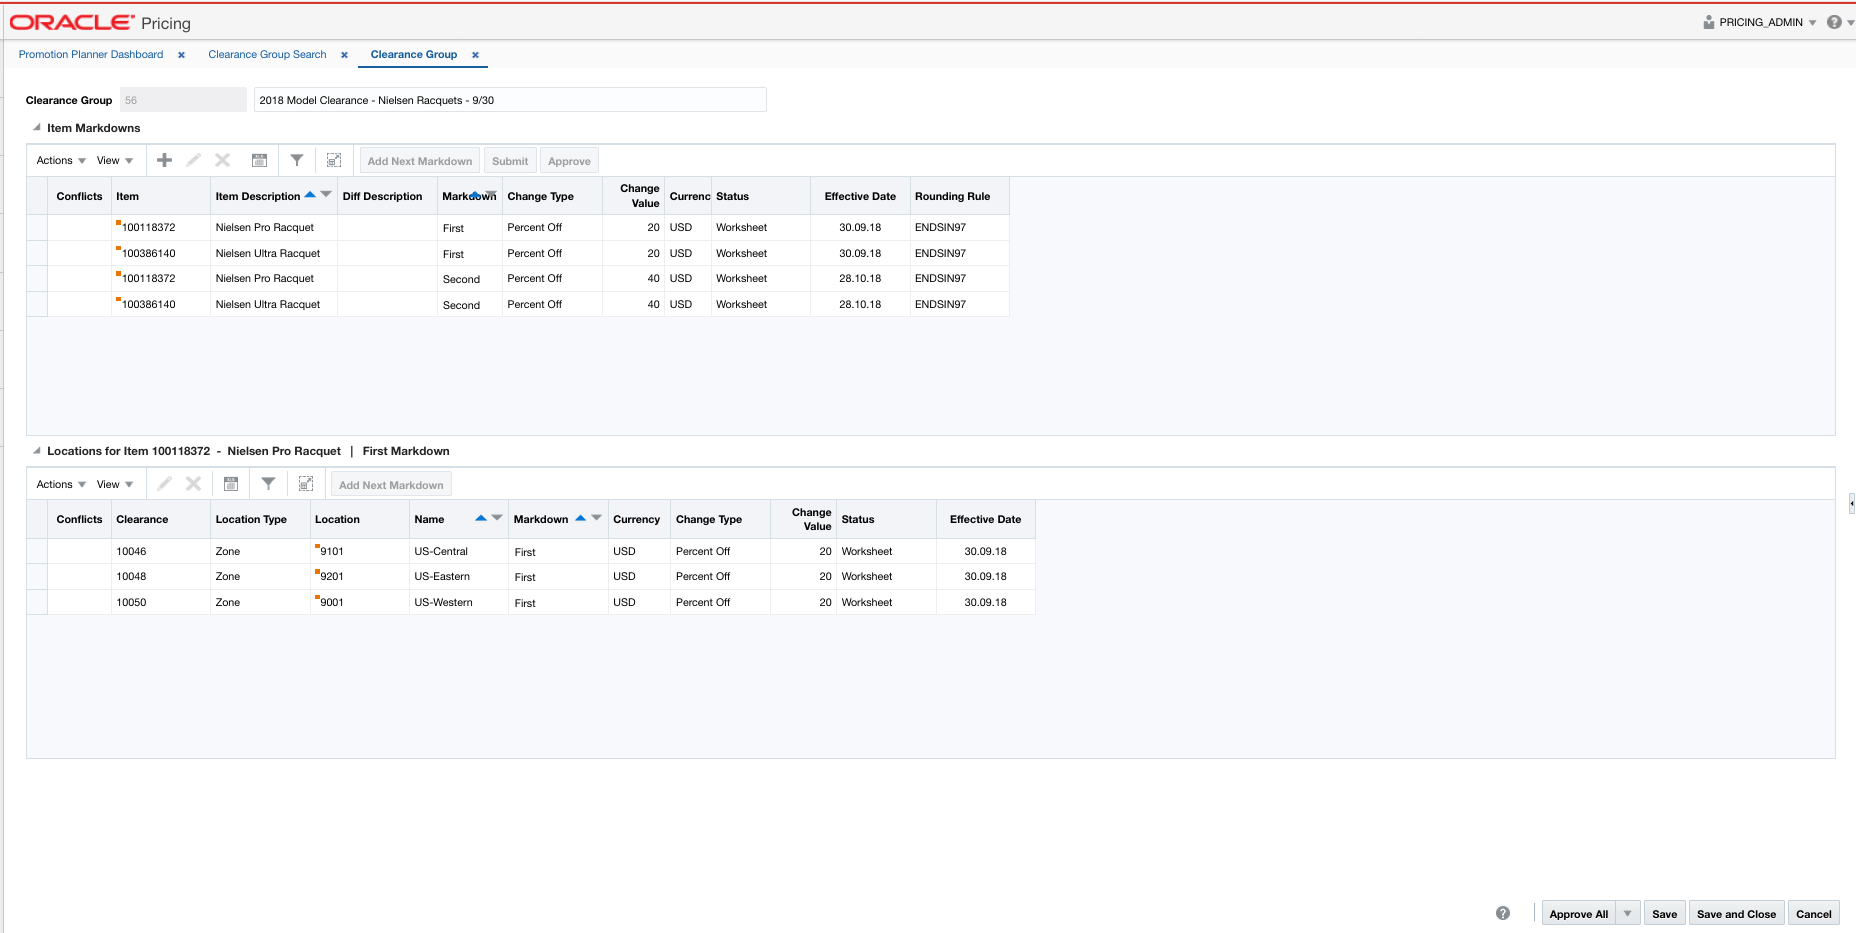
From the search results pane of Clearance Group Search, highlight the clearance group you want to edit and select Edit from the Actions menu. The Clearance Group page appears.
-
From the Clearance Group page, you can select either item markdowns or locations to edit. Highlight the item markdown or location you want to edit (locations shown are associated with the row in the item markdown table which has focus) and select Edit from that table's Action menu. The Edit Clearances pop-up appears. If you wish to modify multiple rows, click on each row to be updated while holding down the Ctrl or Shift button to multi-select.
Note:
If more than one row is selected for update, then check boxes for clearing the markdown, reason code and rounding rules will appear. Selecting these options will remove the appropriate attribute from the selected events. -
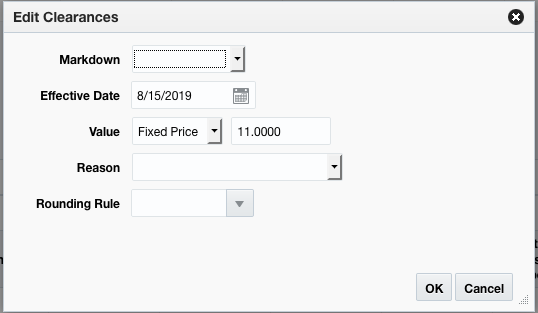
From the Edit Clearances pop-up, use the following fields to edit the clearance details:
Note:
When multiple clearances are selected for editing, fields in the popup may show up as empty. This indicates that the value may vary across the selected clearances. Entering a value and updating will update all the rows, leaving the value empty will leave the values unchanged on the individual clearances.Table 4-2 Edit Clearances Fields
Field Description Markdown
The Markdown field contains the markdown identifier for the selected event.
Effective Date
The date on which the clearance is set to take effect. You have the option to key in a date or select one using the calendar widget.
Value
The Value field provides the options that derive the new retail price. You have the option to modify the Change Type value.
Change Type options:
-
Percent Off: A percent is defined in the change value field that subtracts from the retail price to determine the new retail.
-
Amount Off: An amount is defined in the change value field that subtracts from the retail price to determine the new retail.
-
Fixed Price: The item is at a specified retail that is defined in the change value field (rounding rule may impact entered retail).
After selecting the change type, you will enter the actual value for the change. This field is required entry if a change type is selected. The field supports up to four decimal places for Percent Off value. For Amount Off and Fixed Price decimal placement is based on currency of selected locations.
Reason
The Reason value defines the reason the clearance is being created.
Rounding Rule
The Rounding Rule field provides the ability to smooth retails for an item or location.
Clear Reasons
The Clear Reasons checkbox displays next to the Reasons field when multiple items or locations are selected for edit. If you choose to remove a Reason code for the select clearances the Clear Reasons checkbox can be clicked and the reason will be removed from the selected events.
Clear Rounding Rules
The Clear Rounding Rules checkbox displays when multiple items or locations are selected for edit. When the Clear Rounding Rules checkbox is clicked the value for the rounding rule is removed from the selected events.
Clear Markdown
The Clear Markdown checkbox displays when multiple items or locations are selected for edit. When the Clear Markdown checkbox is clicked the value for the Markdown field is removed from the selected events.
-
-
Once updates are complete on the Edit Clearances pop-up, click OK. The Edit Clearances pop-up closes and you are returned to the Clearance Group page.
Delete a Markdown or Reset
You will have options to delete markdowns and resets at the item or location level. Multiple items or locations can be selected in the respective tables, as well, to delete multiple rows at a time.
-
Item Markdown Level: Highlight one or more rows on the Item Markdowns table and click Delete.
-
Location Level: Highlight a single row on the Item Markdowns table and then highlight one or many rows on the Locations table and click Delete.
-
Perform a search for the clearance group that you want to delete. See Search for a Clearance Group.
-
From the search results pane, select the Clearance Group from which you want to delete markdowns or resets and select Edit from the Actions menu. The Clearance page appears.
-
From the Clearance Group page, you can select one or more items or locations to delete. Highlight the items or locations you want to delete and select Delete from that table's Action menu. The Delete Confirmation message appears.
-
Click OK to confirm the deletion. You are returned to the Clearance Group page.

Update Clearance Status for one or more Clearances
The status of clearance events can be updated at the group level, the item markdown level, or the item markdown/location level.
Update Clearance Status from Group Level
Perform the following procedure to update the clearance status for all events in the clearance group:
-
Perform a search for the clearance group that you want to update. See Search for a Clearance Group.
-
From the search results pane, select the clearance group for which you want to update status. and select Edit from the Actions menu. The Clearance Group page appears.
-
Use the dropdown button at the bottom of the page to update the price change group status. Options are:
-
Submit All
-
Approve All
-
Worksheet All
-
Reject All
-
-
After selecting the status change, click Save to save the updated status and remain on the Clearance Group tab. Click Save and Close to save the updated status and return to the Clearance Group Search tab.
Note:
Depending on the status selected, the event may move to a Pending or Processing status prior to moving to its new status while conflicts are being checked. To see the updated status after conflict checking completes, close the page and re-open.
Update Clearance Status from Item Markdown Level
Perform the following procedure to update the clearance status on item markdowns for all the locations:
-
Perform a search for the clearance group that you want to update. See Search for a Clearance Group.
-
From the search results pane, select the clearance group for which you want to update status. and select Edit from the Actions menu. The Clearance Group page appears.
-
From the Clearance Group tab, from the Item Markdowns table, highlight the records for which you want to update status.
-
With the records highlighted, select the desired status update from the Actions menu.
-
After selecting the status change, click Save to save the updated status and remain on the Clearance Group tab. Click Save and Close to save the updated status and return to the Clearance Group Search tab.
Update Clearance Status from Location Level
Perform the following procedure to update the clearance status on item markdowns at the location level:
-
Perform a search for the clearance group that you want to update. See Search for a Clearance Group.
-
From the search results pane, select the clearance group for which you want to update status. and select Edit from the Actions menu. The Clearance Group page appears.
-
From the Clearance Group page, from the Items Markdown table, highlight the item markdown for which you want to update status.
-
In the Locations table, highlight the location(s) for which you want to update status for one or more locations.
-
With the location highlighted, select the desired status update from the Actions menu.
-
After selecting the status change, click Save to save the updated status and remain on the Price Change Group page. Click Save and Close to save the updated status and return to the Clearance Group Search page.
Note:
If a clearance is selected for a status change and the new status is not valid, the clearance will be ignored and will not be updated.