3 Manage Transportation
Manage a Transportation
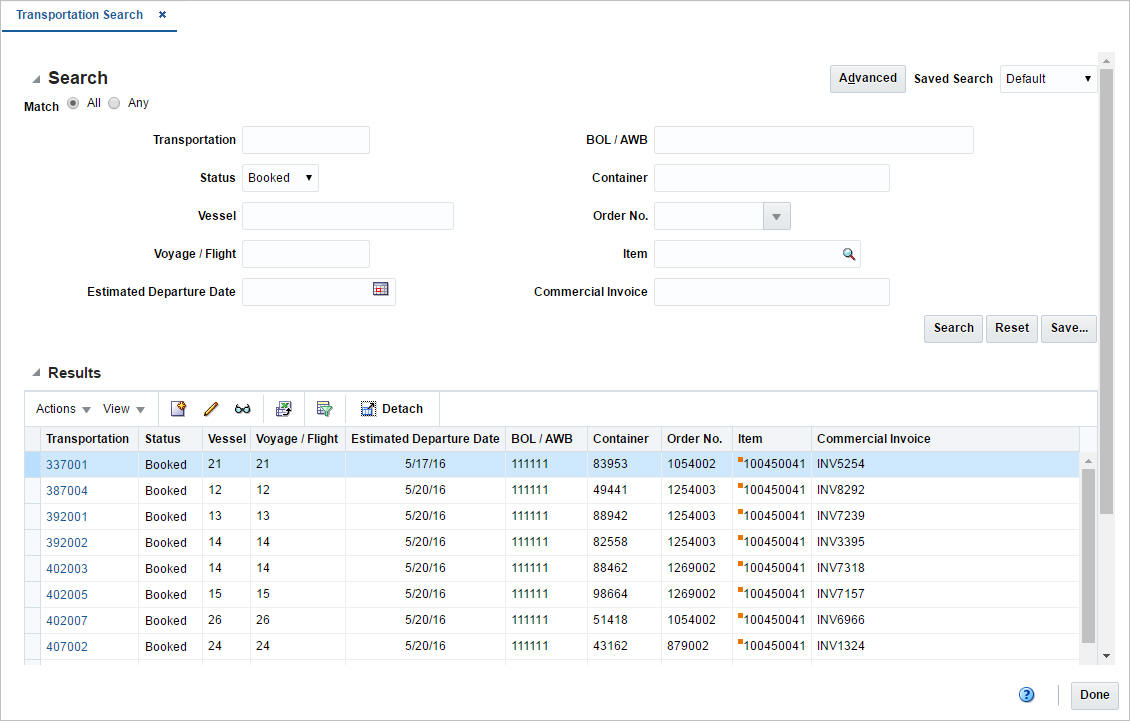
The Manage Transportation option opens the Transportation Search window. In the Transportation Search window you can search, maintain and view transportations.
You can access the Transportation Search window from the Task menu, select Trade Management > Transportation > Manage Transportation. The Transportation Search window appears.
The Transportation Search window contains the following two sections.
-
Search
For more information about how to search for a transportation, see the Search for a Transportation section.
Search for a Transportation
To search for a transportation:
-
From the Task menu, select Trade Management > Transportation > Manage Transportation. The Transportation Search window appears.
-
You can search for a transportation by using basic or advanced search criteria, depending on the requirement. The basic mode is the default search mode.
-
Click Advanced to access the search section in advanced mode.
-
Click Basic to return to the basic mode.
-
Search for a Transportation Through the Basic Search Criteria
To search for a transportation using basic search criteria:
-
Enter, select or search for one or all of the following basic search criteria.
Table 3-1 Transportation Search - Basic Search Criteria and Description
Fields Description Match option
Check radio button All or Any.
All - only transportations matching all entered search criteria are shown.
Any - transportations matching each entered search criteria are shown.
Transportation
Enter the transportation ID.
Status
Select the transportation status. For example, select Booked.
Vessel
Enter the vessel ID.
Voyage/Flight
Enter the voyage/flight number.
Estimated Departure Date
Enter or use the Calendar icon to select the estimated departure date.
BOL/AWB
Enter the bill of lading or airway bill.
Container
Enter the container ID.
Order No.
Enter, select or search for the order number.
Item
Enter the item number or use the Search icon to search for the appropriate item.
Commercial Invoice
Enter the commercial invoice number.
-
Click Search. The transportations that match the search criteria are displayed in the Results section.
-
Click Reset to clear the search section and results.
-
Click Done to close the window.
Search for a Transportation Through Advanced Search Criteria
To search for a transportation using advanced search criteria:
-
To search using advanced search criteria, enter or select one or all of the advanced search criteria.
-
To narrow down the search, use the list next to the search fields. For example, determine if the entered value should equal or not equal the search result.
-
Click Search. The transportations that match the search criteria are displayed in the Results section.
-
Click Reset to clear the search section and results.
-
Click Add Fields to add more fields for the advanced search. To remove the field from the search, click the x right next to the field.
-
Click Done to close the window.
Results
The Results section lists the retrieved transportations. The Results table shows the following columns by default.
-
Transportation ID
-
Status
-
Vessel
-
Voyage/Flight
-
Estimated Departure Date
-
BOL/AWB
-
Container
-
Order No.
-
Item
-
Commercial Invoice
Mark a Transportation Record as a Candidate
Transportation records must be marked as candidates to be used to systematically generate customs entries. To be eligible for marking as a candidate, the transportation record must contain the following information at a minimum:
-
Vessel
-
Voyage/Flight
-
Estimated Departure Date
-
Purchase Order
-
Item
-
Item Quantity and Unit of Measure
-
Commercial Invoice
-
Commercial Invoice Date
-
Commercial Invoice Amount, Currency, and Exchange Rate
To mark the transportation record as a candidate, after the minimum data and any additional data has been entered, check the Candidate checkbox at the top of the Transportation page.
A separate transportation record will be created for each Vessel, Voyage/Flight, Bill of Lading/Airway Bill, Container, Purchase Order, Item, Commercial Invoice combination. Therefore, a single shipment may be represented by multiple transportation records. When all of the transportation records for a given shipment have been marked as candidates, the transportation shipment can be finalized through the Transportation Finalization page, which will generate customs entries based on the data defined on the transportation records. See "Finalize Transportation" for more information about finalizing a transportation.
Manage Transportation by Order
The Manage Transportation by Order window allows you to search and maintain transportations for an order.
The Manage Transportation by Order window contains the same sections and functions as the Create Transportation by Order window.
For more information about the available sections and functions to manage transportations by order, see the Create a Transportation by Order section in "Create a Transportation".
Search for a Transportation by Order
To search for transportations by order follow the steps below.
-
From the Tasks menu, select Trade Management > Transportation > Manage Transportation by Order. The Manage Transportation by Order window appears.
-
Enter or select search for the appropriate order number, vessel ID, voyage/flight number and estimated departure date for which the transportation record needs to be edited.
-
Click Details. The transportation details are displayed in Details table.
-
Then update the transportations as necessary.
-
Add items to the transportation by order. For more information about how to add items to the transportation by order, see the Add Items section in "Create a Transportation".
-
Edit item of the transportation by order. For more information about how to edit items of a transportation by order, see the Edit Items section in "Create a Transportation".
-
Delete items from the transportation by order. For more information about how to delete items from a transportation by order, see the Delete Items section in "Create a Transportation".
-
Update multiple items of a transportation by order. For more information about how to update multiple items from a transportation by order, see the Mass Update section.
-
-
Then choose one of the following options.
-
Click Save and Close, to save changes to the transportation and close the Create/Manage Transportation by Order window.
-
Click the arrow on the right side of the button to display the additional save options.
-
Click Save to save your entries.
-
Click Save and Create Another/Save and Edit Another to save the current transportation and create additional entries.
-
-
Click Cancel to reject all entries and exit the Create/Manage Transportation by Order window.
-
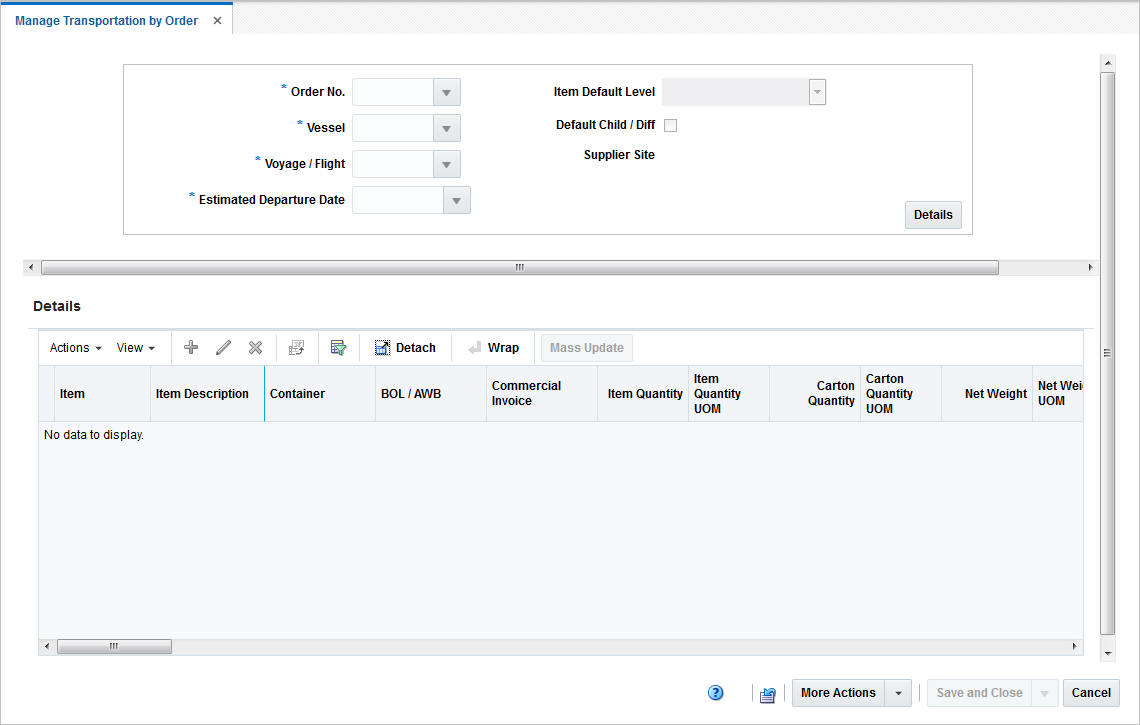
Mass Update
In the Mass Update window you can edit multiple items.
The Mass Update window contains the following sections.
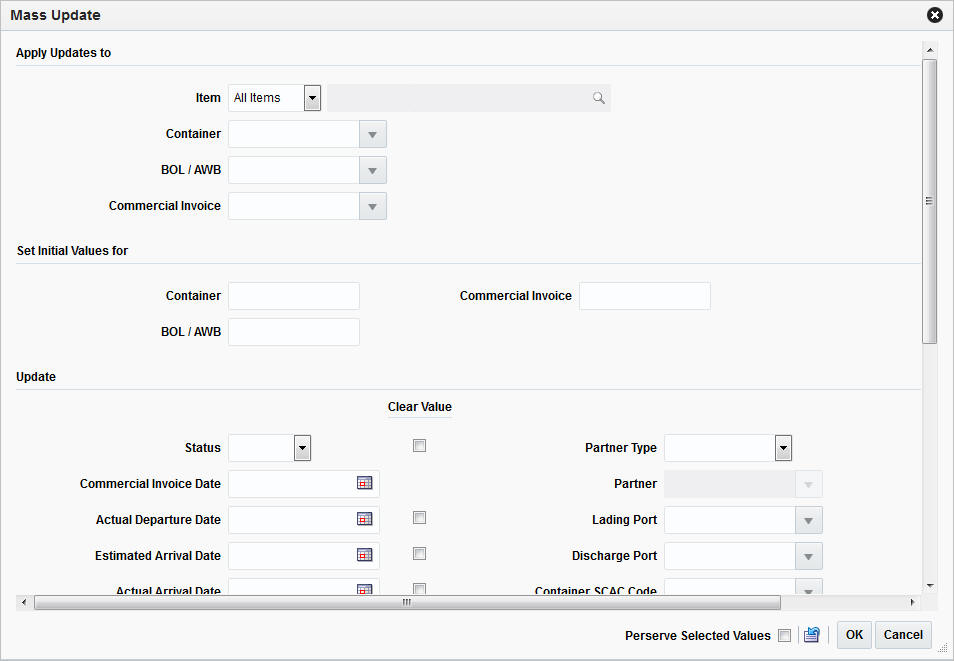
Apply Updates To
In the Apply Updates to section, enter, select or search for the values you want to apply the updates to.
Table 3-2 Apply Updates to - Fields and Description
| Fields | Description |
|---|---|
|
Item |
Choose one of the following options from the list.
|
|
Container |
Enter, select or search for the appropriate container ID, you want to apply the update to. |
|
BOL/AWB |
Enter, select or search for the bill of lading or airway bill, you want to apply the update to. |
|
Commercial Invoice |
Enter, select or search for the commercial invoice, you want to apply the update to. |
Set Initial Values For
In the Set Initial Values section you can enter only initial values for the container, the BOL/AWB and the commercial invoice. You cannot edit these values later.
Update
In the Update section, enter new values for those fields you want to update. The Update section displays the following fields.
Table 3-3 Updates - Fields and Description
| Fields | Description |
|---|---|
|
Status |
Select the appropriate status from the list. For example, select status Loaded. |
|
Commercial Invoice Date |
Enter or use the Calendar icon to select the date. |
|
Actual Departure Date |
Enter or use the Calendar icon to select the date. |
|
Estimated Arrival Date |
Enter or use the Calendar icon to select the date. |
|
Actual Arrival Date |
Enter or use the Calendar icon to select the date. |
|
Delivery Date |
Enter or use the Calendar icon to select the date. |
|
Shipment |
Enter the shipment ID. |
|
Receipt |
Enter the receipt number. |
|
Forwarder's Cargo Receipt |
Enter the forwarder's cargo receipt number. |
|
Forwarder's Cargo Receipt Date |
Enter or use the Calendar icon to select the date. |
|
In Transit |
Enter In Transit number for shipments cleared at inland locations, or other than Discharge Port. |
|
In Transit Date |
Enter or use the Calendar icon to select the date. |
|
Service Contract No. |
Enter the service contract number. |
|
Lot |
Enter the lot number. |
|
Seal |
Enter the seal number |
|
Packing Method |
Select the packing method from the list. For example, select Flat. |
|
Partner Type |
Select the partner type from the list. For example, select Agent. |
|
Partner |
This field is only enabled, if you have selected a partner type. Enter, select or search for the appropriate partner. |
|
Lading Port |
Enter, select or search for the lading port. |
|
Discharge Port |
Enter, select or search for the discharge port. |
|
Container SCAC Code |
Enter, select or search for the container SCAC code. |
|
Vessel SCAC Code |
Enter, select or search for the vessel SCAC code. |
|
Freight Type |
Enter, select or search for the freight type. |
|
Freight Size |
Enter, select or search for the freight size. |
|
Consolidation Country |
Enter, select or search for the consolidation country. |
|
Origin Country |
Enter, select or search for the origin country. |
|
Export Country |
Enter, select or search for the export country. |
|
Shipment Method |
Select the shipment method from the list. |
|
Rush checkbox |
Select the Rush checkbox to indicate that the transport is a rush shipment. |
|
Candidate checkbox |
Select the Candidate checkbox, if the record is complete and ready for finalization. The Candidate checkbox can only be selected for items that have an approved HTS code. |
|
Comments |
Enter comments, if necessary. |
Note:
All fields are enabled by default. Check the Clear Value checkbox to disable the selected field. The field Commercial Invoice can not be cleared.Mass Update Toolbar
The Toolbar displays the icons and buttons for actions that can be performed in the Mass Update window. The Toolbar contains the following icons and buttons.
Table 3-4 Mass Update Toolbar - Icons/Buttons and Description
| Action Icons/Buttons | Description |
|---|---|
|
Preserve Selected Values checkbox |
Select the Preserve Selected Values checkbox, if you want to keep the values for later mass updates. |
|
Refresh icon |
Use the Refresh icon to clear all entered values in the Mass Update window. No values are saved. |
|
OK |
Click OK to perform the updates as indicated and exit the Mass Update window. |
|
Cancel |
Click Cancel to reject all entries and exit the Mass Update window. |