2 Create a Transportation
Create a Transportation
To create a transportation follow the steps below.
-
From the Tasks menu, select Trade Management > Create Transportation. The Create Transportation window appears.
-
In the Shipment Method field, enter, select or search for the appropriate shipment method.
-
In the Vessel field, enter the vessel ID.
-
In the Voyage/Flight field, enter, the voyage/flight ID.
-
In the Estimated Departure Date, enter the estimated departure date or use the Calendar icon to select the date.
-
In the BOL/AWB field, enter the bill of lading number or the airway bill number.
-
In the Container field, enter the container ID.
-
In the Order No. field, enter, select or search for the appropriate order number.
-
In the Item field, enter the item number or use the Search icon to search for the appropriate icon.
-
In the Item Quantity field, enter the quantity of the item and enter, select or search for the appropriate unit of measure.
-
In the Commercial Invoice field, enter the commercial invoice number.
-
In the Date field, enter the date or use the Calendar icon to select the date.
-
In the Amount field, enter the amount of the transportation.
-
After you have entered all necessary transportation information, choose one of the following options.
-
Select OK to save the transportation and close the Create Transportation window. The Transportation window appears.
For more information about the Transportation window, see the Define a Transportation section.
-
Select Cancel to reject all entries and exit the Create Transportation window.
-

Define a Transportation
Item and Quantities
The Item and Quantities section contains the following fields.
Table 2-1 Item and Quantities - Fields and Description
| Fields | Description |
|---|---|
|
Order No. |
Enter, select or search for the appropriate order number. The Details icon opens the Order Details window. For more information about the Order Details window, see the ”Order Details” section in the Oracle Retail Merchandising Purchase Orders and Contracts User Guide. |
|
Item |
Enter the item number or use the Search icon to search for the appropriate item. |
|
Lot |
Enter the lot number. |
|
Carton Quantity |
Enter the carton quantity. Then select or search for the carton unit of measure (UOM). |
|
Item Quantity |
Enter the item quantity. Then select or search for the item unit of measure (UOM). |
|
Gross Weight |
Enter the gross weight. Then select or search for the gross weight unit of measure (UOM). |
|
Net Weight |
Enter the net weight. Then select or search for the net weight unit of measure (UOM). |
|
Cubic |
Enter the cubic quantity. Then select or search for the cubic unit of measure (UOM). |
Commercial Invoice
The Commercial Invoice section contains the following fields.
Table 2-2 Commercial Invoice - Fields and Description
| Fields | Description |
|---|---|
|
Commercial Invoice |
Enter the commercial invoice ID. |
|
Date |
Enter or use the Calendar icon to select the date of the commercial invoice. |
|
Supplier Site |
The supplier site is displayed automatically. |
|
Amount |
Enter the amount of the commercial invoice. Use the Recalculate icon to recalculate the invoice amount. |
|
Currency |
Enter, select or search for the appropriate currency. |
|
Exchange Rate |
Use the Edit Exchange Rate icon to change the rate, if necessary. If you click the icon, the Edit Exchange Rate window appears. For more information about how to edit the Exchange Rate, see the ”Editing the Exchange Rate” section in the Oracle Retail Trade Management Letters of Credit User Guide. |
Shipment and Receipt
The Shipment and Receipt section contains the following fields.
Table 2-3 Shipment and Receipt - Fields and Description
| Fields | Description |
|---|---|
|
Country of Sourcing |
The country of sourcing is displayed automatically. |
|
Consolidation Country |
Enter, select or search for the consolidation country. |
|
Export Country |
Enter, select or search for the export country. |
|
Shipment |
Enter the shipment ID. |
|
Lading Port |
Enter, select or search for the lading port. |
|
Discharge Port |
Enter, select or search for the discharge port. |
|
Receipt |
Enter the receipt number. |
|
Forwarder's Cargo Receipt |
Enter the forwarder's cargo receipt. |
|
Forwarder's Cargo Receipt Date |
Enter or use the Calendar icon to select the Forwarder's Cargo Receipt Date. |
|
Estimated Arrival Date |
Enter or use the Calendar icon to select the estimated arrival date. |
|
Actual Arrival Date |
Enter or use the Calendar icon to select the actual arrival date. |
|
Delivery Date |
Enter or use the Calender icon to select the delivery date. |
Freight
The Freight section contains the following fields.
Table 2-4 Freight - Fields and Description
| Fields | Description |
|---|---|
|
Type |
Enter, select or search for the freight type of the shipment. |
|
Size |
Enter, select or search for the freight size of the shipment. |
|
In Transit No. |
Enter the in transit number. |
|
In Transit Date |
Enter the in transit date or use the Calendar icon to select a date. |
|
Service Contract |
Enter the service contract. |
|
Seal |
Enter the seal. |
|
Container SCAC Code |
Enter, select or search for the container standard carrier alpha code (SCAC). |
|
Packing Method |
Select the packing method from the list. |
|
Level |
Select the level from the list. |
Totals
The Totals section contains the following fields.
Table 2-5 Totals - Fields and Description
| Fields | Description |
|---|---|
|
Total Units |
Enter, select or search for the total units of measure. |
|
Total Cartons |
Enter, select or search for the total cartons units of measure. |
|
Total Gross Weight |
Enter, select or search for the total gross weight units of measure. |
|
Total Net Weight |
Enter, select or search for the total net weight units of measure. |
|
Total Cube |
Enter, select or search for the total cube units of measure. |
|
Total Value |
The total value is displayed automatically. |
Comments
The Comments section contains the comment field. You can enter any comments for the created transport, if necessary.
Transportation - More Actions Menu
Use the More Actions menu to navigate to the following windows. The More Actions menu contains the following options.
Table 2-6 More Actions Menu - Action Buttons and Description
| More Actions Buttons | Description |
|---|---|
|
Details |
Opens the Transportation Details window. This window displays details of the delivery, packing, and license/visa information as well as claims. For more information about Details, see the Details section. |
|
Missing Documents |
Opens the Missing Documents window. You can add and delete all the missing documents for the current transport in this window. For more information about Missing Documents, see the ”Missing Documents” section in the Oracle Retail Trade Management Customs Entry User Guide. |
|
Shipments |
Opens the Transportation Shipments window. This window displays shipment information such as ASNs, shipped and received date, to location and location name. For more information about Shipments, see the Shipments section. |
|
Timelines |
Opens the Timelines menu. The menu contains the following options.
For more information about timelines, see the Timelines section. |
|
Items |
Opens the Transportation Items window. For more information about Items, see the Items section. |
Details
In the Transportation Details window you can edit and view delivery, packing, license/visa and claims information related to a transportation record.
Delivery information is edited and viewed at the final destination level. You can indicate how many units and cartons of an item were delivered to which locations.
You can edit and view packing information at the container level. To display the shipped and received quantities for the packing records, select the appropriate option from the View menu.
The Claims table contains claims against a partner. Claims can be created for damaged merchandise and inadequate quantities. A single claim can span multiple cartons.
The Transportation Details window contains the following sections.
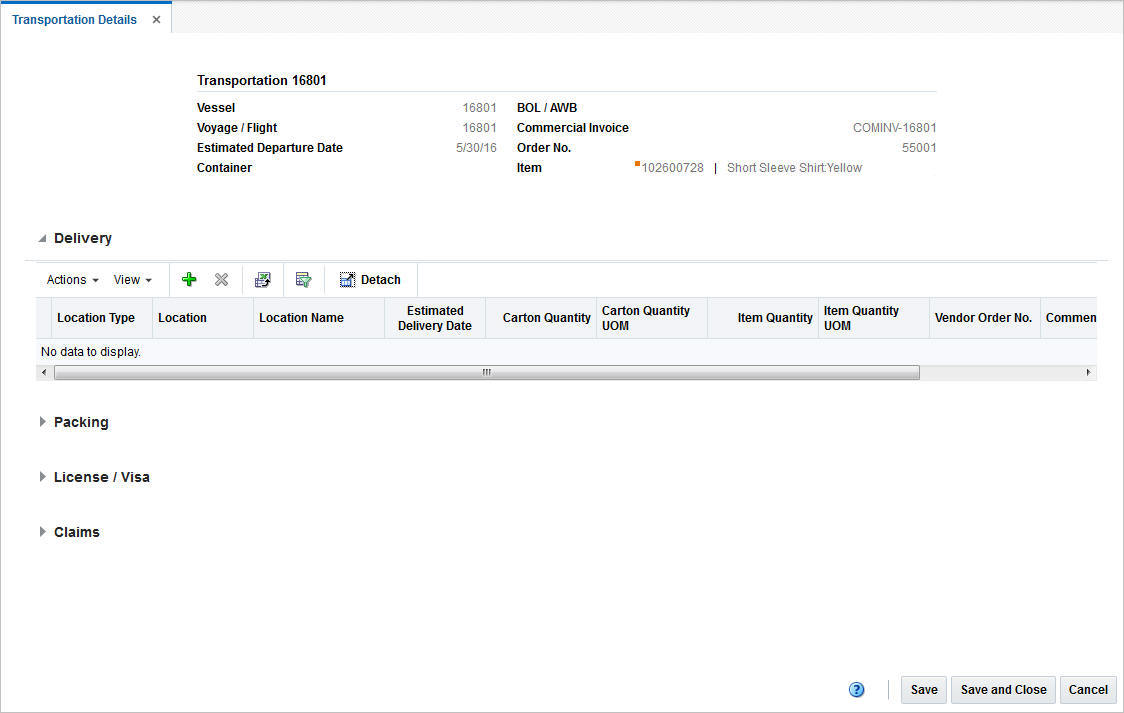
Transportation Details Header
The Transportation Details header displays transportation information such as transportation ID, vessel, voyage/flight number, estimated departure date, container, bill of lading/airway bill, commercial invoice, order number and item information.
Delivery
The Delivery section lists delivery information such as location, location type and description, estimated delivery date, carton and item quantities as well as the vendor order number.
Packing
The Packing section lists packing information such as ID of the first (From Carton) and the last carton (To Carton), the position of a load in the series of containers (Load Position), location of a sample carton, and sample position as well as comments.
Packing Table - Actions Menu, Icons and Buttons
Use the Actions Menu, icons and buttons to apply actions to the table. You can perform the actions listed below, as well as action described in ”Action Menu and Icons” in the Oracle Retail Trade Management Do the Basics User Guide.
Table 2-7 Packing Table - Actions Menu/Icons/Buttons and Description
| Actions Menu/Icons/Button | Description |
|---|---|
|
Default Received Quantities and Default Received Quantities button |
You can default the received quantities to the value of the shipped quantities by selecting Actions > Default Received Quantities or by using the Default Received Quantities button. |
License/Visa
The Licence/Visa section lists license/visa information such as license/visa type, import country, licence/visa quantity and quantity unit of measure, quota category, net weight, and weight UOM as well as possible comments.
Claims
The Claims section contains claims information such as claim ID, ID of the first (From Carton) and the last carton (To Carton), claim date, item quantity and unit of measure, claim against type and ID, as well as the claim amount and comments.
Add a Delivery
To add a delivery information to a transportation follow the steps listed below.
-
From the Tasks menu, select Trade Management > Transportation > Manage Transportation. The Transportation Search window appears.
-
Enter or select search criteria as desired to make the search more restrictive.
-
Click Search. The transportations that match the search criteria are displayed in the Results section.
-
Select a record in the Results section.
-
In the Transportation column, click on the transportation link, or mark a record and select Actions > Edit or use the Edit icon. The Transportation window appears.
-
In the More Actions menu select Details. The Transportation Details window appears.
-
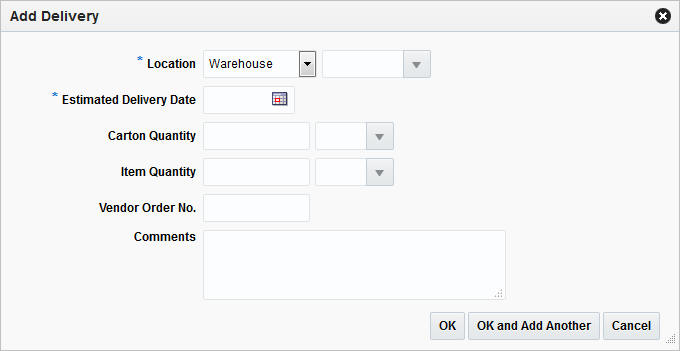
In the Delivery table, select Actions > Add or use the Add icon. The Add Delivery window appears.
-
In the Location type field, select a location type from the list.The field next to the Location type field enables, enter, select or search for the location. The Location field is a required field.
-
In the Estimated Delivery Date field, enter the estimated delivery date or use the Calendar icon to select the date.
-
In the Carton Quantity field, enter the appropriate carton quantity. Then enter, select or search for the carton quantity UOM.
-
In the Item Quantity field, enter the appropriate carton quantity. Then enter, select or search for the item quantity UOM.
-
In the Vendor Order No. field, enter the vendor order number.
-
In the Comments field, enter comments for the delivery, if necessary.
-
Then choose one of the following options.
-
Click OK to add the delivery and close the Add Delivery window. The system returns to the Transportation Details window. The new delivery is added to the Delivery table.
-
Click OK and Add Another to add additional deliveries.
-
Click Cancel to reject all entries and exit the Add Delivery window. The system returns to the Transportation Details window.
-
-
-
After you have added all necessary deliveries, choose one of the following options.
-
Click Save to save your changes.
-
Click Save and Close to save your changes and close the Transportation Details window.
-
Click Cancel to reject all changes and close the Transportation Details window.
-
Delete a Delivery
To delete a delivery from a transportation follow the steps listed below.
-
From the Tasks menu, select Trade Management > Transportation > Manage Transportation. The Transportation Search window appears.
-
Enter or select search criteria as desired to make the search more restrictive.
-
Click Search. The transportations that match the search criteria are displayed in the Results section.
-
Select a record in the Results section.
-
In the transportation column, click on the transportation link, or mark a record and select Actions > Edit or use the Edit icon. The Transportation window appears.
-
In the Transportation Toolbar select Details. The Transportation Details window appears.
-
In the Delivery table, select a delivery.
-
Click Actions > Delete or use the Delete icon to delete the selected delivery.
-
You are prompted if you want to delete the selected delivery from the Delivery table. Confirm with Yes.
-
The delivery is removed from the Delivery table.
-
After you have deleted all necessary records, choose one of the following options.
-
Click Save to save your changes.
-
Click Save and Close to save your changes and close the Transportation Details window.
-
Click Cancel to reject all changes and close the Transportation Details window.
-
Add Packing Information
To add a packing information to a transportation follow the steps listed below.
-
From the Tasks menu, select Trade Management > Transportation > Manage Transportation. The Transportation Search window appears.
-
Enter or select search criteria as desired to make the search more restrictive.
-
Click Search. The transportations that match the search criteria are displayed in the Results section.
-
Select a record in the Results section.
-
In the Transportation column, click on the transportation link, or mark a record and select Actions > Edit or use the Edit icon. The Transportation window appears.
-
In the More Actions menu select Details. The Transportation Details window appears.
-
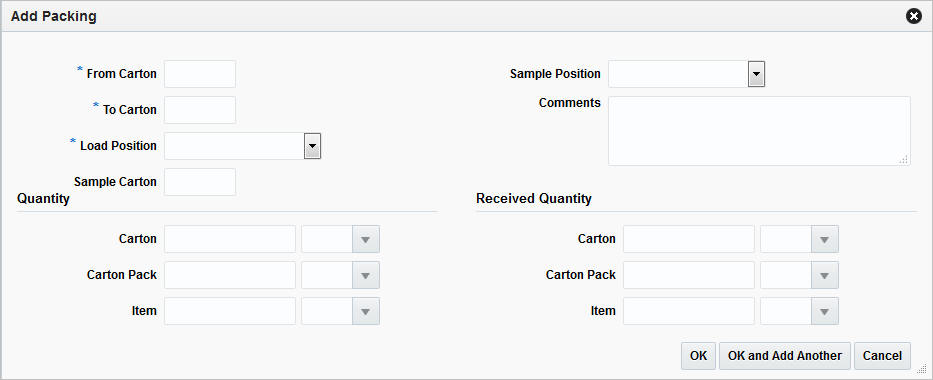
In the Packing table, select Actions > Add or use the Add icon. The Add Packing window appears.
-
In the From Carton field, enter the ID of the first carton of a series. This field is a required field.
-
In the To Carton field, enter the ID of the last carton of a series. This field is a required field.
-
In the Loaded Position field, select the position of a load within a series from the list.
-
In the Sample Carton field, enter the sample carton.
-
In the Sample Position field, select the sample position from a list.
-
In the Comments field, enter a comment for the packing information, if necessary.
-
In the Quantity column, enter one of following options.
-
In the Carton field, enter the carton quantity. Then enter, select or search for the carton quantity UOM.
-
In the Carton Pack field, enter the carton pack quantity. Then enter, select or search for the carton pack quantity UOM.
-
In the Item field, enter the item quantity. Then enter, select or search for the item quantity UOM.
-
-
In the Received Quantity column, enter one of the following options.
-
In the Carton field, enter the received carton quantity. Then enter, select or search for the carton quantity UOM.
-
In the Carton Pack field, enter the received carton pack quantity. Then enter, select or search for the carton pack quantity UOM.
-
In the Item field, enter the received item quantity. Then enter, select or search for the item quantity UOM.
-
-
Then choose one of the following options.
-
Click OK to add the delivery and close the Add Packing window. The system returns to the Transportation Details window. The new packing information is added to the Packing table.
-
Click OK and Add Another to add further records.
-
Click Cancel to reject all entries and close the Add Packing window. The system returns to the Transportation Details window.
-
-
-
After you have added all necessary records, choose one of the following options.
-
Click Save to save your changes.
-
Click Save and Close to save your changes and close the Transportation Details window.
-
Click Cancel to reject all changes and close the Transportation Details window.
-
Edit a Packing Information
To edit a packing information follow the steps below.
-
From the Tasks menu, select Trade Management > Transportation > Manage Transportation. The Transportation Search window appears.
-
Enter or select search criteria as desired to make the search more restrictive.
-
Click Search. The transportations that match the search criteria are displayed in the Results section.
-
Select a record in the Results section.
-
In the Transportation column, click on the transportation link, or mark a record and select Actions > Edit or use the Edit icon. The Transportation window appears.
-
In the More Actions menu select Details. The Transportation Details window appears.
-
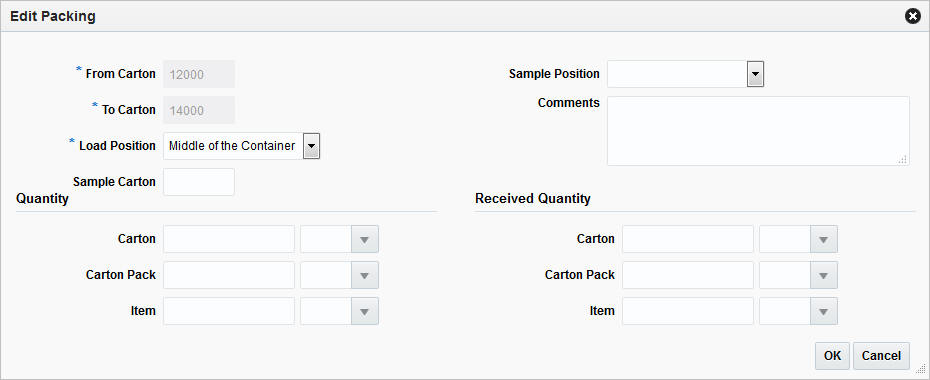
In the Packing table, select Actions > Edit or use the Edit icon. The Edit Packing window appears.
-
All previously entered fields are populated. Change the values in the appropriate fields, if necessary.
-
Then choose one of the following options.
-
Click OK to save the changes and close the Edit Packing window. The system returns to the Transportation Details window. The packing information is updated.
-
Click Cancel to reject all entries and close the Edit Packing window. The system returns to the Transportation Details window.
-
-
-
After you have added all necessary records, choose one of the following options.
-
Click Save to save your changes.
-
Click Save and Close to save your changes and close the Transportation Details window.
-
Click Cancel to reject all changes and close the Transportation Details window.
-
Delete Packing Information
To delete a packing information from a transportation follow the steps listed below.
-
From the Tasks menu, select Trade Management > Transportation > Manage Transportation. The Transportation Search window appears.
-
Enter or select search criteria as desired to make the search more restrictive.
-
Click Search. The transportations that match the search criteria are displayed in the Results section.
-
Select a record in the Results section.
-
In the transportation column, click on the transportation link, or mark a record and select Actions > Edit or use the Edit icon. The Transportation window appears.
-
In the Transportation Toolbar select Details. The Transportation Details window appears.
-
In the Packing table, select a packing information.
-
Click Actions > Delete or use the Delete icon to delete the selected packing information.
-
You are prompted if you want to delete the selected packing from the Packing table. Confirm with Yes.
-
The packing information is removed from the Packing table.
-
After you have deleted all necessary records, choose one of the following options.
-
Click Save to save your changes.
-
Click Save and Close to save your changes and close the Transportation Details window.
-
Click Cancel to reject all changes and close the Transportation Details window.
-
Add a License/Visa
To add a licence/visa information to a transportation follow the steps listed below.
-
From the Tasks menu, select Trade Management > Transportation > Manage Transportation. The Transportation Search window appears.
-
Enter or select search criteria as desired to make the search more restrictive.
-
Click Search. The transportations that match the search criteria are displayed in the Results section.
-
Select a record in the Results section.
-
In the Transportation column, click on the transportation link, or mark a record and select Actions > Edit or use the Edit icon. The Transportation window appears.
-
In the More Actions menu select Details. The Transportation Details window appears.
-
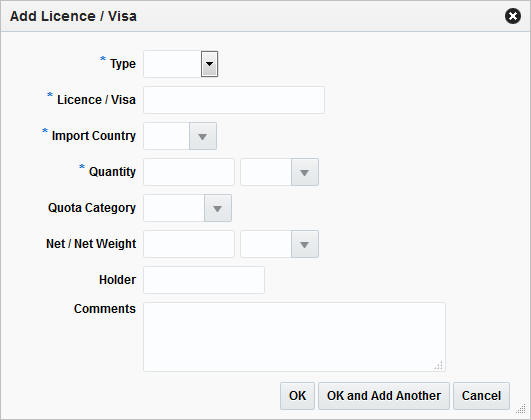
In the Licence/Visa table, select Actions > Add or use the Add icon. The Add Licence/Visa window appears.
-
In the Type field, select licence or visa from the list. This field is a required field.
-
In the Licence/Visa field, enter the licence or visa number. This field is a required field.
-
In the Import Country field, enter, select or search for the import country. This field is a required field.
-
In the Quantity field, enter the appropriated quantity. Then enter, select or search for the quantity unit of measure.
-
In the Quota Category field, enter, select or search for the appropriate quota category.
-
In the Net/Net Weight field, enter the net weight. Then enter, select or search for the weight unit of measure.
-
In the Holder field, enter the holder of the licence/visa.
-
In the Comments field, enter a comment for the licence/visa, if necessary.
-
Then choose one of the following options.
-
Click OK to add the licence/visa and close the Add Licence/Visa window. The system returns to the Transportation Details window. The new licence/visa information is added to the Licence/Visa table.
-
Click OK and Add Another to add additional records.
-
Click Cancel to reject all entries and exit the Add Licence/Visa window. The system returns to the Transportation Details window.
-
-
-
After you have added all necessary records, choose one of the following options.
-
Click Save to save your changes.
-
Click Save and Close to save your changes and close the Transportation Details window.
-
Click Cancel to reject all changes and close the Transportation Details window.
-
Edit a Licence/Visa
To edit a licence/visa information follow the steps below.
-
From the Tasks menu, select Trade Management > Transportation > Manage Transportation. The Transportation Search window appears.
-
Enter or select search criteria as desired to make the search more restrictive.
-
Click Search. The transportations that match the search criteria are displayed in the Results section.
-
Select a record in the Results section.
-
In the Transportation column, click on the transportation link, or mark a record and select Actions > Edit or use the Edit icon. The Transportation window appears.
-
In the More Actions menu select Details. The Transportation Details window appears.
-
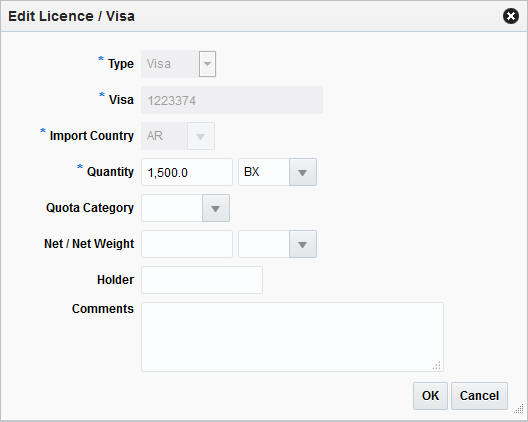
In the Licence/Visa table, select Actions > Edit or use the Edit icon. The Edit Licence/Visa window appears.
-
All previously entered fields are populated. Change the values in the appropriate fields, if necessary.
-
Then choose one of the following options.
-
Click OK to save the changes and close the Edit Licence/Visa window. The system returns to the Transportation Details window. The licence/visa information is updated.
-
Click Cancel to reject all entries and exit the Edit Licence/Visa window. The system returns to the Transportation Details window.
-
-
-
Then choose one of the following options.
-
Click Save to save your changes.
-
Click Save and Close to save your changes and close the Transportation Details window.
-
Click Cancel to reject all changes and close the Transportation Details window.
-
Delete a Licence/Visa
To delete a licence/visa information from a transportation follow the steps listed below.
-
From the Tasks menu, select Trade Management > Transportation > Manage Transportation. The Transportation Search window appears.
-
Enter or select search criteria as desired to make the search more restrictive.
-
Click Search. The transportations that match the search criteria are displayed in the Results section.
-
Select a record in the Results section.
-
In the transportation column, click on the transportation link, or mark a record and select Actions > Edit or use the Edit icon. The Transportation window appears.
-
In the Transportation Toolbar select Details. The Transportation Details window appears.
-
In the Licence/Visa table, select the licence/visa information.
-
Click Actions > Delete or use the Delete icon to delete the selected licence/visa information.
-
You are prompted if you want to delete the selected licence/visa from the Licence/Visa table. Confirm with Yes.
-
The licence/visa information is removed from the Licence/Visa table.
-
Then choose one of the following options.
-
Click Save to save your changes.
-
Click Save and Close to save your changes and exit the Transportation Details window.
-
Click Cancel to reject all changes and exit the Transportation Details window.
-
Add a Claim
To add a claim to a transportation follow the steps listed below.
-
From the Tasks menu, select Trade Management > Transportation > Manage Transportation. The Transportation Search window appears.
-
Enter or select search criteria as desired to make the search more restrictive.
-
Click Search. The transportations that match the search criteria are displayed in the Results section.
-
Select a record in the Results section.
-
In the Transportation column, click on the transportation link, or mark a record and select Actions > Edit or use the Edit icon. The Transportation window appears.
-
In the More Actions menu select Details. The Transportation Details window appears.
-
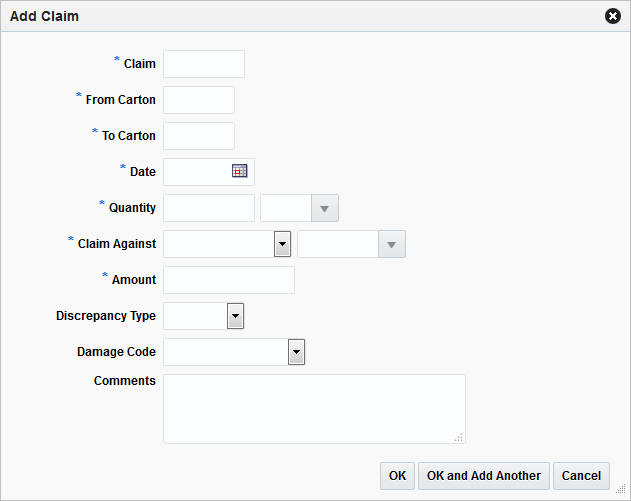
In the Claims table, select Actions > Add or use the Add icon. The Add Claim window appears.
-
In the Claim field, enter the claim ID. This field is a required field.
-
In the From Carton, enter the ID of the first carton of a series. This field is a required field.
-
In the To Carton, enter the ID of the last carton in a series. This field is a required field.
-
In the Date field, enter the claim date or use the Calendar icon to select the date. This field is a required field.
-
In the Quantity field, enter the quantity. Then enter, select or search for the quantity unit of measure. These fields are required fields.
-
In the Claim Against field, select who you want to add a claim against. For example, select Agent. Then select the claim against ID. These fields are required fields.
-
In the Amount field, enter the amount of the claim.
-
In the Discrepancy Type field, select the appropriate type from the list. Possible types are Overage or Shortage.
-
In the Damage Code field, select the appropriate code from the list. For example, select external damage.
-
In the Comments field, enter a comment for the licence/visa, if necessary.
-
Then choose one of the following options.
-
Click OK to add the claim and close the Add Claim window. The system returns to the Transportation Details window. The new claim is added to the Claims table.
-
Click OK and Add Another to add additional records.
-
Click Cancel to reject all entries and close the Add Claims window. The system returns to the Transportation Details window.
-
-
-
After you have added all necessary records, choose one of the following options.
-
Click Save to save your changes.
-
Click Save and Close to save your changes and close the Transportation Details window.
-
Click Cancel to reject all changes and close the Transportation Details window.
-
Edit a Claim
To edit a claim follow the steps below.
-
From the Tasks menu, select Trade Management > Transportation > Manage Transportation. The Transportation Search window appears.
-
Enter or select search criteria as desired to make the search more restrictive.
-
Click Search. The transportations that match the search criteria are displayed in the Results section.
-
Select a record in the Results section.
-
In the Transportation column, click on the transportation link, or mark a record and select Actions > Edit or use the Edit icon. The Transportation window appears.
-
In the More Actions menu select Details. The Transportation Details window appears.
-
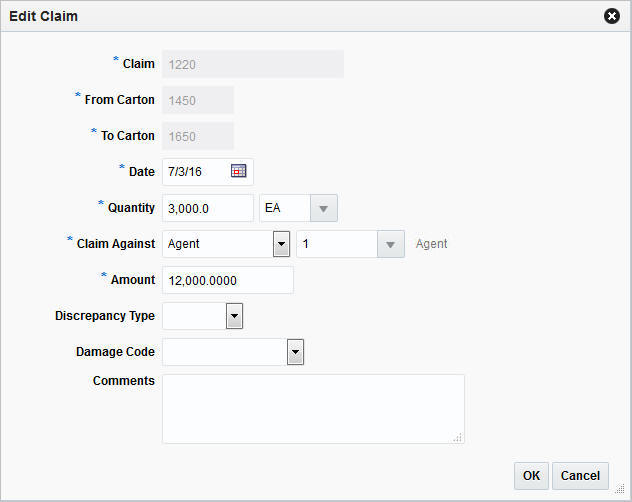
In the Claims table, select Actions > Edit or use the Edit icon. The Edit Claim window appears.
-
All previously entered fields are populated. Change the values in the appropriate fields, if necessary.
-
Then choose one of the following options.
-
Click OK to save the changes and close the Edit Claim window. The system returns to the Transportation Details window. The claim information is updated.
-
Click Cancel to reject all entries and close the Edit Claim window. The system returns to the Transportation Details window.
-
-
-
After you have added all necessary records, choose one of the following options.
-
Click Save to save your changes.
-
Click Save and Close to save your changes and close the Transportation Details window.
-
Click Cancel to reject all changes and close the Transportation Details window.
-
Delete a Claim
To delete claim from a transportation follow the steps listed below.
-
From the Tasks menu, select Trade Management > Transportation > Manage Transportation. The Transportation Search window appears.
-
Enter or select search criteria as desired to make the search more restrictive.
-
Click Search. The transportations that match the search criteria are displayed in the Results section.
-
Select a record in the Results section.
-
In the transportation column, click on the transportation link, or mark a record and select Actions > Edit or use the Edit icon. The Transportation window appears.
-
In the Transportation Toolbar select Details. The Transportation Details window appears.
-
In the Claims table, select a claim.
-
Click Actions > Delete or use the Delete icon to delete the selected claim.
-
You are prompted if you want to delete the selected claim from the Claims table. Confirm with Yes.
-
The claim is removed from the Claims table.
-
After you have deleted all necessary records, choose one of the following options.
-
Click Save to save your changes.
-
Click Save and Close to save your changes and close the Transportation Details window.
-
Click Cancel to reject all changes and close the Transportation Details window.
-
Shipments
In the Transportation Shipments window you can manage associations of shipments with a PO or a transportation record.
The Transportation Shipments window contains the following sections.
Transportation Shipments Header
The Transportation Shipments header contains the following transportation information.
-
Vessel ID
-
Voyage/Flight number
-
Estimated Departure Date
-
Container
-
Bill of Lading/Airway Bill
-
Commercial Invoice
-
Order Number
-
Item
Transportation Shipments Table
The Transportation Shipments table contains information such as shipment, advanced shipping notice (ASN), and shipped as well as received date, the to location and the location name.
Add a Shipment
To add a shipment to a transportation follow the steps listed below.
-
From the Tasks menu, select Trade Management > Transportation > Manage Transportation. The Transportation Search window appears.
-
Enter or select search criteria as desired to make the search more restrictive.
-
Click Search. The transportations that match the search criteria are displayed in the Results section.
-
Select a record in the Results section.
-
In the Transportation column, click on the transportation link, or mark a record and select Actions > Edit or use the Edit icon. The Transportation window appears.
-
In the More Actions menu select Shipments. The Transportation Shipments window appears.
-
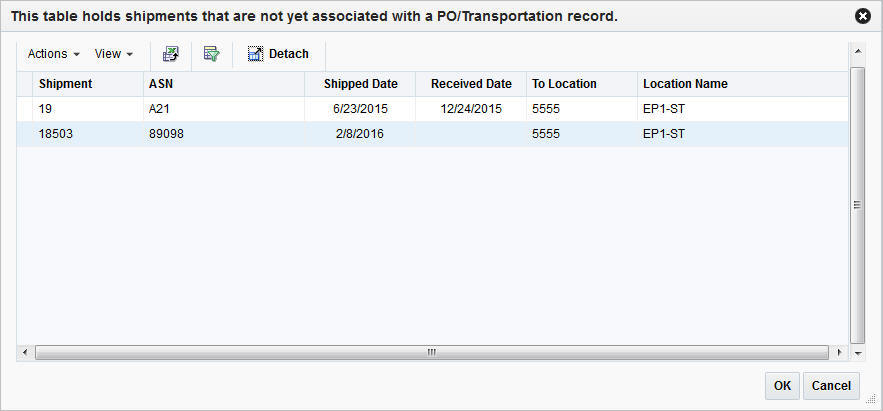
In the table, select Actions > Add or use the Add icon. The Add Shipment window appears.
-
The Add Shipments table displays shipments that are not associated with the PO/transportation record.
-
In the table select all the shipments you want to associate with the current transportation.
-
Then choose one of the following options.
-
Click OK to add the shipments and close the Add Shipments window. The system returns to the Transportation Shipments window. The new shipments are added to the Transportation Shipments table.
-
Click Cancel to reject all entries and close the Add Shipments window. The system returns to the Transportation Shipments window.
-
-
-
After you have added all necessary shipments, choose one of the following options.
-
Click Save to save your changes.
-
Click Save and Close to save your changes and close the Transportation Shipments window.
-
Click Cancel to reject all changes and close the Transportation Shipments window.
-
Delete a Shipment
To delete a shipment from a transportation follow the steps listed below.
-
From the Tasks menu, select Trade Management > Transportation > Manage Transportation. The Transportation Search window appears.
-
Enter or select search criteria as desired to make the search more restrictive.
-
Click Search. The transportations that match the search criteria are displayed in the Results section.
-
Select a record in the Results section.
-
In the transportation column, click on the transportation link, or mark a record and select Actions > Edit or use the Edit icon. The Transportation window appears.
-
In the More Actions menu select Shipments. The Transportation Shipments window appears.
-
In the Transportation Shipments table, select a shipment.
-
Click Actions > Delete or use the Delete icon to delete the selected shipment.
-
You are prompted if you want to delete the selected shipment from the Transportation Shipments table. Confirm with Yes.
-
The shipment is removed from the Transportation Shipments table.
-
After you have deleted all necessary records, choose one of the following options.
-
Click Save to save your changes.
-
Click Save and Close to save your changes and close the Transportation Shipments window.
-
Click Cancel to reject all changes and close the Transportation Shipments window.
-
Timelines
A timeline refers to a schedule of events that can be attached to an activity to track its life cycle. Possible timeline types are.
-
Item
-
Purchase Order
-
Order/Item
-
Customs Entry
-
Transportation
-
Transportation PO/Item
-
Container
-
BOL/AWB
-
Commercial Invoice
-
PO BOL/AWB
You can add timelines to the values listed above. You can attach a date to each step linked with an activity and monitor the completion of the activity. You can also modify the dates based on the changes in the schedule of related activity and add a relevant reason/comment for the change.
The Timelines Window contains the following sections.
-
Timeline Header
The Timeline header varies according to your selected timeline type. For example, if you want to add a timeline for a purchase order, the purchase order number is displayed in the Timeline header.
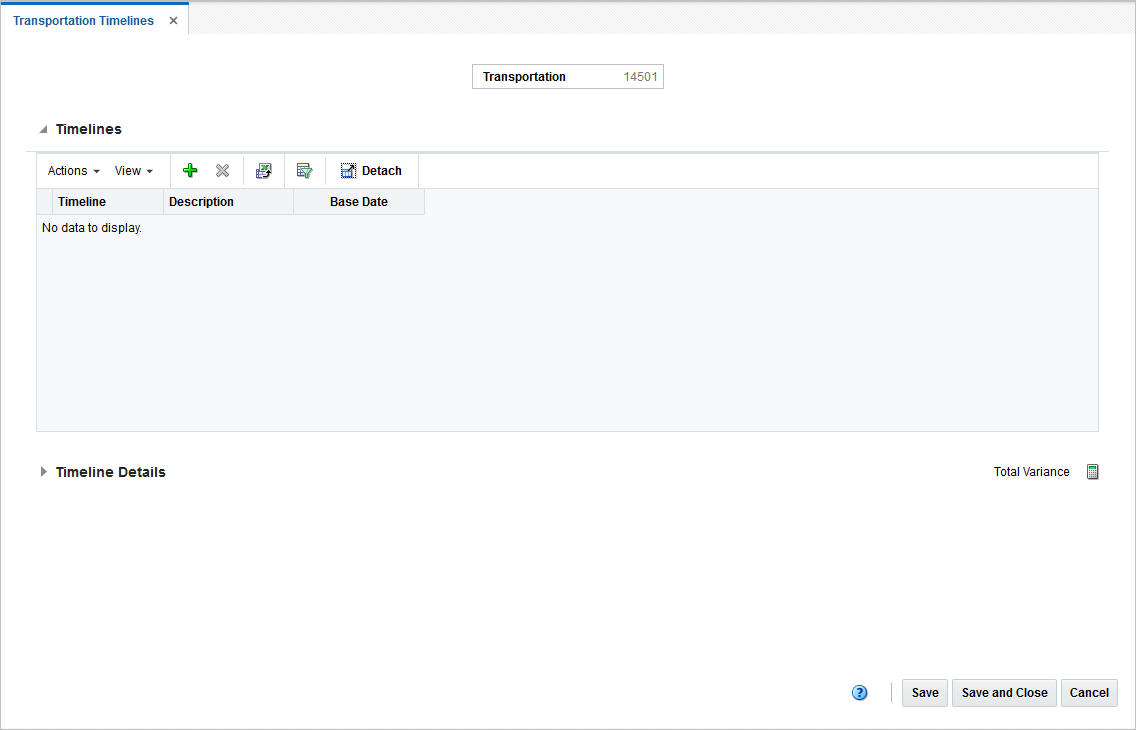
Timelines
In the timelines section you can add or delete a timeline to/from the selected timeline type.
Timeline Details
In the Timeline Details section you can view the reason and comments for a modified step within a timeline. You can also delete a timeline detail from the entry.
Timeline Details Table - Actions Menu and Icons
Use the Actions Menu and Icons to apply actions to the table. You can perform the actions listed below, as well as action described in ”Action Menu and Icons” in the Oracle Retail Trade Management Do the Basics User Guide.
Table 2-8 Timeline Details Table - Actions Menu/Icons and Description
| Actions Menu/Icons | Description |
|---|---|
|
Calculate Revised Dates |
Use the Calculate Revised Dates button to recalculate Base or Original dates. Follow the steps below.
If you enter the Original Date, the Base Date is recalculated. If you enter both, Base and Original date, you receive an error message. |
Add Timelines
To add a timeline to an entry, follow the steps listed below.
-
From the Tasks menu, select Trade Management > Transportation > Manage Transportation. The Transportation window appears.
-
Enter or select search criteria as desired to make the search more restrictive.
-
Click Search. The transportations that match the search criteria are displayed in the Results section.
-
Select a record in the Results section.
-
In the Transportation column, click on the transportation link, or mark a record and select Actions > Edit or use the Edit icon. The Transportation window appears.
-
In the More Actions menu select Timelines. In the submenu choose for which entry you want to add timelines.
-
Transportation
-
Order/Item
-
Container
-
BOL/AWB
-
Commercial Invoice
The Timeline window appears.
-
-
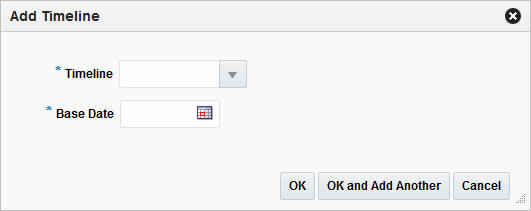
In the Timeline table, select Actions > Add or use the Add icon. The Add Timeline window appears.
-
In the Timeline field, enter, select or search for the step number you want to add a timeline for. This field is a required field.
-
In the Base Date field, enter or use the Calendar icon to select a date.
-
Then choose one of the following options.
-
Click OK to add the timeline and close the Add Timeline window. The system returns to the Timeline window. The new timeline is added to the Timeline table.
-
Click OK and Add Another to add additional timelines.
-
Click Cancel to reject all entries and exit the Add Timeline window. The system returns to the Timelines window.
-
-
-
After you have added all necessary timelines, choose one of the following options.
-
Click Save to save your changes.
-
Click Save and Close to save your changes and close the Timelines window.
-
Click Cancel to reject all changes and close the Timelines window.
-
Delete Timelines
To delete a timeline from an entry, follow the steps listed below.
-
From the Tasks menu, select Trade Management > Transportation > Manage Transportation. The Transportation Search window appears.
-
Enter or select search criteria as desired to make the search more restrictive.
-
Click Search. The transportations that match the search criteria are displayed in the Results section.
-
Select a record in the Results section.
-
In the Transportation column, click on the transportation link, or mark a record and select Actions > Edit or use the Edit icon. The Transportation window appears.
-
In the More Actions menu select Timelines. In the sub menu select the appropriate timeline type. The Timelines window appears.
-
In the Timeline table, select Actions > Delete or use the Delete icon.
-
Confirm the displayed prompt with Yes. The record is deleted from the table.
-
After you have deleted all necessary records, choose one of the following options.
-
Click Save to save your changes.
-
Click Save and Close to save your changes and exit the Timeline window.
-
Click Cancel to reject all changes and exit the Timeline window.
-
Edit Timeline Details
To edit a timeline detail of an entry, follow the steps listed below.
-
In the Timeline Details table, select a record and edit the following columns, if necessary.
-
Revised Date
Enter or use the Calendar icon to select a new date for an activity.
-
Actual Date
Enter or use the Calendar icon to select the actual date for an activity.
-
Reason
Enter, select or search for a reason for the timeline change.
-
Comments
Enter or change comments for the activity.
Note:
The original date is populated, when you enter the base date in the Add Timeline window. You can only modify the Base and Original Date field during the timeline definition. Once a timeline has been attached to an activity, you can no longer update these fields.
-
-
After you have changed all necessary data, choose one of the following options.
-
Click Save to save your changes.
-
Click Save and Close to save your changes and close the Timeline window.
-
Click Cancel to reject all entries and close the Timeline window.
-
Delete Timeline Details
To delete a timeline detail from an entry, follow the steps listed below.
-
In the Timeline Details table, select a record.
-
Then select Actions > Delete or use the Delete icon.
-
Confirm the displayed prompt with Yes. The record is deleted from the table.
-
After you have deleted all necessary records, choose one of the following options.
-
Click Save to save your changes.
-
Click Save and Close to save your changes and exit the Timeline window.
-
Click Cancel to reject all changes and exit the Timeline window.
-
Items
The Transportation Items window allows you to add, edit and view child items for an item parent on an order.
Note:
This menu option is only enabled, if you entered a parent item in the Item field in the Transportation window.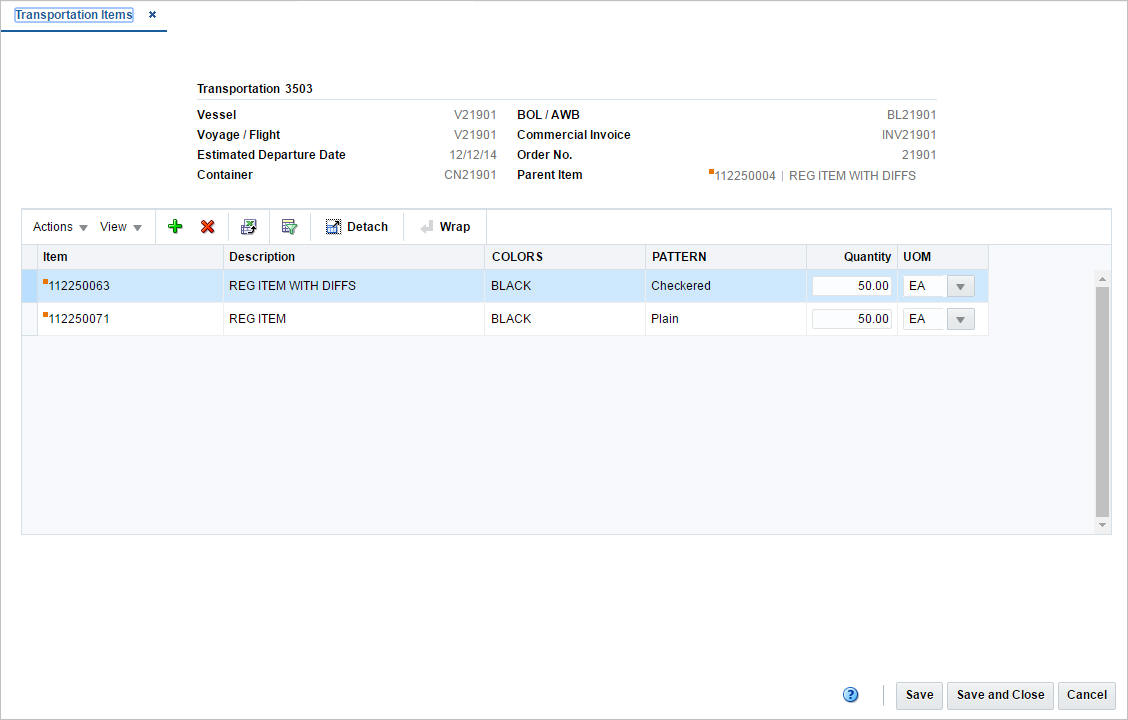
The Transportation Item window contains the following sections.
-
Transportation Items Header
The header displays the transportation ID, the vessel and voyage/flight number, the estimated departure date, container, bill of lading/airway bill, the commercial invoice, and order number as well as parent item information.
Transportation Items Table
The Transportation Items table lists the child items added to the transportation record. You can add and delete records from this table. Furthermore, you can edit the Quantity and UOM field values directly in the table.
The Transportation Item table contains the following columns by default.
-
Item
-
Description
-
Diff 1-4
-
Quantity
You can edit the quantity of the child item directly in the table.
-
UOM (Unit of Measure)
You can edit the UOM of the child item directly in the table.
Add Child Items
To add child items to a transportation of an order, follow the steps below.
-
From the Tasks menu, select Trade Management > Transportation > Manage Transportation. The Transportation Search window appears.
-
Enter or select search criteria as desired to make the search more restrictive.
-
Click Search. The transportations that match the search criteria are displayed in the Results section.
-
Select a record in the Results section.
-
In the Transportation column, click on the transportation link, or mark a record and select Actions > Edit or use the Edit icon. The Transportation window appears.
-
In the More Actions menu select Items. The Transportation Items window appears.
-
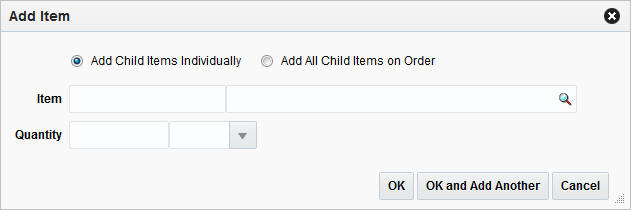
In the Transportation Items table, select Actions > Add or use the Add icon. The Add Item window appears.
-
Select if you want to add the child items individually or if you want to add all the child items on the order.
-
In the Items field, enter or use the Search icon to search for the appropriate child item.
Note:
If you have selected the Add All Child Items on Order checkbox, the Item field is disabled. -
In the Quantity field, enter the appropriate quantity. Then enter, select or search for the item quantity UOM.
-
Then choose one of the following options.
-
Click OK to add the child item and close the Add Item window. The system returns to the Transportation Items window. The new child items is added to the Transportation Items table.
-
Click OK and Add Another to add additional child items.
-
Click Cancel to reject all entries and exit the Add Items window. The system returns to the Transportation Items window.
-
-
-
After you have added all necessary child items, choose one of the following options.
-
Click Save to save your changes.
-
Click Save and Close to save your changes and close the Transportation Items window.
-
Click Cancel to reject all changes and close the Transportation Items window.
-
Delete Child Items
To delete a child item of a transportation, follow the steps below.
-
From the Tasks menu, select Trade Management > Transportation > Manage Transportation. The Transportation Search window appears.
-
Enter or select search criteria as desired to make the search more restrictive.
-
Click Search. The transportations that match the search criteria are displayed in the Results section.
-
Select a record in the Results section.
-
In the Transportation column, click on the transportation link, or mark a record and select Actions > Edit or use the Edit icon. The Transportation window appears.
-
In the More Actions menu select Items. The Transportation Items window appears.
-
In the Transportation Items table, select the child item you want to delete.
-
Then select Actions > Delete or use the Delete icon.
-
You are prompted if you want to delete the selected record. Confirm the prompt with Yes.
-
The selected child item is removed from the Transportation Items table.
-
After you have deleted all necessary child items, choose one of the following options.
-
Click Save to save your changes.
-
Click Save and Close to save your changes and close the Transportation Items window.
-
Click Cancel to reject all changes and close the Transportation Items window.
-
Create a Transportation by Order
In the Create Transportation by Order window you can enter and edit items, related shipments and other information for a specific purchase order. After populating all the information in the header you can query the details. In addition, you can edit or mass edit records.
The Create Transportation by Order window contains the following sections.
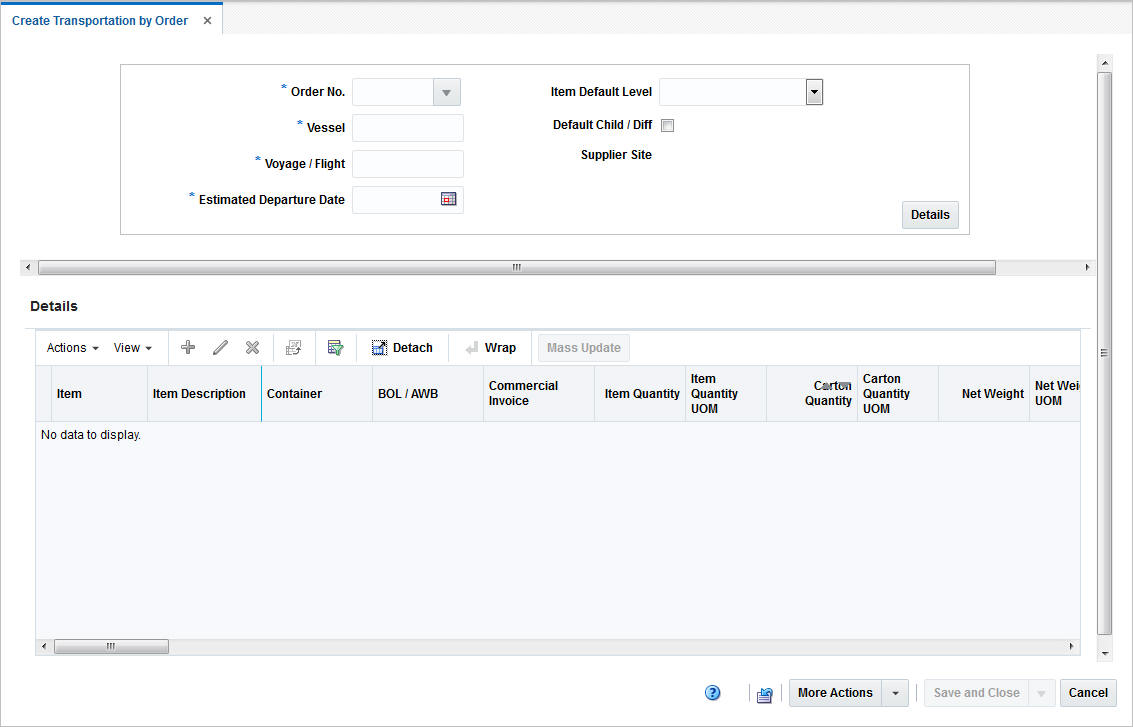
Create Transportation by Order Header
The header contains the following fields and button.
Table 2-9 Create Transportation by Order Header - Fields/Buttons and Description
| Fields/Buttons | Description |
|---|---|
|
Order No. |
Enter select or search for the appropriate order number. This field is a required field. |
|
Vessel |
Enter the vessel ID. This field is a required field. |
|
Voyage/Flight |
Enter the voyage/flight number. This field is a required field. |
|
Estimated Departure Date |
Enter or use the Calendar icon to select an estimated departure date. This field is a required field. |
|
Item Default Level |
Select the item default level from the list. Possible levels are Transaction Level and Above Transaction Level. |
|
Default Child/Diff checkbox |
Select the Default Child/Diff checkbox to indicate that all transaction-level values (child/diffs) associated with the parent items will be defaulted. The quantity/UOM values will be rolled-up and displayed for each parent item. The parent item qty/UOM is non-editable when child records exist. The Child/Diff values may be edited by clicking the Items option. If the you delete all of the quantity values from the Item window, the Parent level quantities can then be edited. The parent-level Item quantity will be calculated based on the sum of child-level quantities in the Item window, the Item UOM value will also default to the parent-level. |
|
Supplier Site |
The supplier site is displayed. You cannot edit the supplier site. |
|
Details button |
Use the Details button, to query the details for the entered order information. The transportation details are displayed in the Details section. For more information about transportation details, see the Details section. |
Details
The Details section lists details for the entered order information. You can add, edit and delete item information for the transportation.
Details Table - Actions Menu, Icons and Buttons
Use the Actions Menu, icons and buttons to apply actions to the table. You can perform the actions listed below, as well as action described in ”Action Menu and Icons” in the Oracle Retail Trade Management Do the Basics User Guide.
Table 2-10 Details Table - Actions Menu/Icons/Buttons and Description
| Actions Menu/Icons/Buttons | Description |
|---|---|
|
Mass Update or Mass Update button |
Opens the Mass Update window. For more information about how to perform a mass update, see the Mass Update section in "Manage Transportation". |
|
Transportation |
Opens the Transportation window. For more information about this function, see the Define a Transportation section. |
|
Items |
Opens the Transportation Items window. For more information about this function, see the Items section. |
Create Transportation by Order - More Actions Menu
Use the More Actions menu to navigate to the following windows. The More Actions menu contains the following options.
Table 2-11 Create Transportation by Order - More Actions Menu
| More Actions Menu | Description |
|---|---|
|
Shipments |
Opens the Transportation Shipments window. This window displays shipment information such as ASN, shipped and received date, to location and location name. For more information about shipments, see the Shipments section. |
|
Details |
Opens the Transportation Details window. This window displays a details of the delivery, packing, license/visa information as well as claims. For more information about transportation details, see the Details section. |
|
Missing Documents |
Opens the Missing Documents window. You can add and delete all the missing documents for the current transport in this window. For more information about missing documents, see the ”Missing Documents” section in the Oracle Retail Trade Management Customs Entry User Guide. |
|
Timelines |
Opens the Timelines menu. The menu contains the following options.
For more information about timelines, see the Timelines section. |
Create a Transportation by Order
To create a transportation by order follow the steps below.
-
From the Tasks menu, select Trade Management > Create Transportation by Order. The Create Transportation by Order window appears.
-
Enter, select or search for the necessary order information. For more information, about what do add in the Create Transportation header, see the Create Transportation by Order Header section.
-
Click Details. The details for the entered order information is displayed in the Detail section.
-
Add items to the transportation by order. For more information about how to add items to the transportation by order, see the Add Items section.
-
Edit item of the transportation by order. For more information about how to edit items of a transportation by order, see the Edit Items section.
-
Delete items form the transportation by order. For more information about how to delete items from a transportation by order, see the Delete Items section.
-
Update multiple items of a transportation by order. For more information about how to update multiple items from a transportation by order, see the Mass Update section in "Manage Transportation".
-
-
After you have made all the necessary changes, choose one of the following options.
-
Click Save and Close, to save changes to the transportation and exit the Create Transportation by Order window.
-
Click the arrow on the right side of the button to display the additional save options.
-
Click Save to save your entries.
-
Click Save and Create Another to save the current transportation and create additional entries.
-
-
Add Items
To add an item to a transportation by order, follow the steps below.
-
In the Details table, select Actions > Add or use the Add icon. The Add Item window appears.
-
In the Item field, enter or use the Search icon to search for the appropriate item. This field is a required field.
-
In the Container field, enter the container ID.
-
In the BOL/AWB field, enter the bill of lading or airway bill number.
-
In the Commercial Invoice field, enter the commercial invoice number. This filed is a required field.
-
In the Invoice Date field, enter or use the Calendar icon to select a date. This field is a required field.
-
In the Invoice Amount field, enter the invoice amount.
-
In the Exchange Rate field the current rate is displayed. If you need to edit the displayed exchange rate, see the ”Editing the Exchange Rate” section in the Oracle Retail Trade Management Letters of Credit User Guide.
-
In the Item Quantity field, enter the appropriate quantity. Then select the item quantity unit of measure.
-
In the Carton Quantity field, enter the appropriate quantity. Then select the carton quantity unit of measure.
-
In the Gross Weight field, enter the appropriate weight. Then select the weight unit of measure.
-
In the Net Weight field, enter the appropriate weight. Then select the weight unit of measure.
-
In the Cubic field, there appropriate cubic amount. Then select the cubic unit of measure.
-
Then choose one of the following options.
-
Click OK to save your entries and close the Add Item window.
-
Click OK and Add Another to add additional records.
-
Click Cancel to reject all entries and close the Add Item window.
-
-
-
After you have made all the necessary changes, choose one of the following options.
-
Click Save and Close, to save changes to the transportation and close the Create/Manage Transportation by Order window.
-
Click the arrow on the right side of the button to display the additional save options.
-
Click Save to save your entries.
-
Click Save and Create Another/Save and Edit Another to save the current transportation and create additional entries.
-
-
Click Cancel to reject all entries and close the Create/Manage Transportation by Order window.
-

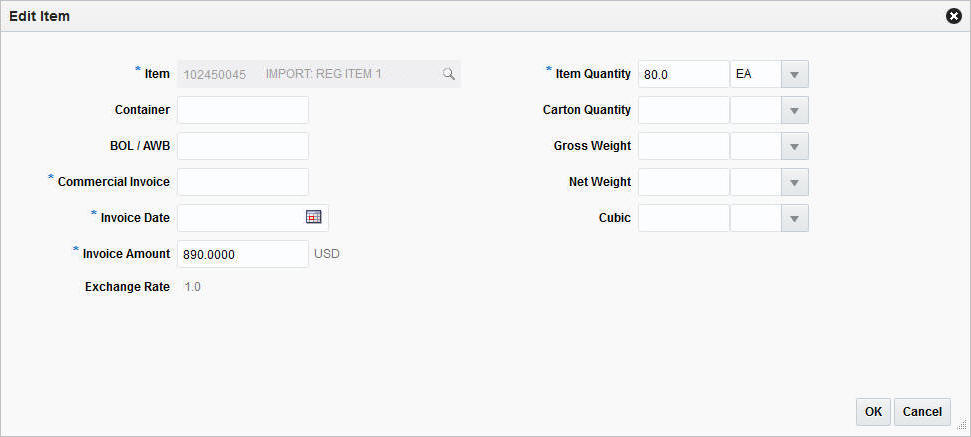
Edit Items
To edit items of a transportation by order, follow the step listed below.
-
In the Details table, select Actions > Edit or use the Edit icon. The Edit Item window appears.
-
The item information of the current item is displayed. Update the field as necessary.
-
Then choose one of the following options.
-
Click OK to save your entries and close the Edit Item window.
-
Click Cancel to reject all entries and close the Edit Item window.
-
-
-
After you have made all the necessary changes, choose one of the following options.
-
Click Save and Close, to save changes to the transportation and close the Create/Manage Transportation by Order window.
-
Click the arrow on the right side of the button to display the additional save options.
-
Click Save to save your entries.
-
Click Save and Create Another/Save and Edit Another to save the current transportation and create additional entries.
-
-
Click Cancel to reject all entries and exit the Create/Manage Transportation by Order window.
-
Delete Items
To delete items from an transportation by order follow the steps below.
-
In the Details table, select the item you want to delete from the transportation.
-
Then select Actions > Delete or use the Delete icon.
-
You are prompted if you want to delete the record. Confirm the prompt with Yes.
-
The item is deleted from the Details table.
-
Then choose one of the following options.
-
Click Save and Close, to save changes to the transportation and close the Create/Manage Transportation by Order window.
-
Click the arrow on the right side of the button to display the additional save options.
-
Click Save to save your entries.
-
Click Save and Create Another/Save and Edit Another to create additional entries.
-
-
Click Cancel to reject all entries and close the Create/Manage Transportation by Order window.
-