|
|
Interportlet communication (IPC)—also called portlet-to-portlet communication—allows multiple portlets to use or react to data. For example, you might want to use IPC in a self-service or sales implementation where common data elements, such as order ID or customer ID, are used across multiple projects. All portlet types supported by WebLogic Portal can implement IPC. Examples of IPC include:
IPC in WebLogic Portal is based on the use of event handlers—objects that listen for predefined events on other portlets in the portal and fire actions when that event occurs. You can set up interportlet communication in two ways: using the WorkSpace Studio interface, or using the WebLogic Portal API.
This chapter includes a tutorial-based example of establishing interportlet communications using an out-of-the-box portal event handler (Basic IPC Example). This example will familiarize you with event handlers and show you some of their common uses.
This example is specific to interportlet communications within a single portal web project. For information on establishing IPC with federated portals (WSRP), refer to the Federated Portals Guide.
| Note: | If you want to use asychronous rendering with IPC, consider using asynchronous desktop rendering, as discussed in the chapter “Designing Portals for Optimal Performance” in the Portal Development Guide. Note that IPC is not compatible with asynchronous portlet rendering, as discussed in Asynchronous Content Rendering and IPC, but workarounds exist for some use cases. |
This chapter includes the following sections:
IPC behavior is based on portlet definition labels; that is, all portlet instances of a given .portlet file respond to the same events. You can use the event handler options Only If Displayed and From Self Instance Only to discriminate among the instances of the same .portlet file. For a description of these options, refer to Portlet Event Handlers Wizard - Add Handler Field Descriptions.
Portlet events (not to be confused with page flow events) allow portlets to communicate. One portlet can create an event and other portlets can listen for that event. A portlet event can also carry accompanying data called a payload, where the payload is a serializable Java object.
This section contains the following topics:
Event handlers listen for events raised on subscribed portlets and fire one or more actions when a specific event is detected. An event handler tag is a child of the <portlet> tag, and a portlet can have any number of events associated with it. Table 8-1 lists the event handlers that are available on the Add Handler menu of the Portlet Event Handlers wizard:
Allows you to set up an event that will fire in several possible situations. For details, see Generic Event Handlers below.
|
|
|
A custom event handler is triggered by an event and can pass a developer-defined payload or fire any predefined action. Custom event handlers can be triggered declaratively or they can be based on a methods called in a backing file. You can specify that an event should be handled by a method in a backing file.
|
|
The generic event handler, with an event attribute value of myEvent, will be triggered on the following conditions:
<handlePortalEvent event=myEvent> handler would react. Using a generic event handler allows you to more effectively decouple your portal design, because your application does not need to know the source or type of an event. You can change the portlet type (for example, from a page flow portlet to a JSP portlet, with a backing file firing custom events) without affecting how you events are processed.
An event action depends upon the type of event being raised. Except for portal events, all other events can be identified in the Events field on the Portlet Event Handlers Wizard, as described in Portlet Event Handlers Wizard Reference. Events available with the portal event handler are listed in Table 8-2.
This event is fired when a Look & Feel is re-initialized. This happens whenever the Look & Feel is dynamically changed, such as when any of the reinit() methods on a PortalLookAndFeel object are called. See the PortalLookAndFeel class
Javadoc for more information about the reinit() methods.
|
|
|
Refer to Event Handlers.
|
Event handlers fire an action on the host portlet when that handler detects an event from another portlet in the application (or possibly the same portlet, for example in the case of a page flow portlet). For example, when the user minimizes the appropriate portlet, a portal event called onMinimize might cause the handler listening for it to fire an action that invokes an attached backing file.
Table 8-3 lists the event actions available for portlets.
Runs a method in the backing file attached to the portlet. For more information on backing files, refer to Backing Files.
|
The Portlet Event Handlers wizard included in WorkSpace Studio allows you to implement several types of event handlers and actions without programming. The following steps summarize the process of setting up an event handler using the wizard:
The following sections describe the dialogs of the wizard and provide information about the information required in each field of the dialogs.
For a specific procedural example of how to use the event handler wizard, refer to Basic IPC Example.
You can open the Portlet Event Handlers wizard in two ways:
| Note: | If no event handlers have been added, the Event Handler field indicates that. If any event handlers have been added, the field indicates the number that currently exist. |
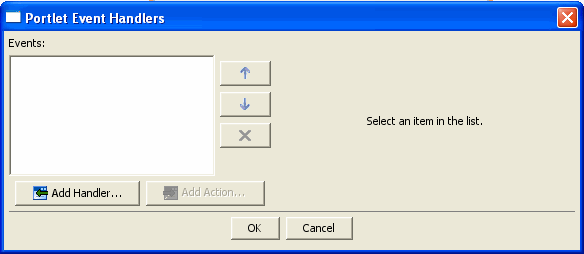
The wizard appears, as shown in Figure 8-1.
When you click Add Handler, the event handler drop-down menu allows you to select a handler; to add an action, click Add Action to open the event action drop-down menu.
Based on your selection, the dialog box expands, displaying additional fields that you can use to set up the handler or action. Figure 8-2 shows an example of the expanded dialog for adding an event handler.
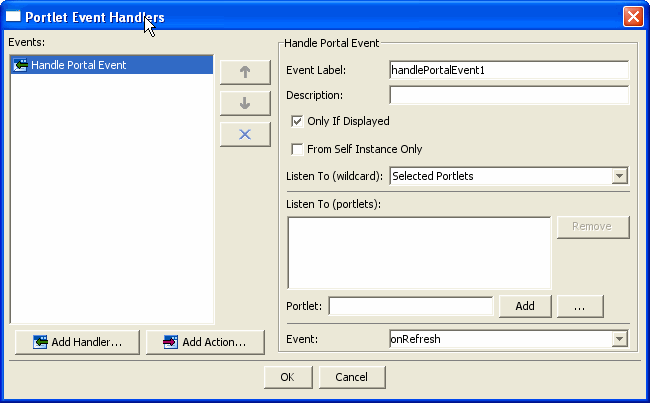
Table 8-4 explains the fields in the Add Handler dialog and how your selections affect the behavior of the event.
| Note: | WebLogic Portal attempts to validate the settings of the Event Handlers dialog. You will receive an error message if any problems are detected. For detailed information on the WebLogic Portal validation framework, see the WebLogic Portal Development Guide. |
The available fields for the action depend on the type of action that you select. Table 8-5 explains the possible fields in the expanded Add Action dialog and how your selections affect the behavior of the action.
This section explains how to add JSF events and listeners to portlets.
To add a faces event to a JSF portlet:
<netuix:content>
    <netuix:facesContent contentUri="/portlets/myJsf.faces"
    requestAttrPersistence="none">
        <netuix:facesEvents>
            <netuix:facesEvent action="/portlets/bar.faces" eventName="bar"/>
        </netuix:facesEvents>
    </netuix:facesContent>
</netuix:content>
To handle a faces event and invoke an action, use the Portlet Event Handlers wizard as discussed in Portlet Event Handlers Wizard Reference. When specifying the Event to listen to, use the event name specified in the facesEvent tag in the JSF portlet (the eventName attribute of the facesEvent tag). For example, in Listing 8-1 the eventName is bar.
Listing 8-2 shows the handleFacesEvent tag that is created when you add a Faces event handler to a JSF portlet. The event handler is listening for an event called bar. (Note that you can use eventName="*" to handle any Faces event that is fired.) The event handler then invokes a JSF action.
<netuix:handleFacesEvent eventLabel="handleFacesEvent1"eventName="bar"fromSelfInstanceOnly="false" onlyIfDisplayed="true"
sourceDefinitionLabels="myJsf">
<netuix:invokeFacesActionaction="/portlets/myportlet.faces"/>
</netuix:handleFacesEvent>
When working with JSF events, note the following:
eventName="*" to handle any Faces event that is fired.
This section contains the following topics:
Before you use the interportlet communication example in this chapter, you must have an existing portal development environment, consisting of a domain, Portal EAR project, Portal Web project, Datasync project, and portal. To complete the pre-requisite tasks, perform the tasks described in the Getting Started with WebLogic Portal tutorial, using the information in Table 8-6 to enter the necessary values.
With a development environment set up, you can complete the steps described in this section:
In this exercise, you create individual page flows, portlets, JSPs, and backing files to establish interportlet communications within the portal project. You then add these portlets to a portal and test the project to ensure that communication is successful.
This section describes the process of setting up interportlet communications between two portlets by using the Portal Event Handlers wizard in WorkSpace Studio. This is a simple example in which minimizing one portlet changes the text string in another portlet in the portal.
You should become familiar with the Portal Event Handlers Wizard and backing files before attempting to replicate this example. For more information about the wizard, refer to Portlet Event Handlers Wizard Reference. For more information on backing files, refer to Backing Files.
This exercise includes five main tasks:
In this section, you create two JSP files and the JSP portlets that surface these files. You also create a backing file that contains the instructions necessary to complete the communication between the two portlets, and you add an event handler to one of the portlets. After you have created the portlets and attached the backing file, you test the project in your browser.
| Note: | Before continuing with this procedure, ensure that WorkSpace Studio is running and the ipcWebProject node is expanded. |
To create the JSP files that the portlets will surface, do the following:
index.jsp.
index.jsp opens in the workbench editor, displaying the source code.
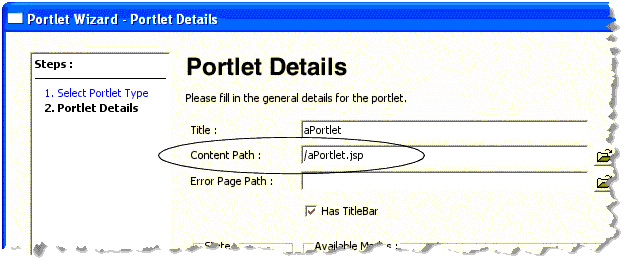
aPortlet.jspaPortlet.jsp in the Package Explorer view and select Generate Portlet from the context menu.
The Portal Details dialog appears (Figure 8-4). with aPortlet.jsp in the Content Path field.
aPortlet.portlet appears in the ipcWebProject/WebContent folder in the Package Explorer view.
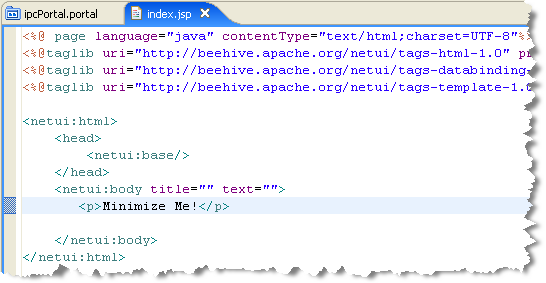
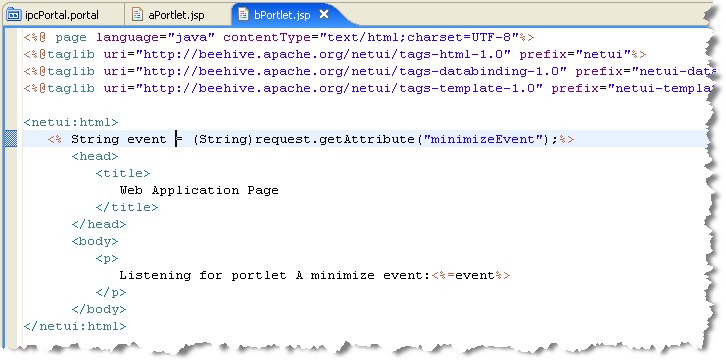
bPortlet.jsp to the copy. bPortlet.jsp in the workbench editor if it is not already open. The XML code for the JSP file appears.
<netui:html> through </netui:html>. This code displays event handling from the backing file that you will create and attach in a subsequent step.<netui:html>
<% String event = (String)request.getAttribute("minimizeEvent");%>
<head>
<title>
Web Application Page
</title>
</head>
<body>
<p>
Listening for portlet A minimize event:<%=event%>
</p>
</body>
</netui:html>
The source should look like the example in Figure 8-5.
bPortlet.jsp file.
Checkpoint: At this point the ipcWebProject/WebContent folder contains these files: aPortlet.jsp, aPortlet.portlet, bPortlet.jsp, and bPortlet.portlet.
To create the backing file, do the following:
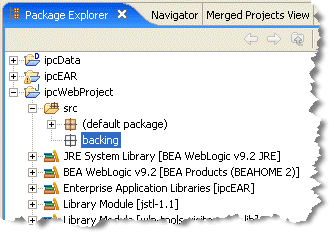
ipcTestWebProject, select the Java Resources/src folder and select File > New > Folder from the main menu. The Create New Folder dialog box appears.
backing.
The folder backing will appear under ipcTestWebProject/src, as shown in Figure 8-6.
backing folder and select New > Other.
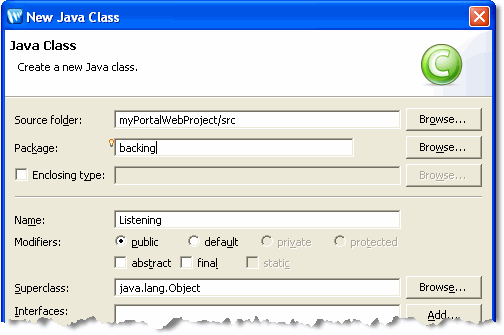
The New Java Class dialog appears, as shown in Figure 8-7. The Source folder field auto-fills with the default path; leave it as is. The Package field auto-fills with backing; leave it as is.
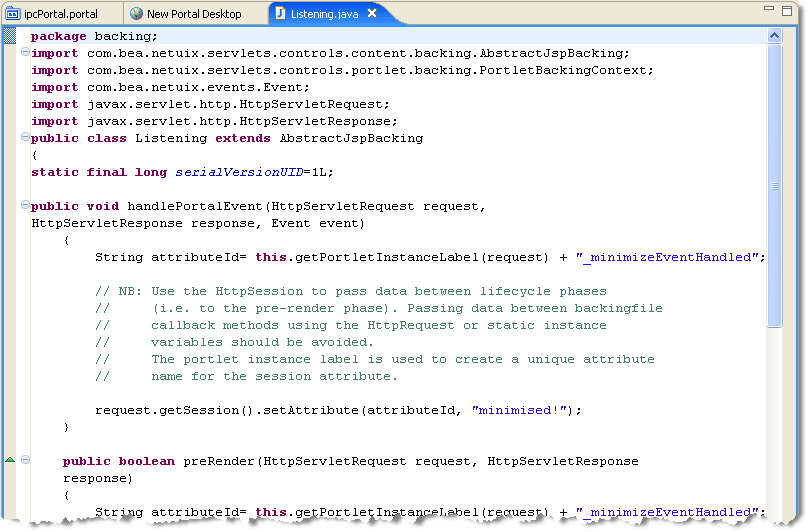
Listening and click Finish.The new Java class appears in the editor.
Listening.java, and copy the code from Listing 8-3 into the file. Figure 8-8 shows the top portion of the Listening.java file as it should look after you paste the code into it. package backing;
import com.bea.netuix.servlets.controls.content.backing.AbstractJspBacking;
import com.bea.netuix.servlets.controls.portlet.backing.PortletBackingContext;
import com.bea.netuix.events.Event;
import javax.servlet.http.HttpServletRequest;
import javax.servlet.http.HttpServletResponse;
public class Listening extends AbstractJspBacking
{
   static final long serialVersionUID=1L;
   public void handlePortalEvent(HttpServletRequest request,
   HttpServletResponse response, Event event)
   {
      String attributeId= this.getPortletInstanceLabel(request) +       "_minimizeEventHandled";
	       // NB: Use the HttpSession to pass data between lifecycle phases
	       //     (that is, to the pre-render phase). Passing data between
	       //     backing file callback methods using the HttpRequest or static
	       //     instance variables should be avoided.
	       //     The portlet instance label is used to create a unique
	       //     attribute name for the session attribute.

      request.getSession().setAttribute(attributeId, "minimized!");
   }
   public boolean preRender(HttpServletRequest request, HttpServletResponse
   response)
   {
      String attributeId= this.getPortletInstanceLabel(request) +
      "_minimizeEventHandled";
         if (request.getSession().getAttribute(attributeId) != null)
         {
            // Reset the session flag
             request.getSession().removeAttribute(attributeId);
            // Pass minimize event notification to the JSP via the request.
            request.setAttribute("minimizeEvent", "Minimize event handled");
         }
         else
         {
            request.setAttribute("minimizeEvent", null);
         }
      return true;
   }
   private String getPortletInstanceLabel(HttpServletRequest request)
   {
      PortletBackingContext context=
      PortletBackingContext.getPortletBackingContext(request);
      return context.getInstanceLabel();
   }
}
Now you will attach the backing file created in the previous section to bPortlet.portlet. Perform the following steps:
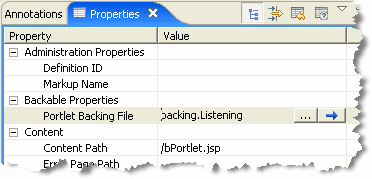
bPortlet.portlet to open it.| Tip: | The Properties view is a default view in the Portal perspective. If it is not visible, select Window > Show View > Properties. |
backing.Listening into the Backable Properties > Portlet Backing File field, as shown in Figure 8-10.
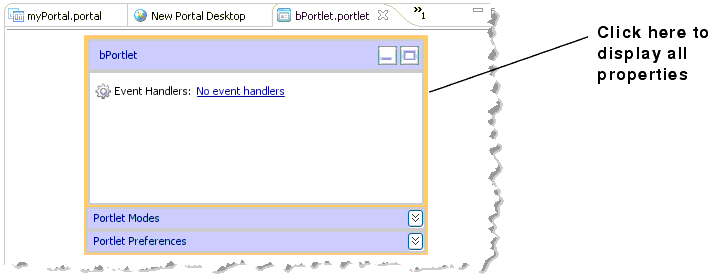
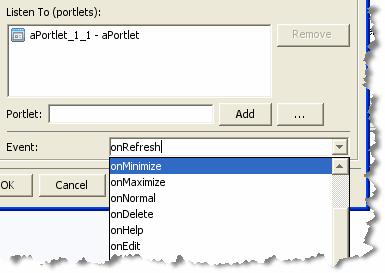
You now add the event handler to bPortlet.portlet. This handler will be set up so that it will listen for an event on a specific portlet and fire an action in response to that event. To add the event handler, perform the following steps:
| Note: | bPortlet.portlet should be displayed in the Workshop for WebLogic editor. If it isn’t, locate it in the ipcTestWebProject/WebContent folder in the application panel and double-click it. |
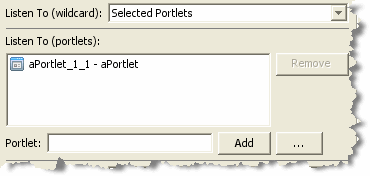
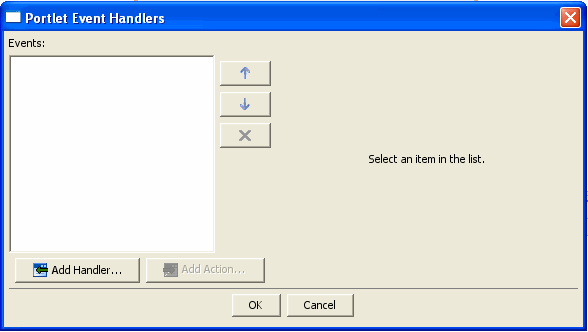
 appears, as shown in Figure 8-11. to display the Portlet Event Handlers dialog, as shown in Figure 8-12.
The Portlet Event Handlers dialog box expands to allow entry of more details, as shown in Figure 8-13.
 .
.The Please Choose a File dialog appears.
aPortlet.portlet and click OK. The dialog box closes and aPortlet_1 appears in the Listen to (portlets): list and in the Portlet field, as shown in Figure 8-14. The label aPortlet_1 is the definition label of the portlet to which the event handler will listen.
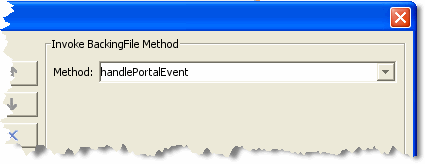
The Invoke BackingFile selection will not appear unless a backing file is detected by WebLogic Portal.
The dropdown menu for this field displays the last several values that you entered, if applicable.
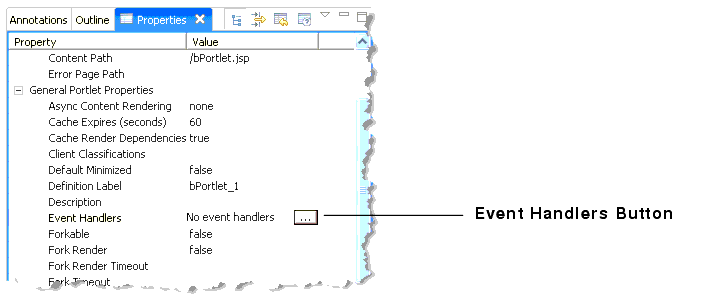
The event handler is added. Note that the Value field of the Event Handlers property now indicates 1 Event Handler.
Test the communication between your portlets by following these steps:
| Note: | Before you begin, ensure that all files are saved. |
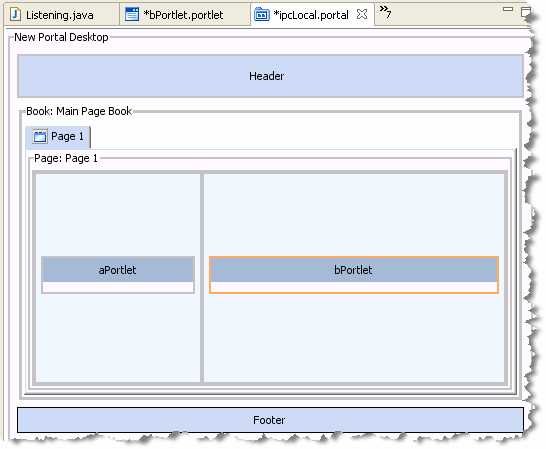
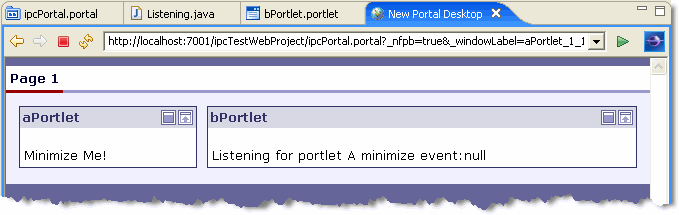
ipcPortal.portal to display it in the workbench editor. aPortlet.portlet and bPortlet.portlet from the Package Explorer view onto the portal layout, as shown in Figure 8-17.ipcPortal.portal in the Package Explorer view and select Run As > Run on Server. Wait while the server starts and the application is published to the server. The portal will render in your browser (Figure 8-18).
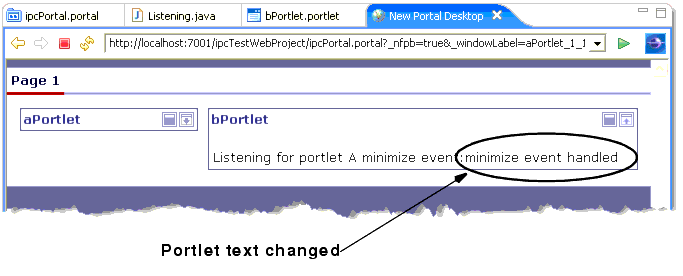
Note the content change in bPortlet, as shown in Figure 8-19.
In this example, you set up your environment and you added two JSP portlets to a local portal. One portlet, aPortlet, was fairly simple, while the second portlet, bPortlet, surfaced a more complex JSP file, used a backing file, and contained a portal event handler. When you tested the communication between the portlets, you observed how the bPortlet changed when an event occurred on aPortlet. This is called local interportlet communication.
The following sections describe special considerations that you should keep in mind as you implement interportlet communications.
This section contains the following topics:
Although IPC is not supported when asynchronous content rendering for specific portlets is enabled, WebLogic Portal provides some features that allow these two mechanisms to coexist in your portal environment. In addition, you can disable asynchronous rendering for single requests using the mechanisms described in Asynchronous Content Rendering and IPC.
| Tip: | If you enable asynchronous rendering at the portal/desktop level, you can use IPC without restrictions. For more information on asynchronous portal/desktop rendering, see the WebLogic Portal Development Guide. |
Use a generic event handler to work with WebLogic Portal WSRP. To do this, first select Generic Event Handler, then select Add Action and select Window Mode|State. Then manually type in the event name—for example, onMinimize.
Pay attention to the Listen To field when you set up the listener portlet. The portlet definition you use on the consumer must match the WSRP portlet’s portlet definition. For example, if you have “portlet_2” listening to “portlet_1”, the WSRP portlet corresponding to “portlet_1”—the proxy on the consumer—must also have its portlet definition label set to “portlet_1”. For more information on using IPC with WSRP, refer to the Federation Guide.


|