Domino Service
Setup Guide
|
|
This chapter describes how to install the Domino Service on the various supported platforms.
This chapter contains the following sections:
Note: The %COMPOZE_HOME% directory refers to the directory where products are installed and the %COMPOZE_DOMINO_SERVICE_HOME% directory refers to the directory where the Domino Service is installed.
Perform the following steps to install the Domino Service on Windows:
Selecting I accept the terms of the License Agreement will allow you to continue with the installation.
Selecting I do NOT accept the terms of the License Agreement will terminate the installation.
%COMPOZE_HOME% directory is chosen. You can change this by entering the absolute path of the directory or by clicking Choose and selecting the directory.C:\Lotus\Domino directory, unless you installed the program files to a different location. You may change this by entering the absolute path of the directory or by clicking Choose and selecting the directory.C:\Lotus\Domino\Data directory, unless you installed the data directory to a different location. You may change this by entering the absolute path of the directory or by clicking Choose and selecting the directory.names.nsf database), an information screen appears stating such. Click Next to continue or Previous to go back and enter a valid Domino data directory.This section contains the following topic:
Check the following items to verify that the Domino Service was installed:
%COMPOZE_HOME%\domino_service.%LOTUS_DOMINO_HOME% directory:%LOTUS_DOMINO_DATA% directory:
You can install the Domino Service on Linux in GUI mode or Console mode.
This section contains the following topics:
Note: It is critical you be root or have write permission for the directory where you plan to install the Domino Service. You must also have write permissions for the Domino server directories.
The installer running in GUI mode will utilize GUI panels and will ask for all necessary configuration questions through the graphical panel. You must have the X-Window server running on the machine where you are installing the Domino Service.
Perform the following steps to install the Domino Service on Linux using the GUI mode:
Selecting I accept the terms of the License Agreement will allow you to continue with the installation.
Selecting I do NOT accept the terms of the License Agreement will terminate the installation.
%COMPOZE_HOME% directory is chosen. You may change this by entering the absolute path of the directory or by clicking Choose and selecting the directory./opt/lotus/notes/{version}/{platform} (or $Notes_ExecDirectory), unless you installed the program files to a different location. You may change this by entering the absolute path of the directory or by clicking Choose and selecting the directory./local/notesdata directory, unless you installed the data directory to a different location. You may change this by entering the absolute path of the directory or by clicking Choose and selecting the directory.names.nsf database), an information screen appears stating such. Click Next to continue or Previous to go back and enter a valid Domino data directory.The installer running in console mode will not utilize GUI panels (X-Window Server), but instead will ask all necessary configuration questions through the command prompt. This is best for machines running Lotus Domino server without an X-Server.
Perform the following steps to install the Domino Service on Linux using the Console mode:
Enter Y to accept the license agreement and allow you to continue with the installation.
Enter N to decline the license agreement and terminate the installation.
%COMPOZE_HOME% directory is chosen. You can change this by entering the absolute path of the directory.Enter Y to accept the directory and continue with the installation.
Enter N to return you to the previous step to select the directory where Domino Service will be installed.
/opt/lotus/notes/{version}/{platform} directory (or the $Notes_ExecDirectory directory), unless you installed the program files to a different location. You may change this by entering the absolute path of the directory./local/notesdata directory, unless you installed the data directory to a different location. You may change this by entering the absolute path of the directory.names.nsf database), the console will display information stating such. Press Enter to continue or enter Back to go back and enter a valid Domino data directory.Check the following items to verify that the Domino Service was installed:
%LOTUS_DOMINO_DATA% directory:
Perform the following steps to configure the Lotus Domino server that will host the Domino Service:
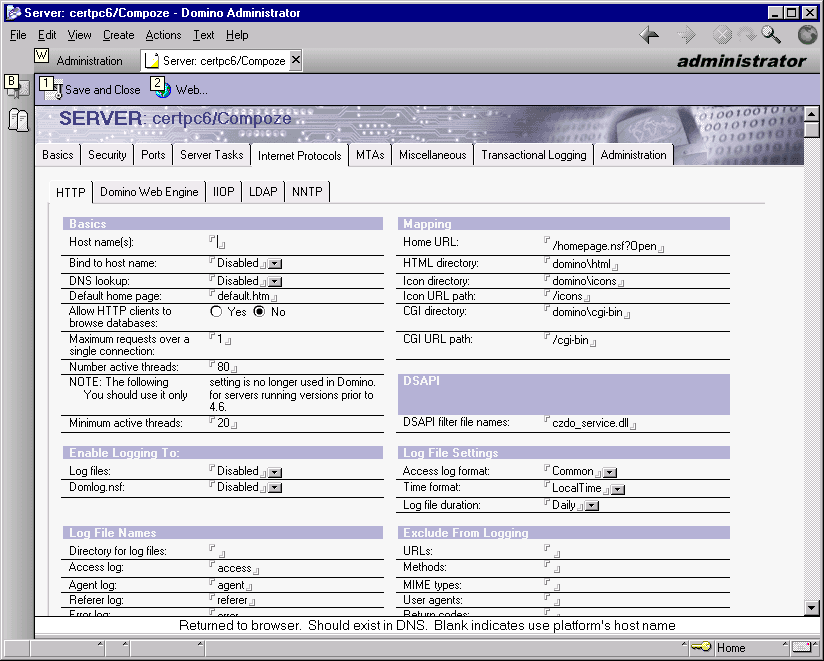
For Windows, add czdo_service.dll.
For Linux, add libczdo_service.so.
Note: If entries exist in this field, append Domino Service to the end, separated by a semicolon (;), with no carriage returns or whitespaces. For example, ndolextn.dll;czdo_service.dll.
If the Domino server is not started, start the server.
Note: Replication of server document to the Lotus Domino server might be needed to ensure that the Domino Service is installed correctly.
10/09/2003 04:19:27 PM  JVM: Java Virtual Machine initialized
10/09/2003 04:19:28 PM  HTTP Server: Java Virtual machine loaded
10/09/2003 04:19:28 PM  BEA Domino Service (version x.x.x): loaded
10/09/2003 04:19:28 PM  HTTP Server: DSAPI BEA Domino Service Loaded successfully
10/09/2003 04:19:29 PM  HTTP Server: Started
|
|
|