The My Activities view is your main work area. Use this area to view your assigned activities. When you select an activity in the activity pane, all panels on the right, which include the progress panel, Steps panel, and Codes and UDFs panel, display information for the activity. Use the progress panel to update your activities to show progress.
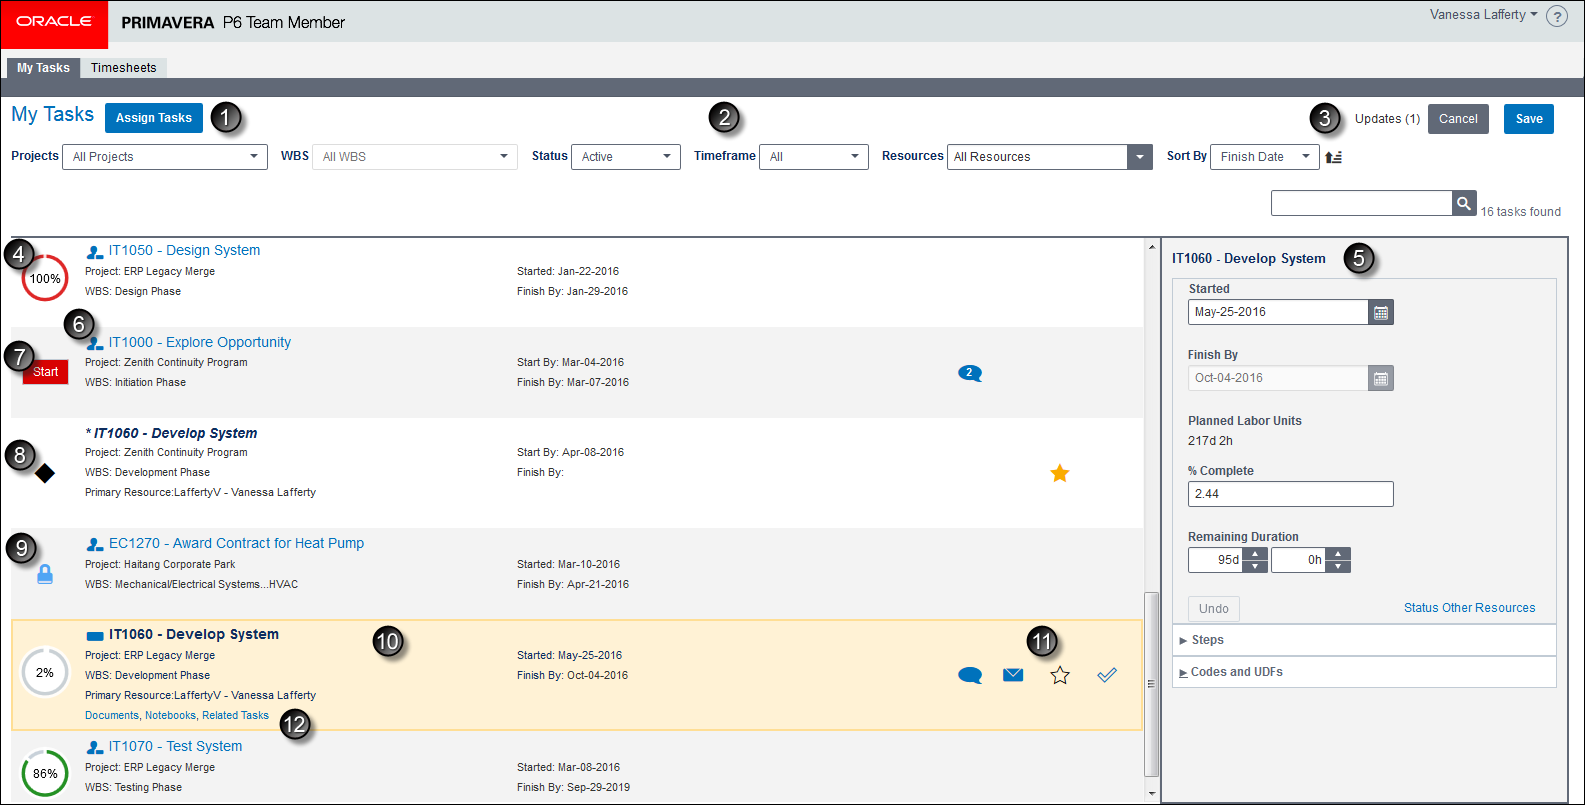
Table of Screen Highlights
Item | Description |
|---|---|
| Assign Activities: Select the Assign Activities button to open the Assign Activities dialog box. In the Assign Activities dialog box, you can select a project and search for relevant activities to assign to yourself. |
| Use one or more of the filtering options to display only the activities that you want to see in your view.
|
| Save or Cancel control panel: The control panel appears when a change is made displaying the number of activities that have been updated. |
| Progress indicator: Provides a visual representation of your progress on the activity. The indicators are color coded to allow you to view your progress at a glance.
|
| Progress panel: Use this area to communicate dates and time worked. The fields available in your view are set by your project manager. Status Other Resources: Opens a dialog box showing other resources' assignments on the selected activity. This link only appears if the system is set up to allow you to update status for other resources. Baseline Dates: Allows you to view the baseline dates for an activity. This section only appears if the system is set up to allow you to see baseline dates. Steps: Allows you to see and update steps for the activity. The project manager can configure the system to allow you to add new steps. This section only appears if the system is set up to allow you to see steps. Codes and UDFs: Allows you to see codes and UDFs assigned to an activity. The project manager can determine the codes and UDFs you can see and whether you are allowed to edit them. This section only appears if the system is set up to allow you to see codes and UDFs. |
| Assignment and Owner indicators: Provides a visual representation of whether your involvement on this activity is as a resource or as the owner of the activity. A project level administrative setting controls whether you see an activity multiple times on the My Activities page depending on whether you are a resource, primary resource or the owner. Overdue indicator: Provides a visual representation when an activity is overdue. |
| Start button: Select the start button to indicate progress on the activity has begun. Once you select start, the progress fields are editable. The start button is red when the activity is overdue. |
| Milestone: Indicates this activity is a start or finish milestone. A milestone represents any significant event or goal in a project. Although milestones are considered a type of activity, they have zero duration. At any moment, they are either achieved or not. Some examples of milestones in an office building addition project include Project Definition Complete, Structure Complete, and End Bidding Process. A start milestone only shows a Start By date and a finish milestone only shows a Finish By date. The milestone icon is red when the scheduled Start By or Finish By date has been reached and the milestone is not complete. |
| Locked Project: Indicates the project is locked for editing by a user in P6. Activities cannot be updated until the project lock is released. |
| Activity pane: Select an activity to review in the activity pane and update the status of your activity using the progress, steps, and codes and UDFs panels. From the activity pane you can indicate you started the activity, send an email, mark the activity as important by starring it, mark the activity complete, open the Discussion dialog box, view Notebook topics, view Related Activities, or view Documents related to your activity. An italicized activity heading with an asterisk * indicates a change has been made but not saved. Note: WBS (work breakdown structure) is a project management term used for the logical breakdown and arrangement of activities in a project. The WBS path helps you to understand exactly where your activity fits within the scope of the project. |
| Discussion: Launches a dialog box where you can communicate with your project manager, or another team member assigned to the same activity, regarding the selected activity. A number on the Discussion icon indicates the number of unread messages. email: Launches an email in your email application, providing activity details from the activities pane. Use this to send your project manager or another team member an email. Star Activity: Select the star to indicate that this activity is important to you. For example, you can star all your high priority activities. Or, you can star all activities you are currently working on to make it easier to view your current workload. Note: The star is not available if you are assigned to activities through a Team Member work distribution filter. Mark Activity Complete: Select the check mark when you have finished work on the activity. |
| Documents: Opens a dialog box listing all documents that are associated with the activity. The link only appears when documents are available for you to view. Notebooks: Opens a dialog box with notes from your project manager about the activity. The link only appears when notebook topics are available for you to view. Related Activities: Opens a dialog box displaying activities that have a relationship with your activity. The link only appears when there are predecessor or successor activities identified for your activity. |