Since the steps are the same, use the following procedures to design either a standard or a picker log.
Important information about a business process log in Standard View
In order for the user to be able to filter for a particular field or fields, you (the designer) must add the fields to the standard log design manually, and then re-deploy the log business process; otherwise, the user will not be able to filter a record per added fields in a business process log, in Standard View.
To design a business process log
- Click the Company Workspace tab and switch to Administration Mode.
- In the left Navigator, click uDesigner > Business Processes.
- Open the business process for which you want to design the log and click Log; then select the Standard Log or the Picker Log node.
- Click New. The Log Page Design window opens.
- Complete the tabs as described in the following sections.
General Tab
- In the Name field, enter a name for the log.
- (Optional) In the Description field, enter text that describes the log.
- (For RFB logs only) In the field titled RFB view form seen by bidders, specify the view or action form that was designed when the bidder form was designed.
- Click Apply.
Layout Tab
Use the Layout tab to designate what data (fields) from the record should appear in the columns of the log. Only the fields from the upper form (including linked elements) are eligible for the log.
For Cost-Type, Multiple-Tab BP Forms
If you include an "amount" field on the log for a line item list for a tab, a total of the line item amounts will automatically appear at the bottom of each numeric column on the BP form.
To add a column of data to the log
- Click the Layout tab.
- Click Add. The Layout Header Properties window opens.
- Use the information in the following table to complete the column layout.
In this field: | Do this: |
|---|---|
Data Element Label | Click the down arrow and choose from the list of data elements. The list shows only those data elements that were on the upper form of the BP. If you do not see the data element, go to the upper form of the BP and add it. |
Data Element Name | No entry required. This field automatically shows the database name of the element you selected. |
Column Heading | This field automatically shows the data element label. You can change this field to show a different heading on the log. |
Width | Enter the width (in pixels) the column should be. The default is 150. |
Alignment | Choose the positioning of the data within the column, including the heading. Select Left, Center, or Right. |
- Click OK.
uDesigner displays the columns on the Log Page Design window.
- (Optional) To change the order of the columns on the log, use the Move Up and Move Down buttons.
These buttons move the columns left or right, respectively, on the log.
- To add another column to the log layout, repeat steps 1 through 4.
- Click Apply.
Sort Order Tab
Use the Sort Order tab to sort the log by column order. You can determine which column to use as the default sort order for the Log. This allows you to choose a column to sort by initially.
- Click the Sort Order tab.
- In the Initial Sort Column field, choose the field by which you want to sort the log.
- In the Sort Order field, choose whether the sort order should be ascending (A-Z) or descending (Z-A).
- Click Apply.
Find Tab
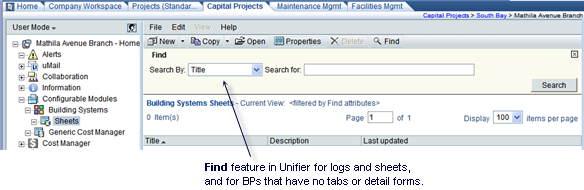
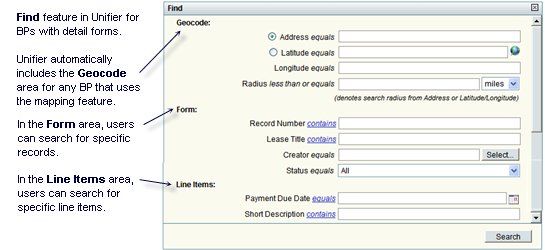
Use the Find tab to specify search criteria for the Find feature.
In the course of a user’s work in Primavera Unifier, he or she will sometimes need to locate particular business process records or line items in the logs, often for the purpose of task management or milestone tracking. To make it easier for users to locate a record, use the Find tab to specify field names they can use to search for particular records. The user can also narrow a search by using operators on the fields, such as "contains" or "equals."
Tip: Users can search for tasks in the various Tasks logs in Primavera Unifier using the field names you specify in the Find tab. You might take this into account when deciding which field names to include on the Find tab. If no fields are specified on the Find tab for a business process, the Find window displays the default search criteria fields, which are From (Company), From (User), Record Number Contains, and Record Title Contains. As a general rule, it's a good idea to use all the fields you included on the forms.
To specify search criteria
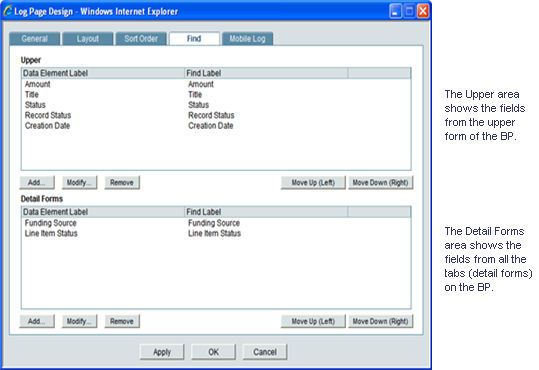
- Click the Find tab.
Use the Find tab to specify the fields on both the upper form and detail forms that can be used in a search.
- To add a field to the search list, click Add in either area of the window. The Find Properties window opens.
- In the Data Element Label field, select a field (data element) users can use to find a record(s) or line item(s).
When you enter a data element label, uDesigner automatically displays the database label of the element in the Find Label field. This field is editable.
- If you want to change the name of the element to something more meaningful to the user, enter the name in the Find Label field.
- Click Add to add another data element field to the find criteria, or click OK to close the window.
- On the Log Page Design window, click OK.
Mobile Log tab
The Mobile Log tab appears for asset classes, shells, and those business processes that have been designated for use with mobile/hand-held devices (see the Options Tab).
Use the Mobile Log tab to designate what fields from the form should appear on the log that will be displayed on mobile devices. Due to space constraints, the log on a mobile device typically shows fewer fields than the log on a workstation monitor.
On this tab, you can designate the fields for the log, the sort order, and also any search criteria that might be valuable to the mobile user in locating records.
If you are abbreviating a form layout for a mobile device:
- You must include at least one field from each action or view form.
- You must include all the required fields on an action form.
- If you include any field that is part of a dynamic data set, then you must include all the fields in the set.
To select log fields for a mobile device layout
- Under Mobile Log Layout, click Add. The Column Header Properties window opens.
- Use the information in the table below to complete the log layout.
- To add another column to the layout, repeat step 2.
- Click OK.
After you add column(s), they will appear as rows on the Design window. You can move the columns left or right to create the order you want. To move columns, select the row of the column you want to move and click the Move Up button to move the column left, or the Move Down button to move the column right.
In this field: | Do this: |
|---|---|
Data Element Label | Choose the field you want on the log. The list shows only those data elements that were on the attribute form. If you do not see the data element you want, go back to the form and add it. When you choose an element, uDesigner displays the name of the element in the Data Element Name field and also displays the element label in the Column Heading field. (You can change the column heading to a heading you prefer.) |
Max Chars | Enter the number of characters the field label should show. Any characters over this limit will be indicated on the mobile log with ellipses (...). |
Width | Enter the width of the field as a percentage of the form width. |
Alignment | Choose the positioning of the data within the column, including the heading. Select Left, Center, or Right. |
To specify search criteria for the Find feature
- Under Mobile Log Find, click Add. The Find Properties window opens.
- Use the instructions under "Find Tab" above to complete this part of the window.
To specify the sort order for a mobile device layout
Use the instructions under "Sort Order Tab" above.
Group By Tab
This tab appears only if you are designing a picker log for a data picker, or a master BP log. This is where you can create a tree or hierarchy structure for the business process and space records. When the Primavera Unifier user opens a data picker on a form or a master BP log, this tree structure appears and makes it easier for the user to view and select records from the log. The following illustration shows a business process log for work order data picker that displays a tree structure created with the Group By tab.
For more information on data pickers, see About Data Pickers.
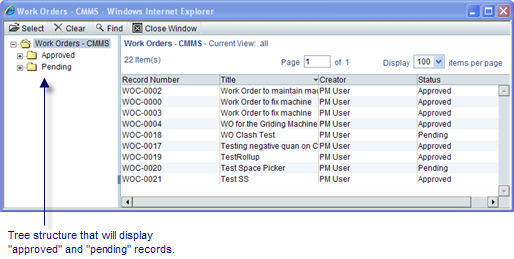
On the Group By tab, you specify what fields from the form you will use to make the tree structure. When the business process or space type is imported into Primavera Unifier, the Primavera Unifier administrator will configure these fields with a query to extract the appropriate records from the database and display them on the data picker list or the log.
To create the tree structure
- On the Group By tab, click the Add button. uDesigner opens the Add Data Element window.
- In the Data Element field, select the field you want to appear in the tree structure.
uDesigner shows the label of the element in the Data Element Name field.
- To add another field for the tree structure, click Add; otherwise, click OK.
The Log Page Design window displays the fields you selected for the tree structure.
- (Optional) If you want to rearrange the order in which these fields will appear in the tree structure, highlight the fields and use the Move Up or Move Down keys until the fields are in the order you want.
Note: If a field in this tree structure is removed from the business process form or space attribute form, the Add Data Element window will show the removed field in red.