If your BP design allows adding or copying of line items, you can also choose to group line items into meaningful categories. You can select one or more line items to add to a group and each group displays the line items under it. The groups are displayed in alphabetical order, and the line items that are not part of a group are displayed under the group Not Grouped. You can change the name of the groups and move line items between groups. When a record or line items are copied, the groups are also copied.
Notes:
- The Manage Groups option is available for Line Item and Cost BP types. The Manage Groups option is not available for SOV type BP (Summary Payment Applications).
- By design, you cannot move a group from the Selected Columns section to the Available Columns section.
To create a group
- After the line items are created, open a business process record, and select a line item tab (for example, Line Item List tab).
- Select one or more line items.
- Click the Actions drop-down menu and select Manage Groups to open the Manage Groups window.
- In the Manage Groups window, click the plus icon (
 ) to create a new group on a new row.
 - Enter a name, and description, for the new group.
- Select one of the following options:
- Cancel: If you make any changes to the groups and click Cancel, the window closes without any changes saved.
- Save: If you make changes and click Save, your changes will be saved, but the Manage Groups window will still be available to make more changes.
- Save & Close: If you make changes and click Save & Close, your changes will be saved, and the Manage Groups window closes.
To edit group property
- From the line item tab, select a group by hovering over the group name.
- From the gear
 menu, select Edit Group Properties.
 - Change the name or description of the group, and select Save.
You cannot change the properties of the default group Not Grouped.
To add line items to a group
- Open a business process record, and select a line item tab.
- Select one or more line items. In order to select multiple line items, you have to click Cancel or Save.
- From the gearmenu, select Add to Group and select a group.
The group line item will appear at the top of the line items area of the business process form in bold. The Amount column will show the sum total of the line items you added.
If a line item has been copied and the copy source is already in a group, then the new copied line item will be in the same group.
If checked in uDesigner, then in the Line Items tab, the Amount column displays the total amount (only the amount value).
To remove line items added to a group
Select a line item and from the gear![]() menu, select Add to Group and select Not Grouped. You can also choose to move line items to other groups.
menu, select Add to Group and select Not Grouped. You can also choose to move line items to other groups.
To manage groups
From the toolbar, select Actions > Manage Groups to open the Manage Groups window and display all of the existing groups, excluding the Not Grouped items. The sorting order is ascending, by default.
The Manage Groups option is available for Line Item type BP and Cost type BP (excluding the SPA type BP), only. When there is a flat list of line items in line item log, the Manage Groups option is not available. The Manage Groups option is available when there is at least one group available to select.
In the Manage Groups window, you can delete existing groups, also (click a row and click the trash-can icon). You can select multiple groups, right-click (or click the gear![]() menu), and select Remove, to move the groups to the Not Grouped items.
menu), and select Remove, to move the groups to the Not Grouped items.
The groups are sorted in alphabetical order. The sort order of the line items within the group will be governed by the Line Item List Sort as set in uDesigner.
To expand or Collapse Groups
From the line items tab, select the ![]() Collapse all Groups or
Collapse all Groups or ![]() Expand all Groups icons.
Expand all Groups icons.
To create line item groups by using CSV
You can group line items by CSV import.
Unifier inserts an additional column in the CSV file, Tab Name, D row. The cell under the Group Name column contains the line item group name. It is optional to enter a value. The column is provided to allow you to assign line items to the groups, at the time of creation.
When you import a line item, if the group name that you enter in the template already exists in the record, then Unifier adds a line to the group.
If the CSV template has multiple line items, and if few lines have Group Name value and others do not, then the ones with the empty Group Name will be in the "Not Grouped" group at runtime.
If the CSV template has no Group Name specified for any of the line items, then the line items will not be grouped.
Example
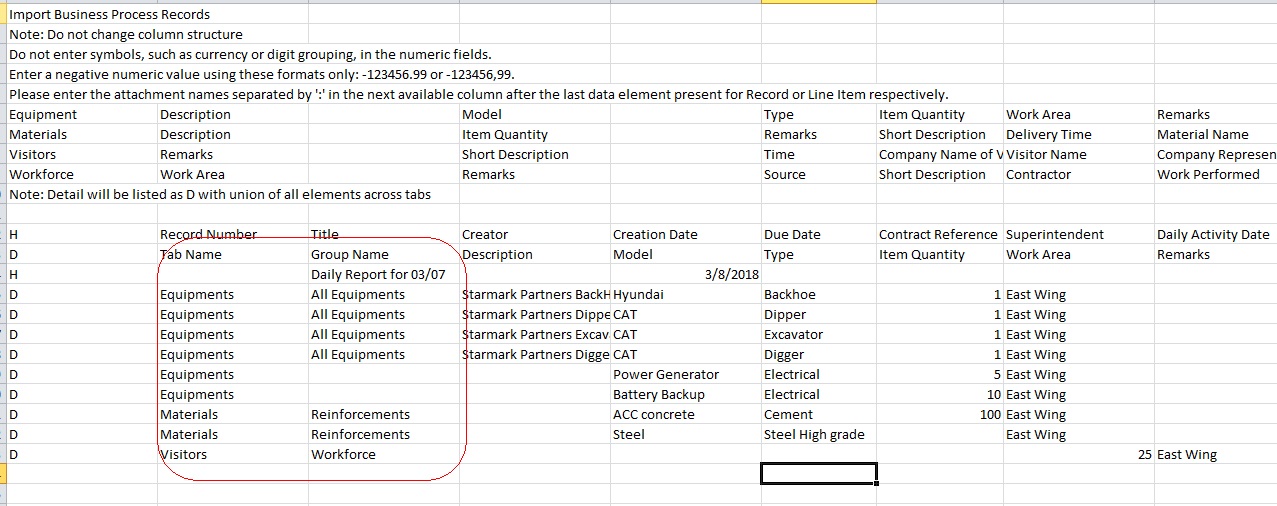
In the CSV template below, the user is attempting to create a Daily Report record.
The user has entered H for the upper form details and wants to create the record with line items in Equipments, Materials, and Visitors tabs.
- Six line items have been entered against the Equipments tab, and four of the line items belong to a Group called "All Equipments." The subsequent columns in the D rows pertain to the line item details.
- The two line items that do not have any group mentioned will go under "Not Grouped," post import.
- The two line items have been entered for the Materials tab. Post a successful import, the group "Reinforcements" will be created.
- One line item has been entered against the Visitors tab, and the user does not want to group this one line item. As a result, the Group Name value has been left blank, intentionally.
Viewing Groups when Referencing Line Items by Way of Line Item Data Picker
You can create line item groups under each line item tab in a business process record and view the line items by group. When referencing a line item within a source BP record, you can also select a line item (from the line item data picker) that belongs to a specific group (e.g., contract type). This is to state that if your selected source record line items have groups, then the line item data picker shows the line items along with the group names; otherwise, a flat list of line items (that match the query conditions) is displayed.
In the line item data picker:
- The groups are displayed in ascending order.
- The line items that do not belong to any group will be displayed under "Not Grouped" column, similar to the line item log.
- In a line item data picker, when line items are filtered using query conditions defined in uDesigner, group names should be shown along with filtered line items. The same behavior is applicable if additionally user filters record using search or find on page in the line item data picker.
- When line items are filtered (using query conditions defined in uDesigner), the group names are displayed along with the filtered line items. The same condition applies if you filter a record using the Search or Find on Page options in the line item data picker.
If you select a group node in the line item data picker, then the select option will not be enabled; therefore, you cannot pick a group from the line item data picker.
The type-ahead feature of the line item data picker displays:
- Display element value
- Line number
- Group Name