State Approval Editor
The State Approval editor is located in the Admin Explorer tab in the Administration folder. This editor allows state approvals to be captured at the plan and segment level according to effective and expiration dates.
The editor is divided into two sections. The top portion cannot be edited and simply reflects the identifying information such as Company, Plan Group (the Plan Group field is only visible if the plan group functionality is turned on), Plan, Segment and version number. The bottom portion contains a list of states that can be selected to create an approval record. Each state can be assigned an effective date and an optional expiration date identifying when the approval is valid for the plan or segment. All plan information captured by this editor is saved to the AsPlanStateApproval table. All segment information captured by this editor is saved to the AsSegmentStateApproval table.
State Approval records can only be added to plans or segments that are set up to support this functionality. Refer to the Plan Screen business rule General Pane section for more information on setting up plans to support state approval. Refer to the SegmentScreen business rule for more information on setting up segments to support state approval.
Steps to Add Plan and Segment State Approval Records
- Navigate to the Admin Explorer.
- Open the Administration folder and scroll down to State Approvals.
- Right-click on State Approvals and select New State Approval.
- Select the company where the plan resides from the Company drop down box.
- Select the plan from the Plan drop down box.
- Select a segment from the Segment drop down box if a segment is available. Segments will appear in this box when they have been granted state approval privileges through the Segment screen business rule.
- Click Finish when the plan or segment has been selected. The name of the file will appear in the State Approval hierarchy in blue font.
- Select effective dates for the states that are supported by the plan. Expiration dates are optional.
- Check-in the new file to save the changes to the database.
New plans will appear under the Plan State Approvals folder, organized by company. New segments will appear in the Segment State Approvals folder, organized by company and plan.
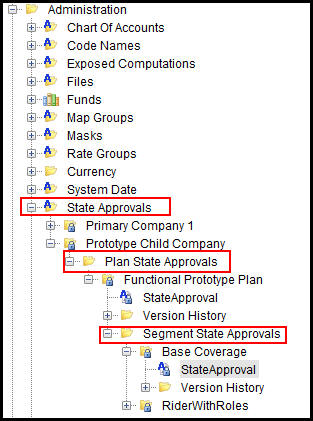
State Approval Hierarchy in Admin Explorer
Delete Plan or Segment State Approvals
Once state approvals have been created, they can be deleted in two ways. The entire state approval for the plan or segment can be deleted by right-clicking on the plan level or segment level state approval editor and selecting Delete Rule. All individual state records for that plan or segment will be removed from AsPlanStateApproval or AsSegmentStateApproval.
Individual state approvals can also be deleted for a plan or segment by checking out the appropriate level editor. Select a state by clicking on the row, then click the Delete button at the bottom of the screen. A check will appear in the Delete column for that row. The approval will be removed when the editor is checked-in.
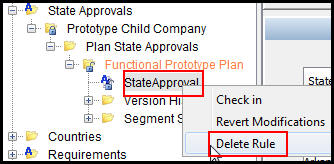
Delete Right-Click Option for Plan Level State Approvals
Update Plan or Segment State Approvals
- Navigate to the Admin Explorer
- Open the Administration folder and scroll down to State Approvals. Open the appropriate Company and Plan folders.
- To edit plan state approvals, right-click on the State Approvals node under the Plan State Approval folder and select Check-out. This will open the plan level State Approval editor.
- To edit segment state approvals, open the Segment State Approval folder, then open the Segment folder. Right-click on the State Approvals node and select Check-out. This will open the segment level State Approval editor.
- Find the appropriate state row in the bottom portion of the editor. All states from AsCodeState occupy a row in the grid.
- To add dates, double-click in the Effective Date column and type a valid date. The date must be in the format m/d/yyyy. A date picker tool is also available and can be used by double-clicking the down arrow next to the date field.
- To remove dates, double-click in the date field, select the date and click the Delete button on the keyboard.
- Right-click the State Approval file and select Check-in. This will save the updates to the database.