8Configuring Siebel UI to Interact with Other Applications
Configuring Siebel UI to Interact with Other Applications
This chapter describes how to configure Siebel Open UI to interact with other applications. It includes the following topics:
Displaying Data from External Applications in Siebel Open UI
This topic describes how to configure Siebel Open UI to interact with other applications. It includes the following information:
Siebel Portal Framework
This topic provides an overview of Oracle’s Siebel Portal Framework and summarizes the technologies that make up the Portal Framework. It contains the following information:
Portal Framework Overview
Enterprises are often composed of many different information technology resources, such as:
Shared network directories.
Department intranet sites.
Legacy applications.
Applications developed in-house.
Purchased Web applications.
With many disparate applications and technologies, IT resources are difficult to maintain and difficult to use. For example, applications:
Follow different user interface guidelines.
Are rendered with different themes.
Track profile attributes differently.
Vary in the quality of online assistance.
Have separate login and password credentials.
Have different search functionality.
One solution to this problem is to integrate the various applications and content sources used in an enterprise and present them in a single user interface, called a portal. The Siebel Portal Framework allows you to do this. The Portal Framework provides you with the tools and supporting technologies that allow you to:
Aggregate external data with Siebel data and present it in the Siebel user interface.
Deliver Siebel CRM data to external applications.
Integrate external application business logic and data with Siebel Business Applications.
Portal Framework Architecture
The portal framework includes the following framework components:
Enterprise Application Integration
Portal Agents that integrate external content into the Siebel user interface
Enterprise Application Integration
Siebel EAI provides mechanisms for sharing data and business logic with other applications, including:
Integration objects
Virtual business objects
Programming APIs
Predefined adapters and connectors
For more information about Siebel EAI, see Overview: Siebel Enterprise Application Integration and other EAI titles on the Siebel Bookshelf. The Siebel Bookshelf is available on Oracle Technology Network (OTN) and Oracle Software Delivery Cloud. It might also be installed locally on your intranet or on a network location.
Portal Agents
Portal Agents provide you with a mechanism to retrieve content from a non-Siebel source and display it in the Siebel user interface. The Portal Agent retrieves content on behalf of the user, logging on to the external application using the user’s credentials and retrieving only the content that is targeted for the user. Portal Agents provide single sign-on capability and a profile tracking mechanism. For more information about Portal Agents, see About Portal Agents.
Integrating External Content
This topic provides an overview of Portal Agents. It describes the configuration and administration tasks necessary to display external content in the Siebel user interface. It also includes a reference topic that lists all of the commands available for use with Portal Agents. This chapter contains the following information:
About Portal Agents
Portal Agents allow you to integrate external data into the Siebel user interface. Portal Agents retrieve data by sending HTTP requests to external applications, and then display the HTML results in a Siebel applet or on some other portion of a Siebel application Web page.
Portal Agents combine a set of features and technologies that allow you to integrate external content at the user interface layer, including the following:
Single sign-on technology (SS0). For applications that are participating in a single sign-on framework, this feature eliminates the need for the user to enter login credentials, such as user name and password, more than once for each work session. For more information about single sign on, see Siebel Security Guide.
Session management and session reuse. Allows the Siebel application and the external application to maintain a user’s session context, without reauthenticating for subsequent requests. This minimizes session resource overhead on the external application, and allows the user to retain session context, such as shopping cart contents.
Time-out handling. The Siebel Server automatically reauthenticates when a request is submitted after the external application’s timeout period has passed.
Symbolic URLs, with multiple disposition types. Allows content to be displayed in different ways, such as in a new browser window, inline with the other content, in an
<iframe>tag. For more information, see About Disposition Types.Session proxy. For content integrated using a disposition type of Inline, the Siebel Server manages the interactions with external applications on behalf of the user. For more information about the Inline disposition type, see Inline Disposition Type.
Symbolic URL commands. Commands that direct the Portal Agent to assemble the URL for the external application in several ways. These include dynamically referencing the user’s user name and password, retrieving stored user name and password values, retrieving data from the user’s personalization profile, establishing the size of an
<iframe>tag, and determining whether to set the browser cookies from the application server’s login page. For a complete list of commands, see Portal Agent Command Reference.
Portal Agents and Authentication Strategies
Portal Agents can be configured to support different authentication strategies:
Simple Portal Agents. The external application does not require any authentication parameters.
Single Sign-On Portal Agents. The external application requires authentication parameters. Form-based Portal Agents send authentication parameters as part of the body portion of the HTTP request.
For more information about authentication, see Siebel Security Guide.
About Disposition Types
One of the steps in setting up a Portal Agent is creating a symbolic URL. The symbolic URL specifies the information necessary to construct the HTTP request to send to the external application. Symbolic URLs can be one of several disposition types. The disposition type determines the following:
The interaction between the browser, the Siebel Server, and the external application.
How external content is displayed in the user interface.
It is important to understand these disposition types and determine which one suits your integration needs. Each disposition type is discussed in one of the following sections.
For information about defining symbolic URLs, see Defining Symbolic URLs.
Inline Disposition Type
With a symbolic URL disposition type of Inline, the Siebel Server receives content sent by an external application. It combines the external content with Siebel-produced content and composes a single HTML page, which it then sends to the client browser for display to the user. Optionally, links in the aggregated content are rewritten so they reference the Siebel Server (proxy), rather than referencing the external application server directly. This allows the Siebel Server to handle links in the aggregated content in such a way that it appears to the user as one integrated application rather than from different application servers.
The Inline disposition type supports session management. The Siebel Server uses session management to manage session cookies and automatically log in again to an external application after a time out occurs.
The Inline disposition type requires that:
The page you are integrating does not include complex JavaScript and does not reference frames.
The maximum number of characters in the calling URL is 2048.
No methods other than the
GETmethod are invoked.
If the Inline disposition type is not appropriate, then you might try the IFrame disposition type.
IFrame Disposition Type
Use this disposition type when aspects of the external application do not allow content to be aggregated with other Siebel content. For more information, see Portal Agent Restrictions.
The IFrame disposition type uses the <iframe> tag to create an internal frame as part of the page generated by the Siebel Server. It allows the Portal Agent to retrieve content to populate the internal frame. This content does not pass through the Siebel Server, but is directly requested by the client and sent by the application server to the user’s browser. Although this disposition type is not as preferable as the Inline disposition type, in most cases, it is a method that works.
The IFrame disposition type supports JavaScript and frames. Therefore, if the Inline disposition type does not work, then the IFrame option is the best option. The IFrame disposition type also supports the Session Keep Alive feature. However, it does not support session management.
The IFrame disposition type works in many cases. However, it does not work when frames displayed within the <iframe> tag refer to top-level JavaScript objects. If frames in the page that you are trying to integrate refer to top-level JavaScript objects, then you might use the Web Control disposition type instead, if it is applicable.
Form Redirect Disposition Type
In the Form Redirect scenario, the Siebel Web client submits a request to the Siebel Server. The Siebel Server creates a form with the necessary authentication information in it, and then sends the form back to the browser. The browser loads the form and then submits it to the external host for processing. The external host sends back the results, which the browser displays in a new window.
The Form Redirect disposition type is usually displayed in a new window, rather than inline with other Siebel applets.
The Form Redirect disposition type is not commonly used with Siebel Business Applications.
Portal Agent Restrictions
Portal Agents are meant to bring existing applications and content into the Siebel user interface without requiring additional modifications of the external application. However, this is not always possible due to the way HTML and Web browsers are designed. For example:
The use of frames by an external application might not be amenable to inline aggregation methods.
Specific frame references in the returned content referring to global frames (_NEW, _TOP, .parent()) might not be amenable to inline aggregation methods.
Reliance on JavaScript functions defined in (assumed) external frames might not be amenable to inline aggregation methods.
URLs that are created dynamically by JavaScript might not be amenable to any fixup techniques, because the URLs would not be easily parsed on the HTML content.
For these reasons, an Inline disposition type does not work often. However, if you control both the Siebel application instance and the external application, and can resolve some of these issues, then the Inline disposition type might work correctly. For more information about the Inline disposition type, see Inline Disposition Type.
If you do not have control over the external application, the IFrame disposition type is the method most likely to provide satisfactory results. It works with about 80% of the form-based application sites tested. For more information about the IFrame disposition type, see IFrame Disposition Type.
Disposition Types Summary
The following table summarizes the characteristics of each disposition type.
Table Disposition Types Summary
| Disposition Type | Benefits | Limitations |
|---|---|---|
Inline |
|
|
IFrame |
|
|
Process of Creating Portal Agents
To create a Portal Agent, perform the following tasks:
Complete one of the following in the following sections:
Determining the Login Requirements
Before you configure Portal Agents, you must understand what information is required by the external application to authenticate users. Typically, this information is gathered using a form page, also called a login page, and then sent to the external application. You must determine exactly what information the form gathers from the user and sends to the external application, including field names and values.
In cases where you have specific knowledge about how an external application is implemented and can consult with authoritative sources regarding how the application authenticates users, determining the required input fields and values is relatively simple.
In cases where you do not have specific knowledge about how an external application is implemented, you must attempt to understand its authentication method by examining the application’s login page. The steps describe an approach that you can use to reverse-engineer a login page and provide related Portal Agent configuration tips.
POST back to the application server, session values might be encoded in the form itself, or session values might be stored in the browser's session cookies.
This task is a step in Process of Creating Portal Agents.
To reverse-engineer a login page
Navigate to the external application’s login page and determine whether the external application uses authentication.
For more information, see Defining Symbolic URLs.
If the external application uses form-based authentication, then view the login page’s HTML using your browser’s view source command.
Identify the form on the login page that asks for user credentials (the form might ask for other information as well) and identify the input fields in this form used to authenticate users.
It is usually best to strip out all non-form lines of HTML and to isolate the
<input>tags. That is, remove lines previous to<form ...>and after</form>and remove lines that are not part of the<input>tags.Determine whether the method attribute of the
<form>tag isPOST.If it is
POST, then you must define the PostRequest command as an argument of the symbolic URL. For more information, see Defining Symbolic URL Arguments and PostRequest Command.If it is
GET, then you do not have to define a symbolic URL command, because the default method of symbolic URLs isGET.Determine the target of the form’s action attribute, which is usually specified as
action="some string".If the target of the action attribute is an absolute URL, one that begins with
httpor a forward slash (/), then use this URL as the base of the Portal Agent.If it is a relative address, then you also have to determine where the root of the URL is defined. It could be defined relative to the URL of the login page itself (most common), in a
<codebase>tag (rare) or in JavaScript (hard to determine).The target URL is defined using the Host Administration View and the Symbolic URL Administration view. For more information, see Defining the External Host and PostRequest Command.
Determine any argument values defined in the target URL.
These are the characters after the ? character. Usually, these are simple field-value constants. The exception is when a field or a value is a session identifier that is dynamically assigned by the external application server and is only valid for a period before it times out. In this case, it might not be possible to configure a Portal Agent. Define any argument values contained in the target URL as symbolic URL arguments. For more information, see Defining Symbolic URL Arguments.
Identify each of the form’s
<input>tags and determine which ones are necessary to send to the external application for authentication.Often there are
<input>tags in the form with atypeattribute ofhiddenthat are not evident when interacting with the application. Determining whether hidden fields are optional or required is often process of trial and error.Some
<input>tags might not have values identified. Either these fields are awaiting input to be entered by the user (for example, login name or password) or they are hidden fields with no values.If the input field is specific to the user (it asks for the user’s login name and password), then you can use UserLoginId Command and UserLoginPassword Command commands to instruct the Portal Agent to retrieve the user’s credentials from the user’s My Logins view. For more information, see Defining End-User Login Credentials.
If there are hidden fields with no values, then, when you enter them as symbolic URL arguments, make sure that the Required Argument column is not checked. If it is checked, and the input field has no value, then the Portal Agent does not send this request to the target application server, because there is no value to put in its place.
You define the input fields and values as symbolic URL arguments. For more information, see Defining Symbolic URL Arguments.
Portal Agent Configuration
Using Portal Agents to integrate external content into the Siebel user interface requires some simple configuration in Siebel Tools. You must configure a field on the business component to handle external data and then configure either an applet or a Web page item to display the content in the user interface. An applet displays external content inside the applet container on a view. A Web page item displays external content outside of an applet, such as in the banner frame for example.
Configuring Business Components to Handle External Data
To configure business components to handle external data using a symbolic URL, you must create a new calculated field on the business component. Rather than representing structured content, such as records in a database, this field represents the HTML content sent from an external host.
This task is a step in Process of Creating Portal Agents.
To configure a business component to handle external data using a symbolic URL
Create a new field on the business component.
Set the field’s Calculated property to TRUE.
Set the field’s Type property to DTYPE_TEXT.
In the Calculated Value field, enter the name of the symbolic URL (enclosed in double quotes) that you want to use to submit the HTTP request.
The name of the symbolic URL in the Calculated Value field must be enclosed in double quotes so that it evaluates as a constant. See the business component named AnalyticsSSO in the Siebel Repository for an example of fields configured this way.
Displaying External Content Within an Applet
After you have created the calculated field on the business component, you expose it in the user interface. You display the external content using a control in a form applet or list applet.
This task is a step in Process of Creating Portal Agents.
To display external content within an applet
Create an applet that you want to use to display the external content.
The applet must be based on the business component that you configured in Configuring Business Components to Handle External Data.
Add a new control or list column to the applet.
Associate the control or list column with a calculated field on the business component that is configured to represent the external data.
Set the control or list column’s Field Retrieval Type property to Symbolic URL.
Set the control or list column’s HTML Type property to Field.
Displaying External Content Outside of an Applet
After you have created the calculated field on the business component, you expose it in the user interface. You can display the external content outside of an applet using Web Page Items.
This task is a step in Process of Creating Portal Agents.
To display content outside of an applet
Start Siebel Tools.
Go to the Web Page object type and select the Web page on which to display external data.
Create a new Web Page Item or use an existing one.
Set the Type property of the Web Page Item to Field.
Create the following two Web Page Item Parameters:
Name Value FieldRetrievalType
Symbolic URL
SymbolicURL
[name of symbolic URL]
Note: The symbolic URL is mapped to the calculated field defined for the business component.
Portal Agent Administration
You administer Portal Agents through several views located under the Administration - Integration screen in the Siebel Web client. As described in the following topics, these views allow you to define how to handle links, define the external host, and define the HTTP request that is sent to the external host.
Defining the External Host
You define the external data hosts in the Host Administration view. This view allows you to do the following:
Maintain external host names in a single place.
Define how to handle (fix) links after external HTML content is rendered.
To define a data host
Navigate to the Administration - Integration screen, and then WI Symbolic URL List.
From the drop-down menu, select Host Administration.
Enter a new record and define the necessary fields.
Some of the fields are described in the following table:
Field Comments Name
Name of the external host.
Virtual Name
User-defined name for the host.
Authentication Type
Leave this value blank. For more information, see Defining Symbolic URLs.
Defining Web Applications
Web applications allow multiple symbolic URLs to send requests to the same Web application and share the same session. This is useful if you have two different applet controls that use symbolic URLs to submit requests to the same Web application. You can associate these symbolic URLs to a single Web application and specify whether they share the same session.
There might be cases in which you do not want requests to share the same session. For example, you might not want to share a session when a session cookie contains more information than the session ID, as this could result in unexpected behavior. When you define a Web application, you specify whether it shares sessions.
Web applications also allow you to define the Time Out value for the session time out feature. The Session Time Out feature is only applicable to symbolic URLs with a disposition type of Inline.
This task is a step in Process of Creating Portal Agents.
To define a Web application
Navigate to the Administration - Integration screen, and then WI Symbolic URL List.
From the drop-down menu, select Web Application Administration.
Enter a record and complete the fields.
Some of the fields are described in the following table:
Field Description Shared
Indicates whether requests generated by symbolic URLs associated with this Web application share the same session.
Time Out
Defines the time out parameter for the session management feature, which is only applicable to symbolic URLs with a disposition type of Inline.
Defining Symbolic URLs
You use the Symbolic URL Administration view to specify how to construct the HTTP request to the external application and to define any arguments and values to be sent as part of the request.
This task is a step in Process of Creating Portal Agents.
To define a symbolic URL
Navigate to the Administration - Integration screen, and then WI Symbolic URL List.
From the drop-down menu, select Symbolic URL Administration.
In the Symbolic URL Administration list view, enter a new record.
Some of the fields are defined in the following table:
Field Description URL
Use the URL field to enter a URL for the external application. A best practice is to substitute the host’s Virtual Name, the one that you defined in the Host Administration view, for the host’s actual name. Doing this makes administering host names easier, because you might have many symbolic URLs pointing to one host. If the host name changes, then you only need to change it in the Host Administration applet rather than having to change it in several symbolic URL definitions.
For example,
https://Virtual_Host/path...Note: Use the Secure Sockets Layer protocol (SSL) with symbolic URLs to ensure that communication is secure. For more information about using SSL, see Siebel Security Guide.For applications that use form-base authentication, the URL is identified by the action attribute of the
<form>tag. For more information, see Determining the Login Requirements.Host Name
The Virtual Name of the host defined in the Host Administration view.
Fixup Name
Name of the fixup type defined in the Fixup Administration view. The fixup type defines how links embedded in the external HTML content are rendered. For example:
Default. Use this fixup type with the IFrame disposition type. Link fixup is inside the view. This fixup does not affect any of the links. The links (relative or absolute) remain as they are with the content being passed back in its original form.
InsideApplet. This fixup converts all of the relative links to absolute links and any links using a host defined in the Host Administration view are proxied in order to maintain SWE context.
OutsideApplication. This fixup converts all of the relative links to absolute links using the host and path of the parent URL. No links are proxied.
Multivalue Treatment
Determines how arguments are handled. Possible values are:
Comma Separated. Instructs SWE to insert a comma between the values defined in the symbolic URL arguments when appending the arguments to the URL. It inserts a comma after the value in the first Argument Value field and the first value in the second Argument Value field. The second Argument Value field is simply a text string entered by the user.
Separate Arguments. Instructs SWE to enter separate arguments for each value defined in the two Argument Value fields.
Use First Record Only. Uses the first record in the current record set.
SSO Disposition
The value selected in this field determines how the HTTP request is constructed and sent and how the external content is rendered in the user interface. Possible values are:
Inline. Proxies the request through the Siebel Server and displays content inline with other applets on a view.
IFrame. Uses the
<iframe>tag to display content inline with other applets on a view.Web Control. Uses an ActiveX control to display content inline with other applets on a view. Browsers displaying symbolic URLs of type Web Control must be set to handle ActiveX controls. For more information about browser security settings, see Siebel Security Guide.
Form Redirect. SWE constructs a form which it sends back to the browser, which the browser then sends to the external host. The content received is displayed in a new window.
Server Redirect. SWE sends the browser a 302 Response with the value of the external host’s URL in the header. The browser is redirected to the external host. The content received is displayed in a new window. Note that for Server Redirect there is a required Symbolic URL argument. For more information, see Portal Agent Restrictions.
For detailed descriptions of each disposition type, see About Portal Agents.
Web Application Name
Associates a Web application with this symbolic URL. For more information about Web applications, see Defining Web Applications.
Defining Symbolic URL Arguments
Symbolic URL Arguments allow you to configure Portal Agents in several ways. You use symbolic URL arguments for two purposes, to define data to be sent to an external host and to submit commands to SWE that affect the behavior of Portal Agents.
When defining arguments that send data, such as authentication requirements, the Argument Name and Argument Value are appended to the URL as an attribute-value pair. You can define symbolic URL arguments that send data as constants or that dynamically retrieve data from the Siebel database. Symbolic URLs allow you to retrieve data from the user’s instantiated Siebel business component, such as Service Request or Account, or retrieve data from the Siebel Personalization business component, such as the user’s ZIP Code or Language.
For information about how to determine required data for applications that use form-based authentication, see Determining the Login Requirements.
Symbolic URL arguments also allow you to implement commands which you use to define the behavior of Portal Agents. For usage descriptions of available commands, see Portal Agent Command Reference.
This task is a step in Process of Creating Portal Agents.
To define symbolic URL arguments
Navigate to the Administration - Integration screen, and then WI Symbolic URL List.
From the drop-down menu, select Symbolic URL Administration.
In the Symbolic URL Administration list view, select the symbolic URL that you want to configure.
In the Symbolic URL Arguments form, enter the arguments that need to be sent to the external host.
Some of the fields are defined in the following table:
Field Description Name
Name of the argument. For arguments of type Constant, Field, and Personalization Attribute, this field defines the exact field name expected by the external application. It is the first part of an attribute-value pair appended to the URL.
For argument types of commands, the Name can usually be anything. The only exception to this is for the EncodeURL and PreloadURL commands. For more information, see Portal Agent Command Reference.
Required Argument
When this field is checked (default) the argument must have a value. If you are configuring an argument that does not have a value, then uncheck the Required field. If an argument has no value and the Required field is checked, then the request is not sent because there is no value to append to the URL.
Argument Type
The Argument Type determines the source of the data to be send along in the HTTP request. Possible values are:
Constant. Sends the value defined in the Argument Value field in the request.
Field. Sends the value of a single-value or multi-value field from the current Siebel business component.
Profile Attribute. Sends the value of a field from the Siebel Personalization business component.
URL Argument. Data comes from the named argument of the current request.
Language Value. The user’s current language setting; for example, ENU.
Command. Implements commands that allow you to affect the behavior of the symbolic URL. For a complete list of commands, see Portal Agent Command Reference.
Argument Value
The value of the argument varies depending on the Argument Type. Descriptions of possible values for each argument type are described here.
If the Argument Type is one of the following:
Constant. The Argument Value is the second part of the attribute-value pair that is appended to the URL.
Field. The Argument Value defines a field name from the current business component. The data from this field is the second part of an attribute-value pair that is appended to the URL.
Profile Attribute. The Argument Value defines a field name on the Siebel Personalization business component. The data from this field is the second part of an attribute-value pair that is appended to the URL
URL Argument. The Argument Value defines the name of the argument on the incoming SWE request.
Language Value. The Argument Value is left null.
Command. The Argument Value typically defines the name of the command. For more information, see Portal Agent Command Reference.
Append as Argument
When this field is checked (default), the value is added as a URL argument on the outgoing request. If this field is not checked, then the value is substituted in the text of the outgoing URL.
Sequence
Determines the sequence of the arguments. In some cases the target host requires arguments in a particular order.
Configuring Multiple Symbolic URLs and Hosts for Alternative Execution Locations
You can configure multiple symbolic URLs and symbolic URL hosts, to execute applications in alternative locations (for example, for testing or demonstration purposes).
Configuring Alternative Symbolic URLs
To use an alternative symbolic URL, define the additional symbolic URL at the Symbolic URL Administration view, and specify the following parameter in the [DataSources] section of the application’s configuration file:
SymbolicURLSuffix. The value of this parameter is appended to the end of the name of the default symbolic URL to specify the name of the alternative symbolic URL.
For example, if the parameter SymbolicURLSuffix is set to _MyDemo in the application’s configuration file, and the default symbolic URL name is AccountNews, then the symbolic URL that is used when the application is executed is AccountNews_MyDemo. The URL value associated with the AccountNews_MyDemo symbolic URL in the Symbolic URL Administration page is used.
For more information about defining symbolic URLs, see Defining Symbolic URLs.
Configuring Alternative Symbolic URL Hosts
To use an alternative symbolic URL host, define the additional symbolic URL host at the Host Administration view, and specify the following parameter in the [DataSources] section of the application’s configuration file:
SymbolicURLHostSuffix. This value is appended to the end of the name of the existing symbolic URL host to specify the name of the alternative symbolic URL host.
For example, if the parameter SymbolicURLHostSuffix is set to _demo in the application’s configuration file, and the existing host name is ABC, then the new host name is ABC_demo. The host name value associated with ABC_demo in the Host Administration page is used.
For more information about defining hosts, see Defining the External Host.
Defining Content Fixup
The Fixup Administration view allows you to define how links embedded within external HTML content are rendered in the Siebel user interface. The fixup types that you define here will be associated with symbolic URLs.
To define a fixup type
Navigate to the Administration - Integration screen, and then WI Symbolic URL List.
From the drop-down menu, select Fixup Administration.
Enter a new record and define the fields.
Some of the fields are described in the following table:
Field Comments Link Context
Select one of the following values:
Do Nothing. This fixup does not affect any of the links. The links (relative or absolute) remain as they are with the content being passed back in its original form.
Outside Application. This fixup converts all of the relative links to absolute links using the host and path of the parent URL. No links are proxied.
Inside Application. This fixup converts all of the relative links to absolute links and any links using a host defined in the Host Administration view are proxied in order to maintain SWE context. After the user clicks a link, this fixup type renders HTML in the view, using the entire view for display.
Inside Applet. This fixup handles links the same way as the Inside Application fixup type. However, in this case, when a user clicks a link, it renders HTML within an applet. The other applets remain present on the view.
Context View Name
Name of the view that displays the link. This is optional.
Link Target
Specifies the name of a specific target frame of the link. For example, _blank for a new browser window or AnyName to open a window of that name. This option is not often used.
Defining End-User Login Credentials
The Portal Framework provides a mechanism to store user login credentials for external Web applications. The SSO Systems Administration view allows you to specify an external application and then enter login credentials on behalf of users. The My Logins view, located in the User Preferences screen, is used by end users to maintain their own credentials.
To specify an external Web application and define login credentials
Navigate to the Administration - Integration screen, and then SSO Systems Admin List.
In the SSO Systems list, enter a new record and define the following:
Field Description System Name
Name of the external Web application.
Symbolic URL Name
Select the name of the symbolic URL that interacts with the external Web application.
The symbolic URL must be configured with the UserLoginId Command and UserLoginPassword Command commands as arguments. These arguments instruct the symbolic URL to pass the stored login credentials when authenticating with an external Web application.
Description
Enter a description of the Web application.
If you are defining login credentials on behalf of end users, then, in the SSO System Users list, enter end-user login names and passwords.
Example Portal Agent
This topic provides an example of using a symbolic URL to integrate content from an external site.
Each of these steps is described in the topics that follow. This example uses www.example.com, which does not have the login page and other elements described here; substitute your actual site.
Review the Login Form
By reviewing the login page at www.example.com, you can determine the target URL of the Action attribute and the required arguments that are being passed to the Web application. Assume that www.example.com has a login page that contains the following <form> and <input> tags:
<form action="/index.shtm" method="POST" name="frmPassLogin" onsubmit="return logincheck();"> <input TYPE="TEXT" NAME="SearchString" SIZE="18" MAXLENGTH="100" VALUE=""> <input type="hidden" value="All" name="sc"> <input type="hidden" value="ON" name="FreeText"> <input type="image" src="/images/nav/button/bttn_form_arrow.gif" NAME="Action" border="0"/ alt="Submit Search"></td> <input type="text" name="username" size="18"> <input type="password" name="password" size="18"> <input type="image" src="/images/nav/button/bttn_form_arrow.gif" border="0" name='login' /> <input type="checkbox" name="remember" checked/> <span class="bdDkGray">Remember my Login<br></span </form>
From the action attribute of the <form> tag, you can determine that the target URL is relative to the root of the login page’s URL. Therefore, the target URL is:
www.example.com/index.shtm
You can also determine that the method attribute of the <form> tag is POST:
method="POST"
After reviewing the <input> tags, you can determine that the required arguments are:
username

password
Define the External Host
The external host is simply the address of the login page. In this example, it is www.example.com. Be sure to provide a meaningful name in the Virtual Host Name field. This value is used instead of the actual host name when you define the symbolic URL. This makes administration easier if the host name changes. Also notice that there is no value for the Authentication Type.
The following figure shows the external host defined for this example.

For more information, see Defining the External Host.
Define the Symbolic URL
After you define the external host, you can define the symbolic URL. Notice that the URL defined here uses the Virtual Name of the host, not the actual name. Also notice that, when you select the external host from the Host Name field, it is populated with the actual host name. When SWE constructs the URL, it substitutes the actual Host Name for the Virtual Name in the URL. In this example, the fixup type is Default, because the page is displayed in the browser using the <iframe> tag and therefore, it is recommended that links not be fixed up in any way.
The following figure shows the symbolic URL defined for this example.

For more information about defining symbolic URLs, see Defining Symbolic URLs.
Define Symbolic URL Arguments
You use symbolic URL Arguments to define the information that you want to append as arguments to the URL. You also use symbolic URL arguments to define commands that you want to execute. In this case, the following arguments are required:
PostRequest. This command instructs SWE to submit the request using a
POSTmethod rather thanGET, which is the default. In this case, you know thatPOSTis required because the method attribute of the<form>tag specifiesPOST.UserLoginPassword. This command instructs SWE to retrieve the password stored for the user and pass it to the external application. The name of this argument is the name of the input field expected by the external application. In this case, it is password.
UserLoginID. This command instructs SWE to retrieve the stored login name for the user and pass it to the external application. The name of this argument is the name of the input field expected by the external application. In this case, it is username.
The following figure shows the symbolic URL arguments defined for this example.

For more information about symbolic URL arguments, see Defining Symbolic URL Arguments. For more information about symbolic URL commands, see Portal Agent Command Reference.
Define User Login Credentials
Finally you must define login credentials for a user. The values defined here are appended as arguments to the URL constructed by SWE. In this case, the following user name and password are defined:
The user name is Joe_Smith@example.com.
The password is abracadabra.
Testing the Integration
After completing the previous steps, you can test the integration.
To test the integration
Log out of the application.
Log back in as the test user.
Navigate to the applet or Web page item that is associated with the symbolic URL.
Content from the external host, in this case example.com, is displayed in the Siebel user interface.
Reviewing the SWE Log File
Reviewing the SWE log file can help you to debug errors in your Portal Agent configuration.
The location of the log file is SIEBSRVR_ROOT
\log.The name of the log files are swelog_pid.txt and sweusage_pid.txt, where pid is the process ID of the corresponding Siebel process.
For more information about log files and about configuring log levels, see Siebel System Monitoring and Diagnostics Guide.
Portal Agent Command Reference
Portal Agent commands allow you to carry out actions such as: use a set of stored credentials for authentication or define additional attributes for the <iframe> tag. These commands are entered as symbolic URL arguments. For more information, see Defining Symbolic URLs.
The commands are described in the following subtopics.
EncodeURL Command
Use the EncodeURL command to specify whether to encode arguments appended to the symbolic URL. By default, the URL is encoded. However, some servers do not recognize standard encoding, in which case you can use this command to not encode the URL.
Define the fields in the Symbolic Arguments applet. See the following table.
Table Symbolic URL Arguments
| Field | Value |
|---|---|
Name |
EncodeURL |
Argument Value |
TRUE or FALSE |
FreePopup Command
Use the FreePopup command to show portal contents in a popup window.
The symbolic URL contains the FreePopup command, it notifies the client that the pop-up is a free one and the client displays the contents in the pop-up window.
FreePopup is supported for FormRedirect, the only disposition type available for opening a portlet in a pop-up.
To start the external application as a full browser window, use the values in the following table.
Table Symbolic URL Arguments
| Name | Required Argument | Argument Type | Argument Value | Sequence | Append as Argument |
|---|---|---|---|---|---|
FreePopup |
True |
Command |
True |
1 |
True |
FullWindow |
True |
Command |
True |
2 |
True |
To start the external application as a modal window, use the values in the following table.
Table Symbolic URL Arguments
| Name | Required Argument | Argument Type | Argument Value | Sequence | Append as Argument |
|---|---|---|---|---|---|
PopupSize |
True |
Command |
750x500 |
1 |
True |
FreePopup |
True |
Command |
True |
2 |
True |
To start the external application in a new browser tab (for each click), use the values in the following table.
Table Symbolic URL Arguments
| Name | Required Argument | Argument Type | Argument Value | Append as Argument |
|---|---|---|---|---|
FreePopup |
Y |
Command |
True |
Y |
Target |
Y |
Command |
_blank |
Y |
IFrame Command
Use the IFrame command to define additional HTML attributes for the <iframe> tag.
Define the fields in the Symbolic URL Arguments applet. See the following table.
Table Symbolic URL Arguments
| Field | Value | Example |
|---|---|---|
Name |
Any Name |
None |
Argument Value |
IFrame [attribute]=[value] |
IFrame Height=100 Width=500 |
Disposition Types
Use the IFrame command with the IFrame disposition type.
IsRecordSensitive Command
Use the IsRecordSensitive command to turn on or off the record-sensitive feature. Set the value to TRUE to ensure that a child applet with a symbolic URL is refreshed on the parent record, for instance, when you embed an Analytics report as a child applet with a requirement that it display contextual information.
This command is turned off by default. Set this argument value to TRUE in the Symbolic URL Arguments configuration.
Define the fields in the Symbolic URL Arguments applet. See the following table.
Table Symbolic URL Arguments
| Field | Value |
|---|---|
Name |
IsRecordSensitive |
Argument Value |
TRUE |
NoCache Command
Use the NoCache command to instruct SWE not to cache Inline responses on the server. This command is only valid for the Inline disposition type.
Define the fields in the Symbolic URL Arguments applet. See the following table.
Table Symbolic URL Arguments
| Field | Value |
|---|---|
Name |
Any name |
Argument Value |
NoCache |
NoFormFixup Command
Use the NoFormFixup command to instruct SWE not to fix up a form by putting proxy SWE arguments into links that appear on the page.
Define the fields in the Symbolic URL Arguments applet. See the following table.
Table Symbolic URL Arguments
| Field | Value |
|---|---|
Name |
Any name |
Argument Value |
NoFormFixup |
PreLoadURL Command
Use this command to specify a preloaded URL. Use this command when the external application gathers information from a preloaded cookie on the client machine. Use this command with disposition types of IFrame and Web Control.
Define the fields in the Symbolic URL Arguments applet. See the following table.
Table Symbolic URL Arguments
| Field | Value |
|---|---|
Name |
PreLoadURL |
Argument Value |
[URL] |
PostRequest Command
Use PostRequest to configure the Portal Agent to use the POST method instead of the GET method, which is the default. Use this command when the method of the action attribute is POST. This method avoids displaying user information on a Web page or browser status bar. Use this command with disposition types of IFrame and Web Control only.
Define the fields in the Symbolic URL Arguments applet. See the following table.
Table Symbolic URL Arguments
| Field | Value |
|---|---|
Name |
Any Name |
Argument Value |
PostRequest |
UserLoginId Command
Use the UserLoginId command to send the stored user login ID for a particular Web application. The command gets the user’s Login ID from the My Login Credential business component.
For more information about how user login IDs are entered into this business component, see Defining End-User Login Credentials.
Define the fields in the Symbolic URL Arguments applet. See the following table.
Table Symbolic URL Arguments
| Field | Value |
|---|---|
Name |
[input field name] |
Argument Value |
UserLoginId |
UserLoginPassword Command
Use the UserLoginPassword command to send the stored user password for a particular Web application. The command gets the user’s password from the My Login Credential business component.
For more information about how user passwords are entered into this business component, see Defining End-User Login Credentials.
Define the fields in the Symbolic URL Arguments applet. See the following table.
Table Symbolic URL Arguments
| Field | Value |
|---|---|
Name |
[input field name] |
Argument Value |
UserLoginPassword |
UseSiebelLoginId Command
Use the UseSiebelLoginId command to retrieve the user’s Siebel login ID from the stored set of credentials.
Define the fields in the Symbolic URL Arguments applet. See the following table.
Table Symbolic URL Arguments
| Field | Value |
|---|---|
Name |
[input field name] |
Argument Value |
UseSiebelLoginId |
UseSiebelLoginPassword Command
Use the UseSiebelLoginPassword command to retrieve the user’s Siebel password from the stored set of credentials.
Define the fields in the Symbolic URL Arguments applet. See the following table.
Table Symbolic URL Arguments
| Field | Value |
|---|---|
Name |
[input field name] |
Argument Value |
UseSiebelLoginPassword |
Displaying Data from External Applications in Siebel Views
The example in this topic describes how to configure Siebel Open UI to get connection details from LinkedIn, find matching mutual contacts in Affiliation views, and then display the matching records in a Siebel view.
To display data from external applications in Siebel views
Set up the data:
Log in to LinkedIn, and then identify two connections that include profile pictures and that allow you to reference them in your configuration.
Write down the case-sensitive first name and last name for each LinkedIn profile.
Log in to Siebel Call Center, navigate to the contacts Screen, and then the Contact List view.
Click New, and then enter the First Name and Last Name values for one of the profiles that you noted in Step b.
The values you enter must match exactly. Make sure uppercase and lowercase usage is the same.
Click New, and then enter the First Name and Last Name values for the other profile you noted in Step b.
Navigate to the Opportunity screen, and then the Opportunity List view.
Click New to create a new opportunity, and then add the contact that you created in Step b to this new opportunity.
Click New to create another new opportunity, and then add the contact that you created in Step d to this new opportunity.
Log in to the Siebel application using the sample database, and then repeat Step b through Step e.
Navigate to the Contact Screen, and then the Contact List view.
Drill down on the first contact, and then navigate to the third level Affiliations view.
Click New, and then add the contact that you created in Step d.
Click New, and then add the contact that you created in Step e.
Download the sociallyawarepmodel.js file into the following folder:
INSTALL_DIR\applicationcontainer\webapps\siebel\language_code\files\custom
To get a copy of this file, see Article ID 1494998.1 on My Oracle Support. This code already contains the configuration that Siebel Open UI requires to authenticate the user with LinkedIn and to get the connections for this user from LinkedIn. For more information about the language_code, see Languages That Siebel Open UI Supports.
Use a JavaScript editor to open the sociallyawarepmodel.js file that you downloaded in Step 2.
Locate the following code:
SociallyAwarePM.prototype.Init = function(){

  SiebelAppFacade.SociallyAwarePM.superclass.Init.call(this);
Add the following code immediately under the code you located in Step 4:
this.AddProperty("linkedINRecordSet", []);

this.AddProperty("linkedINMarker", 0);
where:
linkedINRecordSetstores the connection details of the current user from LinkedIn.linkedINMarkermarks the position in the connection details record set for querying purposes in the Siebel Database.
Add the following code immediately after the code you added in Step 5:
this.AddMethod("QueryForRelatedContacts", QueryForRelatedContacts);

this.AddMethod("GetConnectionByName", GetConnectionByName);
This code allows the presentation model to call the GetConnectionByName method and the QueryForRelatedContacts method that you add in Step 7.
Add the following code immediately after the FetchConnectionFromLinkein method:
function GetConnectionByName(fName, lName){
  var connection = null;
  if(fName && lName){
    var linkedInRecSet = this.Get("linkedINRecordSet");
    for(var i = 0; i < linkedInRecSet.length; i++){
      var current = linkedInRecSet[i];
      if(current.firstName === fName && current.lastName === lName)
      {connection = current;break;}}
        }
return connection;
}
function QueryForRelatedContacts(){
  var currentMark = this.Get("linkedINMarker");
  var recordSet = this.Get("linkedINRecordSet");
  var firstName = "";
  var lastName = "";
  for(var i = currentMark; i < currentMark + 5; i++){
    var current = recordSet[i];
    firstName = firstName + current["firstName"];
    lastName = lastName + current["lastName"];
    if(i < (currentMark + 4))
      {firstName = firstName + " OR ";
      lastName = lastName + " OR ";
      }  }
if(firstName !== "" || lastName !== ""){
  SiebelApp.S_App.GetActiveView().ExecuteFrame(
  this.Get("GetName"),
  [
  {field : "Last Name" , value : lastName},
  {field : "First Name", value : firstName}]);
  }
}
where:
GetConnectionByNameuses the first name and last name to get the connection information stored on the client. Siebel Open UI gets this information from LinkedIn.QueryForRelatedContactsis the presentation model method that uses the subset of the LinkedIn connection record that Siebel Open UI sets to query the Siebel Server for matching records. The notification causes Siebel Open UI to call the BindData method of the physical renderer as part of the reply processing. The BindData method updates the user interface with the matching set of records from server. For more information, see Notifications That Siebel Open UI Supports and GetActiveView Method.
Add the following code immediately after the AddProperty methods you added in Step 5:
this.AddMethod("QueryForRelatedContacts", QueryForRelatedContacts);

this.AddMethod("GetConnectionByName", GetConnectionByName);
These AddMethod calls add the QueryForRelatedContacts method and the GetConnectionByName method so that Siebel Open UI can call them from the presentation model.
Configure the manifest:
Log in to a Siebel client with administrative privileges.
For more information about the screens that you use in this step, see Configuring Manifests.
Navigate to the Administration - Application screen, and then the Manifest Files view.
In the Files list, add the following file.
Field Value Name
siebel/custom/sociallyawarepmodel.js
Navigate to the Administration - Application screen, and then the Manifest Administration view.
In the UI Objects list, specify the following applet.
Field Value Type
Applet
Usage Type
Presentation Model
Name
Enter any value.
In the Object Expression list, add the following expression. Siebel Open UI uses this expression to render the applet on a desktop platform.
Field Value Expression
Desktop
Level
1
In the Files list, add the following file:
siebel/custom/sociallyawarepmodel.js
Test your modifications.
Displaying Data from External Applications in Siebel Applets
The example in this topic describes how to configure Siebel Open UI to display data from an external application in a Siebel applet. Siebel Open UI can use a symbolic URL open this external application from an applet. For example, to display a Google Map or a Linked In view as an applet in a Siebel application.
The example in this topic configure Siebel Open UI to display a Google map as a child applet in the Account detail page. The Map displays a location according to the Zip Code of the account record. If the Zip Code is empty, then it displays the default Google map.
To display data from external applications in Siebel applets
Configure the business component:
Open Siebel Tools.
For more information, see Using Siebel Tools.
In the Object Explorer, click Business Component.
In the Business Components list, query the Name property for Account.
In the Object Explorer, expand the Business Component tree, and then click Field.
In the Fields list, add the following field.
Property Value Name
You can use any value. For this example, use the following value:
SymbolicURLGoogleMap
Calculated
TRUE
Type
DTYPE_TEXT
Calculated Value
Enter the name of any Symbolic URL enclosed in double quotation marks. For this example, enter the following value:
SymbolicURLGoogleMap
You define this Symbolic URL later in this example.
Configure the applet:
In the Object Explorer, click Applet.
In the Applets list, query the Name property for SSO Analytics Administration Applet.
In a typical configuration, you create an applet that Siebel Open UI can to use to display the external content. This applet must reference the business component that you configured in Step 1.
Copy the applet that you located in Step b, and then set the following properties for this copy.
Property Value Name
GoogleMap
Business Component
Account
Title
GoogleMap
In the Object Explorer, expand the Applet tree, expand the List tree, and then click List Column.
In the List Columns list, set the following properties for the single record that the list displays.
Property Value Name
SymbolicURLGoogleMap
Field
SymbolicURLGoogleMap
Field Retrieval Type
Symbolic URL
Configure the view:
In the Object Explorer, click View.
In the Views list, query the Name property for the view that must display the Google map.
For this example, query the Name property for the following value:
Account Detail - Contacts View
In the Object Explorer, expand the View tree, expand the View Web Template tree, and then click View Web Template Item.
In the View Web Template Items list, add the following view Web template item.
Property Value Name
GoogleMap
Applet
GoogleMap
Field Retrieval Type
Symbolic URL
Item Identifier
Enter the next highest number in the sequence of numbers that Siebel Tools displays for all records in the View Web Template Items list.
Note that you cannot drag, and then drop an applet into the Web Layout Editor in Siebel Tools. You must add it manually to the Web page.
Compile your modifications.
Examine the URL that Siebel Open UI must integrate:
Open the URL that Siebel Open UI must integrate.
For this example, open http://maps.google.com/ in a browser.
View the source HTML.
For example, if you use Internet Explorer, then click the View menu, and then click Source. Alternatively, save the file to your computer, and then use an HTML editor to open it.
Identify the input fields.
It is recommended that you search for the input tag.
In this example, the source displays the name in the following way:
name="q"
You use this value when you define the arguments for the Symbolic URL.
Determine if the method attribute of the page is one of the following:
POST. You must define the PostRequest command as an argument of the symbolic URL.
GET. you do not need to define a symbolic URL command.
Determine the target of the from action attribute, which is typically specified as
action = "some string". In this situation, it is'/maps'. It is appended to the predefined URL.
Configure the symbolic URL:
Log in to the Siebel client with administrator privileges.
Navigate to the Administration - Integration screen, and then the WI Symbolic URL List view.
In the Fixup Administration dropdown list, choose Symbolic URL Administration.
In the Symbolic URL Administration list, add the following symbolic URL.
Field Value Name
SymbolicURLGoogleMap
URL
http://maps.google.com/maps
Fixup Name
Default
SSO Disposition
IFrame
In the Symbolic URL Arguments list, add the following symbolic URL argument.
Field Value Name
q
This value is the input tag in HTML for the Google map.
Required Argument
N
You set this argument to N because the account might not include a zip code.
Argument Type
Field
Siebel Open UI must send the value in the zip code field of the account to the Google map.
Argument Value
Postal Code
You set this argument to the name of the business component field that contains the value that Siebel Open UI must send to the Google map.
Append as Argument
Y
Substitute in Text
N
Sequence#
1
In the Symbolic URL Arguments list, add the following symbolic URL arguments. Siebel Open UI uses this argument to embed the Google map in the applet.
Field Value Name
output
Required Argument
Y
Argument Type
Constant
Argument Value
embed
Append as Argument
Y
Substitute in Text
N
Sequence#
2
Test your modifications:
Navigate to the Accounts screen, and then click Accounts List.
In the Accounts List, create a new account and include a value in the Zip Code field.
Drill down on the Account Name field.
Make sure Siebel Open UI displays a Google map and that this map includes a push pin that identifies the zip code that you entered in Step b.
Displaying Data from Siebel Open UI in External Applications
This topic describes how to display data from Siebel Open UI in an external application. It includes the following information:
Configuring Communications with Siebel Portlets When Hosted Inside iFrame
Using iFrame Gadgets to Display Siebel CRM Applets in External Applications
Siebel Open UI comes predefined to display Siebel CRM data only in a Siebel application, such as Siebel Call Center. This topic describes how to display Siebel CRM data in an external application or website, such as Oracle WebCenter or iGoogle.
Displaying Siebel Portlets In External Applications
You can configure Siebel Open UI to display a Siebel portlet. A Siebel portlet is a Siebel Open UI application that is embedded in a thirty-party website. Oracle WebCenter and iGoogle are examples of these types of third-party websites. An HMTL iFrame is used in these websites to display part of the Siebel application in a portlet window.
This topic describes how to display Siebel portlets in external applications.
Configuring Siebel Open UI to Consume Siebel Portlets
Siebel portlets can be integrated inside a portal application using iFrame or any other mechanism supported by the portal application. Siebel accepts both GET and POST requests.
To make a Siebel Server available as part of a portal, you can add the server URL to an iFrame that resides on the main Web page. In this sample code, the HTTP GET method is used:
<HTML>
  <BODY>
    <IFRAME src = "http://server_address/siebel/app/application/
lang?SWECmd=SWECmd=GotoView&IsPortlet =1&other_arguments"> </IFRAME>
  </BODY>
</HTML>
where:
server_address specifies the address of the Siebel Server.
application specifies the Siebel application.
SWECmdis a required argument that specifies how to display the Siebel application when the user accesses this URL.isPortletis a required argument that informs the Siebel Server that this application runs in a portlet. The server requires this argument so that it can do the processing it requires to support a portlet.other_arguments specify how to display the Siebel application. For example, the login requirements to display, the applets to display, how to size applets, and so on.
For example, consider the following iFRAME src:
http://server_name.example.com/siebel/app/callcenter/enu?
SWECmd=GetApplet&SWEApplet=Quote+List+Applet&IsPortlet
=1&SWESM=Edit+List"style="height: 50%;width: 100%;&KeepAlive=1&PtId=my_theme"
The following tabler describes the parts of this iFRAME src that specifies the Siebel URL.
Table Specifying URLs to Siebel Portlets
| URL Argument | Description |
|---|---|
http://server_name.example.com |
Access the Siebel Server that resides at server_name.example.com. |
/callcenter/enu |
Run the CallCenter application. |
SWECmd=GetApplet |
Provide commands to the Siebel Web Engine. |
SWEApplet=Quote+List+Applet |
Display the Quote List Applet. |
IsPortlet =1 |
Run the CallCenter application as a portlet. |
SWESM=Edit+List |
Use the Edit List Mode |
KeepAlive=1 |
Keep Siebel portlet sessions active even if the session is idle longer than SessionTimeout. Siebel CRM is predefined to expire a Siebel session that is not in use for a period of time according to the value that the SessionTimeout server parameter specifies. In the absence of this parameter, the session timing out will lead to Siebel Open UI displaying a login dialog box in the portlet. This behavior might not be desirable in a Siebel portlet. It is recommended that you set this argument to keep the session active. For more information about the KeepAlive parameter, see Configuring the Portlet Session to Stay Alive. |
&PtId=my_theme" |
You can style a portlet application in such a way that the look and feel of the exposed application match that of the portal. The iFrame itself can be styled using a Cascading Style Sheet. For more information, see Configuring the Use of Cascading Style Sheets Instead of iFrame Attributes. In addition, the Siebel application can be styled according to a theme. A theme can be defined in the Siebel manifest, and the PtId argument can be used to reference the theme. The theme defined will be applied to the exposed application. |
SWECmd=ExecuteLogin &SWEUserName=user_name &SWEPassword=my_password |
Provide user name and password authentication arguments. ExecuteLogin is allowed only through HTTP POST. Oracle recommends not passing user IDs and password in an HTTP request due to security reasons. For more information, see About Siebel Portlet Authentication and Security Requirements. |
Siebel Open UI supports HTTP POST and exposes the Siebel portlet for HTTP POST requests. The Siebel portal can send the following URL with the listed form fields:
http://server_name.example.com/siebel/app/callcenter/enu?
SWECmd=ExecuteLogin
SWEUserName=user_name
SWEPassword=my_password
SWEAC=SWECmd=GetApplet
SWEApplet=Quote+List+Applet
IsPortlet =1
KeepAlive=1
PtId=my_theme"
About Siebel Portlet Authentication and Security Requirements
Siebel Open UI portlets must be configured differently depending on whether the application is hosted in HTTP and in HTTPS. The recommended configuration guidelines are as follows:
HTTP. Implement SSO and access Siebel over HTTP or HTTPS, depending on the requirement.
HTTPS. Implement SSO and enable SSL for Siebel.
Configuring Views to be Embedded in a Portlet
You can allow a view to be embedded in a portlet. Doing so runs the Siebel application in the portlet and navigates to a specified view. The view specified must be accessible anonymously or by user who is logged in to the Siebel Open UI client.
To allow a view to be embedded in a portlet, include the following command in the URL:
SWECmd=GotoView; SWEView=<View Name>; ]
The full URL should use the conventions in the following example:
http://<siebel_server>/<siebel/app/application>/lang?IsPortlet
=1&SWECmd=GotoView&SWEView=<View Name>
For example, with the Opportunities List View embedded in a portlet, the URL would use the conventions in the following URL:
http://<siebel_server>/<siebel/app/application>/lang?IsPortlet
=1&SWECmd=GotoView&SWEView=Opportunities+List+View
Configuring Standalone Applets to be Embedded in a Portlet
Siebel Open UI supports standalone applets. You can expose standalone applets in a portlet. This can be achieved by providing the following GetApplet command in the URL:
SWECmd=GetApplet; SWEApplet=<Standalone Applet Name>; SWESM=<Applet's Show Mode>
About the SWESM Parameter
The SWESM parameter is the default mode for the applet to be shown, but can be changed to any one of the preconfigured modes of the applet, such as:
Base.
Edit / Edit List.
Query.
The full URL should use the conventions in the following example:
http://<siebel_server>/<siebel/app/application>/lang?IsPortlet
=1&SWECmd=GetApplet&SWEApplet=Opportunity+List+Applet&SWESM=Base
About Search Specifications
When using standalone applets in portlets, the data displayed in the standalone applet can be controlled by using search specifications. The search specifications are applied to various Business Component fields on which the standalone applet is deployed. You can control the search specifications using the following parameters:
BCField<n>. Defines the business component field on which to query.
BCFieldValue<n>. Defines the value that the
BCField<n>must match for the record to be displayed.PBCField<n>. Defines the parent business component field on which to query.
PBCFieldValue<n>. Defines the value that the
PBCField<n>must match for the record to be displayed.
For example, if you wanted to specify the Opportunities List applet embedded in a portlet and limit the records displayed to Opportunity Names that match "Test Opportunity" you could use the following URL:
http://<siebel_server>/<siebel/app/application>/lang?IsPortlet
=1&SWECmd=GetApplet&SWEApplet=Opportunity+List+Applet&SWESM=Base&BCField0=Opportun
ity+Name&BCFieldValue0=Test+Opportunity
Search Specifications Guidelines
Adhere to these additional guidelines when defining your search specifications:
When specifying multiple business component fields or parent business component fields, use the AND operator at the end of the final expression. Only records that satisfy all of the matching criteria are returned by the search.
Field values can contain any type of data that is accepted by the Siebel search specification system. For example, "PBCFieldValue2=Opportunity1+OR+Opportunity2" is a valid value.
Field values not exposed in the applet itself can still be used by the URL. These fields will be explicitly activated and used for the query.
Search specifications applied to a URL will work in the context. Therefore, the user will not be able to access the super-set of records, unless the user navigates to the view in question.
If a parent business component field and parent business component field value is configured in a URL, and the business component does not have a parent business component, then the specification is ignored.
If a business component field is used in the URL that does not exist on the business component, then the URL is considered invalid and the applet will fail to build. This results in unpredictable behavior in the portlet.
Configuring View-Based Applets to be Embedded in a Portlet
When an applet has been configured part of a view rather than as a standalone applet, it can still be exposed in a portlet. To do this, use the GotoView command with the following additional parameters:
SWECmd=GotoView; SWEView=<View_Name>; SWEApplet=<Applet_Name>
Only the applet specified in the portlet will be embedded in the portlet. For example, only the Opportunity List Applet will be shown using the following URL:
http://<siebel_server>/<siebel/app/application>/lang?IsPortlet
=1&SWECmd=GotoView&SWEView=Opportunity+List+View&SWEApplet=Opportunity+List+Applet
Configuring Multiple Siebel Portlets in Portal Applications
Siebel supports exposing multiple Siebel Portlets to the Portal application in the same portlet session. By default, multiple Siebel Portlets are not exposed to the Portal application. Portal applications having one Siebel portlet works without any change. Each Siebel portlet creates a new Siebel session.
Setting Server Parameter to Enable Multiple Portlets
Log in to a Siebel client with administrative privileges.
Navigate to the Administration - Server Configuration screen, and then the Servers view.
In the Siebel Servers list, choose a Siebel Server.
Click the Components view tab.
In the Components list, select the required Application Object Manager. For example, Call Center Object Manager (ENU).
Select Parameters from the drop-down list above Component Event Configuration section and click the Hidden button.
In the Parameter field, perform a case-sensitive search for the EnableMultiTab parameter.
In the Value on Restart field, enter True.
Restart the Siebel server.
Configuring Application Interface Profile Parameter to Limit the Number of Portlets
To set the Application Interface profile parameter to limit the number of portlets, perform the following steps:
Log in to Siebel Management Console.
Select the required Application Interface profile.
Select the Applications tab and expand the Enhanced Authentication section of the selected application.
In the Maximum Possible Tabbed Sessions field, enter a value to limit the number of browser tabs. For example, 2, if you want to allow only two browser tabs. By default, the value for Maximum Possible Tabbed Sessions field is set to 1.
Note: This parameter is effective only when the EnableMultiTab server parameter is set to True for the specified Application Object Manager.Save the profile.
Append the New PortletId Parameter to the Siebel Portlet URL
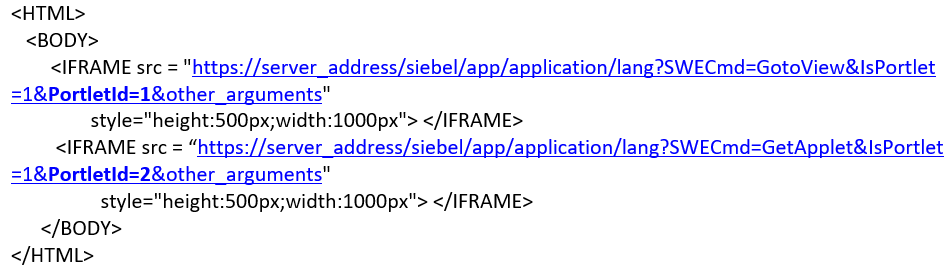
The new PortletId parameter is required in the Siebel portlet URL when more than one portlet needs to be added in the portal application. PortletId should be a valid numeric number. The following sample code snippet illustrates two Siebel portlets exposed in a portal application.
Configuring Advanced Options
This topic describes advanced options when configuring Siebel Open UI in an external application.
Configuring Multiple Command Chaining in a URL
Use the SWEAC parameter to chain more than one command in a URL. An example, where this might be useful is a situation where you want to navigate to a certain view and create a new record in that view's active applet.
To configure multiple command chaining in a URL, include the following attribute in the URL:
SWEAC=SWECmd=NewRecord]
The full URL should use the conventions in the following example:
http://<siebel_server>/<siebel/app/application>/lang?IsPortlet
=1&SWECmd=GotoView&SWEView=Opportunities+List+View&SWEAC=SWECmd=NewRecord
The preceding example runs the Siebel application in the portlet and takes the context to the Opportunity View to create a new record in the active applet on that view.
Configuring the Portlet Session to Stay Alive
Siebel sessions that are not in use will eventually expire. The time for which the session is kept alive is determined by the value of SessionTimeout Siebel server parameter. In some cases when exposing Siebel as a portlet expiring sessions this might not be optimal.
To override the SessionTimeout Siebel parameter so that the portlet session stays alive, include the following attribute in the URL:
KeepAlive=1
[Other values for this parameter are as follows: TRUE, T, ON, and Y.]
The full URL should use the conventions in the following example:
http://<siebel_server>/<siebel/app/application>/lang?IsPortlet
=1&SWECmd=GotoView&SWEView=Contact+List+View&KeepAlive=1
When using the KeepAlive attribute, consider these additional guidelines:
The KeepAlive attribute value is enforced by monitoring periodic client pings to the Siebel server. Consequently, the client must be on a network connected to the server.
If the KeepAlive attribute value is omitted or set to
FALSEthe session will eventually timeout and a login screen is returned to the portlet.Once the KeepAlive attribute is set to
TRUEby a request (either the URL or a subsequent message-based communication) it cannot be changed toFALSEby a subsequent request.
Configuring the Use of Cascading Style Sheets Instead of iFrame
The iFrame tag supports a number of attributes, which can be used to control the visual formatting of the portlet content. For a full list of the attributes, see the following W3C website:
http://www.w3.org/wiki/HTML/Elements/iframe
In recent HTML revisions, many attributes are being deprecated. Consequently, it is recommended that cascading style sheets be used for visual formatting.
Siebel Open UI attaches CSS classes for the portlet iFrame. In Siebel Open UI, the CSS can be applied by defining a theme in the Theme.js file and passing the theme name as a parameter in the URL under PtId.
The full URL should use the conventions in the following example:
http://<siebel_server>/<siebel/app/application>/lang?IsPortlet
=1&SWECmd=GotoView&SWEView=Contact+List+View&KeepAlive=1&PtId=CUSTOM_PORTLET_THEME
Where CUSTOM_PORTLET_THEME is defined in Theme.js. If the argument value is omitted, invalid, or cannot be found in Theme.js, then the Siebel Open UI will use the default theme.
For more information about customizing themes, see Customizing Themes.
Configuring Communications with Siebel Portlets When Hosted Inside iFrame
This topic outlines the Siebel server parameter configurations that are required and optional to enable communication with Siebel portlets when hosted inside an iFrame. These parameters can be modified for the Siebel Component with which the functionality is meant to communicate. The instructions in this topic are not required when cross-domain communications are not needed.
Planning Across Domain Integrations
Siebel Open UI can be used in same domain IFrames starting in Siebel Innovation Pack 2013 and supports use across domains starting with Siebel Innovation Pack 2014 release. The following settings support this feature:
Xframe-options allow-from. Allows Siebel to be hosted inside a portal. The portal application name has to be listed as the Allow-From value.
PortletOriginList. Gives the list of allowed applications to communicate with Siebel Open UI when it is hosted inside an iFrame.
Planning Cross-Domain Integrations
You can use the X-Frame-Options HTTP header to determine whether or not Siebel Open UI can display a page in a browser in a frame or in an iFrame. This capability is useful to avoid a potential security problem by making sure a hacker cannot embed the content that Siebel Open UI provides into another application. The XFrameOptions parameter is a hidden Siebel Server parameter that you can use to control the value of the X-Frame-Options header. You can set it to one of the following values:
SAMEORIGIN. Display the page only in a frame that resides in the same location as the page.This is the default value.
ALLOW-FROM. url Display the page only in a frame that resides in the specified location. If an external application accesses a Siebel URI, then you specify the URI that this external application uses. For example, if the external application uses my_url.com, then you use the following value: ALLOW-FROM http://my_url.com/ If a browser (such as Chrome or Safari) does not support ALLOW-FROM, then the browser ignores it.
DENY. Do not display the page in a frame or in an iFrame.
Make sure that HTTPS/HTTP transports match for cross-domain sites.
To configure communications with Siebel portlets when hosted inside an iFrame
Set up the Siebel server parameters:
Log in to a Siebel client with administrative privileges.
Navigate to the Administration - Server Configuration screen, and then the Servers view.
In the Siebel Servers list, choose a Siebel Server.
Click Parameters.
In the Parameters list, add the following parameters.
Parameter Description PortletAPIKey
This is a required parameter. It is a unique key configured as a server parameter. The source portal program must pass this key to call the Siebel application exposed as the portlet. The messaging object used to communicate with Siebel Portal will need to contain a parameter msg.Key. The msg.Key must match the key configured in this parameter. If the messaging object does not contain a key, or contains an invalid one, the invocation will result in an error in the Siebel portlet.
PortletOriginList
This is a required parameter. It defines the list of valid domains from which the Siebel portlet will accept a communication request. A comma separated list can be provided for this parameter. Any invocations coming from domains that are not listed here will cause an error in the Siebel portlet.
PortletMaxAllowedAttempts
This is an optional parameter. Its default value is 3. This parameter specifies the number of unsuccessful communication attempts with the portlet before Siebel Open UI blocks any subsequent calls. An unsuccessful call can occur in the following situations:
A domain attempts to send a communication request to the portlet, but the PortletOriginList does not specify this domain.
The portlet_key sent by the communicating domain does not match the parameter specified in the Siebel server.
The Siebel portal will remain blocked up to the time extent as defined by PortletBlockedInterval after which Siebel Open UI resets the unsuccessful attempts to zero
PortletBlockedInterval
This is an optional parameter. Its default value is 900 seconds. This parameter specifies the time in seconds for which Siebel portlet will remain blocked to any communication attempt from the hosting portal or a neighboring portlet after having exceeded the number of unsuccessful communication attempts (as defined by PortletMaxAllowedAttempts). During this time, the Siebel portlet will still be open to access by the user of the application. However, no programmatic access is permitted.
Based on your configuration, the portal, or another portlet in the portal, add the following object to your custom code. The SWEView, SWEApplet, and Key arguments are required. All other arguments are optional:
var msg = new Object();
msg.SWEView = view_name;
msg.SWEApplet = applet_name;
msg.SWECmd =GotoView or GetApplet
msg.Key = portlet_key;
where:
view_name specifies the view that Siebel Open UI displays in the portlet window. If you specify only the view, then Siebel Open UI displays the view and all the applets that this view contains.
applet_name specifies the applet that Siebel Open UI displays in the portlet window. If you specify only the applet, then Siebel Open UI displays only this applet and no view. If you specify the view and applet, then Siebel Open UI displays the applet in the view.
GotoView or GetApplet specifies whether or not to display a view or an applet in the portlet window.
portlet_key must specify the value that you specify for the PortletAPIKey server parameter in Step . The Siebel client sends this value to the Siebel Server when it calls a Siebel application. You must include the msg.Key argument, and the value of this argument must match the value of the key that the PortletAPIKey server parameter contains on the Siebel Server. If the messaging object does not contain a key, or if it contains a key that does not match the value of the server parameter, then Siebel Open UI displays an error in the Siebel portlet.
For example, the following code displays the Opportunity List Applet inside the Opportunity List View:
var msg = new Object();

msg.SWEView = Opportunity List View;

msg.SWEApplet = Opportunity List Applet;

msg.Key = oracle123;
Add the following code immediately after the code that you added in Step .
document.getElementById('siebelframeid').contentWindow.postMessage(msg, '*');This code invokes a change in the Siebel Portlet window, so that the requested view or applet will get loaded in the content area.
You can use several SWE commands to display a Siebel portlet in Siebel Open UI. For security reasons, you can use only the GotoView and GetApplet method to call a Siebel portlet from an external application. GotoPage and GotoPageTab are not applicable to Siebel Open UI. You can use the commands in the following table within a Siebel portlet. You cannot use them to call a portlet.
Supported Values Inside External Siebel Application Called from UI Element Inside Siebel Portlet Container Called from Outside Siebel Portlet Container CanInvokeMethod
Yes
Yes
No
ExecuteLogin
Yes. It is not supported for HTTP GET. It is supported through HTTP POST.
Not applicable for this use case.
No. Yes. It is not supported for HTTP GET. It is supported through HTTP POST.
GotoView
Yes. Use only when invoked from the browser address bar by refresh or history navigation.
Yes
Yes
GetApplet
Yes
Yes
Yes
InvokeMethod
Yes
Yes
No
For more information, see Allowing Blocked Methods for HTTP GET Access.
LoadService
Yes
Yes
No
Login
Yes
Not applicable to Siebel Open UI.
Not applicable (use SSO or similar)
Logoff
Yes
Not applicable to Siebel Open UI.
No
ReloadCT
Yes
Yes
No
Additional Considerations
The following list outlines additional considerations when displaying data from Siebel Open UI in external applications:
All parameters passed in a URL need to be URL-encoded. For example, "Account List View" would become "Account+List+View" or "Account%20List%20View". For more information on URL encoding, refer to:
http://en.wikipedia.org/wiki/Percent-encoding
Anonymous sessions are supported in portlet expositions.
Tasks Workflow URLs are also supported in portlets.
SWE Commands are limited to the ones mentioned in Step 4 of Configuring Communications with Siebel Portlets When Hosted Inside iFrame. However, other parameters may be passed in portlet mode to the Siebel server. They will be honored by the server depending on the context.
If the content in the Siebel portlet is bootstrapped to load an applet using the GetApplet method, then the subsequent messaging to the portlet will be limited to whether the applet can be invoked. Operations such as invoking of popups or navigating to other views will not be supported. If these are required, the portlet must be bootstrapped via the GotoView call. For more information, see Configuring Standalone Applets to be Embedded in a Portlet.
Limitations
The following list outlines limitations when displaying data from Siebel Open UI in external applications:
Siebel supports only one portlet in a valid Siebel session. Consuming more than one portlet that is targeted to same Siebel session is not supported.
Opening Siebel Open UI in multiple browser tabs that share the same Siebel session ID is not supported.
Portal communications as described in Configuring Communications with Siebel Portlets When Hosted Inside iFrame, is not supported in any version of Microsoft Internet Explorer. Siebel Open UI uses HTML 5 specified Cross Document Messaging, that is not fully supported in the latest version of Internet Explorer.
Preparing Standalone Applets
A standalone applet is a type of applet that Siebel Open UI can display outside the context of a Siebel CRM view. A predefined view references a business object, a business object references a business component, and an applet also references a business component, but an applet does not reference a business object in a predefined Siebel Open UI configuration. You must modify this configuration so that the applet can work independently of the view. To do this, you configure the applet to directly reference the business object.
To prepare standalone applets
Open Siebel Tools.
For more information, see Using Siebel Tools.
In the Object Explorer, click Applet.
In the Applets list, query the Name property for the applet that Siebel Open UI must display outside of the view.
In the Object Explorer, expand the Applet tree, and then click Applet User Prop.
In the Applet User Properties list, add the following applet user property.
Property Description Name
Enter the following value:
Business Object
Value
Enter the name of the business object that this applet must reference.
Using iFrame Gadgets to Display Siebel CRM Applets in External Applications
The example in this topic describes how to use iFrame gadgets to configure Siebel Open UI to display a Siebel applet in an external application.
To use iFrame gadgets to display Siebel CRM applets in external applications
Do the setup:
Create a LinkedIn profile at the http://www.linked.com Web site.
Create a Gmail profile at the http://www.google.com/ig Web site.
Configure the external applications:
Open a new browser session, navigate to http://www.linked.com/, and then log in to your profile:
Open a new browser tab, navigate to http://www.google.com/ig, and then log in to your gmail profile:
Navigate to http://www.google.com/ig/settings.
Click Add More Gadgets.
In the Search for Gadgets section, enter iFrame Gadget, and then click Search.
In the Search Results for the iFrame Gadget list, click iFrame Gadget.
Click Embed This Gadget.
In the Add This Gadget to Your Webpage page, enter the following URL that Siebel Open UI uses to display the applet. You enter this URL into the Address of Page to Show field:
http://server_name.example.com/siebel/app/callcenter/enu?
SWEUserName=user_name&SWEPassword=user_password&SWECmd=ExecuteLogin&S
WEAC=SWECmd=GotoView&SWEView=view_name&IsPortlet=1&SWEApplet=applet_name
where:
server_name identifies the name of the server.
user_name identifies the user name.
user_password identifies the user password.
view_name identifies the name of the view that contains the applet.
applet_name identifies the applet that Siebel Open UI must display in the external application.
For example, you enter the following URL to display the Opportunity list applet:
http://server_name.example.com/siebel/app/callcenter/enu?
SWEUserName=%48%4B%49%4D&SWEPassword=%48%4B%49%4D&SWECmd=ExecuteLogin
&SWEAC=SWECmd=GotoView&SWEView=Opportunity+List+View&IsPortlet=1&SWEApplet=Oppo
rtunity+List+Applet
This URL configures the gadget to load the Opportunity applet from the server that this URL specifies. It uses an encrypted user name and password, represented as the following:
%48%4B%49%4D
It is strongly recommended that you use Web Single Sign-On (SSO) to handle this user name and password authentication. For more information, see the topic that describes the URL Login in Siebel Security Guide.
Click Preview Changes.
Click Save.
Test your modifications:
Verify that iGoogle refreshes the page and displays the Opportunity list.
Expand the widget to full screen to display the full width of the list.
To choose a LinkedIn contact, use the menu that Google displays on the list header of the screen.
Verify that the Web browser displays the opportunities for the contact that you choose.
Verify that the chosen LinkedIn contact matches a Siebel contact record.
Make sure the Web browser displays a layout that is similar to the following layout.

SWE API
This topic contains reference information about SWE commands, methods, and arguments. The command is described in the following section.
SWE Commands Available in Siebel Open UI
You can use several SWE commands to display a Siebel portlet in the external application. For security reasons, you can use only the GotoView and GetApplet methods to call a Siebel portlet from an external application. GotoPage and GotoPageTab are not applicable in Siebel Open UI. You can use the commands listed in the following table within a Siebel portlet. You cannot use them to call a portlet.
Table SWE Commands Available in Siebel Open UI
| Supported Values | Inside Siebel Application | Called from UI Element Inside Siebel Portlet Container | Called from Outside Siebel Portlet Container |
|---|---|---|---|
CanInvokeMethod |
Yes |
Yes |
No |
ExecuteLogin |
Yes This is not supported for HTTP GET. It is supported through HTTP POST. |
Not applicable for this use case. |
Yes This is not supported for HTTP GET. It is supported through HTTP POST. |
GotoView |
Yes Use only when invoked from the browser address bar by refresh or history navigation. |
Yes |
Yes |
GetAplet |
Yes |
Yes |
Yes |
InvokeMethod |
Yes |
Yes |
No |
LoadService |
Yes |
Yes |
No |
Login |
Yes |
Not applicable. |
Not applicable (use SSO or similar). |
Logoff |
Yes |
Not applicable. |
No |
ReloadCT |
Yes |
Yes |
No |
Web Engine HTTP TXN Business Service
This chapter describes the Web Engine HTTP TXN Business Service. It contains the following information:
About the Web Engine HTTP TXN Business Service
HTTP provides several means to allow Web servers to obtain information from the browser. The most familiar example is when a user enters data into a form on a Web page and the data is sent to the Web server, which can access the value of each form field. This example illustrates sending form field parameters to the Web server with a POST method. In general, a browser can send cookies, headers, query string parameters, and form field parameters to the Web server. Web servers can also respond to the browser with cookies and custom headers. The Web Engine HTTP TXN Business Service allows Siebel Business Applications to retrieve or set cookies, headers, and query string and form field parameters.
The Web Engine HTTP TXN Business Service can be invoked by scripts or by workflow. The inbound HTTP request to the Siebel Web Engine (SWE) is parsed and the business service returns property sets containing cookies, headers, or parameters. In addition, server variables, which are not a part of the HTTP request header, can also be retrieved. The business service can also set a custom cookie or header in the HTTP response header generated by the SWE. The business service gives complete control over the request header received and the response header sent by the SWE.
For more information, see the following topics:
Web Engine HTTP TXN Business Service API
The following table lists the methods exposed by the Web Engine HTTP TXN Business Service.
Table Web Engine HTTP TXN Business Service API
| Method | Description | Parameters |
|---|---|---|
GetAllRequestCookies |
Retrieves all request cookies sent from the client to the server. |
InputArguments: Ignored. OutputArguments: Property Set hierarchy. Each cookie is a child Property Set with the TYPE property set to the cookie name. |
GetAllRequestHeaders |
Retrieves all request headers sent from the client to the server. |
InputArguments: Ignored. OutputArguments: Property Set containing the HTTP Parameter name-value pairs. |
GetAllRequestParameters |
Retrieves all request parameters sent from the client to the server. |
InputArguments: Ignored. OutputArguments: Property Set containing the HTTP Parameter name-value pairs. |
GetAllResponseCookies |
Retrieves all response cookies sent from the server to the client. |
InputArguments: Ignored. OutputArguments: Property Set hierarchy. Each cookie is a child Property Set with the TYPE property set to the cookie name. |
GetAllResponseHeaders |
Retrieves all response headers sent from the server to the client. |
InputArguments: Ignored. OutputArguments: Property Set containing the HTTP Header name-value pairs. |
GetAllServerVariables |
Retrieves all server variables. |
InputArguments: Ignored. OutputArguments: Property Set containing the Server Variable name-value pairs. |
GetClientCertificate |
Retrieves the client certificate info. |
InputArguments: Ignored. OutputArguments: Property Set containing certificate name-value pairs. Currently only returns Common Name (CN) property of the certificate. |
GetRequestCookies |
Retrieves the request cookies named in InputArguments. |
InputArguments: Property Set containing the cookie names to retrieve. OutputArguments: Property Set hierarchy. Each cookie is a child Property Set with the TYPE property set to the cookie name. |
GetRequestHeaders |
Retrieves the request headers named in InputArguments. |
InputArguments: Property Set containing the header names to retrieve. OutputArguments: Property Set containing the HTTP Header name-value pairs. |
GetRequestInfo |
Retrieves the request Web Session, Headers, Cookies, Parameters and Client Certificate information in one call. |
InputArguments: Ignored OutputArguments: Property Set hierarchy. Each section is a child Property Set with the TYPE property set to 'Headers', 'Cookies', 'Parameters' or 'ClientCertificate'. The Web Session information is simply stored as properties of OutputArguments. |
GetRequestParameters |
Retrieves the request parameters named in InputArguments. |
InputArguments: Property Set containing the parameter names to retrieve. OutputArguments: Property Set containing the HTTP Parameter name-value pairs. |
GetResponseCookies |
Retrieves the response cookies named in InputArguments. |
InputArguments: Property Set containing the cookie names to retrieve. OutputArguments: Property Set hierarchy. Each cookie is a child Property Set with the TYPE property set to the cookie name. |
GetResponseHeaders |
Retrieves the response headers named in InputArguments. |
InputArguments: Property Set containing the header names to retrieve. OutputArguments: Property Set containing the HTTP Header name-value pairs. |
GetResponseInfo |
Retrieves the response Headers and Cookies in one call. |
InputArguments: Ignored. OutputArguments: Property Set hierarchy. Each section is a child Property Set with the TYPE property set to 'Headers' or 'Cookies'. Content Type and Status are simply stored as properties of OutputArguments. |
GetServerVariables |
Retrieves the server variables named in InputArguments. |
InputArguments: Property Set containing the server variable names to retrieve. OutputArguments: Property Set containing the Server Variable name-value pairs. |
GetWebSessionInfo |
Retrieves the client's Web session information. |
InputArguments: Ignored. OutputArguments: Property Set containing the Web session name-value pairs—SessionName; Cookie Name; SessionId; Web Session ID; SessionFrom (Value is 'URL' or 'COOKIE'). |
SetResponseCookies |
Sets the response cookies to the values in InputArguments. |
InputArguments: Property Set hierarchy. Each cookie is a child Property Set with the TYPE property set to the cookie name. The PERSISTENT property determines whether the cookie persists between sessions. If the value is Y, then the cookie persists between browser sessions. Otherwise, the cookie exists for one session at a time. OutputArguments: Ignored. |
SetResponseHeaders |
Sets the response headers to the values in InputArguments. |
InputArguments: Property Set containing the HTTP Header name-value pairs. OutputArguments: Ignored. |
SetResponseInfo |
Sets the response Headers and Cookies in one call. |
InputArguments: Property Set hierarchy. Each section is a child Property Set with the TYPE property set to 'Headers' or 'Cookies'. Content Type and Status are simply stored as properties of InputArguments. OutputArguments: Ignored. |
Example of Using Web Engine HTTP TXN Business Service
To invoke each method of the Web Engine HTTP TXN Business Service and write the results to a text file, use the following two procedures:
Adding Sample Code for Displaying Results of Using the Business Service
The following procedure shows how to add sample code for displaying results of the Web Engine HTTP TXN Business Service.
To add sample code for displaying results of Web Engine HTTP TXN Business Service
In Oracle’s Siebel Tools, navigate to the desired Applet object, in the Object Explorer.
Lock the project, if required.
Right-click and select the Edit Server Script option.
Add the following three functions, individually to the declarations section:
WebApplet_OutputChildPropertySets
WebApplet_OutputProperties
WebApplet_OutputPropertySet
Sample Code Functions
Sample code for the WebApplet_OutputChildPropertySets Function:
function WebApplet_OutputChildPropertySets(oPropertySet, nLevel, fp)
{
var oChildPropSet;
var nChild = 0;
Clib.fputs('-------------------------------------\n',fp);
Clib.fputs('CHILD PROPERTY SETS\n',fp);
Clib.fputs('-------------------------------------\n',fp);
if ( oPropertySet.GetChildCount() == 0 )
{
Clib.fputs('(NONE)\n',fp);
}
else
{
for ( nChild = 0; ( nChild <= oPropertySet.GetChildCount() - 1 ) ; nChild++ )
{
oChildPropSet = oPropertySet.GetChild(nChild);
WebApplet_OutputPropertySet (oChildPropSet, nLevel+1, fp);
}
}
}
Sample code for the WebApplet_OutputProperties Function:
function WebApplet_OutputProperties(oPropertySet, nLevel , fp )
{
var strName;
var strValue;
Clib.fputs('-------------------------------------\n',fp);
Clib.fputs('PROPERTIES\n',fp);
Clib.fputs('-------------------------------------\n',fp);
if (oPropertySet.GetPropertyCount() == 0 )
{
Clib.fputs('(NONE)\n',fp);
}
else
{
strName = oPropertySet.GetFirstProperty();
while ( strName != '')
{
Clib.fputs(strName + ' : ' + oPropertySet.GetProperty(strName) + '\n' ,fp);
strName = oPropertySet.GetNextProperty();
}
}
}
Sample code for the WebApplet_OutputPropertySet Function:
function WebApplet_OutputPropertySet(oPropertySet, nLevel, fp )
{
Clib.fputs('\n',fp);
Clib.fputs('-------------------------------------\n',fp);
Clib.fputs('START' + ' ',fp);
Clib.fputs('LEVEL : ' + nLevel + '\n', fp);
Clib.fputs('-------------------------------------\n',fp);
Clib.fputs('TYPE  : ' + oPropertySet.GetType() + '\n',fp);
Clib.fputs('VALUE : ' + oPropertySet.GetValue() + '\n',fp);
WebApplet_OutputProperties(oPropertySet, nLevel, fp);
WebApplet_OutputChildPropertySets(oPropertySet, nLevel, fp);
Clib.fputs('-------------------------------------\n',fp);
Clib.fputs('END' + ' ',fp);
Clib.fputs('LEVEL : ' + nLevel + '\n',fp);
Clib.fputs('-------------------------------------\n',fp);
}
Adding Sample Code for Invoking Methods of the Business Service
The following procedure shows how to add sample code for invoking methods of the Web Engine HTTP TXN Business Service.
To add sample code for invoking methods of Web Engine HTTP TXN Business Service
Add the code from Sample Code for Invoking Methods of Web Engine HTTP TXN Business Service to the WebApplet_InvokeMethod event.
Compile the project.
Start the Siebel application.
Navigate to the applet where the server script has been placed.
Perform an action on the applet that invokes a SWE method (for example, change the record or create a new record).
The code generates a text file in the
bindirectory where the Siebel application is installed containing results of each method of the Web Engine HTTP TXN Business Service.
Sample Output
The following is an excerpt of the resulting text file.
=====================================
WebApplet InvokeMethod event:
=====================================
=====================================
Method: GetAllRequestCookies
=====================================
-------------------------------------
START LEVEL : 0
-------------------------------------
TYPE  : COOKIES
VALUE :
-------------------------------------
PROPERTIES
-------------------------------------
(NONE)
-------------------------------------
CHILD PROPERTY SETS
-------------------------------------
-------------------------------------
START LEVEL : 1
-------------------------------------
TYPE  : SWEUAID
VALUE : 1
-------------------------------------
PROPERTIES
-------------------------------------
Max-Age : -1
Domain :
Path :
-------------------------------------
CHILD PROPERTY SETS
-------------------------------------
(NONE)
-------------------------------------
END LEVEL : 1
-------------------------------------
-------------------------------------
END LEVEL : 0
-------------------------------------
=====================================
Method: GetAllRequestHeaders
=====================================
-------------------------------------
START LEVEL : 0
-------------------------------------
TYPE  : HEADERS
VALUE :
-------------------------------------
PROPERTIES
-------------------------------------
HOST : <host computer name>
CACHE-CONTROL : no-cache
CONNECTION : Keep-Alive
COOKIE : SWEUAID=1
USER-AGENT : Mozilla/4.0 (compatible; MSIE 6.0; Windows NT 5.1; Q312461; SV1; .NET
CLR 1.1.4322)
CONTENT-TYPE : application/x-www-form-urlencoded
ACCEPT-ENCODING : deflate
CONTENT-LENGTH : 348
-------------------------------------
CHILD PROPERTY SETS
-------------------------------------
(NONE)
-------------------------------------
END LEVEL : 0
-------------------------------------
=====================================
Method: GetAllRequestParameters
=====================================
-------------------------------------
START LEVEL : 0
-------------------------------------
TYPE  : PARAMETERS
VALUE :
-------------------------------------
PROPERTIES
-------------------------------------
SWEActiveView : Account List View
SWERowIds :
SWEP :
SWESP : false
SWECmd : InvokeMethod
SWEMethod : PositionOnRow
SWER : 1
SWEControlClicked : 0
SWEIgnoreCtrlShift : 0
SWEVI :
SWEActiveApplet : Account List Applet
SWERPC : 1
SWEReqRowId : 1
SWEView : Account List View
SWEC : 3
SWERowId : 1-6
SWEShiftClicked : 0
SWETS : 1118939959734
SWEApplet : Account List Applet
-------------------------------------
CHILD PROPERTY SETS
-------------------------------------
(NONE)
-------------------------------------
END LEVEL : 0
-------------------------------------
Sample Code for Invoking Methods of Web Engine HTTP TXN Business Service
This topic contains the sample code for invoking the methods of the Web Engine HTTP TXN Business Service and writing the results to a text file. For more information, see Example of Using Web Engine HTTP TXN Business Service.
Add the following sample code to the WebApplet_InvokeMethod event:
function WebApplet_InvokeMethod (MethodName)
{
var fp = Clib.fopen('testfile.txt','a');
if ( fp == null )
{
TheApplication().RaiseErrorText(" ERROR Opening File ")
}
else
{
var oBS = TheApplication().GetService('Web Engine HTTP TXN');
var Inputs = TheApplication().NewPropertySet();
var Outputs = TheApplication().NewPropertySet();
var Headers = TheApplication().NewPropertySet();
var Cookies = TheApplication().NewPropertySet();
var tmpCookie = TheApplication().NewPropertySet();

Clib.fputs('=====================================\n',fp);
Clib.fputs('WebApplet InvokeMethod event:\n',fp);
Clib.fputs('=====================================\n',fp);

Clib.fputs('\n',fp);
Clib.fputs('=====================================\n',fp);
Clib.fputs('Method: GetAllRequestCookies\n',fp);
Clib.fputs('=====================================\n',fp);

Inputs.Reset();
Outputs.Reset();
oBS.InvokeMethod ( 'GetAllRequestCookies', Inputs, Outputs);
WebApplet_OutputPropertySet(Outputs, 0, fp);

Clib.fputs('\n',fp);
Clib.fputs('=====================================\n',fp);
Clib.fputs('Method: GetAllRequestHeaders\n',fp);
Clib.fputs('=====================================\n',fp);

Inputs.Reset();
Outputs.Reset();
oBS.InvokeMethod ('GetAllRequestHeaders', Inputs, Outputs);
WebApplet_OutputPropertySet(Outputs, 0, fp);

Clib.fputs('\n',fp);
Clib.fputs('=====================================\n',fp);
Clib.fputs('Method: GetAllRequestParameters\n',fp);
Clib.fputs('=====================================\n',fp);

Inputs.Reset();
Outputs.Reset();
oBS.InvokeMethod ('GetAllRequestParameters', Inputs, Outputs);
WebApplet_OutputPropertySet(Outputs, 0, fp);

Clib.fputs('\n',fp);
Clib.fputs('=====================================\n',fp);
Clib.fputs('Method: GetAllResponseCookies\n',fp);
Clib.fputs('=====================================\n',fp);

Inputs.Reset();
Outputs.Reset();
oBS.InvokeMethod ('GetAllResponseCookies', Inputs, Outputs)
WebApplet_OutputPropertySet(Outputs, 0, fp);

Clib.fputs('\n',fp);
Clib.fputs('=====================================\n',fp);
Clib.fputs('Method: GetAllResponseHeaders\n',fp);
Clib.fputs('=====================================\n',fp);

Inputs.Reset();
Outputs.Reset();
oBS.InvokeMethod ('GetAllResponseHeaders', Inputs, Outputs);
WebApplet_OutputPropertySet(Outputs, 0, fp);

Clib.fputs('\n',fp);
Clib.fputs('=====================================\n',fp);
Clib.fputs('Method: GetAllServerVariables\n',fp);
Clib.fputs('=====================================\n',fp);

Inputs.Reset();
Outputs.Reset();
oBS.InvokeMethod ('GetAllServerVariables', Inputs, Outputs);
WebApplet_OutputPropertySet(Outputs, 0, fp);

Clib.fputs('\n',fp);
Clib.fputs('=====================================\n',fp);
Clib.fputs('Method: GetRequestCookies\n',fp);
Clib.fputs('=====================================\n',fp);

Inputs.Reset();
Outputs.Reset();

Inputs.SetProperty ('MY-COOKIE', '');
Inputs.SetProperty ('TestCookie', '');
Inputs.SetProperty ('Test1Cookie', '');

oBS.InvokeMethod ('GetRequestCookies', Inputs, Outputs);
WebApplet_OutputPropertySet(Outputs, 0, fp);

Clib.fputs('\n',fp);
Clib.fputs('=====================================\n',fp);
Clib.fputs('Method: GetRequestHeaders\n',fp);
Clib.fputs('=====================================\n',fp);

Inputs.Reset();
Outputs.Reset();

Inputs.SetProperty ('MyHEADER', '');
Inputs.SetProperty ('MY_TEST', '');
Inputs.SetProperty ('CONTENT-TYPE', '');
Inputs.SetProperty ('CONTENT-LENGTH', '');

oBS.InvokeMethod ('GetRequestHeaders', Inputs, Outputs);
WebApplet_OutputPropertySet(Outputs, 0, fp);

Clib.fputs('\n',fp);
Clib.fputs('=====================================\n',fp);
Clib.fputs('Method: GetRequestInfo\n',fp);
Clib.fputs('=====================================\n',fp);

Inputs.Reset();
Outputs.Reset();

oBS.InvokeMethod ('GetRequestInfo', Inputs, Outputs);
WebApplet_OutputPropertySet(Outputs, 0, fp);

Clib.fputs('\n',fp);
Clib.fputs('=====================================\n',fp);
Clib.fputs('Method: GetRequestParameters\n',fp);
Clib.fputs('=====================================\n',fp);

Inputs.Reset();
Outputs.Reset();

Inputs.SetProperty ('TestQstr', '');
Inputs.SetProperty ('SWEActiveView', '');
Inputs.SetProperty ('SWECmd', '');
Inputs.SetProperty ('SWEMethod', '');
Inputs.SetProperty ('TestParam', '');

oBS.InvokeMethod ('GetRequestParameters', Inputs, Outputs);
WebApplet_OutputPropertySet(Outputs, 0, fp);

Clib.fputs('\n',fp);
Clib.fputs('=====================================\n',fp);
Clib.fputs('Method: GetResponseCookies\n',fp);
Clib.fputs('=====================================\n',fp);

Inputs.Reset();
Outputs.Reset();

Inputs.SetProperty ('My-Test-COOKIE', '');
Inputs.SetProperty ('_sn', '');
oBS.InvokeMethod ('GetResponseCookies', Inputs, Outputs);
WebApplet_OutputPropertySet(Outputs, 0, fp);

Clib.fputs('\n',fp);
Clib.fputs('=====================================\n',fp);
Clib.fputs('Method: GetResponseHeaders\n',fp);
Clib.fputs('=====================================\n',fp);

Inputs.Reset();
Outputs.Reset();

Inputs.SetProperty ('Content-Language', '');
Inputs.SetProperty ('MyHeader', '');

oBS.InvokeMethod ('GetResponseHeaders', Inputs, Outputs);
WebApplet_OutputPropertySet(Outputs, 0, fp);

Clib.fputs('\n',fp);
Clib.fputs('=====================================\n',fp);
Clib.fputs('Method: GetResponseInfo\n',fp);
Clib.fputs('=====================================\n',fp);

Inputs.Reset();
Outputs.Reset();

oBS.InvokeMethod ('GetResponseInfo', Inputs, Outputs);
WebApplet_OutputPropertySet(Outputs, 0, fp);

Clib.fputs('\n',fp);
Clib.fputs('=====================================\n',fp);
Clib.fputs('Method: GetServerVariables\n',fp);
Clib.fputs('=====================================\n',fp);

Inputs.Reset();
Outputs.Reset();

Inputs.SetProperty ('AUTH-USER-ID', '');
Inputs.SetProperty ('SERVER-NAME', '');

oBS.InvokeMethod ('GetServerVariables', Inputs, Outputs);
WebApplet_OutputPropertySet(Outputs, 0, fp);

Clib.fputs('\n',fp);
Clib.fputs('=====================================\n',fp);
Clib.fputs('Method: GetWebSessionInfo\n',fp);
Clib.fputs('=====================================\n',fp);

Inputs.Reset();
Outputs.Reset();

oBS.InvokeMethod ('GetWebSessionInfo', Inputs, Outputs);
WebApplet_OutputPropertySet(Outputs, 0, fp);

Clib.fputs('\n',fp);
Clib.fputs('=====================================\n',fp);
Clib.fputs('Method: SetResponseCookies\n',fp);
Clib.fputs('=====================================\n',fp);

Inputs.Reset();
Outputs.Reset();

tmpCookie = null;
tmpCookie = TheApplication().NewPropertySet();

tmpCookie.SetType ('My_Test_Cookie');
tmpCookie.SetValue ('Cookie Value for My_Test_Cookie');
tmpCookie.SetProperty ('Max-Age', '23434343');
tmpCookie.SetProperty ('Domain', '.example.com');
tmpCookie.SetProperty ( 'Path', 'eapps/test/cookie/path');

Inputs.AddChild (tmpCookie);

tmpCookie = null;
tmpCookie = TheApplication().NewPropertySet();

tmpCookie.SetType ('Another_Cookie');
tmpCookie.SetValue ('Cookie Value for Another_Cookie');
tmpCookie.SetProperty ('Max-Age', '23434343');
tmpCookie.SetProperty ('Domain', 'esales.example.com');
tmpCookie.SetProperty ('Path', 'esales/cookie/path');

Inputs.AddChild (tmpCookie);

oBS.InvokeMethod ('SetResponseCookies', Inputs, Outputs);
Clib.fputs('------------------------------------\n',fp);
Clib.fputs('Input Cookies\n',fp);
Clib.fputs('------------------------------------\n',fp);
WebApplet_OutputPropertySet(Inputs, 0, fp);

oBS.InvokeMethod ('GetAllResponseCookies', Inputs, Outputs);
Clib.fputs('------------------------------------\n',fp);
Clib.fputs('Output Cookies\n',fp);
Clib.fputs('------------------------------------\n',fp);
WebApplet_OutputPropertySet(Outputs, 0, fp);

Clib.fputs('\n',fp);
Clib.fputs('=====================================\n',fp);
Clib.fputs('Method: SetResponseHeaders\n',fp);
Clib.fputs('=====================================\n',fp);

Inputs.Reset();
Outputs.Reset();

Inputs.SetProperty ('MyHeader', 'THIS is MyHeader');

oBS.InvokeMethod ('SetResponseHeaders', Inputs, Outputs);
Clib.fputs('------------------------------------\n',fp);
Clib.fputs('Input Headers\n',fp);
Clib.fputs('------------------------------------\n',fp);
WebApplet_OutputPropertySet(Inputs, 0, fp)

oBS.InvokeMethod ('GetAllResponseHeaders', Inputs, Outputs);
Clib.fputs('------------------------------------\n',fp);
Clib.fputs('Output Headers\n',fp);
Clib.fputs('------------------------------------\n',fp);
WebApplet_OutputPropertySet(Outputs, 0, fp);

Clib.fputs('\n',fp);
Clib.fputs('=====================================\n',fp);
Clib.fputs('Method: SetResponseInfo\n',fp);
Clib.fputs('=====================================\n',fp);

Inputs.Reset();
Outputs.Reset();
Headers.Reset();
Cookies.Reset();

Headers.SetType ('HEADERS');
Headers.SetProperty ('ABC_RESPONSE_HEADER1', 'RESPONSE_HEADER1 Value');
Headers.SetProperty ('ABC_RESPONSE_HEADER2', 'RESPONSE_HEADER2 Value');
Headers.SetProperty ('ABC_RESPONSE_HEADER3', 'RESPONSE_HEADER3 Value');
Headers.SetProperty ('ABC_RESPONSE_HEADER4', 'RESPONSE_HEADER4 Value');
Inputs.AddChild( Headers);

Cookies.SetType('COOKIES');

tmpCookie = null;
tmpCookie = TheApplication().NewPropertySet();

tmpCookie.SetType ('My_Test_Cookie2');
tmpCookie.SetValue ( 'Cookie Value for My_Test_Cookie2');
tmpCookie.SetProperty ( 'Max-Age', '23434343');

Cookies.AddChild (tmpCookie);

tmpCookie = null;
tmpCookie = TheApplication().NewPropertySet();

tmpCookie.SetType ('Another_Cookie2');
tmpCookie.SetValue ('Cookie Value for Another_Cookie2');
tmpCookie.SetProperty ('Max-Age', '23434343');

Cookies.AddChild (tmpCookie);

Inputs.AddChild (Cookies);

oBS.InvokeMethod ('SetResponseInfo', Inputs, Outputs);
Clib.fputs('------------------------------------\n',fp);
Clib.fputs('Input Info\n',fp);
Clib.fputs('------------------------------------\n',fp);
WebApplet_OutputPropertySet(Inputs, 0, fp);

oBS.InvokeMethod ('GetResponseInfo', Inputs, Outputs);
Clib.fputs('------------------------------------\n',fp);
Clib.fputs('Output Info\n',fp);
Clib.fputs('------------------------------------\n',fp);
WebApplet_OutputPropertySet(Outputs, 0, fp);

Clib.fclose(fp);
}
}