5Presentations
Presentations
This chapter includes information about administering and using Siebel Presentations. It includes the following topics:
About Siebel Presentations
Siebel Presentations enables sales representatives to create presentations using templates that you create in Microsoft PowerPoint.
Traditionally, sales representatives create presentations by starting with a past presentation and then modifying it for the current prospect. Sales representatives must not only change such basic information as the customer name, but also possibly restructure the presentation so that it fits the new prospect’s unique needs. For example, the original presentation might focus on price, but the new presentation might focus on other decision criteria, such as speed or extra functionality.
After the administrator creates the correct templates, the sales representative can click one button to build the correct presentation for a specific account or opportunity. Siebel Presentations uses information that sales representatives enter in the early stages of an opportunity to create the presentation.
Sales representatives can add deal-specific information to the presentation without worrying about formatting or presentation. Using the Presentation Library, sales representatives can find any additional information and automatically insert it into the presentation.
System Requirements for Siebel Presentations
Certain system requirements must be met to use Siebel Presentations. For information about the Documentation Server and other software that is required for Siebel Presentations, see Document Server.
System Requirements for the Siebel Web Client
Before you can use Siebel Presentations, you must meet the system requirements for the Siebel Web Client.
To meet the system requirements for the Siebel Web Client:
Install on the server, such as a Siebel Server and a Web Server, all of the components that are required to use the Siebel application.
Install the Document Server on one or more Windows computers.
Install Microsoft Office on the Document Server computer.
Siebel Presentations uses the Document Server. The Document Server is a component of the Siebel Server that lets users on the Web work with Microsoft PowerPoint slides on the server. For more information about installing the components required to use the Siebel application, see Siebel Installation Guide for the operating system you are using.
Before employees or partners can use Siebel Presentations, they must have the following:
A Web browser to use the Siebel application. For information about the Web browsers that Siebel applications support, see Siebel System Requirements and Supported Platforms on Oracle Technology Network.
Note: For Siebel CRM product releases 8.1.1.9 and later and for 8.2.2.2 and later, the system requirements and supported platform certifications are available from the Certifications tab on My Oracle Support. For information about Certifications, see article 1492194.1 (Article ID) on My Oracle Support.(Optional) Microsoft Office to edit presentations.
System Requirements for the Siebel Remote Web Client
Siebel Presentations is available for the Siebel Remote Web Client and the Siebel Web Client. The user interface for Presentations is identical in the Siebel Remote Web Client and the Siebel Web Client.
Siebel Remote Web Client processes requests to generate presentations locally so field sales representatives can generate presentations while traveling. To run Siebel Presentations on the Siebel Remote Web Client, Microsoft Office must be installed on the same computer as the Siebel Remote Web Client.
Process of Creating Presentation Templates
To create presentation templates, perform the following tasks:
Creating Presentation Template Slides in Microsoft PowerPoint. To create the slides for the template, you must write the content and insert bookmarks for such variables as company, contact name, address.
Creating Records for Presentation Templates. Use the Siebel application to create a single record for the template.
Defining Presentation Template Sections. Specify the sections the presentation contains.
Adding Components to Presentation Template Sections. Specify the components each section contains.
Using Conditions in Presentation Templates. You can add conditions to specify that sections or components are included in the presentation only under certain circumstances.
Defining Presentation Field Mappings. Specify the Siebel objects that correspond to each bookmark in the Microsoft PowerPoint component slides. You also specify the name of this mapping in the template record.
Associating Field Mappings with Presentation Templates. Associate the mapping with a template to make it apply to all the components in that template.
Creating the Presentation Library. Create a separate library of slides that sales representatives can draw upon to customize their presentations. You can perform this optional step at any time.
Enabling Users to Display Presentations in HTML Format. Update settings on the Document Server to enable end users to view presentations in HTML format.
Creating Presentation Template Slides in Microsoft PowerPoint
The first step for creating presentation templates is to create slides in Microsoft PowerPoint. The following image shows these slides consist of one background slide and multiple component slides (such as Product Description, Corporate Overview, Benefit, and Competitive Landscape).
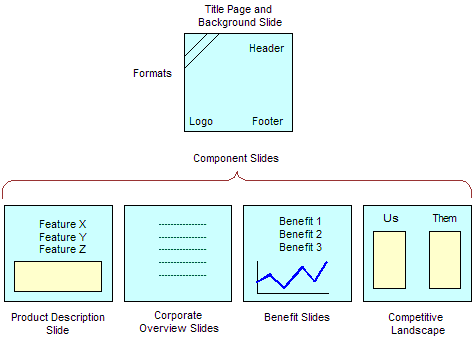
The component slides in the image are examples. You can use other component slides, such as an agenda, and you can exclude some of these component slides, such corporate overview. However, a template must have a background slide and one or more component slides. For information about the versions of Microsoft PowerPoint that are supported, see Siebel System Requirements and Supported Platforms on Oracle Technology Network.
Presentations can use fields from only one business object. If you want to include additional fields, you must use Siebel Tools to add the business components that include these fields to the business object that is the basis of the presentation.
This task is a step in Process of Creating Presentation Templates.
Planning Presentation Templates
Before you create the slides in Microsoft PowerPoint, you must determine the format of the presentation and the information to include in the presentation.
Begin by reviewing previous successful presentations to see the sections they contain. For example, do they all contain an agenda, an executive overview, and a product summary? Also, review the current slides you have on hand, and note the customer questions these slides answer. Then determine how to organize the information. What topics are standard across all presentations? What topics are specific to certain presentations? What is the best order for the parts of the presentation? Finally, determine the fields to insert to customize the presentation (for example, contact name, account name, and industry). You use this information to create bookmarks in the Microsoft PowerPoint slides.
Creating a Background Slide
After you plan a template, you can create the presentation background slide for the template. This Microsoft PowerPoint slide serves as the title slide and also defines the layout and formatting of the entire presentation. This background slide can contain a company logo, special colors, background designs, headers, and footers.
To create a background slide
Create a new slide in Microsoft PowerPoint.
Because this slide also serves as the title slide, select the title slide layout template, and enter the title of the presentation.
Set up headers, footers, fonts, background colors, and other layout options for the template.
For more information about completing these tasks, see the online help for Microsoft PowerPoint.
Save and close the file.
Choose a name that uses only alphanumeric characters, and use the PPT file extension for Microsoft PowerPoint.
Creating Component Slides for Presentation Templates
After you create the background slide for the template, you can create the component slides. A component slide is a Microsoft PowerPoint slide that includes standard text, pictures, bulleted information, and personalized data.
To create a component slide, you enter the standard text in a Microsoft PowerPoint presentation and then create bookmarks, or Microsoft PowerPoint placeholders for custom data. When a sales representative generates a presentation, these bookmarks are replaced with data from the Siebel application.
To create a component slide with bookmarks in Microsoft PowerPoint
Create a new slide in Microsoft PowerPoint.
Enter the standard text, pictures, bulleted information, and so on for the component slide.
Add bookmarks to the locations in the component slide to which you want to insert Siebel field data by completing the following steps:
Place the cursor where you want to create a bookmark.
Enter the following text:
[[“name of bookmark”]]For example, to create a bookmark for the company name, enter the following text:
[[Company]]
Note the names of the bookmarks because you need these names when you map the bookmarks to Siebel field names.
For more information, see Defining Presentation Field Mappings.
Save the component slide as a PPT file.
Creating Records for Presentation Templates
After you create the template slides in Microsoft PowerPoint, you can use Siebel Presentations to create a record for the presentation template.
This task is a step in Process of Creating Presentation Templates.
To create a record for a presentation template
Navigate to the Administration - Document screen, then the Presentation Templates view.
In the Templates list, create a new record, and complete the necessary fields.
Some fields are described in the following table.
Field Comments Name
Type a name for the template.
Default
Select the check box to indicate this template is the default presentation template. When a user clicks Auto Presentation, Siebel Presentations uses the default template if there are no decision issues that match the theme of a presentation. You can select only one Opportunity Presentation default and one Account Presentation default.
Category
Select one of the following types of templates:
Opportunity Presentation. These templates are available only when you are working with Opportunities.
Account Presentation. These templates are available only when you are working with Accounts.
Mapping Name
Leave this field blank until you create a mapping. Then select the mapping name that indicates the group of bookmark fields to use with this template.
Template File Name
Select the Microsoft PowerPoint template slide to attach the slide to the template. (This slide is the background slide.)
Theme
Select a theme if you want to associate the template with a decision issue. When you assign the presentation template a theme, you associate it with a decision issue that is important for the opportunity. When a presentation theme matches the number one decision issue for the current opportunity, Siebel Presentations automatically selects the correct template when the user clicks Auto Presentation. Users can also select a theme template.
Because accounts do not relate to decision issues, the Theme field is not applicable for Account Presentation templates. It applies only to Opportunity Presentation templates.
Description
Type a description of the template.
Language
Select the language in which the template is written.
Locale
Select the locale. Only the templates specific to this locale appear.
Defining Presentation Template Sections
After you create the Microsoft PowerPoint slides and a record for the template, define the structure of the presentation template. A presentation is made up of sections that divide and subdivide the presentation. A single section might contain multiple components or a single component.
The type of a section depends on the nature of the data it contains. For example, file sections contain slides, chart sections reference Siebel charts, and so on.
You define the structure of the presentation template by creating sections in the Presentation Templates view of the Administration - Document screen. Sections are associated with the Template record you create for the template. You must create high-level sections. Optionally, you can add subsections to these sections. The presentation structure can include multiple levels of sections because a subsection can contain other subsections.
This task is a step in Process of Creating Presentation Templates.
Creating High-Level Sections for Presentation Templates
You must create High-level sections to insert into presentation templates.
To create a high-level section
Navigate to the Administration - Document screen, then the Presentation Templates view.
Navigate to the Sections list by completing the following steps:
In the Template explorer, click the arrow icon next to the template name folder.
Click the arrow icon next to the Sections folder under the template name folder.
In the Sections list, create a new record, and complete the fields described in the following table.
Field Comments Name
Type the name of the section. The section name is the title of the slide for some section types, such as Bullet Slide.
Sequence
Type a number to indicate the order in which the section appears in the presentation.
In the Section Type field, select the type of section.
The available section types are described in the following table.
Type Comments Bullet Slide
Creates a slide and inserts a list of Siebel data in bullet format. This section name is used as the slide title.
Chart
Creates a slide and inserts a Siebel chart. The chart is automatically centered, and you can change x, y, and z axes in the chart.
File
Inserts the content of files in PPT, DOC, or TXT format if you use Microsoft PowerPoint. For text, creates a slide and inserts the text.
Locator
Inserts slides or text (PPT slides or TXT files) from the Siebel Encyclopedia. The Add Sales Tools dialog box displays the content in the Siebel Encyclopedia. For more information, see Adding Components to Presentation Template Sections.
For example, Siebel Presentations can dynamically insert slides from the Siebel Encyclopedia that relate to the products of interest for an opportunity. If you want the to dynamically insert slides related to the products for the opportunity, use a locator section type. The file types must be PPT, TXT, or RTF. If more than one slide meets the locator criteria you specify, Siebel Presentations inserts each slide.
Organization Chart
Creates a slide and inserts organization charts for the account or opportunity associated with the template. Charts are automatically centered in the presentation.
Table
Creates a slide and inserts Siebel application data into a table format. You select fields to include, the sequence of the fields, and the column lengths. Tables are automatically centered in the presentation. For a table section type, you can also create a related table section. For more information, see Adding Related Table Subsections to Presentation Templates.
Two-Column Slide
Creates a slide that inserts two subsections next to each other. For example, you can show a list of key product features (a Bullet Slide section) next to a picture of the product (a File section). The two subsections can be any of the other section types.
For this section type, you create two subsections under the section. For each subsection, complete the fields appropriate for that type of section. For example, if you want to show a Chart section next to a Table section, create a subsection of the Chart section type (and complete the Chart-related fields) and create a subsection of the Table type (and complete the Table-related fields).
Complete the fields applicable to the section type.
For the Bullet Slide section type, complete the field described in the following table.
Field Comments Condition
Type the condition, if any, to apply to the section. For information about conditions, see Using Conditions in Presentation Templates.
Business Object
Select the Siebel business object from which the bullet slide information is taken. The Business Objects dialog box shows all available Siebel business objects. For example, to include a bullet list of products with the quantity and ship date for an opportunity, select Opportunity.
For the Chart section type, complete the fields described in the following table.
Field Comments Condition
Type the condition, if any, to apply to the section. For information about conditions, see Using Conditions in Presentation Templates.
Business Object
Select the Siebel business object from which the chart information is taken. The Business Object list shows all available Siebel business objects. For example, select Opportunity.
Chart or Table Name
Select the name of the chart applet. For example, select Opportunity Chart Applet - Current Opportunity Analysis.
To display records from a multi-value group (MVG), select a list applet, not an MVG applet. If the list applet that you want is not available, use Siebel Tools to create the list applet for the child business component in the MVG. You do not need to associate this new list applet with a view.
Search Spec
Type the search criteria to use to restrict data for the chart. For example, if you want to include revenue greater then $500,000, type Revenue > 500000.
Category
Type the option to use for the X-axis in charts that provide multiple X-axis options. For example, in the Lead Analysis by Rep chart, type Sales Representative or Quality.
Function
Type the option to use for the Y-axis in charts that provide multiple Y-axis options. For example, in the Lead Analysis by Rep chart, type Number of Opportunities, Opportunity Revenue, or Average Opportunity Revenue.
Series
Type the option to use for the Z-axis in charts that provide multiple Z-axis options.
For the File section type, complete the field described in the following table.
Field Comments Condition
Type the condition, if any, to apply to the section. For information about conditions, see Using Conditions in Presentation Templates.
For the Locator section type, complete the fields described in the following table.
Field Comments Condition
Type the condition, if any, to apply to the section. For information about conditions, see Using Conditions in Presentation Templates.
Information Retrieval Method
Select the relationship to use to find the literature. For example, select Oppty Competitor Literature for the literature about competitors associated with an opportunity.
To associate literature with a product, competitor, or partner, use the Literature view of the Administration - Document screen (or the Decision Issues, Competitors, and Administration - Product screens). For more information, see Siebel Applications Administration Guide.
Retrieved Literature Category
Select the type of literature (for example, brochures or specification sheets) to filter the slides from the Siebel Encyclopedia that you want to include in the presentation.
For the Organization Chart section type, complete the fields described in the following table.
Field Comments Condition
Type the condition, if any, to apply to the section. For information about conditions, see Using Conditions in Presentation Templates.
Business Object
Select the Siebel business object from which the organization chart information is taken. The Business Objects dialog box shows all available business objects.
Chart or Table Name
Select the name of the applet that contains the organization chart data. For example, select Opportunity Organization Analysis Applet.
For the Table section type, complete the fields described in the following table.
Field Comments Condition
Type the condition, if any, to apply to the section. For information about conditions, see Using Conditions in Presentation Templates.
Business Object
Select the Siebel business object from which the table information is taken. The Business Objects dialog box shows all available business objects. For example, if you want to include a table of products with the quantity and ship date for an opportunity, select Opportunity.
Chart or Table Name
Select the name of the applet that contains the table data. For example, if you want to include the products in an opportunity, select Opportunity Product Applet.
Table Fields
Click the select button to open the Table Fields dialog box. For each table field, add a new record, and complete the following fields for the record:
Field Name. Type the field name of the field. For example, type Product.
Sequence. Type the sequence in which you want the field to appear in the table.
Width. Type the width of the field column in the table. Column width is measured in pixels. The default (and minimum) width is 100 pixels. You can also define column width by a percentage of the table width. When you enter a value for table width, column width equates to a percentage of total table width. For example, if there are three fields in a table, and the table width is 100, field widths of 25, 65, and 35 equate to 25%, 65%, and 35% of the total table width. If the table width is blank, the field widths equate to 25, 65, and 35 pixels.
Alignment. Select the alignment of the data in the field. For example, select Left, Center, or Right.
Adding Subsections to Presentation Templates
After adding high-level sections, you can add subsections to them.
To add subsections to an existing section
Navigate to the Administration - Document screen, then the Presentation Templates view.
Navigate to the Sections list for subsections by completing the following steps:
In the Template explorer, click the arrow icon next to the template name folder.
Click the arrow icon next to the Sections folder under the template name folder.
Click the arrow icon next to the section name folder under the Sections folder.
Click the arrow icon next to the Sections folder under the section name folder.
In the Sections list, add subsections in the same way that you add high-level sections.
For more information, see Creating High-Level Sections for Presentation Templates.
Note: When a presentation is generated, a section is generated before any of its subsections and appears before subsections in the finished presentation.
Adding Related Table Subsections to Presentation Templates
After adding a Table Name subsection, you can add related tables that provide detailed information for the table. For example, if the tables subsection contains a quote record, the related table can contain the quote line items. The relationship between the information is essentially a parent-child-grandchild relationship; the opportunity is the parent, the quote table is the child, and the related table containing the quote line items is the grandchild.
To add a related table subsection
Navigate to the Administration - Document screen, then the Presentation Templates view.
Navigate to the Sections list by completing the following steps:
In the Templates explorer, click the arrow icon next to the template name folder.
Click the arrow icon next to the Sections folder. under the template name folder.
Click the arrow icon next to the section name folder under the Sections folder.
In the Sections list, make sure that the Section Type field for the selected section has a value of Table and that the Chart or Table Name field for the selected section has a table name.
In the Templates explorer, click the arrow icon next to the Related Table folder under the section name folder.
Note: The Related Table folder in the Template explorer applies to only the Table section type. You can add related tables only for the Table section type.In the Related Table form, create a new record, and complete the fields described in the following table.
Field Comments Business Object
Select the Siebel object to which this table is related.
Table Name
Select the name of the related table applet.
Field Name
Select the fields to appear in the table. If you select no fields, all fields appear.
Adding Components to Presentation Template Sections
After you define the structure of the presentation, you must specify the location of the component slides that make up the bulk of the presentation.
For sections that extract data from a Siebel database (such as a Chart section), you specify all the information necessary to generate the appropriate contents. However, the component slides that you create earlier in Microsoft PowerPoint are not part of the presentation until you add them to the appropriate sections.
Component files can be PPT or DOC, TXT, or RTF files. When they are not PPT files, Siebel Presentations creates a slide (with the template background), and imports the text into the slide. Microsoft PowerPoint inserts the TXT and DOC files according to how you format the documents. For example, Microsoft PowerPoint inserts TXT or DOC paragraphs in the slide as paragraphs, but if the file contains TXT or DOC indented or bulleted paragraphs, Microsoft PowerPoint attempts to create a slide for each bullet point, or one slide for all bullet points, depending on the formatting and line breaks (carriage returns) in the document.
To make sure that TXT or DOC files are inserted correctly in the Microsoft PowerPoint presentation, open the text or Microsoft PowerPoint file in Microsoft PowerPoint and verify that the format is correct. The format you see when you open the file in Microsoft PowerPoint is the same format used in the presentation.
This task is a step in Process of Creating Presentation Templates.
To add a component to a presentation template section
Navigate to the Administration - Document screen, then the Presentation Templates view.
Navigate to the Components list by completing the following steps:
In the Templates explorer, click the arrow icon next to the template name folder.
Click the arrow icon next to the Sections folder under the template name folder.
Click the arrow icon next to the section name folder under the Sections folder.
Click the arrow icon next to the Components folder under the section name folder.
In the Components list, create a new record.
In the Add Sales Tools dialog box, select the component you want to add, and click Add.
If the component does not appear in the Add Sales Tools dialog box, create a new record in the dialog box, and complete the fields described in the following table.
Field Comments Name
Type a name for the component.
Sequence
Type a number to indicate the order in which the component appears in the section.
Attachment Name
Select the file for the component.
Condition
Type a condition. The component appears only when the condition is TRUE.
Using Conditions in Presentation Templates
You can add query conditions to a section or a component to specify the conditions under which the section or component is used in the presentation. For example, if you have an executive summary for deals of over $100,000 and another executive summary for smaller deals, you can use the condition field in each Executive Summary section to enable Siebel Presentations to insert the appropriate executive summary when the appropriate conditions are TRUE.
This task is a step in Process of Creating Presentation Templates.
Entering Criteria
You can enter query criteria (such as [Revenue] > 100000) in the Condition field of a section or component record. If the condition is TRUE, the section or component is included in the presentation. If the condition is FALSE, the section or component is not included. If you do not specify a condition, the section or component is always included.
You can create conditions for any field that relates to the business object of the presentation; use Opportunity fields for opportunity presentations, and Account fields for account presentations. If the definition of a condition must be based on fields from another business object, then you must add those fields to the Opportunity or Account business object through either a link or a join.
The syntax for conditions is similar to the syntax for Siebel queries. For more information about the syntax of Siebel queries, see Siebel Fundamentals and Siebel Developer's Reference.
Examples of Criteria
The following examples illustrate the syntax for conditions:
If the opportunity is for a Pentium computer, you want to insert a component about the advantages of the Pentium chip. In the Condition field for this component, enter the following condition:
EXISTS ([Product] LIKE "Pentium*")
This condition reviews the products for the opportunity. If the product name begins with Pentium, Siebel Presentations inserts the component. Otherwise, Siebel Presentations leaves out the component.
Note: To use a product in a condition, the product must be entered in the Products view of the Opportunities screen. The condition does not apply to products that were are as quote line items.If the account is located in Georgia, you want to enter a section with terms and conditions limited to that state. In the Condition field of the section, enter the following:
EXISTS ([State] = "GA")
or
[State] = "GA"
Use the first line if the account is located only in Georgia, and the second line if the account is located in Georgia and another location.
This condition reviews the state for the account, and if the state is Georgia, then Siebel Presentations includes the section in the presentation. Otherwise, Siebel Presentations skips this section and moves on to the next section.
If the opportunity has a revenue amount greater than $1,000,000 and it is expected to close in 2003, insert a component on a special program for this type of customer. Enter the following condition in the Condition field for the component:
[Revenue] > 1000000 AND [Close Date] <= ("12/31/2003") AND [Close Date] >= ("1/1/2003")After you enter a condition, test it as a query on the view to use it in. For example, you can text this condition as a query on the My Opportunities view. If the query returns the data you expect, the query is probably in the correct format for the Condition field.
Defining Presentation Field Mappings
When you create the component slides of the presentation, you probably include bookmarks for personalized fields. You must map the bookmarks in the component slides to Siebel fields.
This mapping designates the Siebel field to use for substituting data for a bookmark in the component slide. For example, by mapping the Company bookmark to the Account field, each Company bookmark is replaced with the value of the Account field.
You cannot map fields to a bookmark in the header or footer of the template unless that bookmark is also somewhere else in the content of the template, other than in the footer or header.
Because you might work with multiple presentation templates, you can have multiple sets of bookmarks. You can use one mapping for one presentation template and another mapping for another presentation, or you can use a single mapping for several presentation templates. In either case, you must specify a mapping name in the template record to associate the template with a specific mapping.
If you map a bookmark to a multi-value field, the primary record of the group is retrieved. If you want to retrieve multiple values from a multi-value field, you can add a Table section type to the presentation template. This section type retrieves multiple values from the multi-value field in table format.
This task is a step in Process of Creating Presentation Templates.
Creating Field Mappings for Presentations
To create a field mapping, create a record for the mapping, and then map the fields.
To create a field mapping for presentations
Navigate to the Administration - Document screen, then the Presentation Field Mappings view.
In the Business Objects list, create a new record, and complete the necessary fields.
Some fields are described in the following table.
Field Comments Mapping Name
Type a name for the mapping.
Business Object
Select the business object that contains fields in the presentation. For example, to create an opportunity presentation, select the Opportunity business object.
Description
Type a description of the mapping.
Navigate to the Business Components list by completing the following steps:
In the Business Objects explorer, click the arrow icon next to the business object name folder.
Click the arrow icon next to the Business Components folder under the business object name folder.
In the Business Components list, create a new record, and complete the necessary fields.
Some fields are described in the following table.
Field Comments Business Component
Select the business component. The business component must be related to the business object.
Search Specification
Type the search specification. The search specification limits the records returned for the business component. If you do not designate a search specification, all records for the business component are returned.
Note: You can associate more than one business component mapping with an object. For example, to create an opportunity presentation, you select the Opportunity business component. You can also select the TAS Account business component to create mappings for views under the Opportunity TAS view.
Mapping the Fields for Presentations
After you create a record for the mapping, you can map the fields.
To map the fields for presentations
Navigate to the Administration - Document screen, then the Presentations Field Mappings view.
Navigate to the Business Component Fields list by completing the following steps:
In the Business Objects explorer, click the arrow icon next to the business object name folder.
Click the arrow icon next to this Business Components folder under the business object name folder.
Click the arrow icon next to the business component name folder under the Business Components folder.
Click the arrow icon next to the Business Component Fields folder under the business component name folder.
In the Business Component Fields list, create a new record for each field to map, and complete the necessary fields.
Associating Field Mappings with Presentation Templates
After you create a mapping, you must associate it with a template so that it applies to all the components in that template. You can associate a mapping with one or more templates.
This task is a step in Process of Creating Presentation Templates.
To associate a field mapping with a presentation template
Navigate to the Administration - Document screen, then the Presentation Templates view.
In the Templates list, select the record for the template with which you want to associate the mapping.
In the Mapping Name field, select the mapping.
Creating the Presentation Library
Administrators create and maintain a Presentation Library that consists of slides that sales representatives can add to the presentations.
Slides in the Presentation Library are different from the other component slides you create. Component slides are part of the presentation template, and are automatically included in presentations generated from that template. Slides in the Presentation Library are available to sales representatives as needed. Administrators can also recommend Presentation Library slides to include in the templates.
After sales representatives create a default presentation automatically, they can add more slides from the Presentation Library or use the Edit Layout button to customize the presentation. The Presentation Library enables multiple presentations created from the same template to have different content.
Administrators add the various components to the Presentation Library and maintain the information. When the sales representatives need additional slides to add to a presentation, they review the Presentation Library, select the component they want to insert, and automatically insert it into the presentation.
The sales force cannot update the information in the Presentation Library. The only sections and components available to sales representatives are those you provide for them.
This task is a step in Process of Creating Presentation Templates.
Creating Presentation Files for the Presentation Library
You create presentation files for the Presentation Library in the same way that you create the presentation templates. Use Microsoft PowerPoint to enter text, graphics, and bookmarks, and then map these bookmarks to fields in your Siebel database.
Adding Sections to the Presentation Library
Sections organize slides in the Presentation Library. For example, if some of the slides in the Presentation Library are marketing slides and others are technical slides, you can create a section for each of these slide types. Users can browse through the marketing slides and the technical slides separately. You must add at least one section to the Presentation Library. For more information about adding sections, see Defining Presentation Template Sections.
To add sections to the Presentation Library
Navigate to the Administration - Document screen, then the Presentation Library view.
Navigate to the Sections list of the Presentation Library by completing the following steps:
In the Library explorer, click the arrow icon next to the Library folder if that folder is not already open.
Click the arrow icon next to the Presentation Library folder under the Library folder.
Click the arrow icon next to the Sections folder under the Presentation Library folder.
In the Sections list, add sections in the same way that you add sections to a presentation.
Adding Components to the Presentation Library
After adding sections to the Presentation Library, you add components to the sections. For more information about adding components, see Adding Components to Presentation Template Sections.
To add components to the Presentation Library
Navigate to the Administration - Document screen, then the Presentation Library view.
Navigate to the Components list of the Presentation Library by completing the following steps:
In the Library explorer, click the arrow icon next to the Library folder if that folder is not already open.
Click the arrow icon next to the Presentation Library folder under the Library folder.
Click the arrow icon next to the Sections folder under the Presentation Library folder.
Click the arrow icon next to the section name folder under the Sections folder.
Click the arrow icon next to the Components folder under the section name folder.
In the Components list, add the components in the same way that you add components to a presentation.
Recommending Content for Presentations
Administrators can simplify the process of creating a presentation by associating recommended content with the presentation template.
To recommend content for a presentation
Navigate to the Administration - Document screen, then the Presentation Library view.
Navigate to the Components list of the Presentation Library by completing the following steps:
In the Library explorer, click the arrow icon next to the Library folder if that folder is not already open.
Click the arrow icon next to the Presentation Library folder under the Library folder.
Click the arrow icon next to the Sections folder under the Presentation Library folder.
Click the arrow icon next to the section name folder under the Sections folder.
Click the arrow icon next to the Components folder under the section name folder.
In the Components list, select the component, and click the select button in the Recommended Template field.
In the Presentation Templates dialog box, select the template for which to recommend the component.
You can recommend a component for multiple templates. For example, you might recommend a legal clause for all templates. Recommended content appears when a user edits a presentation using the Edit Layout button, and the Show Recommended Only box is selected.
Enabling Users to Display Presentations in HTML Format
By default, presentations are saved only in a document format, not in HTML format. The View HTML button is unavailable, and the user cannot view the presentations in HTML format. To enable users to display presentations in HTML format, you must edit the DocumentServerViewHTML parameter to a value TRUE instead of FALSE.
This task is a step in Process of Creating Presentation Templates.
To enable users to display presentations in HTML format
Start the Server Manager.
Enter the following command:
srvrmgr> change param DocumentServerViewHTML=True for comp DocServer
Note: You can also change parameters in the Administration - Server Configuration screen. For more information, see Siebel System Administration Guide.
About Generating Presentations
Using presentation templates that the administrator creates, sales representatives can create, modify, and print presentations for an opportunity by using the Presentations view of the Opportunities screen.
A presentation uses the details you record about an account or opportunity and combines the details with a predefined template to create a presentation tailored to the customer needs. The template defines the initial formatting and structure of the presentation, and can include predefined components, such as text, tables, and diagrams that address specific issues. You can also set up a template to include files from the Presentation Library.
After generating a presentation, you can modify it to meet customer needs by changing the order of slides and adding slides from the Presentation Library. When the presentation is complete, you can print it.
Scenario for Generating Presentations
This topic gives one example of how a sales representative might generate presentations for prospective accounts. You might generate presentations differently, depending on your business model.
A prospective customer asks a sales representative to deliver a presentation about service offerings. The sales representative already recorded the opportunity and its related details in Siebel Sales, including the number one decision issue (price).
The sales representative navigates to the Presentations view of the Opportunity screen, and creates a new presentation record. Because price is the most important decision issue, the presentation uses a template that includes slides that address price issues.
When the sales representative generates a draft of the presentation, the presentation is formatted according to company standards, and includes the relevant slides. The sales representative makes some minor adjustments to the presentation, and saves it.
Process of Generating Presentations (End User)
To generate presentations, perform the following tasks:
Creating Presentations (End User)
Before end users can generate a draft of the presentation, they must create a presentation and associate the presentation with an opportunity or account. The following procedure explains how to create a presentation using the Opportunities screen. You can also use the Accounts screen.
This task is a step in Process of Generating Presentations (End User).
To create a presentation
Navigate to the Opportunities screen, then the Opportunities List view.
Drill down on the Opportunity Name field for the opportunity record.
Navigate to the Presentations view, and click Auto Presentation.
A presentation is automatically generated using the default template or the template for the decision issue associated with the opportunity.
Note: To generate a presentation using a different template, select a different template in the Template field of the presentation record.
Generating a Presentation Draft (End User)
After creating a presentation, end users can generate a presentation draft. The draft is a presentation that end users can edit if Microsoft PowerPoint is installed on their computers. If Microsoft PowerPoint is not installed, end users can view the presentation, and they can add sections and change the order of sections, but they cannot edit slides.
End users creating a presentation in a Siebel Web Client environment (network connection), can follow all of the steps in the procedure in this topic. End users creating a presentation in a Siebel Mobile Web Client environment (remote), and who have the Siebel Mobile Web Client installed locally, can omit the final step in this procedure.
This task is a step in Process of Generating Presentations (End User).
To generate a presentation draft
Navigate to the Opportunities screen, then the Opportunities List view.
Drill down on the Opportunity Name field for the opportunity record associated with the presentation.
Navigate to the Presentations view, select the presentation in the Presentations list, and click Generate Draft.
The Status field changes to a value of In Queue, and a draft of the presentation is created if you are working in a Siebel Mobile Web Client environment (remote).
Click Update to generate a presentation draft from the server if you are working in a Siebel Web Client environment.
The status of the presentation refreshes. Status field values include In Progress, Generating, Completed, and Failed.
Modifying and Adding Presentation Content (End User)
After creating and reviewing a draft of a presentation, end users can change the content in the presentation.
This task is a step in Process of Generating Presentations (End User).
Viewing the Structure of Presentations
End users can view the structure of a presentation in the Presentation Table of Contents explorer. In this explorer, they can view the hierarchy of sections and components included in a presentation.
Sections are the main points of the presentation. Sections can contain subsections and components. Components are the slides in the presentation. In some cases, you can set up sections to generate slides.
To view the structure of a presentation
Navigate to the Opportunities screen, then the Opportunities List view.
Drill down on the Opportunity Name field for the opportunity record associated with the presentation.
Navigate to the Presentations view, select the presentation in the Presentations list, and drill down on the Name field.
In the Presentation Table of Contents explorer, click the arrow icon next to the presentation name folder to show it contents.
Click the arrow icon next to each folder in the presentation to show more content.
Adding Sections for Presentation Library Components
If an administrator creates optional slides in the Presentation Library, end users can customize the presentation by adding these slides. The Edit Layout button enables end users to add slides in the Presentation Library to a presentation. Complete the procedure in this topic to add new sections to a presentation. These new sections contain components in the Presentation Library.
To add sections for Presentation Library components
Navigate to the Opportunities screen, then the Opportunities List view.
Drill down on the Opportunity Name field for the opportunity record associated with the presentation.
Navigate to the Presentations view, select the presentation in the Presentations list, and click Edit Layout.
To display more components in the Content Library list of the Template Layout dialog box, clear the Show Recommended Only check box.
Note: If the Show Recommended Only check box is selected, only those components the administrator recommends appear in the Content Library list. If this check box is cleared, all available components appear in the Content Library list. For more information about recommend content, see Creating the Presentation Library.In the Template Layout dialog box, move components from the Content Library pane list the Table of Contents list, and click Save.
If you make a mistake, click Reset Layout to undo all changes to the Table of Contents list.
To see the new content in the presentation, complete the following steps:
In the Presentations list, drill down on the Name field of the presentation.
In the Presentation Table of Contents explorer, click the arrow icon next to the presentation name folder.
Click the arrow icon next to the Sections folder under the presentation name folder.
The new sections appear under the Sections folder.
Changing the Order of Sections in Presentations
When end users add a section to a presentation, the section sequence numbers are not automatically regenerated. If you insert a section in a presentation, you must modify each sequence number for the presentation. The sequence numbers in the Presentations list determine the order in which sections appear in the presentation.
You can use the Edit Layout button and the Presentation Table of Content explorer to re-sequence presentation sections.
Changing the Order of Presentation Sections Using Edit Layout Button
Complete the following procedure to use the Edit Layout button to re-sequence presentation sections.
To change the order of presentation sections using Edit Layout button
Navigate to the Opportunities screen, then the Opportunities List view.
Drill down on the Opportunity Name field for the opportunity record associated with the presentation.
Navigate to the Presentations view, select the presentation in the Presentations list, and click Edit Layout.
In the Template Layout dialog box, change the order of the sections or remove sections, and click Save.
Note: The Show Recommended Only check box is automatically selected in the Template Layout dialog box only if the Content Library list contains recommended components. Otherwise, the check box is cleared.
Changing the Order of Presentation Sections Using Presentation Table of Contents Explorer
Complete the following procedure to use the Presentation Table of Contents explorer to re-sequence presentation sections.
To change the order of presentation sections using Presentation Table of Contents explorer
Navigate to Opportunities screen, then the Opportunities List view.
Drill down on the Opportunity Name field for the opportunity record associated with the presentation.
Navigate to the Presentations view, and drill down on the Name field of the presentation in the Presentations list.
Navigate to the Sections list by completing the following steps:
In the Presentation Table of Contents explorer, click the arrow icon next to the presentation name folder.
Click the arrow icon next to the Sections folder under the presentation name folder.
In the Sections list, change the number in the Sequence field for each section.
If you want to a remove section from a presentation, select the section, and delete it.
Adding Components to Presentations
Components are the slides that you can add to a presentation. End users can add components to sections from the Presentation Library, from the Siebel Encyclopedia, and from another location, such as a local hard drive. You can add more than one component to a section.
The Presentation Library includes a hierarchical structure that administrators can use when designing literature components to associate with a presentation. Using the Presentation Library, end users can navigate to a section or subsection, and then select the component file associated with the section.
Adding Components from the Presentation Library
Complete the following procedure to add a component from the Presentation Library.
To add a component from the Presentation Library
Navigate to the Opportunities screen, then the Opportunities List view.
Drill down on the Opportunity Name field for the opportunity record associated with the presentation.
Navigate to the Presentations view, and drill down on the Name field of the presentation in the Presentations list.
Navigate to the Sections list by completing the following steps:
In the Presentations Table of Contents explorer, click the arrow icon next to the presentation name folder.
Click the arrow icon next to the Sections folder under the proposal name folder.
Click the arrow icon next to the section name folder under the Sections folder.
In the Sections list, click Library.
Navigate to the Components list of the Presentation Library by completing the following steps:
In the Library explorer, click the arrow icon next to the Presentation Library folder.
Click the arrow icon next to the Sections folder under the Presentation Library folder.
Click the arrow icon next to the section name folder under the Sections folder.
Click the arrow icon next to the Components folder under the section name folder.
In the Components list, select the component to add, and then Add Components.
The component file is added to the Components folder for the section you selected in Step 4 of this procedure.
Adding Components from the Siebel Encyclopedia
Complete the following procedure to add a component from the Siebel Encyclopedia.
To add a component from the Siebel Encyclopedia
Navigate to the Opportunities screen, then the Opportunities List view.
Drill down on the Opportunity Name field for the opportunity record associated with the presentation.
Navigate to the Presentations view, and drill down on the Name field of the presentation in the Presentations list.
Navigate to the Components list by completing the following steps:
In the Presentation Table of Contents explorer, click the arrow icon next to the presentation name folder.
Click the arrow icon next to the Sections folder under the presentation name folder.
Click the arrow icon next to the section name folder under the Sections folder.
Click the arrow icon next to the Components folder under the section name folder.
In the Components list, create a new record.
In the Add Sales Tools dialog box, select a component you want to add, and click Add.
Note: You can add only PPT files as components directly into a template section.
Adding Components from Another Location
Complete the following procedure to add a component from another location.
To add a component from another location
Navigate to the Opportunities screen, then the Opportunities List view.
Drill down on the Opportunity Name field for the opportunity record associated with the presentation.
Navigate to the Presentations view, and drill down on the Name field of the presentation in the Presentations list.
Navigate to the Components list by completing the following steps:
In the Presentation Table of Contents explorer, click the arrow icon next to the presentation name folder.
Click the arrow icon next to the Sections folder under the presentation name folder.
Click the arrow icon next to the section name folder under the Sections folder.
Click the arrow icon next to the Components folder under the section name folder.
In the Components list, create a new record, and complete the following steps:
In the Add Sales Tools dialog box, create a new record to display the Components list again.
In the Components list, enter a name and sequence for the file, and then click the select button in the File Name field to display the Add Attachment dialog box.
In the Add Attachment dialog box, attach the file.
Modifying Presentation Component Files
End users can modify a component file if Microsoft PowerPoint is installed locally on their computers. End users must have the same application that was used to create the component file.
To modify a presentation component file
Navigate to the Opportunities screen, then the Opportunities List view.
Drill down on the Opportunity Name field for the opportunity record associated with the presentation.
Navigate to the Presentations view, and drill down on the Name field of the presentation in the Presentations list.
Navigate to the Components list by completing the following steps:
In the Presentation Table of Contents explorer, click the arrow icon next to the presentation name folder.
Click the arrow icon next to the Sections folder under the presentation name folder.
Click the arrow icon next to the section name folder under the Sections folder.
Click the arrow icon next to the Components folder under the section name folder.
In the Components list, select the component, and drill down on the File Name field.
To edit the file, complete the following steps:
Save the file to your local hard drive.
Edit the saved file.
In the Components list, delete the value in the File Name field.
Click the select button in the File Name field, and attach the modified file.
The old file is replaced with the modified file.
Printing Presentations (End User)
After generating a presentation, and the Status field is Completed, end users can print the presentation.
This task is a step in Process of Generating Presentations (End User).
To print a presentation
Navigate to the Opportunities screen, then the Opportunities List view.
Drill down on the Opportunity Name field for the opportunity record associated with the presentation.
Navigate to the Presentations view, and drill down on the Draft Name field of the presentation in the Presentations list.
The presentation appears in the application in which it was created.
Print the presentation using the application in which it was created.
Locking Presentations (End User)
Use the lock feature to secure the completed presentation and make the presentation read-only. Only the presentation author, the author’s manager, that manager’s manager, and so on, can modify or unlock the presentation.
This task is a step in Process of Generating Presentations (End User).
To lock a presentation
Navigate to the Opportunities screen, then the Opportunities List view.
Drill down on the Opportunity Name field for the opportunity record associated with the presentation.
Navigate to the Presentations view, and select the presentation in the Presentations list.
In the presentation record, select the check box in the Locked field.
Note: If the Locked field does not appear, click Menu (the cogwheel icon) in the Presentations list, and then select Columns Displayed to display the field.
Samples of Presentation Templates
Siebel Business Applications come with a sample database. The Presentation Templates view of the Administration - Document screen includes some sample presentation templates.
You can use these sample presentations as a reference when you define a presentation template. The following sample presentations are included in the sample database:
Corporate Presentation (Opportunity category)
Corporate Presentation - Account (Account category)