3Getting Started with Siebel Finance
Getting Started with Siebel Finance
This chapter lists the applications administration tasks specific to Siebel Finance. Use this chapter in combination with Siebel Applications Administration Guide.
This chapter includes the following topics:
About Applications Administration Tasks
Siebel Applications Administration Guide covers the setup tasks that are common to all Siebel Business Applications, such as using license keys, defining employees, and defining your company’s structure. It also provides the information you must implement, configure, and monitor the Siebel sales, service, and marketing products and to perform data administration and document administration tasks. This guide assumes that you have already installed or completed the upgrade of Siebel Finance.
The Siebel database server installation creates a Siebel administrator account that can be used to perform the tasks described in this guide. For more information about this process, see the Siebel Installation Guide for the operating system you are using.
Renaming Siebel Account Objects
In general, Siebel applications refer to companies as accounts. In the Financial Services industry, the term account has typically been synonymous with financial accounts, so historically the word company has been used in many places in Siebel Finance. By default,Siebel Finance installs using the term accounts. Users can change this term and use another description, such as Companies, Clients, or Customers. Users wishing to change this default must rename all Siebel Account objects prior to deployment. Make changes to the UI layer (for example, applet titles and control labels), rather than the Business Objects layer. For more information, see Siebel Database Upgrade Guide.
Integrating Data with Host Applications
Siebel Finance is not designed as a financial institution’s primary system of record for financial account information. Typically, financial institutions operate mainframe systems, or sometimes multiple systems, as their core operating systems. Financial account information from these systems is made accessible in Siebel Finance by loading it in batches using Enterprise Integration Manager, or in real time using one of Siebel applications’ real-time integration technologies.
Using the Show Audit Trail Button
The Show Audit Trail toolbar button is not visible in the preconfigured Siebel Finance product. Using Siebel Tools, you can activate the Show Audit Trail button to display the audit trail for the selected record.
For more information on configuring the Audit Trail in Siebel Tools, see the Audit Trail chapter in Siebel Applications Administration Guide.
To use the Show Audit Trail button
Navigate to the Administration - Audit Trail screen.
In the Audit Trail Buscomp list, create a new record and complete the necessary fields.
Click the Field tab, and create a new record for the field that you want to audit.
Repeat Step 3 until the Field list shows all the fields in the business component that you want to audit.
Click the Show Audit Trail button on the toolbar to show the audit trail records.
Configuring Lists of Values
In Siebel Finance, modify the List of Values (LOV) in accordance with the terminology used by your financial institution. For example, the list of transaction types used inSiebel Finance must match those used by your financial institution. For more information on configuring a LOV, see Siebel Applications Administration Guide.
Setting Up Type, Area, and Subarea Information
Many records in Siebel Finance are associated with a type of product, such as a bank account, mutual fund, or security. Based on a record’s associated product type, a corresponding list of values might be used along with the record, and in some instances, a subarea is assigned. As a result, you must set up the account categories and account types so that they are associated with the proper products.
For more information about setting up financial product types, see Siebel Product Administration Guide. For more information on setting up securities, see Process of Administering Securities.
Establishing Applets as Read and Write or Read-Only
The preconfigured Siebel Finance functionality allows read and write data modification for many of the Siebel Finance views. This might not be desirable in all cases; for example, your financial institution might not want end users to modify account balances or create transaction records. Carefully evaluate each view to determine the appropriate read and write configuration, and the appropriate user access of each view to the various classes of employee users.
Where data is considered to be editable, it might be desirable to send these transactions to the host system that is the system of record. If not, data might not be synchronized between the Siebel database and the system of record.
About Displaying Back End/Host System Fields
Make sure that fields returned by back end/host system are displayed within the Siebel application. There might also be additional fields that are displayed only within the Siebel application, such as calculated or otherwise denormalized fields, or data for which Siebel is the system of record. Also, make sure the Siebel required fields match those captured by the financial institution. Where certain required fields are not used, it might be necessary to provide a default value.
Configuring Summary Views
In Siebel Finance, summary views have been restructured. In the past, multiple summary views existed, typically one summary view for a particular type of user. For example, there were preconfigured summary views specifically for salespeople and customer service agents. This has been replaced by common summary views whose appearance can be configured by individual end users.
Users can change the way a list appears in a summary view by using the controls in the corner of each list.
The summary view controls, described in the following table, allow users to manage what appears on the summary view.
| Button | Description |
|---|---|
Hide |
Temporarily hides a list or form from view. |
Collapse |
Collapses the list of records. If the list cannot be collapsed, the expand button appears instead of the collapse button. |
Expand |
Expands the list of records. If the list cannot be expanded, the collapse button appears instead of the expand button. |
Any changes made to a summary view layout are only visible to the current user and remain in effect until that user changes them again or reverts to the default layout. If users hide a list, they must click Edit Layout to restore it. For more information, see Editing a Summary View Layout.
Editing a Summary View Layout
Using the Edit Layout view, users can restore hidden lists, collapse or expand all lists, move lists or forms up or down on the page, or revert to the default layout.
The edit layout buttons, described in the following table, allow users to change the way a summary view appears and apply those changes to future sessions.
| Button | Description |
|---|---|
Collapse |
Collapses the list or form. |
Expand |
Expands the list or form. |
Move up |
Moves the list or form up on the home page. |
Move down |
Moves the list or form down on the home page. |
Show |
Displays the list or form on the home page. |
Hide |
Hides the list or form from view on the home page. |
For more information on available summary views, see Viewing a Contact Summary (End User), Viewing Company Summaries (End User), and Viewing Household Summaries.
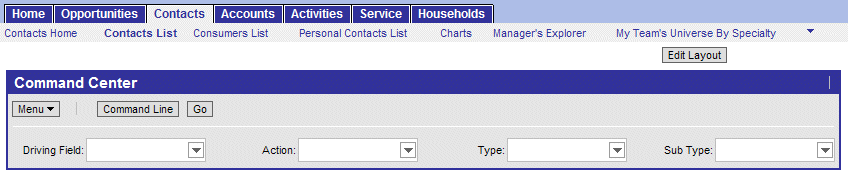
About Command Center
The command center allows you to launch a process, perform a task, or jump to a view. Command center actions are preconfigured by your system administrator in accordance with your company’s business process requirements. For example, if the financial services agents at your company often have to jump to the financial accounts view for a contact, you could configure the command center to perform this action, saving them time and keystrokes. See Command Center Configuration and Administration for information on how to configure the command center.
Out of the box, the command center is only available from the Summary views on the Contacts and Companies screens.
Command Center Interface Types
There are two interface types for the command center:
Action form
Command line
The following figure shows the action form, a menu-driven interface guiding the end user through preconfigured choices in order to launch an action. The command line requires the end user to enter specific command line syntax to launch the action.
Command Center Configuration and Administration
Command Center configuration and administration must only be done by expert users accustomed to working with business services.
Process of Configuring the Command Center Action Form
To configure the appearance and function of the Command Center Action form you must:
Define the business object where the Command Center Action form appears and what business component and fields are to be used. See Defining the Command Center Business Object.
Define actions available for the business object, indicating for each combination of possible attribute values what action is taken (launch a business service or workflow, go to a view, and so on). See Defining the Command Center Actions.
For actions defined as private, select the defined roles for which the actions will be available. See Selecting the Command Center Responsibilities.
An example configuration is included at Example of Configuring the Command Center Action Applet.
Defining the Command Center Business Object
The first step in configuring the Command Center Action form is to define the business object where the Command Center form appears, and what business component and fields are to be used. Out of the box, the Command Center forms appear on the Contact Summary and Company Summary views.
This task is part of Process of Configuring the Command Center Action Form
To define the business object
Navigate to Site Map, Administration - Command Center screen, and then the Defined Objects view.
Create a new object definition record and complete the the fields described in the following table.
| Field | Parameters | Description |
|---|---|---|
Business Object |
Any Business Object for which the forms have been defined. For example, Contact or Companies. |
This identifies the screen where the Command Center form is to appear. |
Source Business Component |
The business component against which the Driving Field will be compared. For example, FINCORP Account. This must be a business component available on the view where the Command Center applets are visible (for example, Contact Summary view). |
The value of this field is constrained by the value of Business Object field. In turn, it is a constraint for the Driven Field. |
Source Business Search Specification |
A filter on the source business component. For example, Acct. Status = Open. Only Financial accounts with a status of Open will be available in the Command Center. |
Use this field to enter an optional filter criteria on the selected Business Component. |
Driving Field |
A field name from the Source Business Component. The field name can be ascertained using Siebel Tools. Following the examples in the preceding field parameter descriptions, this could be the Financial Account name or ID. |
The value of this field is constrained by Source Business Component and Source Business Search Specification (if entered). The driving field is equivalent to Attribute 1. |
Driving Field Label |
Free text field, 20 character limit. |
The text label exposed in the UI for Driving Field (Attribute 1). If blank, the label defaults to the Driving Field on the Command Center form. |
Attribute 2,3,4 Label |
Free text fields, 20 character limit. |
The text label for each of Attributes 2-4. If left blank, the attribute does not appear on the form. |
Driving Field on Cmd Form |
Check box. |
If checked, it exposes the Driving Field label on the Command Center form preceding the Command field. |
Expression |
Free text field. |
Use this field to constrain the available set of actions based on what the user has selected in the Driving Field. As each object definition can have multiple action definitions, the expression field is a way to limit the available actions based on a business component field. For example, if the user selects a checking account, investment based actions might not be appropriate. For example: IIF([Account Number] LIKE '1800*', Liability, Asset). That is, if the account number starts with 1800, it maps to action definitions in the Action Definition list that have the Attribute 1 Map field set to Liability. Otherwise, it is mapped to action definitions that have the Attribute 1 Map field set to Asset. If there is no need to constrain the actions, then any value suffices (for example, Contact - All). |
Defining the Command Center Actions
After you define the business object, you define actions for each object. These actions indicate for each object a combination of possible attribute values what action is taken (launch a business service or workflow). The relationship is one-to-many.
This task is part of Process of Configuring the Command Center Action Form.
To define actions for the Command Center applet
Navigate to Administration - Command Center screen, the Defined Objects view, and then select the Object Definition for which you wish to define actions.
Scroll down to the Action Definition list, create actions, and complete the fields as described in the following table.
| Field | Parameters | Description |
|---|---|---|
Attribute 1 Required |
Check box. |
Indicates whether or not an entry in the Driving Field (Attribute 1) is required for the Command Center to return results. |
Attribute 1 Map |
Free text. |
Works in concert with the Expression field of the Object Definition to determine the contents of the Command Center dropdown menus. |
Attribute 2-4 |
Free text. |
Value lists for Attributes 2-4. |
Command |
Free text. Each entry must be unique, that is, you cannot use the same command for different actions. |
The command line equivalent for the action. These commands are restricted to the Business Object with which they are associated. See also Creating Global Commands for the Command Line Applet. |
Command Help Text |
Free text. |
The Help text for the command help feature when a question mark (?) is entered using the command line. This field is reserved for future use. You can expose it in some manner, if you choose, using a custom configuration. |
Business Service |
Free text. EX: FINS Goto View Service |
The name of the Business Service to be run. |
Business Service Context |
Free text. |
The parameters for the Business service. |
Business Service Method |
Free text. |
The method for the selected Business service. |
Public Flag |
Check box. |
If checked (true), then any roles selected for the action do not apply. If unchecked (false), then any roles selected do apply and visibility to actions are limited by the selected roles. |
Inactive |
Check box. |
This hides the defined action and attribute combination. |
Selecting the Command Center Responsibilities
For each action, select the defined responsibilities for which the action will be available. The relationship between actions and responsibilities is one-to-many.
This task is part of Process of Configuring the Command Center Action Form.
To select responsibilities for a Command Center action
Navigate to Administration - Command Center screen, the Defined Objects view, and then select the Action for which you wish to define responsibilities.
Scroll down to the Responsibility list, create a new record, and select the responsibility.
The responsibilities information appears as read-only in the Responsibility list. Selected responsibilities are only enforced if the Public Flag for the action is unchecked (false).
Example of Configuring the Command Center Action Applet
This topic gives an example of configuring the Action applet. You might use this feature differently, depending on your business model.
The Command Center is available on the Siebel Healthcare Member Summary view and can be configured to launch several key sales processes such as ordering a new ID card or changing a primary care physician. For more information on using the Member Summary Command Center when configured as in this example, see Siebel Healthcare Guide.
The Command Center is set up using the Administration - Command Center view.
To configure the action applet to run the business service FINS Goto View
Navigate to FINS Command Center Admin Object view and create a new object definition record. Complete the fields described in the following table.
Table
Field Value Business Object Name
FINS Members
Source Business Component
FINS Members
Driving Field
Last Name
Driving Field Label
Name
Attribute 2 Label
Area
Attribute 3 label
Action
Expression
RedundantExpression
Driving Field On Cmd Form
Checked
To set up a pop-up applet, in the Action Definition list create a new action record and complete the fields described in the following table.
Field Value Attribute 2
ID Card Requests
Attribute 3
Show History
Command
IDCSH
Business Service
SLM Save List Service
Business Service Context
'Applet Mode', '6', 'Applet Name', 'FINS Service Request Order ID Popup Applet'
Note: The applet in this example is only available in Siebel Healthcare. Siebel Finance customers would select a suitable view and applet available in their respective applications.Business Service Method
LoadPopupApplet
Public Flag
Checked
To set up a view navigation, in the Action Definition list create a new action record and complete the fields described in the following table.
Field Value Attribute 2
ID Card Requests
Attribute 3
Order New ID Card
Command
IDCOR
Business Service
FINS Goto View Service
Business Service Context
'ViewName', 'FINS Member Benefits View', 'RowId', '[Current Src Rec Id]', 'AppletName', 'FINS Member Form Applet - short'
Note: The view and applet in this example are only available in Siebel Healthcare. Siebel Finance customers would select a suitable view and applet available in their respective applications.Business Service Method
GotoView
Public Flag
Checked
Creating Global Commands for the Command Line Applet
Some users might prefer to use only the Command form. In this case, the only configuration required is to indicate the command line syntax and the associated business service and responsibility information. Use these global commands through the Command line form on whatever business object it appears.
To create global commands for the Command Line applet
Navigate to the Administration - Command Center screen, and then the Global Commands view.
In the Global Commands list, create a command record, and complete the fields as described in Defining the Command Center Actions.
For each Command, record select responsibilities as described in Selecting the Command Center Responsibilities.